Advertisement
Main Features
Acoustic Singer is an amp that's designed to let the singer-instrumentalist perform powerfully on acoustic guitar and vocals.
- Independent mic and guitar channels are provided, and can be mixed.
- A newly developed two-way speaker is bi-amped to deliver clear and powerful sound.
- You can automatically add harmony to your vocal along with your guitar performance.
- The mix of your vocal and guitar sound can be recorded and used for loop performances.
- Independent effects are provided for the mic channel and guitar channel.
| MIC channel | Anti-feedback, delay/echo, reverb |
| GUITAR channel | Acoustic resonance, anti-feedback, chorus reverb |
- A tweeter attenuator button is provided to deliver a milder sound.
- An AUX input allows you to connect your audio player or other audio source, and the line output can be connected to your PA system.
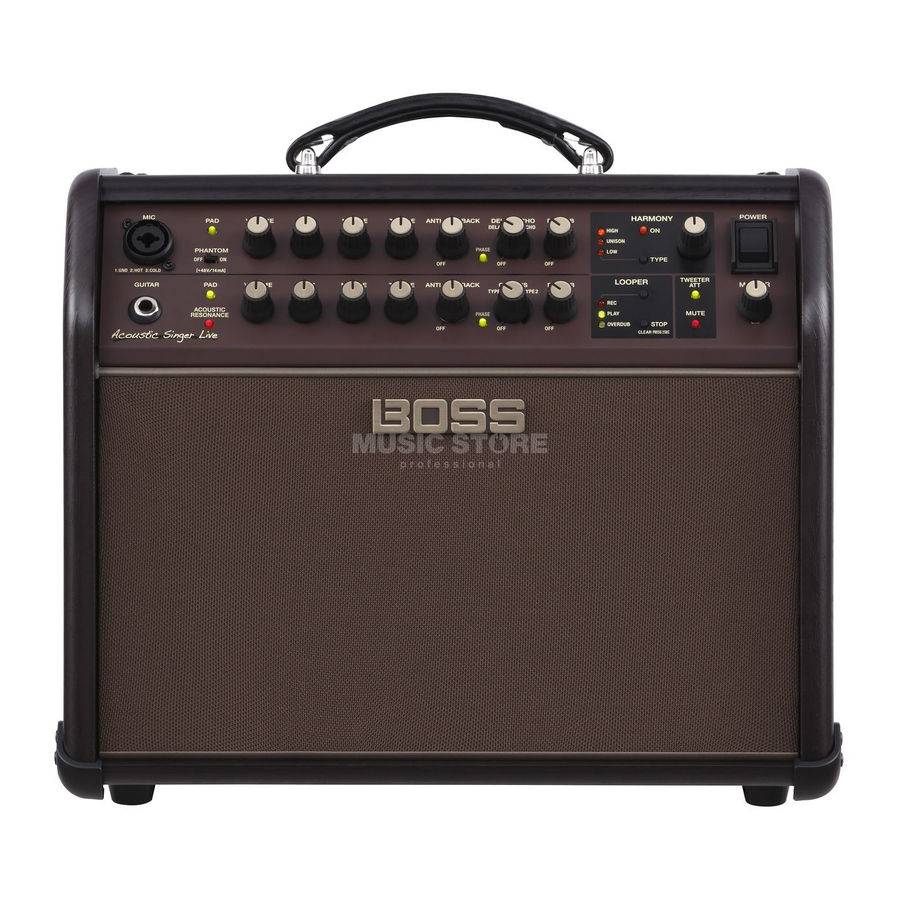
Panel Description
Front Panel

Mic Channel (Upper Row)
This is the channel for connecting a vocal mic.
- MIC jack
Connect your mic here.
* Pin assignment of MIC jack
![]()
- [PAD] button
Use this if the input level of the MIC jack is excessive, or if the sound is distorted. When the button is pressed, the input level is attenuated by 15 dB, and the button is lit green. - [PHANTOM] switch
Supplies phantom power. Turn this ON if you connect a condenser mic that requires a phantom power supply. - [VOLUME] knob
Adjusts the volume. - EQUALIZER

[BASS] knob
Adjusts the sound level of the low-frequency range.
[MIDDLE] knob
Adjusts the sound level of middle-frequency range.
[TREBLE] knob
Adjusts the sound level of the high-frequency range.
- ANTI-FEEDBACK
[PHASE] button
If acoustic feedback is a problem, first try pressing the [PHASE] button. Switching the phase will help suppress acoustic feedback.
[NOTCH] knob
If turning on the [PHASE] button does not help, adjust the [NOTCH] knob.
- While acoustic feedback is occurring, turn the [NOTCH] (frequency) knob to find the location at which feedback is suppressed.
- Turning the knob toward the right suppresses feedback at a higher frequency; turning the knob toward the left suppresses feedback at a lower frequency.
- [DELAY/ECHO] knob
Applies delay/echo to the audio that is input from the MIC jack. Turn the knob to adjust the depth of the effect.
* Either DELAY or ECHO is selected depending on the position of the knob.
![]()

| Type | Effect |
| DELAY | Produces an echo-like effect. |
| ECHO | Produces a distinctively spacious effect similar to a tape echo unit. |
- [REVERB] knob
Adjusts the reverb depth. - HARMONY
Lets you add natural harmony to the audio that is input from the MIC jack.
[LEVEL] knob
Adjusts the volume of the harmony.
[ON] button
Switches HARMONY on/off.
[TYPE] button
Selects the type of harmony. The type switches each time you press the button.
| Type | Explanation |
| HIGH | Adds harmony above the vocal sound that is input. |
| UNISON | Simulates the doubling effect produced when a vocalist records the same melody a second time, adding richness to the sound. |
| LOW | Adds harmony below the vocal sound that is input. |
* You can specify the reference pitch used when the harmony is added. For details, refer to "Specifying the Harmony Reference Pitch"
Guitar Channel (Lower Row)
This is the channel for connecting a guitar, such as an acousticelectric guitar.
- GUITAR jack
Connect your guitar here. You can connect any guitar that is equipped with a pickup. - [PAD] button
Use this if the input level of the GUITAR jack is excessive. When the button is pressed, the input level is attenuated by 10 dB, and the button is lit green. - [ACOUSTIC RESONANCE] button
Adds the natural resonance of an acoustic guitar.
The setting changes in the following order each time you press the button.
| Button | Explanation |
| Green | A full sound with emphasized body resonance |
| Orange | A bright sound with boosted mid-range resonance |
| Red | A brilliant sound extending to the high range |
| Unlit | Off |
- [VOLUME] knob
Adjusts the volume. - EQUALIZER
[BASS] knob
Adjusts the sound level of the low-frequency range.
[MIDDLE] knob
Adjusts the sound level of middle-frequency range.
[TREBLE] knob
Adjusts the sound level of the high-frequency range.
- ANTI-FEEDBACK
[PHASE] button
If acoustic feedback is a problem, first try pressing the [PHASE] button. Switching the phase will help suppress acoustic feedback.
[NOTCH] knob
If turning on the [PHASE] button does not help, adjust the [NOTCH] knob.
- While acoustic feedback is occurring, turn the [NOTCH] (frequency) knob to find the location at which feedback is suppressed.
- Turning the knob toward the right suppresses feedback at a higher frequency; turning the knob toward the left suppresses feedback at a lower frequency.
- [CHORUS] knob
Applies a chorus effect to the sound that is input from the GUITAR jack. Turn the knob to adjust the depth of the effect.
* Either TYPE1 or TYPE2 is selected depending on the position of the knob.
![]()

| Type | Effect |
| TYPE1 | Chorus with natural modulation. |
| TYPE2 | Chorus with emphasized modulation. |
- [REVERB] knob
Adjusts the reverb depth. - LOOPER
You can record up to 40 seconds (MONO) of a performance and play back the recorded section over and over. You can also layer additional performances with the recording as it plays back (overdubbing). This lets you create real-time backing performances on the fly.
* For more about how to operate the looper, refer to "Using the Looper".
[LOOPER] button
Switches between recording, loop playback, and overdubbing.
[STOP] button
Stops recording or playback.
REC/PLAY/OVERDUB indicator
Indicates the status of the looper.
Common to Both Channels
- [TWEETER ATT] button
Applies a filter to the high-frequency region, making the sound milder. If this is on, the button is lit green. This is effective in cases such as when you want the guitar strings to sound softer and more natural. - [MUTE] button
You can mute the sound while leaving the unit powered-on. This lets you mute the amp without changing the volume or other settings when you leave the stage, such as between sets of your live performance.
* The sound of the PHONES/REC OUT jack is not muted.
* The sound from the AUX jack that is output to the DI/LINE OUT jacks is not muted. - [POWER] switch
Turns the power of the Acoustic Singer on/off. - [MASTER] knob
Adjusts the overall volume.
Rear Panel

* To prevent malfunction and equipment failure, always turn down the volume, and turn off all the units before making any connections.
- AC IN jack
Connect the included power cord.
* Use only the power cord that was included with the unit. - DI/LINE OUT
Connect this to your PA system or recorder.
You can use this in conjunction with an external PA system, or to record your performance via direct line while monitoring the sound from this unit.
Adjust the output level using the [VOLUME] knob of each channel.
MIC/MIX jack
From this jack, the audio that is input from the MIC jack can be output by itself, or mixed with the audio that is input from the GUITAR jack.
GUITAR/MIX jack
From this jack, the audio that is input from the GUITAR jack can be output by itself, or mixed with the audio that is input from the Specifies the output of the MIC/MIX jack and GUITAR/MIX jack.
* Pin assignment of MIC/MIX jack and GUITAR/MIX jack

[OUT SELECT] switch
Specifies the output of the MIC/MIX jack and GUITAR/MIX jack.
| Setting | Explanation |
| MIX | The inputs from the MIC jack and the GUITAR jack pass through the effects of the respective channel, and are then mixed and output. The input from the AUX jack is also mixed and output. |
| POST EFX | The inputs from the MIC jack and the GUITAR jack pass through the effects of the respective channel, and are then output separately from the MIC/MIX jack and the GUITAR/MIX jack. |
| DI | The inputs from the MIC jack and GUITAR jack do not pass through the effects, but are output separately from the MIC/MIX jack and the GUITAR/ MIX jack. |
- PHONES/REC OUT jack
Connect headphones here. To adjust the volume, use the [VOLUME] knob along with the [MASTER] knob.
* If a plug is inserted in this jack, no sound will be output from the Acoustic Singer's own speaker. This is convenient if you don't want loud sound to be produced from the speaker, such as when you're practicing at night. - REC OUT
![]() jack
jack
If a commercially-available USB 2.0 cable is connected here, you can record the sound of this unit into your computer, or use this unit to play back sound from your computer.
![]()
* Set your computer's sample rate and bit depth to 44.1 kHz and 24-bit respectively.
* The nominal level of the signal that is output from USB provides 20 dB of margin from the maximum level. If the sound is not loud enough, adjust the level on your computer.
You must install the USB driver when connecting the unit to your computer.
Download the USB driver from the BOSS website. For details, refer to Readme.htm which is included in the download.
www.boss.info/support/ - FOOT CONTROL
If you connect a footswitch (sold separately: BOSS FS-6, FS-7, or FS-5U), you can use your foot to control LOOPER operations or turn CHORUS, HARMONY, and MUTE on/off.
* Pin assignment of LOOPER/CHORUS jack, HARMONY/MUTE jack, and GA-FC jack.


If connected to the LOOPER/CHORUS jack
| Switch | Explanation | |
| TIP | LOOPER | Operates LOOPER. |
| RING | CHORUS | Turns CHORUS on/off. |
If connected to the HARMONY/MUTE jack
| Switch | Explanation | |
| TIP | HARMONY | Turns HARMONY on/off. |
| RING | MUTE | Turns MUTE on/off. |
GA-FC jack
You can connect a GA-FC (sold separately) and turn on/off the following.
DELAY/ECHO and REVERB of the mic channel, CHORUS and REVERB of the guitar channel.
HARMONY, MUTE
Connecting the GA-FC
Connect a stereo cable to the GA-FC jack.
* Always use a stereo cable.

Using the GA-FC
You can switch on/off the REVERB of each channel, DELAY/ECHO, HARMONY, and MUTE.

Using the expression pedals
If you connect an expression pedal (sold separately: Roland EV-5, BOSS FV-500L, BOSS FV-500H), you can use the pedal to vary the volume of the guitar channel or control the volume of the HARMONY effect.
* Use only the specified expression pedal. By connecting any other expression pedals, you risk causing malfunction and/or damage to the unit.

| Jack | Explanation |
| GTR VOL. | Adjusts the volume of the guitar channel. |
| HARMONY LEV. | Controls the HARMONY volume. |
Setting MINIMUM VOLUME of an expression pedal
With the [MINIMUM VOLUME] knob of an expression pedal, you can set the value for when the pedal is lifted up all the way (lowest value).

- AUX
You can connect a CD player, audio player, or electronic musical instrument, and hear it play along with your own performance.
INPUT jack
Connect your CD player, audio player, or electronic musical instrument here.
[LEVEL] knob
Adjusts the volume of the connected instrument.
Turning the Power On/Off
* Once everything is properly connected, be sure to follow the procedure below to turn on their power. If you turn on equipment in the wrong order, you risk causing malfunction or equipment failure.
- Make sure that the Acoustic Singer's [MASTER] knob and the volume of the devices connected to the Acoustic Singer are set to 0.
- Turn on the Acoustic Singer.
* Before turning the unit on/off, always be sure to turn the volume down. Even with the volume turned down, you might hear some sound when switching the unit on/off. However, this is normal and does not indicate a malfunction.
![]()
- Turn on the power of the devices connected to the LINE OUT jack, PHONES jack, and REC OUT
![]() port.
port. - Use each channel's [VOLUME] knob and [MASTER] knob to adjust the volume of the Acoustic Singer.
- Adjust the volume levels for the connected devices.
Before switching off the power, lower the volume on each of the devices in your system and then TURN OFF the devices in the reverse order to which they were switched on.
* If you need to turn off the power completely, first turn off the unit, then unplug the power cord from the power outlet. Refer to "To completely turn off power to the unit, pull out the plug from the outlet".

 port.
port.Specifying the Harmony Reference Pitch
Here's how to specify the reference pitch that is used when adding harmony. Match this reference pitch to the tuning of your guitar or other accompaniment instrument.
- Long-press the [TYPE] button.
The Acoustic Singer is in harmony reference pitch setting mode.
![]()
- Use the [TYPE] button to select a reference pitch.
Each time you press the button, you'll cycle through the following settings in the order of 1–7.

| Indicator | Explanation | |
| 1 | UNISON lit | 440 Hz (factory setting) |
| 2 | UNISON+HIGH lit | 441 Hz |
| 3 | UNISON+HIGH blinking | 442 Hz |
| 4 | HIGH blinking | 443 Hz |
| 5 | UNISON+LOW lit | 439 Hz |
| 6 | UNISON+LOW blinking | 438 Hz |
| 7 | LOW blinking | 437 Hz |
- Long-press the [TYPE] button to exit reference pitch setting mode.
* This setting is remembered even when the power is switched off. When you switch on the power and enter reference pitch setting mode, the currently specified setting (1–7 listed above) is shown.
![]()

Using the Looper

Record
When audio is input, recording starts immediately.
At the point where you want to loop, press the [LOOPER] button to playback.
Overdub
Record additional layers while playing back the loop.
Press the [LOOPER] button to switch to playback.
Stop/Clear
To stop, press the [STOP] button.
To clear the phrase, hold down the [STOP] button for at least two seconds while stopped.

REC/PLAY/OVERDUB indicator status
| Indicator | Explanation |
| REC | Blinking while in record-standby, lit while recording. |
| PLAY | Lit while playing back. |
| OVERDUB | Lit while overdubbing. |
Looper operations using a footswitch
You can also operate the looper by using a footswitch (sold separately: FS-5U, FS-6, FS-7).
- If a footswitch is connected, recording starts not when audio is input but when you press the footswitch (TIP). Playback and overdubbing operations are the same as when using the [LOOP] button.
- If you press the footswitch (TIP) twice within one second, the looper stops.
- If you hold down the footswitch (TIP) for two seconds or longer, the phrase is cleared.
Main Specifications
BOSS Acoustic Singer Pro: Acoustic Amp
BOSS Acoustic Singer Live: Acoustic Amp
| Acoustic Singer Live | Acoustic Singer Pro | |
| Rated Power Output | 60 W (Woofer: 50 W, Tweeter: 10 W) | 120 W (Woofer: 100 W, Tweeter: 20 W) |
| Nominal Input Level | MIC INPUT: -33 dBu (2.5 k Ω) GUITAR INPUT: -10 dBu (5 M Ω) AUX INPUT: -8 dBu (10 k Ω) | |
| Speaker | 16 cm (6.5 inches) Woofer x 1, 2.5 cm (1 inch) Dome Tweeter x 1 | 20 cm (8 inches) Woofer x 1, 2.5 cm (1 inch) Dome Tweeter x 1 |
| Connectors | MIC jack: Combo type (XLR, 1/4-inch TRS phone type) GUITAR jack: 1/4-inch phone type AUX IN jack: Stereo miniature phone type PHONES/REC OUT jack: Stereo 1/4-inch phone type DI/LINE OUT MIC/MIX jack: XLR type DI/LINE OUT GUITAR/MIX jack: XLR type FOOT CONTROL LOOPER/CHORUS jack: 1/4-inch TRS phone type FOOT CONTROL HARMONY/MUTE jack: 1/4-inch TRS phone type GA-FC jack: 1/4-inch TRS phone type USB port: USB B type AC IN jack | |
| Power Consumption | 40 W | 50 W |
| Dimensions | 367 (W) x 274 (D) x 314 (H) mm 14-1/2 (W) x 10-13/16 (D) x 12-3/8 (H) inches | 417 (W) x 330 (D) x 358 (H) mm 16-7/16 (W) x 13 (D) x 14-1/8 (H) inches |
| Weight | 10.5 kg 23 lbs 3 oz | 14.5 kg 32 lbs oz |
| Accessories | Owner's manual Power cord GA-FC sticker | |
* 0 dBu = 0.775 Vrms
* This document explains the specifications of the product at the time that the document was issued. For the latest information, refer to the Roland website.
Block Diagram


Documents / Resources
References
Download manual
Here you can download full pdf version of manual, it may contain additional safety instructions, warranty information, FCC rules, etc.
Download BOSS Acoustic Singer Live ACS-LIVE, Acoustic Singer Pro ACS-PRO - Acoustic Amplifier Manual
Advertisement
Thank you! Your question has been received!


Need Assistance?
Do you have a question about the Acoustic Singer Live that isn't answered in the manual? Leave your question here.