Advertisement
Features
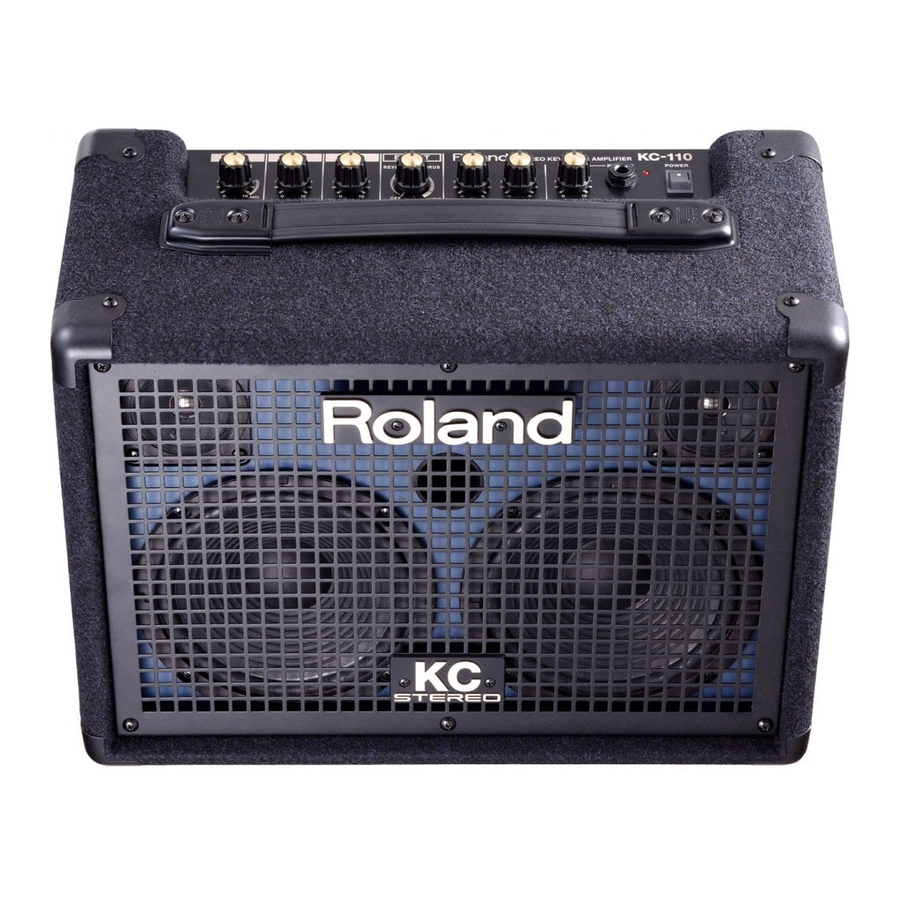
A compact, high-efficiency 30 W stereo keyboard amp that provides stereo playback in a single unit
- The ideal compact size for use at home.
- Built-in high-efficiency stereo 30 W power amp (15 W + 15 W) (when using the AC adaptor).
- Delivers wide-range stereo sound using two 6.5 inch (16 cm) speakers and two tweeters.
Dual power design allows operation using eight AA batteries or the AC adaptor
- Dual power design lets you use the unit anywhere. When used with a battery-powered musical instrument, you can perform outdoors.
- Rechargeable (nickel-metal hydride) batteries are supported. Running time is approximately 7 hours when using alkaline batteries, or approximately 8 hours when using nickel-metal hydride batteries.
A full complement of input/output jacks supports stereo devices, microphones, portable audio players, and more
- In addition to one microphone/instrument input and two stereo inputs, there are AUX IN jacks for connecting your CD/portable audio player, as well as LINE OUT jacks.
This is an ideal amp for a keyboardist/singer, or for use as a small mixing monitor or PA system. - A convenient headphone jack is provided for night-time practice or sound checks.
Use in a variety of situations with a speaker stand or the KC-110's own arm stand
- You can use the KC-110 with a separately sold speaker stand (ST-A95) as a simple PA or monitor.
- An "arm stand" is built into the KC-110, allowing it to be placed on the floor at a convenient angle for monitoring.
High-quality stereo digital effects
- Stereo reverb and stereo chorus are built in. The chorus effect combines the chorused signals in the air, and also provides a "WIDE" mode, which delivers an effect with an enveloping sense of spaciousness made possible thanks to the stereo specifications.
- A foot switch (sold separately) can be connected, allowing you to turn the effect on/off with your foot.
Before using this unit, carefully read the sections entitled: "USING THE UNIT SAFELY" and "IMPORTANT NOTES". These sections provide important information concerning the proper operation of the unit. Additionally, in order to feel assured that you have gained a good grasp of every feature provided by your new unit, Owner's manual should be read in its entirety. The manual should be saved and kept on hand as a convenient reference.
Connecting the Power
The KC-110 can be operated using either an AC adaptor or batteries. Use the type of power that's appropriate for your situation.
Connecting the AC adaptor

* Use only the AC adaptor that is supplied with the KC-110.
- Make sure that the [POWER] switch is off.
- Connect the included power cord to the included AC adaptor.
- Connect the AC adaptor to the DC IN jack.
- Plug the power cord into an AC outlet. Connect the electrical ground as well.
Installing batteries

- Remove the screws from these two locations.
- Remove the battery compartment cover.
- Insert batteries, taking care to observe the correct polarity.
Removing the battery case
Although it is possible to replace the batteries without removing the battery case, battery replacement will be easier if you remove the battery case.

- Remove the screws from these two locations.
- Remove the battery case.
* We recommend that you keep batteries installed in the unit even though you'll be powering it with the AC adaptor. That way, you'll be able to continue a performance even if the cord of the AC adaptor gets accidently disconnected from the unit.
* To prevent malfunction and speaker damage, make sure to switch off the KC-110's power before you insert or replace its batteries, and before connecting it to other devices.
* Take care that no metal object touches the contacts of the battery case. This can short-circuit the batteries, causing the case to overheat or burn.
About batteries
Batteries that can be used
The KC-110 uses eight AA alkaline or nickel-metal hydride batteries.
* Nickel-metal hydride batteries cannot be recharged by the KC-110 itself. You'll need to use a commercially available battery manufacturer.
* When using nickel-metal hydride batteries, please be aware that the battery life will normally shorten each time they are recharged.
Caution regarding batteries
- Insert the batteries as directed, taking care to observe the correct polarity (+/- orientation).
- Do not mix new and used batteries, or batteries of different types.
- Carefully read and observe the cautions and handling instructions that accompany the batteries.
When using nickel-metal hydride batteries, you must use the charger that is specified by the battery manufacturer. - Remove the batteries if you won't be using the unit for several months.
- If any electrolyte leaks from a battery, use a dry cloth to carefully wipe off any electrolyte that might be on the battery case, and then install new batteries. Battery electrolyte that contacts your skin may cause a rash. Battery electrolyte is hazardous to your eyes; if any electrolyte gets into your eyes, flush them immediately with water.
- Do not carry or store batteries together with metallic objects such as pens, necklaces, or hairpins.
Producing Sound
Once the connections have been completed, turn on power to your various devices in the order specified. By turning on devices in the wrong order, you risk causing malfunction and/or damage to speakers and other devices.
- Make sure that the power to all equipment is turned off.
- Connect your external equipment.
- Set each of the KC-110's level knobs and the [VOLUME] knob to 0.

- Switch on the power to any external equipment connected to CH 1–3 or AUX IN jacks.
- Switch on the KC-110's power.

- Power up the equipment connected to the LINE OUT jack.
To turn the power off, reverse these steps.


NOTE
- To prevent malfunction and/or damage to speakers or other devices, always turn down the volume, and turn off the power on all devices before making any connections.
- This unit is equipped with a protection circuit. A brief interval (a few seconds) after power up is required before the unit will operate normally.
- Always make sure to have the volume level turned down before switching on power. Even with the volume all the way down, you may still hear some sound when the power is switched on, but this is normal, and does not indicate a malfunction.
- If you're operating the KC-110 only on batteries, the POWER indicator will become dim as the batteries run low.
When the batteries run even lower, the POWER indicator will blink. Replace the batteries as soon as possible. - If the batteries are extremely low, the sound will be more likely to distort, and you may hear distortion at high volume levels. This is not a malfunction. Either replace the batteries, or use the included AC adaptor.
- Expected battery life under continuous use:
- Alkaline batteries approximately 7 hours
- Nickel-metal hydride batteries approximately 8 hours
- Howling could be produced depending on the location of microphones relative to speakers. This can be remedied by:
- Changing the orientation of the microphone(s).
- Relocating microphone(s) at a greater distance from speakers.
- Lowering volume levels.
Adjusting the volume and tone
- Set the level knob of each channel to 5 (center).
Lower the knobs of any channels you're not using.

- If you're using a microphone, turn the CH 1 level knob to the MIC range.

- While you produce sound on the connected device, turn the [VOLUME] knob to adjust the overall volume.

- Use the level knobs of each channel to adjust the volume balance of the connected devices.

- Use the [VOLUME] knob to adjust the overall volume, and use the [LOW] (low range) knob and [HIGH] (high range) knob to adjust the tone.


Applying an effect
- Use the [EFFECT] knob to select an effect and adjust its depth.
![]()
The left half of the knob's range produces reverb and the right half produces chorus. Turning the knob all the way to the right produces a wide chorus effect.
Within each range, turning the knob toward the right will increase the effect.
* The effect is not applied to the sound that's being input from AUX IN jack.

Names of Things and What They Do
Control panel

CHANNEL CONTROL
 Level Knobs 1–3
These knobs adjust the volume of the devices connected to the channels.
Turning the knob toward the right will increase the volume.
A microphone can be connected to CH 1.
If you connect a microphone, turn the knob to the range indicated as MIC.
* If you're not using a channel, leave its level knob set to 0.
MASTER CONTROL
 [EFFECT] Knob
The position of this knob lets you switch between three effects, and adjust the effect depth.
REVERB:
This effect produces the reverberation of a concert hall.
It is a stereo reverb with a spacious feeling.
The position of the knob adjusts the volume of the reverb. This is also ideal for a microphone connected to CH 1.
CHORUS:
This effect adds depth and spaciousness to the sound.
The position of the knob adjusts the depth of the effect. This is particularly suitable for sounds such as strings.
WIDE:
This is a stereo chorus that processes the three frequency bands independently, creating a spacious, embracing effect.
The low range remains firmly localized in the center, and the sound will become more spacious as you go from the mid to the high range.
* The effect is not applied to the sound that's being input from AUX IN jack.

 Equalizer
This adjusts the tone of the speaker output and headphone output.
Normally, you should place these knobs at 0.
* These knobs do not affect the output from LINE OUT jack.
[LOW] Knob
This adjusts the tonal character of the low-frequency range.
[HIGH] Knob
This adjusts the tonal character of the high-frequency range.
 VOLUME
[VOLUME] Knob
This adjusts the overall volume that is output by the KC-110's speakers.
If headphones are connected, this adjusts the headphone volume.
* The [VOLUME] knob does not affect the output from LINE OUT.
 PHONES
PHONES Jack
You can connect stereo headphones to this jack.
* If headphones are connected, sound will not be output from the speakers.
* You must set the [VOLUME] knob to 0 before connecting headphones.
 POWER
POWER
[POWER] Switch
This turns the KC-110's power on/off.
POWER Indicator
This will light when the power is on.

* The POWER indicator will become dim when the batteries run low. If the batteries become even lower, the POWER indicator will blink.
Please replace the spent batteries with fresh ones.
Jack panel

 CH 1 Input Jacks
Here you can connect up to three devices, such as a keyboard or other electronic musical instrument, a CD player, or a microphone (CH 1 only).
CH 1 BALANCED (XLR) Input Connector
CH 1 Input Jacks
These provide both a 1/4" phone jack and an XLR connector for conveniently connecting a microphone.
This input supports a range from microphone input level (-50 dBu) to the line input level (-20 dBu) typical of a keyboard.
This instrument is equipped with balanced (XLR) type jacks. Wiring diagrams for these jacks are shown below. Make connections after first checking the wiring diagrams of other equipment you intend to connect

* This jack does not supply phantom power.
CH 2, 3 Input Jacks
Here you can connect a keyboard or other electronic musical instrument, or you can connect audio devices such as a CD player (-20 dBu).
If your device uses a monaural output, connect it to L/MONO.
 AUX IN Jacks
Here you can connect a device such as a CD or portable audio player (-10 dBu).
Two types of jacks are provided (RCA phono jacks and a stereo mini jack), and the signals are mixed internally.
You may use the two types of jacks simultaneously, but this may cause the volume to be lower than if they are used separately.
* The effect is not applied to the sound that's input from AUX IN jack.
 AUX IN [LEVEL] Knob
This adjusts the level of the input from AUX IN jack.
 LINE OUT Jacks
You can connect these jacks to your mixer or recorder.
Use L/MONO jack if you're outputting in mono.
The equalizer knobs and [VOLUME] knob do not affect LINE OUT.
 FOOT SW Jack
If you connect a foot switch here, you'll be able to turn the internal effect on/off with your foot. You'll need a separately sold momentary type foot switch (BOSS FS-5U; sold separately) and a connection cable.
Set the polarity switch toward the jack.

 DC IN Jack
Connect the included AC adaptor here.
You must use only the AC adaptor that is supplied with the KC-110.
 Security Slot (
 ![]() )
)
http://www.kensington.com/
* When connection cables with resistors are used, the volume level of equipment connected to the inputs (CH 1–CH 3, AUX IN) may be low. If this happens, use connection cables that do not contain resistors.
Various Ways to Use the Device
Keyboardist/singer
You can connect your keyboard in stereo, and sing/narrate while you perform.

With various instruments
Multiple instruments such as keyboard or electronic drums (up to four) can be connected to the KC-110 and mixed.

Convenient Ways to Use the Device
Using a separately available speaker stand
By using the KC-110 with the ST-A95 speaker stand (sold separately), it can be positioned at the ideal height for monitoring or use as a simple PA system.
Attaching the stand
* You must obtain the assistance of at least one other person when attaching the KC-110 to the speaker stand, or when adjusting the height of the speaker stand with the KC-110 attached.
* When setting up, take care not to pinch your fingers.

- Loosen the tripod knob, and open the tripod.
After you've opened the tripod sufficiently, tighten the tripod knob.
* As shown in the illustration below, open the tripod so that its feet are 98 cm apart. The tripod will be unstable if it is not opened wide enough.
![]()
- Loosen the height adjustment knob, and extend the upper pipe.
- Insert the stopper into the upper tube to obtain the desired height, up to a maximum height of 145 cm for the stand.
![]()
* The stopper must be inserted when using the system. - Tighten the height adjustment knob.
- Insert the KC-110 onto the upper tube.


- The KC-110 is designed to be used only in combination with a Roland-manufactured speaker stand (ST-A95). Do not use it with any other stand.
- As shown in the illustration below, adjust the speaker stand to a height of no more than 140 cm, and open the tripod to a spread of 98 cm or more.
![]()
- Adjusting the speaker stand to a height greater than 140 cm or the tripod to a spread of less than 98 cm may allow the system to fall over, resulting in damage or personal injury.
- If you use the KC-110 with a speaker stand, do not place it on an unstable or tilted location.
You must place the system on a stable, horizontal location. - Cables connected to the KC-110 should have enough slack, so that they will not cause an accident if someone trips over them.
- To prevent accidents caused by falling objects, do not place anything on top of a KC-110 that is mounted on a speaker stand.

Using the device arm stand
When using the KC-110 at a low position such as on the floor, extending the arm stand will make the sound from the speakers easier to hear.

NOTE
- If you use the arm stand, you must place the KC-110 on a horizontal surface.
- Fold the arm stand if you're not using it.
![]()

NOTE
- Do not lift or carry the KC-110 by grasping its arm stand.
- When using the arm stand, do not place objects on the KC-110, or sit or stand on the KC-110.
- Take care not to pinch your fingers when folding the arm stand.
Troubleshooting
If the system does not work as you expect, check the following points first.
| Symptom | Cause |
Power will not turn on | Are the AC adaptor and AC cord connected correctly? |
| Is the AC cord correctly connected to an AC outlet? | |
| Are the batteries installed correctly? Could the batteries have run low? | |
No sound | Is the external equipment connected correctly? |
| If headphones are connected, no sound will be output from the speakers. | |
| Are each channel's level knob and the [VOLUME] knob adjusted correctly? | |
| Is the AUX IN [LEVEL] knob adjusted correctly? | |
| Could the batteries have run low? The POWER indicator will dim when the batteries run low. If the batteries run even lower, the POWER indicator will blink. Please install fresh batteries. | |
Sound is distortedNoise is heard | Could each channel's level knob or the [VOLUME] knob be raised excessively? |
| Are the knobs of unused channels set to zero? | |
| Is the input level from a device connected to an external mixer appropriate? | |
Insufficient volume | Are each channel's level knob and the [VOLUME] knob adjusted correctly? |
| Is the input level from a device connected to an external mixer appropriate? | |
| Could multiple devices be connected to AUX IN jack? | |
| Could the batteries have run low? The POWER indicator will dim when the batteries run low. If the batteries run even lower, the POWER indicator will blink. Please install fresh batteries. | |
Effect not applied | Is the [EFFECT] knob adjusted correctly? |
| Could you have used a foot switch to turn off the effect? | |
| Effects cannot be applied to AUX IN. |
Block Diagram

Main Specifications
KC-110: BATTERY POWERED STEREO KEYBOARD AMPLIFIER
| Rated Power Output | 30 W (15 W + 15 W) (when using the AC adaptor) 20 W (10 W + 10 W) (when using the Alkaline batteries) | ||
| Nominal Input Level (1 kHz) | Input | CH 1 (MIC/LINE) | -50–-20 dBu |
| CH 2, 3 (LINE) | -20 dBu | ||
| AUX IN | -10 dBu | ||
| Nominal Output Level | LINE OUT | -10 dBu | |
| Speakers | 16 cm (6.5 inches) × 2 | ||
| Tweeter × 2 | |||
| Controls | CH 1 (MIC/LINE) Level Knob | ||
| CH 2 (LINE) Level Knob | |||
| CH 3 (LINE) Level Knob | |||
| EFFECT Knob | |||
| EQUALIZER: LOW Knob, HIGH Knob | |||
| VOLUME Knob | |||
| AUX IN LEVEL Knob | |||
| POWER Switch | |||
| Indicator | POWER | ||
| Connectors | CH 1 Input Connector (XLR type) CH 1 Input Jack (1/4" phone type) | ||
| CH 2 Input (L/MONO, R) Jacks (1/4" phone type) | |||
| CH 3 Input (L/MONO, R) Jacks (1/4" phone type) | |||
| AUX IN Jacks (RCA phono type, Stereo miniature phone type) | |||
| LINE OUT (L/MONO, R) Jacks (1/4" phone type) | |||
| PHONES Jack (Stereo 1/4" phone type) | |||
| FOOT SW Jack (TRS phone type) | |||
| DC IN Jack | |||
| Power Supply | DC 13 V: AC Adaptor or Dry Battery (LR6 (AA) type) x 8 | ||
| Current Draw | 550 mA | ||
| Expected battery life under continuous use: (These figures will vary depending on the actual conditions of use.) | Alkaline batteries approximately 7 hours | ||
| Nickel-metal hydride batteries approximately 8 hours | |||
| Dimensions | 420 (W) x 244 (D) x 320 (H) mm 16-9/16 (W) x 9-5/8 (D) x 12-5/8 (H) inches | ||
| Weight | 7.3 kg 16 lbs 2 oz (Excluding Battery) | ||
| Accessory | Owner's Manual, AC Adaptor, AC Cord | ||
| Options | Speaker Stand: ST-A95 Foot Switch: BOSS FS-5U (EFFECT) | ||
* 0 dBu = 0.775 Vrms
* In the interest of product improvement, the specifications and/or appearance of this unit are subject to change without prior notice.
Copyright © 2009 ROLAND CORPORATION
All rights reserved. No part of this publication may be reproduced in any form without the written permission of ROLAND CORPORATION.

Documents / Resources
References
Download manual
Here you can download full pdf version of manual, it may contain additional safety instructions, warranty information, FCC rules, etc.
Advertisement
Thank you! Your question has been received!


Need Assistance?
Do you have a question about the KC-110 that isn't answered in the manual? Leave your question here.