Advertisement
Quick Links
Homeowner's Guide / Installation, Start-Up, and Operating Instructions
Visit www.carrier.com
Programming and Operating Instructions
AT POWER UP
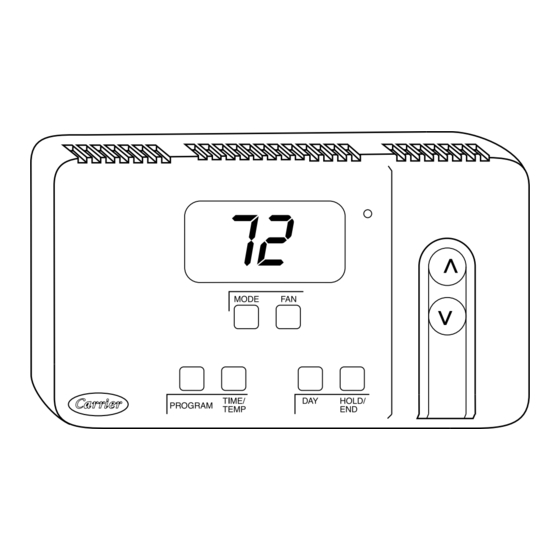
When power is first applied, AC or HP will appear for 5 seconds
to tell you it is an air conditioner (AC) or a heat pump (HP) model.
After this, the time display will flash to tell you the power has been
off. The day and time will show, within 10 minutes, when the
power went off. Pressing any button will stop the flashing.
SETTING THE CURRENT TIME:
1. Press the TIME/TEMP button. SET TIME flashes on the
display.
2. Press the Up or Down button until the correct time is
displayed.
3. To quickly advance to the proper time, press and hold the UP
or DOWN button.
4. When the correct time appears on the display, press the
HOLD/END button.
(Note: If you choose not to press the HOLD/END button, the
thermostat will automatically exit the time setting mode after
10 seconds.)
SETTING THE CURRENT DAY:
1. Press the DAY button to advance to the correct day.
MANUAL OPERATION
TO OPERATE MANUALLY
(WITHOUT THE PROGRAMMED COMFORT SCHEDULE):
Press the HOLD/END button to make the HOLD icon appear.
Then follow the four steps below:
1. To Select the Mode:
Use the MODE button to move between the choices. OFF,
HEAT, COOL, or EMHT will appear on the display. EMHT
will only appear on heat pump models.
2. To Select the Fan Operation:
Use the FAN button to move between continuous fan (indi-
cated by the FAN ON icon) and auto fan operation.
Manufacturer reserves the right to discontinue, or change at any time, specifications or designs without notice and without incurring obligations.
Book 1
4
PC 101
Tab misc. misc.
Standard Programmable Thermostat
Homeowner's Guide
Fig. 1—Standard Programmable Thermostat
Catalog No. 03TS-TA19
Printed in U.S.A.
3. To Read the Room Temperature:
The large display reads room temperature until a button is
pressed.
4. To Adjust the Set Point:
The first press of the UP or DOWN button does not change the
set point. It displays the current set point for a period of 5
seconds. Successive presses within this 5 seconds will adjust
the set point and restart the 5 seconds. During the 5 seconds,
the SET TEMP icon will be flashing.
PROGRAMMED OPERATION
Introduction: The Standard Programmable Thermostat provides
four periods per day (MORNING, DAY, EVE, NIGHT) and two
schedules per week (MoTuWeThFr and SaSu). A separate time,
heat set point, and cool set point can be set for each period and
schedule. Before starting to actually program the thermostat, fill
out Table 1 with the values you wish to program. (The Energy
Star, US Department of Energy recommended time and tempera-
ture values are already programmed for you as a starting point and
are shown on the left side of the table.)
The first press of the PROGRAM button brings up the program-
ming mode and places you at the current day and period.
Successive presses move you between the four daily periods.
WHILE PROGRAMMING:
The TIME/TEMP button moves between selections of SET TIME,
SET TEMP and HEAT, and SET TEMP and COOL. These three
numbers are to be programmed for each of the periods MORN-
ING, DAY, EVE, and NIGHT.
The DAY button moves between the weekdays, (MoTuWeThFr)
and the weekend (SaSu) selections. A different schedule may be
set for the weekdays and the weekend.
You may exit programming at any time by pressing the
HOLD/END button.
Form TSTAT-24SI
Pg 1
A99068
Replaces: TSTAT-24SI
Advertisement

Related Manuals for Carrier A99068


Summary of Contents for Carrier A99068
- Page 1 Standard Programmable Thermostat Homeowner’s Guide / Installation, Start-Up, and Operating Instructions Visit www.carrier.com Homeowner’s Guide Fig. 1—Standard Programmable Thermostat A99068 3. To Read the Room Temperature: Programming and Operating Instructions The large display reads room temperature until a button is AT POWER UP pressed.
- Page 2 PROGRAMMING A WEEKLY COMFORT SCHEDULE: MODIFYING YOUR WEEKLY COMFORT SCHEDULE: If you choose to change any of your weekly schedule, press 1. Press the PROGRAM button. The word PROGRAMMING PROGRAM at any time. You will enter the programming schedule appears on the display and the words SET TIME flash on the at the present day, present mode, but always in the morning period.
-
Page 3: Safety Considerations
(See Fig. 2, 3, and 5 and notes.) 7. Connect wires to proper terminal location on backplate. NOTE: All Carrier equipment, with the exception of the Ther- 8. Push any excess wire back into wall. Seal hole in wall to mostat Conversion Kit, TSTATXXCNV10, is compatible with this prevent air leaks. - Page 4 Step 3—Set Thermostat Configuration Option 4—G (fan) ON with W (Heat) Selection Available thermostat configuration options and their numbers are: This selection determines whether G (fan) output is to be ON or Option 1 -- Anticipator adjustment OFF when W (furnace or strip heat) output is ON. Most furnaces Option 2 -- Not available and fan coils manage their own blowers and do not require a Option 3 -- Fahrenheit or Celsius operation...
- Page 5 Step 4—Thermostat Operation However, if the heating demand is greater than 5°, there will be only a 3-minute delay before bringing on W. TEMPERATURE DISPLAY Thermostat will display room temperature until UP or DOWN ERROR MESSAGES button is pressed. The words SET TEMP appear when these E4 will be displayed if the thermostat has an internal memory buttons are pressed and the current set point is displayed.
- Page 6 TYPICAL FAN COIL/ TYPICAL THERMOSTAT FURNACE FAN COIL/ SINGLE-SPEED THERMOSTAT AIR CONDITIONER FURNACE HEATING HEATING 270 Ω, 10 W * RESISTOR 24 VAC HOT (SUPPLIED) 24 VAC HOT 270 Ω, 10 W * 24 VAC COMM RESISTOR (SUPPLIED) 24 VAC COMM COOLING COOLING * See note 1...
- Page 7 STANDARD PROGRAMMABLE THERMOSTAT CONFIGURATION RECORD Date __________________ Owner/Operator __________________________ Thermostat Model No. ______________________________ Indoor Unit Model No. _____________________ Outdoor Unit Model No. ___________________________ A) Mode Settings ______ Hold (On or Off) ______ Mode (OFF, HEAT, COOL, EMHT) ______ Heating Set Point Value ______ Cooling Set Point Value ______ Fan (AUTO or ON) B) Configuration Options...
-
Page 8: Service Training
[ ] Packaged Service Training [ ] Classroom Service Training Copyright 1999 CARRIER Corp. • 7310 W. Morris St. • Indianapolis, IN 46231 tstt24si Manufacturer reserves the right to discontinue, or change at any time, specifications or designs without notice and without incurring obligations.