
Related Manuals for Hanna Instruments HI98198/10


Summary of Contents for Hanna Instruments HI98198/10
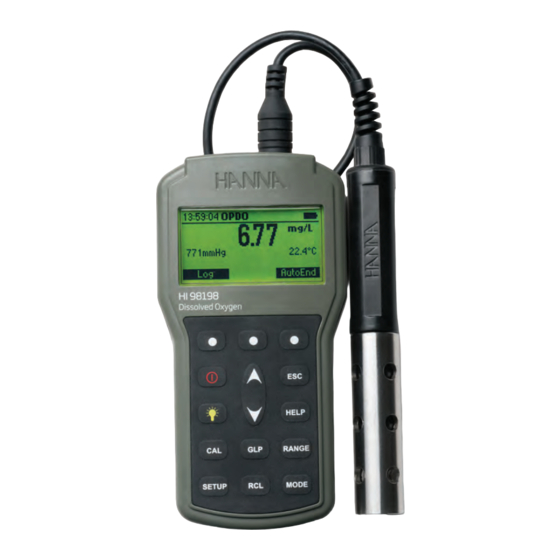
- Page 1 HI98198 opdo ™ Optical dissolved oxygen meter GlobalTestSupply www. .com Find Quality Products Online at: sales@GlobalTestSupply.com...
- Page 2 Dear Customer, Thank you for choosing a Hanna Instruments product. Please read this instruction manual carefully before using the meter. This manual will provide you with the necessary information for correct use of the meter, as well as a precise idea of its versatility.
-
Page 3: Table Of Contents
PRELIMINARY EXAMINATION ....................GENERAL DESCRIPTION ...................... FUNCTIONAL DESCRIPTION ....................SPECIFICATIONS ....................... THEORY OF OPERATION ..................... PROBE COMPONENTS ......................GETTING STARTED ......................SETUP ..........................DO CALIBRATION .................... PRESSURE CALIBRATION..................... TEMPERATURE CALIBRATION....................GOOD LABORATORY PRACTICE (GLP) ..................MEASUREMENT........................LOGGING........................... RETRIEVING DATA......................OPERATIONAL GUIDE....................BOD MEASUREMENT...................... -
Page 4: Preliminary Examination
If noticeable damage is evident, contact your local Hanna Instruments office. Each meter is supplied with: Optical DO probe with built‑in temperature sensor, protective shield and 4 m (13’4) cable •... -
Page 5: General Description
HI98198 opdo™ meter is a rugged, portable dedicated dissolved oxygen (DO) meter designed for fresh and saltwater measurements of dissolved oxygen. This professional, waterproof meter com‑ plies with IP67 standards and measures DO, barometric pressure, and temperature. The HI98198 supplied with a HI764113 digital optical dissolved oxygen probe in a custom thermoformed durable carrying case with accessories. -
Page 6: Functional Description
FRONT VIEW TOP VIEW 1) Liquid Crystal Display (LCD). 2) F1, F2, F3 functional keys. keys to manually increase/decrease the parameters or to scroll through the menu. 4) ON/OFF ( ) key, to turn the meter ON and OFF. 5) LIGHT ( ) key, to toggle display back‑lighting. 6) GLP key, to display Good Laboratory Practice information. -
Page 7: Specifications
HI98198 Meter with HI764113 Probe Specifications Range 0.00 to 50.00 mg/L / 0.0 to 500.0% saturation Resolution 0.01 mg/L / 0.1% saturation Dissolved Oxygen 1.5% of reading ± 0.01mg/L for 0.00‑20.00mg/L 5% of reading for 20.00‑50.00mg/L Accuracy 1.5% of reading ±0.1% for 00‑200.0% 5% of reading for 200.0‑500.0% Range 420 to 850 mmHg... - Page 8 HI764113 Probe Specifications Probe body material Smart Cap™ material Polypropylene Cable jacket material Cable length 4 m (13.1 ft.), 10 m (32.8 ft.), and 20 m (65.6 ft.) options Probe guard 316 Stainless Steel Temperature Thermistor Measurement Pressure 20 m (29 PSI) Probe Dimensions 174 X 25 mm (6.8 X 1”) (with Guard)
-
Page 9: Theory Of Operation
THEORY OF OPERATION optical DO sensing probe is based on the principle of fluorescence quenching. The Hanna HI764113 The sensing method features an immobilized Pt based luminophore that is excited by the light of a blue LED and emits a red light. Dissolved oxygen quenches this excitation. When there is no oxygen present, the lifetime of the signal is the greatest;... -
Page 10: Probe Components
1. Strain relief 2. ABS Probe body 3. Temperature Sensor 4. O‑Ring Seal 5. Optical window 6. Alignment key 7. Smart Cap™ 8. RFID Tag 9. Embedded O sensitive luminophore with black protective layer 10. Protective shield GlobalTestSupply www. .com Find Quality Products Online at: sales@GlobalTestSupply.com... -
Page 11: Getting Started
Turn the meter ON by pressing ON/OFF key. At start‑up the meter will show the Hanna Instruments logo for a few seconds, followed by the percentage indication of the remaining battery life. Before connecting the probe for the first time, press SETUP and using arrows navigate to Date/Time. - Page 12 A probe info screen will be displayed momentarily before defaulting to the measurement screen: “No Probe” message is displayed on meter if the probe connector is not plugged in properly. The “No cap info detected. Install the cap and press Continue.“ message on the meter indicates that the Smart Cap™...
-
Page 13: Setup
Setup menu allows viewing and modifying the measurement parameters. The following table lists the Setup parameters, their valid range and the factory default settings. Item Description Valid value Default Log Separator Log file column separator Comma, Semicolon Comma Salinity The solution’s salt content 0 to 70 PSU 0 PSU Manual Pressure... - Page 14 Item Description Valid value Default Min end DO The minimum DO value at the end 0.00 to 50.00 mg/L 0.00 mg/L of the test Total volume 0.1 to 300.0 mL 0.1 mL The total volume of the solution to be tested 0.1 to 300.0 mL 0.1 mL Sample volume...
- Page 15 PARAMETER SCREENS Log Separator Log separator or CSV file separator is a special character used to separate columns in the CSV log file. There are two options available: Comma (,) or Semicolon (;). The field separator depends upon regional preferences. Press the function key to modify the CSV file separator.
- Page 16 Manual Pressure HI98198 has a built in barometer for automatic compensation of ambient pressure for oxygen measurement. The user may enable Manual Pressure to disregard the barometer measurement and manually enter a pressure value which will be used for oxygen measurements. Once enabled, pressure values are entered from the measurement screen using the keys.
- Page 17 Temperature Unit HI98198 has the ability to convert and display temperature measurements in degree Celsius or Fahrenheit. Highlight Temperature Unit. To change the temperature unit, press the displayed functional key. Calibration Timeout HI764113 dissolved oxygen probe utilizes optical technology which offers significant advantages over polarographic or galvanic type dissolved oxygen probes.
- Page 18 Press SETUP key. Highlight Calibration timeout. Press Modify. Use the keys to set the desired value. Press Accept to confirm or ESC to return without saving. Note: If enabled, a ”CAL DUE” warning will be shown on the display after the Calibration timeout period has expired.
- Page 19 Press keys to modify the selected parameter’s value. Press Prev/Next to select a different parameter. Press Save to save the new BOD configuration. Press ESC to leave without changing. Parameters: • Sample min ∆ DO ‑ the minimum acceptable difference between the initial and final DO values for a sample.
- Page 20 Press keys to modify the selected parameter’s value. Press Prev/Next to select a different parameter. Press Save to save the new OUR configuration. Press ESC to leave without changing. Parameters: • Min time ‑ the minimum time for the OUR test. Range: 1 to 3600 seconds.
- Page 21 Press keys to modify the selected parameter’s value. Press Prev/Next to select a different parameter. Press Save to save the new SOUR configuration. Press ESC to leave without changing. • Min time ‑ the minimum time for the SOUR test. Range: 1 to 3600 seconds.
- Page 22 Backlight The display backlight can be adjusted to increase visibility in various lighting environments. To adjust the backlight, highlight Backlight and press Modify. Use ←/→ keys to change intensity, then press Accept to confirm. Press ESC to leave without changing. Contrast The display contrast ratio adjusts the ratio of light areas to dark areas to improve readability in various environments.
- Page 23 Auto Light OFF The backlight must be manually enabled by pressing the light bulb key on the keypad. When the selected time has expired, back lighting turns off automatically. To change the duration, highlight Auto Light OFF than press the desired functional key to change the option.
- Page 24 Date / Time This parameter should be configured to the current date and time prior to connecting a HI764113 probe for the first time. To set the time and / or date, from the Setup menu, highlight Date / Time, then press Modify. Use ←/→...
- Page 25 Language This option allows the user to choose the desired language in which all information will be displayed. To modify the language, highlight Language from the Setup menu and press the desired virtual key to make selection. Beep On This option allows the user to turn an acoustic warning signal on or off. If enabled, a short tone will occur to signal a condition is correct (key press, calibration) or a long tone will occur when an incorrect key is pressed.
- Page 26 Meter Info This parameter captures the firmware version, language version, pressure calibration date, meter serial number as well as the battery capacity. Highlight the Meter Info then press Select. Probe Info This parameter displays probe and Smart Cap™ information. Press Select to view cap information. Press Next to view the Cap information.
-
Page 27: Do Calibration
There are three calibration functions and procedures that can be accessed through the CAL button. These are calibration of the probe (DO), calibration of the barometer (Pressure) and calibration of the temperature (Temp). Prepare the dissolved oxygen probe according to the instructions from GETTING STARTED (page 11). - Page 28 For 100% calibration, water‑saturated air is the simplest method (and recommended method). It involves suspending the probe over a contained surface of water or moistened absorbent material. The temperature element should also be inside the container. Under equilibrium conditions, the partial pressure of oxygen in air‑saturated water is equal to the partial pressure of oxygen in water‑saturated air;...
- Page 29 The DO calibration screen will be displayed and the standard 0% saturation (or 0 mg/L, depending on the currently selected measuring unit), will be automatically selected. When the reading is stable within the acceptable range, the CFM functional key is displayed. Press CFM to confirm the calibration point.
- Page 30 Two points automatic calibration at 0% saturation (0 mg/L) and 100% saturation (8.26 mg/L) Note: if performing the two point calibration, the 0 point must be done first. Submerge the probe into HI7040 zero oxygen solution and stir gently for 2‑3 minutes. Press CAL.
- Page 31 Single point manual calibration Determine the dissolved oxygen value of the sample using a reference method such as the Winkler titration. Place the HI764113 probe in a sample, lake, basin, stream etc. that a recent dissolved oxygen determination has been made. The probe should be at thermal equilibrium with the sample. Press CAL.
-
Page 32: Pressure Calibration
Pressure calibration HI98198 meter incorporates a pressure transducer that accurately tracks local barometric pressure. Oxygen partial pressure is influenced by the local barometric pressure as dictated by Henry's Law. HI98198 automatically compensates dissolved oxygen measurements for these changes. The HI98198’s pressure transducer is factory calibrated and no user calibration should be necessary. If the pressure reading appears out of tolerance, the pressure reading can be checked and a calibration performed if required. -
Page 33: Temperature Calibration
To clear the pressure calibration and restore the factory one, press CAL from any measure mode (DO, BOD, OUR or SOUR). The calibration menu will be displayed. Press the Pressure functional key and then Clear. The user calibration will be removed and the factory calibration restored. Press ESC key at any time to exit the calibration without changing values. - Page 34 Use the keys to set the calibration point values to that of the reference thermometer. When available, CFM will appear on the display. Press CFM to complete the calibration. To clear the user temperature calibration at any time, press CAL from any measure mode (DO, BOD, OUR or SOUR).
-
Page 35: Good Laboratory Practice (Glp)
GLP is a set of functions that allows storage and retrieval of data regarding the calibration of the DO probe. All data regarding DO calibration is stored for the user to review when necessary. Last DO calibration data Data from the last 5 DO calibrations are stored automatically after a successful calibration. To view the last calibration data, press GLP when the meter is in the DO, BOD, OUR or SOUR measurement mode. -
Page 36: Measurement
MEASUREMENT Measurements can be made simply and quickly with a calibrated HI764113 and HI98198. The AutoEnd key can freeze data with a single touch, and the measurement units changed by pressing the Range key. Power the opdo™ meter with the probe connected. After initialization, the meter enters in measurement mode. -
Page 37: Logging
Mode Key Repetitive presses of the MODE key changes the direct measurement into one of three available dissolved oxygen applications: BOD, OUR, and SOUR. See page 41 for BOD, page 46 for OUR, and page 49 for SOUR for application specifics. This feature allows the user to log DO, BOD,OUR and SOUR measurements. - Page 38 VIEW LOGGED DATA Press RCL to retrieve the stored data while in the measurement mode (DO). The list of records is displayed in the range it was measured (% sat. or mg/L). to select the desired record. Press Delete All to enter Delete All screen. Press CFM to clear all logged records. Press Delete to enter Delete the selected screen.
-
Page 39: Retrieving Data
DO recall: METER TO PC Logged data on opdo™ can be transferred from the meter to a PC by following these simple directions. Suitable operating systems include Windows (XP or newer), OS X or Linux. 1. Connect opdo™ to the PC using the supplied USB‑A to USB‑C cable. 2. - Page 40 METER TO USB DRIVE The logged data can be transfered from the meter to a USB Flash Drive. In order to transfer all the logged data onto a USB Flash Drive insert USB‑C into opening on the top of meter. Press the RCL key and using keys highlight any log.
-
Page 41: Operational Guide
DISSOLVED OXYGEN MEASUREMENTS: 1. Select measurement units of convenience. Press SETUP to change temperature or pressure mea‑ surement units (see page 16 and 17). 2. Press RANGE to access the preferred measurement units; mg/L or % saturation. 3. Routinely Inspect probe for biofouling. Routinely clean off the probe with clean water (between measurements). -
Page 42: Bod Measurement
Press MODE to access the BOD measurement screen. Press BOD Data. The following screen will open. Place the probe into the BOD sample and allow the measurement to stabilize. The sample should be well mixed. Follow all standard operating procedures. Press Add new. - Page 43 When a new record is saved the meter will display a message indicating the remaining free BOD initial data space in %. Repeat procedure with additional samples: Rinse off probe between samples. Place the probe into the BOD sample and allow the measurement to stabilize. The sample should be well mixed. Follow all standard operating procedures.
- Page 44 Select the Bottle ID that is currently being measured by the probe and press EvalBOD. The BOD will be calibrated. Press RCL while in the BOD application. BOD recall: Note: “S.C. “ message in the title bar means seed corrected. “not S.C.”...
- Page 45 Seed Correction In case that the BOD was evaluated for a seeded sample and the list of the saved seed BOD values is not empty, the Correct functional key will be displayed. Press Correct to view the list of the saved seed BOD values. Select the desired seed BOD and then press Correct to compute the corrected BOD value.
-
Page 46: Our Measurement
The OUR is used to determine the oxygen consumption or respiration rate in water. It is defined as the mg/L of oxygen consumed per hour. The following equation is used for OUR determination: where: = Dissolved oxygen level at start of test START = Dissolved oxygen level at end of test = Elapsed time of test in seconds... - Page 47 OUR recall: At the end of the analysis the meter will display the computed OUR value, the duration of the measurement, the pressure and the temperature values. Press Log to record a record of this analysis. GlobalTestSupply www. .com Find Quality Products Online at: sales@GlobalTestSupply.com...
-
Page 48: Sour Measurement
To analyze another sample, clean and dry off probe. Place probe into the next prepared sample. Press Start. OUR Error messages will be displayed anytime a measurement exceeds the limits that were configured. These will have to be reconfigured and the analysis restarted. If the DO value is less than the minimum start DO value the meter will display an error message, and the test cannot be started GlobalTestSupply... - Page 49 The Specific Oxygen Uptake Rate (SOUR), also known as the oxygen consumption or respiration rate, is defined as the milligram of oxygen consumed per gram of volatile suspended solids (VSS) per hour. This quick test has many advantages: rapid measure of influent organic load and biodegradability, indication of the presence of toxic or inhibitory wastes, degree of stability and condition of a sample, and calculation of oxygen demand rates at various points in the aeration basin.
- Page 50 During the analysis the meter will display the ongoing calculation. At the end of the analysis the meter will display the computed SOUR value, the duration of the measurement, and the pressure and temperature values. Press Log to record a record of this analysis. To analyze another sample, clean and dry off probe.
- Page 51 Press LOG to save a complete set of data regarding the SOUR test. Press Start to begin a new SOUR test. Notes: If the DO reading is less than the minimum end DO value set during SOUR configuration, a warning message will be displayed. Press any key to clear the message from the screen, or press HELP to view detailed information about the warning.
-
Page 52: Batteries Replacement
To replace the batteries, follow the next steps: • Turn OFF the meter. • Open the battery compartment by removing the four screws from the back of the meter. • Remove the old batteries. • Insert four new 1.5V AA batteries in the battery compartment while paying attention to the correct polarity. -
Page 53: Probe Maintenance
PROBE MAINTENANCE Cleaning the HI764113 Probe Body • Rinse the probe with clean water to remove debris from around the probe body; wipe with a soft cloth. Unscrew and remove the protective shield and set aside. Ensure weeds, debris, or other materials are not coating the protective guard as this will block sample circulation preventing sample from reaching the active measurement surface. - Page 54 1. Unplug the HI764113 from the HI98198 meter. Remove the stainless steel guard from probe body and set aside. Wipe off the probe and cap with a soft tissue. 2. Remove the expired “Smart Cap™” from the probe; Squeeze the used cap at the notched V and pull it off the probe body (without twisting).
-
Page 55: Troubleshooting Guide
No conditioning period is required when using a HI764113 DO probe. Store the HI764113 probe in the HI98198 carrying case when not in use. For frequent use and short term storage it is recommended to remove the stainless steel guard and replace with the storage vessel that has a small amount of deionized water. -
Page 56: Accessories
SYMPTOMS PROBLEM SOLUTION Display shows “No Cap Cap not on correctly. Check Cap/Reseat Cap. Detected” . Display shows “No Cap Cannot read Cap Check Cap and Retry. Replace Cap Info Detected” with Cap. Info. if it continues. Display shows “Cap Sensor Damaged. - Page 57 Code Description HI7040 Bi‑component Zero HI40036P 100 mL plastic beaker (10 pcs.) HI740027P 1.5V AA batteries (12 pcs.) HI764113 Optical DO probe with built‑in temperature sensor, shield and 4 m (13’4) cable HI764113-1 Smart Cap™ with O‑ring HI764113-2 Calibration/storage vessel HI764113-3 Stainless steel protective shield HI764113/10...
-
Page 58: Certification
All Hanna Instruments conform to the CE European Directives. RoHS compliant Disposal of Electrical & Electronic Equipment. The product should not be treated as household waste. Instead hand it over to the appropriate collection point for the recycling of electrical and electronic equipment which will conserve natural resources. -
Page 59: Recommendations For Users
If the repair is not covered by the warranty, you will be notified of the charges incurred. If the meter is to be returned to Hanna Instruments, first obtain a Returned Goods Authorization (RGA) number from the Technical Service department and then send it with shipping costs prepaid.