
Related Manuals for Gravely Promaster PM 250Z


Summary of Contents for Gravely Promaster PM 250Z
- Page 1 Promaster Owner/Operator Manual Models 992018 - PM 260Z 992020 - PM 260Z 992021 - PM 260Z 992022 - PM 260Z 992024 - PM 260Z 992023 - PM 250Z 992027 - PM 260Z ENGLISH FRANÇAIS ESPAÑOL 08481700 1/00 Printed in USA...
- Page 2 Manufacturers of Printed in U.S.A. 1-00 Outdoor Power Equipment...
-
Page 3: Controls And Features
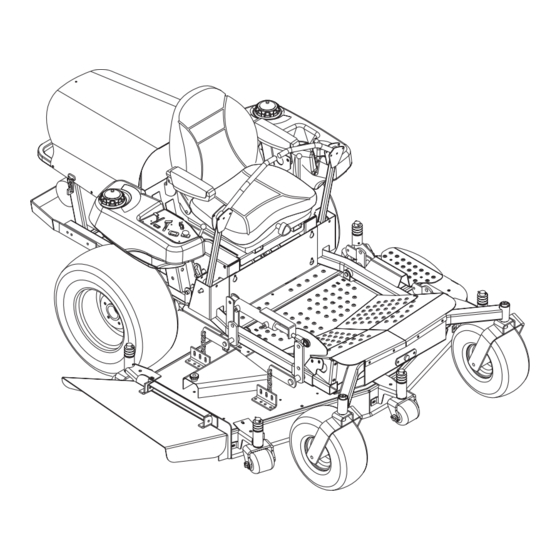
ONTROLS AND EATURES 10 11 12 WARNING The engine exhaust from this product contains chemicals known to the State of California to cause cancer, birth defects or other reproductive harm. Figure 1 OF1722 ENGLISH 1. Mower Deck with Chute Deflector 2. - Page 4 FRANÇAIS ESPAÑOL 1. Carter de coupe avec déflecteur 1. Plataforma de corte 2. Robinet de carburant 2. Válvula de cierre de combustible 3. Frein de stationnement 3. Freno de estacionamiento 4. Batterie 4. Batería 5. Compteur horaire 5. Horómetro 6. Indicateur de pression d'huile 6.
-
Page 5: Table Of Contents
OWNER / OPERATOR MANUAL – TABLE OF CONTENTS 1: I ECTION NTRODUCTION Controls and Features ........................... 3 The Manual............................6 Product Registration ..........................6 Disclaimer.............................. 6 2: S ECTION AFETY Safety Alert Symbol ..........................7 Signal Words ............................7 Practices and Laws ..........................7 Required Operator Training ........................ -
Page 6: Section 1: Introduction
Gravely authorized replacement part may adversely affect the performance, durability, and safety of this unit and may When ordering publications, replacement void the warranty. Gravely disclaims liability for any claims Transfer parts, or making service inquiries, know model & serial... -
Page 7: Section 2: Safety
SECTION 2: SAFETY SAFETY ALERT SYMBOL PRACTICES AND LAWS These are safety alert symbols. They Practice usual and customary safe working precautions, mean: for the benefit of yourself and others. Understand and follow all safety messages. Be alert to unsafe conditions •... -
Page 8: Safety Decals And Locations
SAFETY DECALS AND LOCATIONS ALWAYS replace missing or damaged Safety Decals. Refer to Figure 3 for Safety Decal locations. DANGER/DANGER/PELIGRO DANGER/DANGER/PELIGRO Figure 3 OF1623 Keep children out of work area and under DANGER! TO AVOID SERIOUS INJURY OR DEATH watchful care of a responsible adult. Read Owner/Operator Manual. - Page 9 DO NOT operate on slopes over 17˚. 3. WARNING! Do not operate mower unless guards are in operating position or bagger is attached. Go up and down slopes, not across. Always stand clear of discharge area. 17° OL4450 • If machine stops going uphill, stop blade and back OL4430 down slowly.
-
Page 10: Unit, Personal, Operational, Maintenance, Service & Storage Safety
UNIT SAFETY Thrown Objects Disengage PTO when crossing hard surfaces and gravel Rules of Operation drives. Be aware of mower discharge direction and do not KNOW your Unit – before starting engine. Understand: point it at anyone. • How to operate all controls Keep all safety covers: •... - Page 11 Hazardous Slopes Abnormal Vibrations Operate up and down slopes, not across slopes. Disengage PTO, stop engine, remove key and wait for all DO NOT operate on slopes of more than 17°. Keep all moving parts to stop before servicing or unclogging movement on slopes slow and gradual.
-
Page 12: Attachment And Accessory Safety
Lower cutting deck when unit is parked or stored unless a positive mechanical lock is used. Replacement Parts Keep all parts in good working condition. Replace worn or damaged parts only with Gravely recommended service parts. ATTACHMENT AND ACCESSORY SAFETY Use only attachments or accessories designed for your unit. -
Page 13: Assembly
SECTION 3: ASSEMBLY UNIT ASSEMBLY WARNING Make all seat adjustments with unit stationary, parking brake on and engine shut off. Package Contents: Unit, Mower Deck and Literature Pack OF3140 1. Steering Lever in 3. Steering Lever in Shipping Position Operation Position 2. -
Page 14: Section 4: Operation
SECTION 4: OPERATION CONTROLS AND FEATURES Throttle Lever FAST See Figure 1 for Controls and Features locations. The throttle lever is used to change the speed of the engine. Moving the throttle lever to the “Fast” position increases the engine speed. Moving the lever to the “Slow”... -
Page 15: Pre-Start
Fuel Shut-Off Valve 1. Check Safety Interlock System This valve is used to control the flow of If this system does not function as described do not fuel leaving the fuel tanks. The valve operate until repairs are made. must be open for the engine to operate. 2. -
Page 16: Parking
TO MOW WITH UNIT PARKING Operate the unit only when seated in the operator’s To park the unit: position. 1. Move the control levers to the neutral position. Turn off PTO. 1. Start the engine. Let the engine warm until it is running smoothly. -
Page 17: Mowing Tips
MOWING TIPS • A good fertilization program and frequent watering will keep your turf weed-free and green all year long. Due The following tips will help you to mow safely, achieve to variations in climate, soil and grass varieties, contact maximum performance from your mower and enhance your local garden supply dealer, park or golf course the appearance of your turf. -
Page 18: Section 5: Maintenance
SECTION 4: MAINTENANCE Gravely Dealers will provide any service which may be Service Position for 250Z required to keep your unit operating at peak efficiency. Remove pin holding seat down on left rear corner. Firmly Should engine service be required, it can be obtained grasp seat frame handle and lift past vertical. -
Page 19: Engine
Add fuel to Fuel Tank as needed. See your Engine Manual for correct type and grade of fuel. To add fuel to the fuel tank: 1. Refuel the unit only in a well ventilated open area. 2. Stop the engine. 3. -
Page 20: Tires
LUBRICATION IMPORTANT: Wipe each fitting clean before and after lubrication. Steering system and Speed Selector components should be lubricated every 50 hours of operation or every 3 months whichever comes first. (Figure 11) Lube fitting locations are: – each deck push arm (2) –... -
Page 21: Hydraulics And Transaxles
HYDRAULICS AND TRANSAXLES MOWER BLADES NOTE: If mower is used under sandy soil conditions, WARNING replace blades when air lifts become eroded through at ends (Figure 12). HYDRAULIC FLUID can result in severe burns. Fluid in hydraulic system can penetrate skin and result in serious injury or death. -
Page 22: Battery
BATTERY Remove tie down rod nuts and lift battery out. Clean or service battery away from unit. Remove corrosion from When charging battery remove it from unit first. Keep battery terminals and cable connections with wire brush, batteries out of reach of children. ALWAYS follow then wash with a weak baking soda solution. -
Page 23: Adjustments
9. Charge the battery at two and a half amps for ten ADJUSTMENTS hours or until all cells are gassing freely and the Steering Control Neutral Adjustment specific gravity is constant over three 30 minute intervals. If the unit has excessive creep when the control levers are in neutral, adjust as follows. - Page 24 levers and turn the stop screw in or out until neutral is Adjusting the Parking Brake found. 1. The Parking Brake may be adjusted through the use 9. Then, with the adjustable arms of the parking brake of the jam nuts on the brake rod which push against set so the clamping bolt is in the middle of the slot, the compression spring which pushes on the caliper adjust the ball joint on or off the control link rod so...
- Page 25 Leveling the Mower Deck These adjustments should be made on a level surface Right Side View with the tires inflated to the correct air pressure. The mower is leveled from side to side with the slots where 4 chains fasten to the mower mounting brackets. The mower is leveled from front to rear by adjusting the rod running down each side of the frame (Figure 15).
-
Page 26: Cleaning And Storage
CLEANING AND STORAGE MAINTENANCE SCHEDULE Proper maintenance can prolong the life of unit. The Storage - Two Months Or More following charts show the recommended service Do the daily and 25-hour maintenance, but do not add schedule. More frequent service may be required due to gasoline. -
Page 27: Specifications
SPECIFICATIONS 992020 & 022 992018 992021 992023 992024 992027 Model Number Model PM260Z 25 HP PM260Z 25 HP PM260Z 22 HP PM250Z 20 HP PM260Z 22 HP PM260Z 25 HP Kohler Kohler Robin Briggs & Stratton Robin Kohler with 60" deck with 50"... -
Page 28: Service And Replacement Parts
Publication and Service Part List Order the following parts through your Gravely Dealer: Part No. Qty. Description 09251700 Parts Manual 03621100 Battery 21416800 Air Filter - Kohler 21527200 Air Filter - Robin 21530000 Air Filter, Dual Element - Briggs & Stratton... -
Page 29: Warranty
Product Registration covered by this warranty. • The Gravely dealer must fill out and return the warranty • Service completed by someone other than an authorized registration card to validate the warranty. - Page 30 GRAVELY A Division of Ariens Company 655 West Ryan Street P.O. Box 157 Brillion, WI 54110-0157 920-756-2141 Fax 920-756-2407 www.gravely.com...