
Related Manuals for Sony MHC-DX101


Summary of Contents for Sony MHC-DX101
- Page 1 4-235-112-11(1) Mini Hi-Fi Component System Operating Instructions MHC-DX101 © 2001 Sony Corporation...
- Page 2 WARNING To prevent fire or shock hazard, do not expose the unit to rain or moisture. To avoid electrical shock, do not open the cabinet. Refer servicing to qualified personnel only. Do not install the appliance in a confined space, such as a bookcase or built-in cabinet.
-
Page 3: Table Of Contents
Table of Contents Parts Identification Sound Adjustment Main unit ..........4 Adjusting the sound ......16 Remote Control ........5 Selecting the sound effect ....16 Adjusting the graphic equalizer and Getting Started storing ..........17 Hooking up the system ......6 Selecting the surround effect .... -
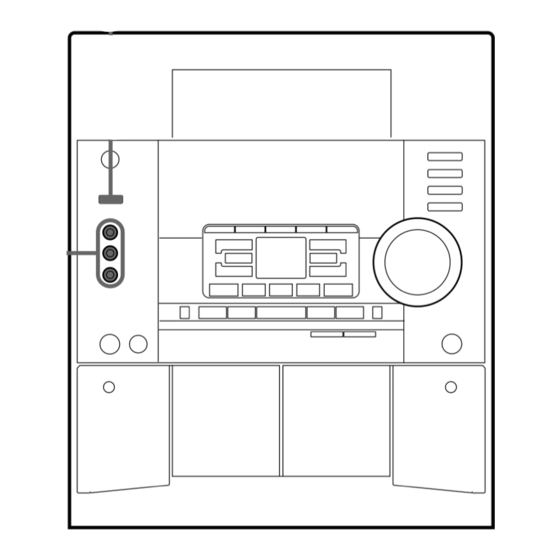
Page 4: Main Unit
Parts Identification The items are arranged in alphabetical order. Refer to the pages indicated in parentheses for details. Main unit 1 2 3 4 8 9 q; AUDIO jacks ed (22) MD (VIDEO) qg (21, 22) BUTTON DESCRIPTIONS CD qs (9 – 11, 14, 15) MIC jack e;... -
Page 5: Remote Control
Remote Control 1 2 3 4 CD qj (9 – 11, 14, 15) MD (VIDEO) 9 (21, 22) BUTTON DESCRIPTIONS CLEAR 6 (10) P FILE qd (17) CLOCK/TIMER SELECT 2 PRESET EQ qg (16) v/V/b/B qs (16, 21) SLEEP 1 (20) M (fast forward)/TUNING CLOCK/TIMER SET 3 (8, 15, SURROUND 0 (18) -
Page 6: Getting Started
Getting Started Hooking up the system Perform the following procedure 1 to 3 to hook up your system using the supplied cords and accessories. AM loop antenna FM antenna Front speaker (Right) Front speaker (Left) 1 Connect the front speakers. 2 Connect the FM/AM antennas. -
Page 7: Inserting Two R6 (Size Aa) Batteries Into The Remote
3 Connect the power cord to a wall outlet. When carrying this system The demonstration appears in the display. Perform the following procedure to protect the When you press ?/1, the system turns on CD mechanism. and the demonstration automatically ends. Make sure that all discs are removed from To connect optional components the unit. -
Page 8: Setting The Time
Setting the time Saving the power in standby mode Turn on the system. Press CLOCK/TIMER SET on the Press DISPLAY repeatedly when the remote. system is off. Each time you press the Proceed to step 5 when “CLOCK” appears button, the system switches cyclically as in the display. -
Page 9: Loading A Cd
Press CD. Loading a CD Press PLAY MODE repeatedly until the mode you want appears in the display. Press Z OPEN/CLOSE. Select To play The disc tray opens. CONTINUE All CDs in the disc tray ALL DISCS continuously. Place a CD with the label side up on the (Normal Play) disc tray. -
Page 10: Programing Cd Tracks
Playing a CD (continued) Press one of DISC 1 – 3 to select a CD. To program all the tracks on a CD at once, proceed to step 5 with “AL” displayed. Do this Press . or > until the desired Switch to CD Press DISC 1 –... -
Page 11: Using The Cd Display
Tuner Tips Presetting radio stations • The program you made remains after Program Play finishes. To play the same program again, press CD, then press nN. You can preset up to 20 stations for FM and 10 • “--.--” appears when the total CD program time stations for AM. -
Page 12: Listening To The Radio
Presetting radio stations (continued) Listening to the radio — Preset Tuning To erase a preset station Press and hold TUNER MEMORY until a Preset radio stations in the tuner’s memory first preset number appears in the display. (see “Presetting radio stations” on page 11). Press TUNER/BAND repeatedly to select “FM”... -
Page 13: Tape
Tape Do this Loading a tape Press x. Stop play Press X. Press again to Pause resume play. Press TAPE A/B repeatedly to select deck A or B. Press m or M. Fast-forward or rewind Press Z. Press Z. Remove the cassette Insert a recorded tape in deck A or B with the side you want to play/record... -
Page 14: Recording To A Tape
Recording to a tape — CD Synchro Recording/Recording Manually/Program Edit You can record from a CD, tape or radio. You can use TYPE I (normal) tapes. The recording level is adjusted automatically. Steps Recording from a CD Recording from a CD/tape/radio manually (CD Synchro Recording) Load a recordable tape into deck B. -
Page 15: Timer-Recording Radio Programs
Recording to a tape (continued) To check the required tape length for recording a CD, press EDIT until “EDIT” flashes after you have loaded a CD and pressed CD. The required tape Recording a CD by specifying length for the currently selected CD appears, followed track order by the total playing time for side A and side B respectively (Tape Select Edit). -
Page 16: Sound Adjustment
Sound Adjustment Repeat step 4 to set the time to stop Adjusting the sound recording. The start time appears, followed by the stop time, the preset radio station to be recorded You can reinforce the bass and create a more (e.g., “TUNER FM 5”), then the original powerful sound. -
Page 17: Adjusting The Graphic Equalizer And Storing
Selecting the sound effect Adjusting the graphic (continued) equalizer and storing To cancel the effect Press EFFECT ON/OFF repeatedly until You can adjust the sound by raising or “EFFECT OFF” appears in the display. lowering the levels of specific frequency ranges, then store up to three PERSONAL Sound effect options FILEs (P FILE) in the memory. -
Page 18: Selecting The Surround Effect
Other Features Selecting the surround Enhancing video game effect sound — Game Sync Press SURROUND on the remote repeatedly to turn the surround effect on You need to connect a video game machine or off. (see “Connecting a video game machine” on Every time you press the button, the display page 22). - Page 19 Singing along: Karaoke (continued) Mixing and recording sounds Do the procedure for “Singing along” Press KARAOKE PON repeatedly to obtain (steps 1 through 5). Then, load a the karaoke effect you desire. recordable tape in deck B. Every time you press the button, the display Press the function button of the source changes cyclically as follows: you want to record (e.g., CD).
-
Page 20: Falling Asleep To Music
Falling asleep to music Waking up to music — Sleep Timer — Daily Timer You can set the system to turn off after a You can wake up to music at a preset time. certain time, so you can fall asleep to music. Make sure you have set the clock (see “Setting the time”... -
Page 21: Optional Components
Optional Components Waking up to music (continued) Hooking up the optional A/V components Press ENTER. The type of timer (DAILY 1 or DAILY 2), followed by the start time, stop time, and You can connect your MD deck or VCR to this the music source, appear, then the original system. -
Page 22: Connecting A Video Game Machine
To the video input of a TV Notes • If you cannot select “MD” when you press MD (VIDEO), press ?/1 while holding down MD (VIDEO) when the system is on. “VIDEO” will be switched to “MD”. To return to “VIDEO”, do the same procedure. -
Page 23: Additional Information
For details, refer to the instructions of the cleaning cassette. If you have any questions or problems concerning your stereo system, please consult your nearest Sony Demagnetizing the tape heads dealer. Demagnetize the tape heads and the metal parts that... -
Page 24: Troubleshooting
CLOCK/TIMER SET. • Set the timer correctly. Should any problem persist, consult your • Set the clock. nearest Sony dealer. The remote does not function. General • There is an obstacle between the remote and the system. -
Page 25: Messages
Troubleshooting (continued) Noise increases or the high frequencies are erased. • The record/playback heads are magnetized (see Speakers “Demagnetizing the tape heads” on page 23). Sound comes from one channel or unbalanced left and right volume. Tuner • Check the speaker connection and speaker placement. -
Page 26: Specifications
Tape deck section Design and specifications are subject to change without notice. Recording system 4-track 2-channel stereo Frequency response 40 – 13,000 Hz (±3 dB), using Sony TYPE I cassette Wow and flutter ±0.15% W.Peak (IEC) 0.1% W.RMS (NAB) ±0.2% W.Peak (DIN) - Page 28 Sony Corporation Printed in India...