
Related Manuals for Brother 888-M36


Summary of Contents for Brother 888-M36
- Page 1 Operation Manual Embroidery Machine Product Code: 888-M36/M37 Be sure to read this document before using the machine. We recommend that you keep this document nearby for future reference.
- Page 3 In addition, after you have finished reading this manual, Return the machine to the nearest authorized store it where it can quickly be accessed for future Brother dealer for examination, repair, electrical or reference. mechanical adjustment. • While the machine is stored or in use if you notice...
- Page 4 Operation Manual to inspect and adjust COUNTRIES the machine yourself. If the problem persists, please consult your local authorized Brother dealer. This appliance can be used by children aged from 8 years and above and Use this machine only for its intended use as described persons with reduced physical, sensory in the manual.
- Page 5 • If the available electrical outlet is not suitable for the plug supplied with this equipment, you should contact your authorized Brother dealer to obtain the correct lead. Trademarks App Store is a service mark of Apple Inc.
-
Page 6: Table Of Contents
CONTENTS CONTENTS Chapter 1 GETTING READY Names of Machine Parts........5 Included accessories .............. 7 Optional accessories .............. 8 Turning the Machine On/Off........ 9 LCD Operation ........... 10 Settings screen..............10 Adjusting input sensitivity for operation keys......11 Winding/Installing the Bobbin......11 Winding the bobbin ............. -
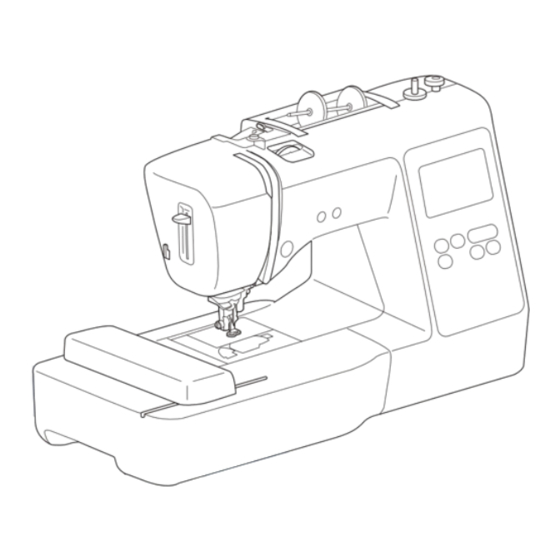
Page 7: Chapter 1 Getting Ready
Names of Machine Parts GETTING READY Chapter 1 Bobbin winding thread guide and pretension disk Names of Machine Parts (page 13) 2 Thread guide (page 12) 3 Spool cap (page 11) ■ Main parts 4 Spool pin (page 11) 5 Bobbin winder (page 11) 6 LCD (liquid crystal display) (page 10) 7 Operation panel (page 6) 8 Operation buttons (page 6) - Page 8 Names of Machine Parts ■ Needle and presser foot section ■ Operation panel and operation keys 1 Needle bar thread guide (page 16) 2 Needle plate 1 LCD (liquid crystal display) (touch panel) 3 Needle plate cover (page 14) Selected pattern settings and messages are displayed. 4 Bobbin cover/bobbin case (page 14, 37) Touch the keys displayed on the LCD to perform operations.
-
Page 9: Included Accessories
Names of Machine Parts Included accessories Included accessories may differ from the table below depending on the machine model you purchased. For more details on included accessories and their part codes of your machine, refer to the additional sheet “Included Accessories”. Embroidery foot “Q”... -
Page 10: Optional Accessories
• All specifications are correct at the time of printing. Please be aware that some specifications may change without notice. • Visit your nearest authorized Brother dealer or our site http://s.brother/cpjaf for a complete listing of optional accessories available for your machine. -
Page 11: Turning The Machine On/Off
These things may damage the cord, or cause fire or electric shock. If the cord or plug is damaged, take the machine to your authorized Brother dealer for repairs before continuing use. • Unplug the power cord if the machine is not to be used for a long period of time. -
Page 12: Lcd Operation
(page 11) F Display the service count which is a reminder to take your machine in for regular servicing. (Contact your authorized Brother dealer for details.) G Display the total number of stitches embroidered on this machine. H The [No.] is the internal machine number for your machine. -
Page 13: Adjusting Input Sensitivity For Operation Keys
Winding/Installing the Bobbin Adjusting input sensitivity for operation keys Winding/Installing the Bobbin You can adjust the sensitivity of the operation keys to 5 levels. Display the settings screen to set desired level. CAUTION Press to display the settings screen. • Only use the plastic bobbin that comes with this machine or bobbins of the same type Display page 5 by pressing (SA156/SFB: XA5539-151/SFB). - Page 14 Winding/Installing the Bobbin Slide the spool cap onto the spool pin. Memo Slide the spool cap as far as possible to the right, as shown, with the rounded side on the left. • When using the spool as shown below, use the small spool cap, and leave a small space between the cap and the spool.
-
Page 15: Installing The Bobbin
Winding/Installing the Bobbin Pass the thread under the hook on the bobbin winding When the bobbin winding becomes slow, press the thread guide, and then wind it counterclockwise under “Start/Stop” button once to stop the machine. the pretension disk. CAUTION •... - Page 16 Winding/Installing the Bobbin Slide the bobbin cover latch to the right and remove While lightly holding down the bobbin with your right the bobbin cover. hand (1), continue guiding the thread through the slit with your left hand (2). Then, cut the thread with the cutter (3).
-
Page 17: Upper Threading
Upper Threading Remove the spool cap and place the spool of thread Upper Threading onto the spool pin. Slide the spool onto the spool pin so that the thread unwinds to the front from the bottom. Otherwise the thread may become tangled around the spool pin. CAUTION •... - Page 18 Upper Threading Press • If the needle threader cannot be used, insert the thread through the eye of the needle from front to The screen changes, and all keys and operation back by hand. At this time, be sure to lock all keys buttons are locked (except and operation buttons described in step CAUTION...
- Page 19 Upper Threading Lower the needle threader lever on the left side of the machine as much as possible to make the hook turn. 1 Needle threader lever 2 Needle 3 Hook Note • If the needle is not raised to it's highest position, the needle threader cannot thread the needle.
-
Page 20: Replacing The Needle
Replacing the Needle Press Replacing the Needle The screen changes, and all keys and operation buttons are locked (except CAUTION CAUTION • Only use recommended home sewing machine • When replacing the needle, be sure to press needles. Use of any other needle may bend the on the operation panel to lock all keys needle or damage the machine. -
Page 21: Chapter 2 Embroidery
Embroidering Preparation EMBROIDERY Chapter Attaching the Embroidery Unit Embroidering Preparation Follow the steps below to prepare the machine for embroidery. CAUTION Step 8 • Before attaching the embroidery unit, be sure to turn off the machine. Otherwise, injuries may occur if one of the operation buttons is accidentally pressed and the machine starts embroidering. -
Page 22: Embroidery Attractive Finishes
Embroidering Preparation Be sure that no objects or hands are near the Embroidery Attractive Finishes embroidery unit and press There are many factors that go into beautiful embroidery. Using the appropriate stabilizer (page 21) and hooping the fabric in the frame (page 21) are two important factors mentioned earlier. -
Page 23: Hooping The Fabric In The Embroidery Frame
Brother dealer for the correct stabilizer to use. ■ Inserting the Fabric CAUTION •... - Page 24 Embroidering Preparation Loosen the embroidery frame adjustment screw and Tighten the adjustment screw while removing any slack remove the inner and outer frames, placing the outer in the fabric by hand. The goal is to have a drum-like frame on a flat surface. sound when the fabric is struck lightly.
-
Page 25: Attaching The Embroidery Frame
Embroidering Preparation ■ Removing the embroidery frame Attaching the Embroidery Frame Raise the presser foot lever to raise the presser foot. Press the part of the embroidery frame holder in the Note figure to the left side, and raise the embroidery frame. •... -
Page 26: Embroidering
• The pattern can also be moved by dragging it with your finger. Embroidery settings screen appears. Press 1 Embroidery patterns 2 Brother “Exclusives” 3 Floral alphabet patterns 4 Character patterns 5 Frame patterns 6 Press this key to position the embroidery unit for storage 7 Patterns saved in the machine's memory •... - Page 27 Embroidering • After selecting a character if you would like to Memo change the character size press . The size changes each time you press the key, from large to • If [Embroidery Frame Identification View] in the settings medium to small. After the character size is changed, screen is set to [ON], the pattern can be edited in the all characters on the same line will have the new screen as if that embroidery frame is attached.
-
Page 28: Embroidering A Pattern
Embroidering Embroidering a pattern From , press the key for the position that you want to check. Embroidery patterns are embroidered with a change of thread after each color. Prepare embroidery thread of the color shown on the screen. 1 Selected position ... - Page 29 Embroidering ■ Changing the thread color display Lower the presser foot, then press the “Start/Stop” button to start embroidering. You can display the name of the thread colors or embroidery After 5-6 stitches, press the “Start/Stop” button again thread number. to stop the machine.
-
Page 30: Adjusting Thread Tension
Embroidering ■ If the thread breaks or the bobbin runs out of Adjusting thread tension thread during embroidering The upper thread tension is changed using the thread tension Press the “Start/Stop” button to stop the machine. dial. When doing machine embroidery, the tension dial should be Press and set the upper thread or bobbin thread. -
Page 31: Embroidering The Appliqué Patterns
Embroidering ■ 2. Sewing the appliqué position on the base Embroidering the appliqué patterns fabric When the color embroidering order display shows Sew the appliqué position. (APPLIQUE MATERIAL)], (APPLIQUE POSITION)] or (APPLIQUE)], follow the procedure below. 1 Position of appliqué 2 Base material Required materials Remove the embroidery frame from the embroidery... -
Page 32: Using A Frame Pattern To Make An Appliqué
Embroidering ■ Method 2 Using a frame pattern to make an appliqué Select a straight stitch frame pattern, and embroider the pattern onto the base fabric. You can use framed patterns of the same size and shape to create an appliqué. Embroider one pattern with a straight stitch and one pattern with a satin stitch. -
Page 33: Split Embroidery Patterns
Embroidering Split embroidery patterns Split embroidery patterns created with PE-DESIGN Ver.7 or later, or PE-DESIGN NEXT can be embroidered. With split embroidery patterns, embroidery designs larger than the embroidery hoop are divided into multiple sections, which combine to create a single pattern after each section is embroidered. -
Page 34: Editing Patterns (Pattern Editing Screen)
Editing Patterns (Pattern Editing Screen) Display Editing Patterns (Pattern Editing Explanation Key Name Screen) Press this key to rotate the pattern. You can rotate a pattern one degree, ten Rotate key When a pattern is selected in the pattern selection screen degrees or ninety degrees at a time. -
Page 35: Editing Patterns (Embroidery Settings Screen)
Editing Patterns (Embroidery Settings Screen) ■ Font editing screen Display Explanation Font editing screen appears by pressing on the pattern Key Name editing screen. Press this key to split text between 1 2 3 4 characters so that they can be edited Split text key separately. -
Page 36: Aligning The Pattern And The Needle Position
Editing Patterns (Embroidery Settings Screen) Display to align the needle and the mark on the Explanation Key Name fabric, press and begin embroidering the pattern. Press this key to rotate the entire pattern. Rotate key You can rotate a pattern one degree, ten degrees or ninety degrees at a time. -
Page 37: Using The Memory Function
Please to align the needle with the end of the visit our website “ http://s.brother/cpjaf ” for more details. embroidering for the previous pattern. Precautions on using the computer to create and save... -
Page 38: Saving Embroidery Patterns
Using the Memory Function Saving embroidery patterns Retrieving embroidery patterns You can save embroidery patterns that you have customized Retrieve embroidery patterns saved in the machine's memory in the machine's memory or USB flash drive. or USB flash drive. When retrieving the embroidery patterns from a USB Note flash drive, insert the USB flash drive into the USB port •... -
Page 39: Chapter 3 Appendix
If problems occur, such as difficulty turning the handwheel or an unusual noise, immediately stop using the machine, and contact your authorized Brother dealer or the nearest Brother authorized service center. Grasp the bobbin case, and then pull it out. -
Page 40: Touch Panel Is Malfunctioning
For a new bobbin 2 Wrong side (bottom) case, contact your nearest Brother authorized of fabric service center. • Be sure that the bobbin case is correctly installed, otherwise the needle may break. -
Page 41: Replacing The Embroidery Foot
Care and Maintenance ■ Bobbin thread is too loose Replacing the Embroidery Foot Bobbin thread appears slightly on the right side (top) of fabric. 1 Right side (top) of fabric CAUTION 2 Wrong side (bottom) of fabric • Only use embroidery feet designed specifically for this machine. -
Page 42: If The Thread Becomes Tangled Under The Bobbin Winder Seat
Care and Maintenance Secure embroidery foot “Q” with the embroidery foot If the thread becomes tangled under the screw, making sure that embroidery foot “Q” is vertical. bobbin winder seat If the bobbin winding starts when the thread is not passed under the pretension disk of the bobbin-winding thread guide correctly, the thread may become tangled under the bobbin winder seat. -
Page 43: Troubleshooting
FAQs and troubleshooting tips. Visit us at “ http:// electrical outlet. s.brother/cpjaf ”. The LCD screen is fogged up. If the problem persists, contact your Brother dealer or the nearest Brother authorized service center. Condensation has formed on the LCD screen. –... - Page 44 Troubleshooting Symptom, Cause/solution Reference Symptom, Cause/solution Reference A bobbin designed specifically for this machine is Fabric puckers. not used. There is a mistake in the upper or bobbin 11, 15 Upper threading is incorrect. threading. Bobbin is set incorrectly. Spool of thread is set incorrectly. Embroidery foot is attached incorrectly.
- Page 45 • Always use stabilizing material, especially with stretch fabrics, lightweight fabrics, fabrics with a coarse weave, or fabrics that often cause pattern shrinkage. See your authorized Brother dealer for the proper stabilizer. There was an object placed near the machine, and the carriage or embroidery frame hit the object during embroidering.
-
Page 46: Error Messages
Preventive maintenance is recommended. Once this message appears, it is recommended to take your machine to an authorized Brother dealer or nearest Brother authorized service center for a regular maintenance check. Although this message will disappear and the machine will continue to function once you press , the message will display several more times until the appropriate maintenance is performed. - Page 47 This message is displayed when you try to recall or save a pattern while no USB flash drive is loaded. If error message [F**] appears in the LCD while the machine is being used, the machine may be malfunctioning. Contact your authorized Brother dealer or the nearest Brother authorized service center.
-
Page 48: Operation Beeps
When an upgrade program is available on our website at or four times. “ http://s.brother/cpjaf ”, please download the file(s) following the instructions on the website and steps listed If the machine locks up, for example, because the thread is below. -
Page 49: Index
Index Index Rotate .................. 32 Aligning the position ..............34 Appliqué ................29 Saving ..................36 Size ....................32 Split embroidery patterns ............. 31 Bobbin ..................11 Spool cap ..................12 Bobbin case ................. 37 Spool net ..................12 Bobbin installation ..............13 Stabilizer .................. - Page 52 (Instruction Videos, FAQs, etc.) for your Brother product. Brother SupportCenter is a mobile app that provides the support information (Instruction Videos, FAQs, etc.) for your Brother product. Visit the App Store or Google Play™ to download.