Table of Contents
Advertisement
Quick Links
Download this manual
See also:
User Manual
This Quick Start Guide is only for quick reference. For more details
on advanced functions, you can refer to your Operating Manual.
GETTING TO KNOW YOUR CAMERA
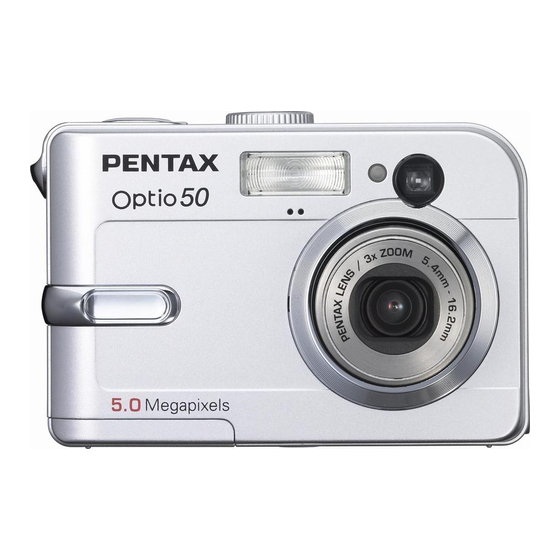
Front View
Name
Self-timer LED
Viewfinder
Flash
Shutter release
button
Lens
Power button
Mode dial
DC input terminal
PC/AV terminal
Microphone
Description
Blinks blue during Self-timer mode until picture is
taken.
Allows you to frame the subject of the picture.
Provides flash illumination.
Focuses and locks the exposure of the camera
when pressed halfway down, and takes the picture
when pressed all the way down.
3x optical zoom lens allows you to take telephoto
and wide-angle pictures.
Turns the camera power on and off.
Sets the camera mode.
Allows you to connect AC power adapter to the
camera to operate the camera without battery.
Allows you to connect a USB cable or an AV cable to
the camera.
Allows you to record sound with the recorded movie
clips.
Shutter release button
Flash
Power button
Mode dial
Self-timer LED
Viewfinder
Microphone
PC/AV terminal
DC input terminal
Lens
1
Advertisement
Table of Contents

Related Manuals for Pentax Optio 50


Summary of Contents for Pentax Optio 50
- Page 1 This Quick Start Guide is only for quick reference. For more details on advanced functions, you can refer to your Operating Manual. GETTING TO KNOW YOUR CAMERA Front View Name Description Self-timer LED Blinks blue during Self-timer mode until picture is taken.
-
Page 2: Rear View
Rear View Name Viewfinder Viewfinder LED button button button MENU button /DISPLAY button Strap holder button Tripod socket Viewfinder Viewfinder LED Zoom/ Strap holder MENU button Four - way controller OK/DISPLAY button Battery/Card cover Tripod socket LCD monitor Description Allows you to frame the subject of the picture. Displays the camera current state. - Page 3 Battery/Card cover Allows you to access to the battery and insert or remove the memory card. LCD monitor Provides menu information to operate the camera, and previews the picture before taking it and review it afterwards. Four-way Allows you to scroll through menus and pictures, controller and then select choices.
-
Page 4: Getting Started
GETTING STARTED Attaching the Camera Strap Attaching the Camera Strap Attach the camera strap as shown in the illustration. Inserting the Battery 1. Open the battery/card cover. 2. Insert the battery in the correct orientation as shown on the right. 3. -
Page 5: Turning The Power On
Inserting the SD Memory Card (Optional Accessory) 1. Open the battery/card cover. 2. Insert the SD memory card in the correct orientation as shown on the right. Hold the SD memory card with its metal contact end surface facing the rear side of the camera, and then insert the card as far as it can go. - Page 6 Choosing the OSD (On-Screen Display) Language Choosing the OSD (On-Screen Display) Language 1. Set the mode dial to 2. Use the four-way controller ( ) to select [Set-up2] menu. [Set-up2] of the set-up menu is displayed. 3. Use the four-way controller ( ) to select [Language] and press the button.
-
Page 7: Setting The Date And Time
Setting the Date and Time 1. Set the mode dial to the four-way controller ( ) to select [Set-up2] menu. [Set-up2] of the set-up menu is displayed. 2. Select [Date Adjust] with the four- way controller ( ). 3. Use the four-way controller ( to select the date type. -
Page 8: Taking Still Pictures
Taking Still Pictures Shutter release button Power button Viewfinder LCD monitor 1. Press the button to turn on the camera. 2. Set the mode dial to 3. Compose your image in the LCD monitor or through the viewfinder. 4. Press the shutter release button halfway down to automatically focus the image. -
Page 9: Recording Movie Clips
Recording Movie Clips This mode allows you to record movie clips with sound via built-in microphone. 1. Rotate the mode dial to your camera on by pressing the button. 2. Press the shutter button to start recording. 3. To stop recording, press the shutter button again. -
Page 10: Erasing Images
Erasing Images 1. Press the button. The last image will be displayed on the screen. 2. Select the image you want to erase with the four-way controller 3. Press the button. 4. Use the four-way controller ( select [OK]. 5. Press the button to confirm the deletion. - Page 11 Setting Up Your Digital Camera After installing the necessary software on your computer, you must now set up your digital camera to transfer images from the camera to your computer. The USB driver included in the CD-ROM (S-SW33) is exclusively for Windows 98/98SE.
-
Page 12: Connecting The Camera To Your Computer
Connecting the Camera to Your Computer 1. Connect the camera to the PC with the USB cable. If there is no SD Memory Card in the camera, the images stored in the internal memory will be transmitted to the computer. 2. - Page 13 Downloading Images/Movie Clips When the camera is turned on and connected to your computer, it is considered to be a disk drive, just like a floppy disk or CD. You can download (transfer) images by copying them from the “removable disk” (“untitled”...
- Page 14 USING THE DIGITAL CAMERA AS A PC CAMERA Your digital camera can act as a PC camera, which allows you to videoconference, or have a real-time conversation with friends or family. 1. Install the PC camera driver. The PC-camera driver included in the CD-ROM (S-SW33) is exclusively for Windows.
- Page 15 To use Windows NetMeeting for videoconferencing 1. Go to Start => Programs => Accessories => Communications => NetMeeting to launch the NetMeeting program. 2. Click the Start Video button to view live video. 3. Click the Place Call button. 4. Type the e-mail address or the network address of the computer that you are calling.