Table of Contents
Advertisement
Quick Links
Advertisement
Table of Contents

Related Manuals for Grizzly G0586


Summary of Contents for Grizzly G0586
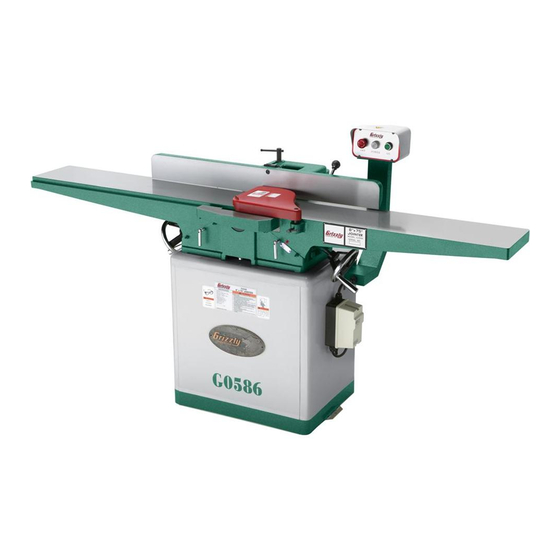
- Page 1 8" X 75" DELUXE JOINTER MODEL G0586 INSTRUCTION MANUAL COPYRIGHT © MARCH, 2005 BY GRIZZLY INDUSTRIAL, INC. WARNING: NO PORTION OF THIS MANUAL MAY BE REPRODUCED IN ANY SHAPE OR FORM WITHOUT THE WRITTEN APPROVAL OF GRIZZLY INDUSTRIAL, INC. #TR6958 PRINTED IN CHINA...
- Page 2 WARNING Some dust created by power sanding, sawing, grind- ing, drilling, and other construction activities contains chemicals known to the State of California to cause cancer, birth defects or other reproductive harm. Some examples of these chemicals are: • Lead from lead-based paints. •...
-
Page 3: Table Of Contents
Table of Contents INTRODUCTION ..........................3 Foreword ............................ 3 Contact Info ..........................3 Identification ..........................5 SECTION 1: SAFETY........................6 Safety Instructions for Machinery ....................6 Additional Safety for Jointers ..................... 8 SECTION 2: CIRCUIT REQUIREMENTS ..................9 220V Single-Phase ........................9 SECTION 3: SET UP ........................ - Page 4 Calibrating Depth Scale ......................31 Setting Fence Stops ......................... 32 Adjusting Gibs .......................... 33 Wiring Diagram ........................34 G0586 Electrical Components ....................35 Troubleshooting Guide ......................36 Jointer Parts Breakdown ......................38 Jointer Parts List ........................39 Stand/Motor Parts Breakdown ....................40 Stand/Motor Parts List ......................
-
Page 5: Introduction
INTRODUCTION Foreword Contact Info We are proud to offer the Model G0586 8" X 75" If you have any comments regarding this manual, Deluxe Jointer. This machine is part of a growing please write to us at the address below: Grizzly family of fine woodworking machinery. - Page 6 MACHINE DATA SHEET Customer Service #: (570) 546-9663 • To Order Call: (800) 523-4777 • Fax #: (800) 438-5901 MODEL G0586 8" X 75" DELUXE JOINTER Design Type:......................Cabinet Overall Dimensions: Table Size ....................8" W x 75" L Height (from floor to table) ..................31"...
-
Page 7: Identification
D. Fence Lock E. Fence Adjustment Knob Fence Tilt Handle G. Control Panel H. Infeed Table Infeed Table Handwheel Magnetic Switch K. Depth Scale Infeed Table Lock M. Outfeed Table Lock N. Outfeed Table Handwheel G0586 8" X 75" Deluxe Jointer... -
Page 8: Section 1: Safety
TIRED, OR UNDER THE INFLUENCE OF RESPIRATOR WHEN OPERATING DRUGS OR ALCOHOL. Be mentally alert MACHINERY THAT PRODUCES DUST. at all times when running machinery. Wood dust is a carcinogen and can cause cancer and severe respiratory illnesses. G0586 8" X 75" Deluxe Jointer... - Page 9 16. MAKE SURE GUARDS ARE IN PLACE exposed to and always wear an approved AND WORK CORRECTLY BEFORE respirator. USING MACHINERY. G0586 8" X 75" Deluxe Jointer...
-
Page 10: Additional Safety For Jointers
Like all machines there is danger associ- No list of safety guidelines can be complete. Every shop environment is different. Always ated with the Model G0586. Accidents are frequently caused by lack of familiarity or consider safety first, as it applies to your individual working conditions. -
Page 11: Section 2: Circuit Requirements
DO NOT connect the machine to the power source until instructed to do so. Amperage Draw Electrocution or fire could The 2 HP motor on the Model G0586 will draw result if this machine is the following amps: not grounded correctly or if your electrical con- Motor Load at 220V ....... -
Page 12: Section 3: Set Up
Wear safety glasses dur- ing the entire set up pro- cess! The Model G0586 was carefully packed when it left our warehouse. If you discover the machine is damaged after you have signed for delivery, The Model G0586 is a please immediately call Customer Service at heavy machine (546 lbs. -
Page 13: Inventory
In the event that any nonproprietary parts are missing (e.g. a nut or a washer), we would be glad to replace them, or for the sake of expedi- ency, replacements can be obtained at your local hardware store. -11- G0586 8" X 75" Deluxe Jointer... -
Page 14: Clean Up
Floor Load The unpainted surfaces are coated with a waxy oil to protect them from corrosion during ship- The Model G0586 weighs 418 lbs. and has a ment. Remove this protective coating with a sol- base footprint of 17 ⁄... -
Page 15: Mounting Jointer
2. Align the three bolt holes on the jointer with the three holes on the stand (Figure 6). Figure 6. Mounting holes. 3. Using a 14mm wrench, secure the jointer to the stand with the special mounting bolts and lock washers. -13- G0586 8" X 75" Deluxe Jointer... -
Page 16: V-Belt
Flat Washers ⁄ " ..........4 Figure 8. V-belt guard installed. Tools Needed: Phillips Head Screwdriver ......... 1 Install the dust port as shown in Figure 10. Figure 10. Correctly installed dust port. -14- G0586 8" X 75" Deluxe Jointer... -
Page 17: Cutterhead Guard
Note—DO NOT overtighten the plastic screws —If the guard does not snap back, remove or they will break! it and repeat Steps 1 & 2, increasing the spring tension as needed. Continued on next page -15- G0586 8" X 75" Deluxe Jointer... - Page 18 Make sure there is a little slack in the wire between the switch and the strain relief, then snap fit the strain relief into the opening as shown in Figure 14. Motor Cord Figure 14. Installing strain relief. -16- G0586 8" X 75" Deluxe Jointer...
-
Page 19: Handwheels
Secure the handwheels to the shafts with the hardware removed in Step 1. Secure the handwheel handles to the handwheels, as shown in Figure 16. Figure 17. Knife setting jig assembly. Figure 16. Securing the handwheel handle. -17- G0586 8" X 75" Deluxe Jointer... -
Page 20: Test Run
Page 36 to troubleshoot/fix any problems before start- ing the jointer again. — If you need any help with your jointer call our Tech Support at (570) 546-9663. -18- G0586 8" X 75" Deluxe Jointer... -
Page 21: Section 4: Operations
OMMEND that you read books, trade maga- zines, or get formal training before begin- ning any projects. Regardless of the con- tent in this section, Grizzly Industrial will not be held liable for accidents caused by lack of training. Figure 18. Correct and incorrect grain align- ment to cutterhead. -
Page 22: Squaring Stock
4. Rip Cut On A Table Saw—The jointed edge of the workpiece is placed against a table saw fence and the opposite edge cut off. ⁄ " Min. 1" Min. Previously Jointed Edge Figure 20. Minimum dimensions for surface planing. -20- G0586 8" X 75" Deluxe Jointer... -
Page 23: Surface Planing
To keep your hands safe, DO NOT let them get closer than 4" from the cutterhead when it is moving! Figure 22. Illustration of surface planing results. Repeat Step 7 until the entire surface is flat. -21- G0586 8" X 75" Deluxe Jointer... -
Page 24: Edge Jointing
DO NOT let them get closer than 4" from the cutterhead when it is mov- ing! Repeat Step 7 until the entire edge is flat. Figure 24. Illustration of edge jointing results. -22- G0586 8" X 75" Deluxe Jointer... -
Page 25: Bevel Cutting
25 & 26). for dangerous conditions as described in the Stock Inspection instructions, beginning on The Model G0586 has preset fence stops at 45˚ Page 19. inward, 90˚, and 45˚ outward (135˚). If your situ- ation requires a different angle, the preset fence Set the cutting depth for your operation. -
Page 26: Rabbet Cutting
Always replace the cutterhead Figure 28. Illustration of rabbet cutting effects guard after rabbet cutting! and a few sample joints. -24- G0586 8" X 75" Deluxe Jointer... -
Page 27: Section 5: Accessories
48"; replaces all "M" sized V-belts. Requires two and easily. Great for touch-ups. Power Twist V-belts to replace the stock V-belts ® on your Model G0586. Figure 32. G3631 Jointer/Planer Knife Hone. Figure 30. G3639 Power Twist V-Belt. ® -25- G0586 8" X 75" Deluxe Jointer... - Page 28 Yes, that means you can throw away the knife jig! Figure 36. Straightedges. Figure 34. Dispoz-A-Blade Holder and Knife. ® -26- G0586 8" X 75" Deluxe Jointer...
- Page 29 Comes with its own plastic case for clean, sealed storage. Finally, a respirator you can look forward to wearing—at an affordable price! Figure 40. Recommended products for protect- ing unpainted cast iron/steel part on machinery. Figure 38. H6175 Power Respirator. -27- G0586 8" X 75" Deluxe Jointer...
-
Page 30: Section 6: Maintenance
SECTION 6: MAINTENANCE Cleaning Always disconnect power to the machine before Cleaning the Model G0586 is relatively easy. performing maintenance. Vacuum excess wood chips and sawdust, and Failure to do this may wipe off the remaining dust with a dry cloth. If any... -
Page 31: Section 7: Service
This section is provided for your convenience— Figure 41. Jig positioned over cutterhead knife. it is not a substitute for the Grizzly Service Department. Carefully inspect how the jig touches the cutterhead and the knife. - Page 32 The Grizzly 8" Jointers come with both jack Position the knife gauge over the knife as screws and springs to provide you with two shown in Figure 41 and loosen the gib bolts options for cutterhead adjustments (see Figure until the knife is completely loose.
-
Page 33: Setting Outfeed Table Height
(Figure 45). ������������ ������� ������ Figure 45. Using a straightedge to align outfeed table height with knife at TDC. Figure 47. Depth-of-cut pointer Lock the outfeed table. adjusted to “0” position. -31- G0586 8" X 75" Deluxe Jointer... -
Page 34: Setting Fence Stops
Figure 49. 45˚ inward fence stop jam nut. Adjust the 45˚ inward fence stop nut until it makes contact with the back of the fence bracket. Retighten the jam nut loosened in Step 2. -32- G0586 8" X 75" Deluxe Jointer... -
Page 35: Adjusting Gibs
Figure 53. 45˚ outward fence stop jam nut. Adjust the 45˚ outward fence stop bolt until it makes contact with the back of the fence. Retighten the jam nut loosened in Step 2. -33- G0586 8" X 75" Deluxe Jointer... -
Page 36: Wiring Diagram
Wiring Diagram ����� ����� ���������� ��������� ����������� ������ ����� ����� �������� ������ �������� �� �� ������������� �� ����������� ��� ��� ��� ������ ��� ��� ��� -34- G0586 8" X 75" Deluxe Jointer... -
Page 37: G0586 Electrical Components
G0586 Electrical Components Control Panel Power Light STOP/Reset Switch Motor Junction Box ON Switch Magnetic Switch Grounding Block Contactor Overload Relay -35- G0586 8" X 75" Deluxe Jointer... -
Page 38: Troubleshooting Guide
Tables are hard to adjust engaged. 2. Re-adjust the table gibs (Page 33). 2. Table gibs are too tight. 1. Re-adjust the table gibs (Page 33). Excessive play in table movement. 1. Table gibs are too loose. -36- G0586 8" X 75" Deluxe Jointer... - Page 39 3. Adjust the knives so they are set up evenly in the cutterhead (Page 29). other in the cutterhead. 4. Nicked or chipped knives. 4. Adjust one of the nicked knives side- ways; replace knives (Page 29). -37- G0586 8" X 75" Deluxe Jointer...
-
Page 40: Jointer Parts Breakdown
���� �� ���� ���� �� ���� ����� ����� ����� ���� ���� �� �� ����� ���� �� �� � ���� ����� ����� ����� ����� ���� �� �� �� �� �� �� �� �� �� -38- G0586 8" X 75" Deluxe Jointer... -
Page 41: Jointer Parts List
DEPTH POINTER PS22 PHLP HD SCR 10-24 X 5/8 PS23 PHLP HD SCR 8-32 X 1/4 PLW03 LOCK WASHER #10 P0586078 GUARD LOCK HANDLE P0586051 TABLE ASSEMBLY P0586079 RABBET TABLE 51-1 P0586051-1 INFEED TABLE -39- G0586 8" X 75" Deluxe Jointer... -
Page 42: Stand/Motor Parts Breakdown
�� ���� �� ���� �� ���� ����� ����� ���� �� ����� �� �� ����� ����� ���� �� �� ���� �� �� ��� ���� ���� �� ���� ���� ���� �� �� ���� ���� �� -40- G0586 8" X 75" Deluxe Jointer... -
Page 43: Stand/Motor Parts List
PUSH BLOCKS WARNING PW01M FLAT WASHER 8MM PLABEL-12 READ MANUAL WARNING PB09M HEX BOLT M8-1.25 X 20 P0586116 G0586 MODEL NUMBER LABEL P0586093 MOTOR G8588 CAST GRIZZLY LOGO PLATE 93-1 P0586093-1 FAN COVER -41- G0586 8" X 75" Deluxe Jointer... -
Page 44: Warranty And Returns
WARRANTY AND RETURNS Grizzly Industrial, Inc. warrants every product it sells for a period of 1 year to the original purchaser from the date of purchase. This warranty does not apply to defects due directly or indirectly to misuse, abuse, negligence, accidents, repairs or alterations or lack of maintenance. - Page 45 Would you recommend Grizzly Industrial to a friend? _____ Yes _____No Would you allow us to use your name as a reference for Grizzly customers in your area? Note: We never use names more than 3 times. _____ Yes _____No 10.
- Page 46 FOLD ALONG DOTTED LINE Place Stamp Here GRIZZLY INDUSTRIAL, INC. P.O. BOX 2069 BELLINGHAM, WA 98227-2069 FOLD ALONG DOTTED LINE Send a Grizzly Catalog to a friend: Name_______________________________ Street_______________________________ City______________State______Zip______ TAPE ALONG EDGES--PLEASE DO NOT STAPLE...
- Page 48 Buy Direct and Save with Grizzly – Trusted, Proven and a Great Value! ® Visit Our Website Today And Discover Why Grizzly Is The Industry Leader! ® • SECURE ORDERING • ORDERS SHIPPED WITHIN 24 HOURS • E-MAIL RESPONSE WITHIN ONE HOUR...