Table of Contents
Advertisement
Quick Links
Advertisement
Table of Contents

Related Manuals for Boss Gigcaster 8


Summary of Contents for Boss Gigcaster 8
- Page 1 Reference Manual © 2023 Roland Corporation...
-
Page 2: Table Of Contents
Contents Getting Ready . . . . . . . . . . . . . . . . . . . . . . . . . . . . . . . . . . . . . . . . . . 3 Output Settings . -
Page 3: Getting Ready
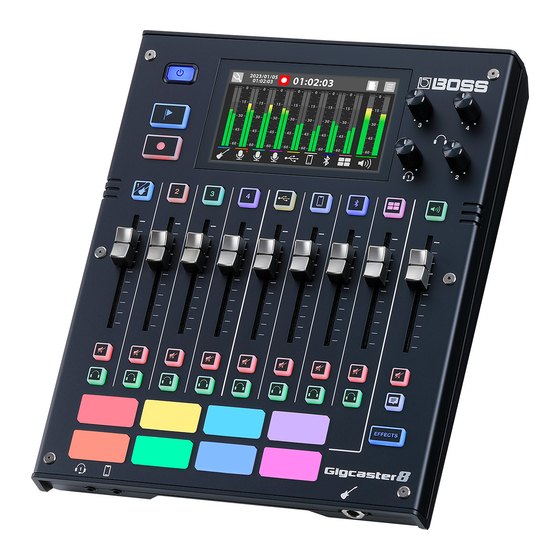
Getting Ready Top Panel CHANNEL ]–[ ] (Channel edit) buttons When these are on (lit up), the unit switches to the settings screen for the selected channel. Channel faders These adjust the volume for each input channel. ] (Mute) buttons Turns the mute feature on (lit) or off (unlit) for each input channel. -
Page 4: Front Panel / Rear Panel
Getting Ready Front Panel / Rear Panel * To prevent malfunction and equipment failure, always turn down the volume, and turn off all the units before making any connections. Front panel Rear panel (Headphones 1) jack Connect your headset or headphones here. Headsets can only be used with headphones jack 1. -
Page 5: Inserting A Microsd Card
Getting Ready Turning the Power On/Off – (Headphones 2–4) jacks Before turning the unit on/off, always be sure to turn the volume down. Even with the volume turned down, you might hear some Connect your headphones here. sound when switching the unit on/off. However, this is normal and does not indicate a malfunction (Channel) 1–4 jacks Turning the Power On... -
Page 6: Screen (Touch Panel) Operations
Getting Ready Screen (Touch Panel) Operations Home screen The screen that appears after you turn on the power is called the “home screen”. On the home screen, you check the input/output levels and recording status. You can also touch the buttons shown on the screen to switch between input/output channels and settings screens for each function. Date/time display Recording display SD CARD button... - Page 7 Getting Ready MENU screen Various settings on the MENU screen are shown here as a menu. To switch between screens, touch the menu item until the desired settings screen appears. Menu Explanation Menu Explanation Configures the respective input Specifies the function of the CHANNEL channels.
-
Page 8: Configuring The Channels
Configuring the Channels Channel 1–4 Setting the input gain Press the [ ]–[ ] button on the top panel. The settings screen for the channel corresponding to the Use the GAIN control to adjust the input gain. button you pressed appears. Turning phantom power on/off Turn the +48V setting to “ON”... -
Page 9: Effects
Configuring the Channels Adjusts the effect parameters. EFFECTS Touch <EFFECTS>. Tap the EFFECTS button to turn it ON (the button lights up green). * For details on the parameters, refer to “Parameter Guide” (Roland website). GENERAL Touch <GENERAL>. Selecting a category Set the parameters. -
Page 10: Usb Channel
Configuring the Channels USB Channel This channel is used for USB audio signals from devices (such as a computer) that are connected to the ă (USB) port. * When using this unit while AUDIO MODE (p. 35) is operating in multitrack (MTK-RECORD, MTK-STREAM), select the “CH USB” setting for the computer’s USB audio. -
Page 11: General
Configuring the Channels GENERAL Touch <GENERAL>. Set the parameters. Ducking (DUCK) When the audio from a performance or conversation is playing (through channels 1–4), this function makes the sound of the performance or conversation more prominent by making all other sounds quieter. This works by automatically bringing down the volume of the music (such as background music) while the narrator is talking or while other participants are having a chat. -
Page 12: Mobile Channel
Configuring the Channels MOBILE Channel This channel is used for audio signals from devices (such as a smartphone) that are connected to the (Mobile) jack. INPUT Press the [ ] button on the top panel. Selecting an input source Touch <INPUT>. Touch one of the inputs from <MOB>... -
Page 13: Effects
Configuring the Channels GENERAL Touch <EQ>. Touch <GENERAL>. Set the parameters. Tap the EQ button to turn it ON (the button lights up green). Ducking (DUCK) Adjust the tonal character of each frequency band. When the audio from a performance or conversation is playing * For details on the parameters, refer to “Parameter Guide”... -
Page 14: Bluetooth® Channel
Configuring the Channels BLUETOOTH® Channel This channel is used for audio signals from mobile devices (such as a smartphone) that are connected via Bluetooth. Tap “GCS-8 Audio” that is shown in the Bluetooth Press the [ ] button on the top panel. device screen of your mobile device. -
Page 15: Effects
Configuring the Channels GENERAL Touch <EQ>. Touch <GENERAL>. Set the parameters. Tap the EQ button to turn it ON (the button lights up green). Ducking (DUCK) Adjust the tonal character of each frequency band. When the audio from a performance or conversation is playing (through channels 1–4), this function makes the sound of the * For details on the parameters, refer to “Parameter Guide”... -
Page 16: Sound Pad Channel
Configuring the Channels SOUND PAD Channel This channel is for the audio that’s assigned to the sound pads. GENERAL Press the [ ] button on the top panel. Touch <GENERAL>. Set the parameters. EFFECTS Ducking (DUCK) You can use effects exclusively for the SOUND PAD channel. When the audio from a performance or conversation is playing (through channels 1–4), this function makes the sound of the performance or conversation more prominent by making all... -
Page 17: Editing The Effects
Configuring the Channels Editing the Effects For channels 1–4, you can edit “effect patches”, and for the channels from USB through SOUND PAD, you can edit the dedicated effects for each channel. Touch <EFFECTS>. Edit the parameter’s value. For channels 1–4: set “PATCH” to the effect patch you To save the effect patch you edited, follow the steps want to edit. -
Page 18: Saving An Effect Patch (Patch Write)
Configuring the Channels Saving an Effect Patch (Patch Write) Here’s how to save the effect patches you edit as user patches. List of Patch Write Functions On the effect patch’s edit screen, touch < > (write button). You can use the following functions on the PATCH WRITE screen. The PATCH WRITE screen appears. -
Page 19: Using The Tuner
Configuring the Channels Using the Tuner You can use the GCS-8’s built-in tuner to tune your guitar or to check the pitch of the vocal input via mic or your instrument. Play a single note on your instrument, or sing a On the home screen, touch <... -
Page 20: Using The Sound Pads
Using the Sound Pads In this mode, the pads play the audio assigned to each pad. This lets you play background music, jingles, sound effects and so on at the optimum timing. ¹ You can assign up to 64 sounds (8 banks × 8) to the sound pads overall. ¹... - Page 21 You can use the dedicated app to import the WAV files to be To make the audio stop during playback, assigned to the sound pads. long-press the pad. For details on the dedicated app, see the BOSS website. (TYPE) Plays back from the beginning each https://www .boss .info/support/ time you press the pad.
-
Page 22: Using The Effect Pads
Using the Effect Pads In this mode, you can use the settings for the effects assigned to each pad. ¹ You can assign up to 64 effect settings (8 banks × 8) to the effect pads overall. ¹ There are four groups (A–D) for each effect configuration. You can assign functions to each group and control each group at the same time. ¹... - Page 23 Using the Effect Pads Touch <A>–<D> to select a group. Edits the parameter’s value. * The settings you edit are saved as-is. Parameter Explanation Select the category. CATEGORY The functions you can select are different for each category. Specifies the function that’s assigned to the pads. FUNCTION Set this to “OFF”...
-
Page 24: Using A Footswitch And Expression Pedal
Using a Footswitch and Expression Pedal You can control various functions with a footswitch (FS-5U/FS-6/FS-7), an expression pedal (FV-500H/FV-500L/EV-30 or Roland EV-5) or a foot controller (GA-FC) that’s connected to this unit. Connecting footswitches Connect one or more footswitches and set their mode/polarity switches by referring to the illustrations below. FS-6 FS-5U x 2 FS-5U x 1... -
Page 25: Specifying A Foot Controller
Using a Footswitch and Expression Pedal Specifying a Foot Controller Footswitch/Expression Pedal Settings Here’s how to specify which foot controller (footswitch, expression There are four groups (A–D) each for the footswitch (CTL 1,2) pedal or GA-FC) is connected to the FOOT SW jack. and the expression pedal (EXP). -
Page 26: Configuring Pad Link
Using a Footswitch and Expression Pedal CTL1, 2 Configuring Pad Link Use pad link to control the functions that are assigned to pads 1–8 Function Explanation by operating the GA-FC. You can control the sound pads and the effect pads. Select the category. -
Page 27: Ga-Fc Settings
Using a Footswitch and Expression Pedal GA-FC Settings There are four groups (A–D) each for the switches (PEDAL 1–6) and the expression pedals (EXP 1, 2). You can assign functions to each group and control them at the same time. Select “GA-FC”... -
Page 28: Recording
Recording Now, let’s record your guitar performance or conversations. NOTE ¹ A microSD card (commercially available) is required for recording. ¹ Depending on the manufacturer or type of microSD card, some cards might not work correctly for recording or playback on the GCS-8. ¹... -
Page 29: Recording
Recording Recording Playing Back Recorded Audio Press the [ ] button. On the SD CARD screen, touch <PLAYBACK>. The button lights up red, and recording begins. The PLAYBACK screen appears. The elapsed recording time is shown on the home screen. Touch <... -
Page 30: Deleting Your Recorded Data
] icon, and then click “GCS-8_EXT”. macOS Drag the “GCS-8_EXT” icon to the trash (“Eject” icon). You can use the dedicated app to convert the audio file format. For details on the dedicated app, see the BOSS website. https://www .boss .info/support/... -
Page 31: Output Settings
Output Settings MAIN OUT Press the [ ] button on the top panel. The OUTPUT screen is shown. Here’s how to configure the MAIN OUT output settings. Touch <EQ>. Tap the EQ button to turn it ON (the button lights up green). -
Page 32: Usb
Output Settings Here’s how to configure the USB output settings. USB MAIN USB MONITOR This is the main output for USB. The same audio as the audio This is the monitor output for USB. The same signal is output as output from the MAIN OUT jacks is outputted. -
Page 33: Usb Aux In
Output Settings USB AUX IN Talkback Settings (TALKBACK) This is the USB input that’s mixed just before the OUTPUT fader. Here’s how to configure the settings for using talkback. Use this when you want to check the sound without effects, such as when you’re editing sounds or music on your computer. -
Page 34: Effects
Output Settings EFFECTS This shows you how to apply effects to the output audio. COMP GENERAL Touch <COMP>. Touch <GENERAL>. Set the parameters. Set the parameters. Parameter Explanation Sets the compressor depth. Parameter Explanation COMP When this is “OFF”, no compressor effect is A common KEY and BPM are set for the effect applied. -
Page 35: Operating The Menu Screen
Operating the MENU Screen Various settings on the MENU screen are shown here as a menu. To switch between screens, touch the menu item until the desired settings screen appears. SETUP On the home screen, touch < > (MENU button). The MENU screen appears. -
Page 36: Backing Up Data From The Gcs-8
Drag the “GCS-8_INT” icon to the trash (“Eject” icon). Open the GCS-8_INT drive. You can use the dedicated app to back up the data from the GCS-8. Windows For details on the dedicated app, see the BOSS website. In “PC”, open “GCS-8_INT”. https://www .boss .info/support/ macOS... -
Page 37: Restoring The Factory Default Settings (Factory Reset)
Operating the MENU Screen Restoring the Factory Default Settings (Factory Reset) You can restore all of the settings to their factory-set values, and you can also specify certain items to be reset. * When you execute “Factory Reset”, the settings you made are lost. Back up any necessary data to your computer. On the MENU screen, touch <SETUP>Ó<GENERAL>. -
Page 38: Error Message List
Error Message List Message Meaning Action microSD card CARD FULL The microSD card has run out of free storage space. Delete any unnecessary WAV files. When recording or playing back, data cannot be CARD TOO BUSY Use a different microSD card. written/read fast enough from the microSD card. -
Page 39: Main Specifications
Main Specifications Sample Rate 48 kHz AD Conversion 24 bits DA Conversion 32 bits Processing 32-bit floating point Input: 20 ch USB Audio Input: 14 ch Bluetooth A2DP, HFP Data Format: BWF (48 kHz, 32-bit float) Recording Storage: microSD card (sold separately) Data Format: WAV (48 kHz, 16-bit linear) Sound Pad Storage:... - Page 40 Main Specifications Guitar jack: 1/4-inch phone type Channel 1–4 jacks: Combo type (XLR, 1/4-inch TRS phone), balanced Mobile jack: Stereo miniature phone type (CTIA) MAIN OUT (L, R) jacks: 1/4-inch phone type Connectors Headphones 1 jack: Stereo miniature phone type (CTIA) Headphones 2–4 jacks: Stereo miniature phone type FOOT SW jack:...