Table of Contents
Advertisement
Quick Links
GT-2C-L/GT-2C
SERVICE MANUAL
GT-2H-L/GT-2H
Residential/Tenant Station,
Sub Residential/Tenant Station
OPERATION MANUAL
GT-2C-L/GT-2C
GT-2H-L/GT-2H
Thank you for selecting Aiphone for your communication needs.
* Please read this manual for safe and correct use of the system, and keep in a safe place for future reference.
Please note that images and illustrations depicted in this manual may differ from the actual product.
Advertisement
Table of Contents

Related Manuals for Aiphone GT-2C-L/GT-2C


Summary of Contents for Aiphone GT-2C-L/GT-2C
- Page 1 GT-2C-L/GT-2C GT-2H-L/GT-2H Thank you for selecting Aiphone for your communication needs. * Please read this manual for safe and correct use of the system, and keep in a safe place for future reference. Please note that images and illustrations depicted in this manual may differ from the actual product.
-
Page 2: Precautions
• This system is not intended for life support or crime prevention. It is just a result. supplementary means of conveying information. Aiphone will under no 5. If there is any smoke, unusual odor, or abnormal sound, or if you drop conditions be liable for loss of life or property which occurs while the or damage the unit, turn off the system power breaker immediately. -
Page 3: Table Of Contents
Table of Contents PRECAUTIONS ..............................2 PART NAMES AND FUNCTIONS ....................... 4 ..........................4 1 OPERATION PANEL ............................5 2 INDICATORS ..................6 3 SCREEN VIEW (Residential/tenant station) USING THE STATION ............................ 7 ................7 1 OPERATING METHOD (Residential/tenant station) ......................... -
Page 4: Part Names And Functions
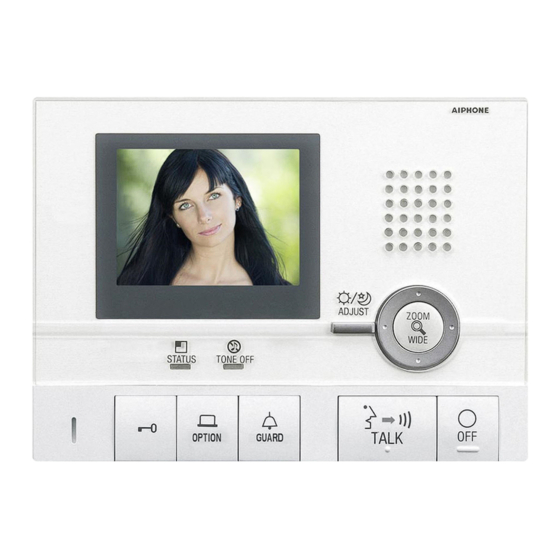
PART NAMES AND FUNCTIONS OPERATION PANEL Residential/tenant station (GT-2C-L/GT-2C) Screen brightness control Color LCD video (0 - 10) monitor Speaker Adjust the LCD screen Hearing aid T-mode brightness. (*1) compatibility symbol (GT-2C-L only) (*4) Speaker volume control MENU button (0 - 10) -
Page 5: Indicators
PART NAMES AND FUNCTIONS INDICATORS GT-2C-L/GT-2C GT-2H-L/GT-2H Indication patterns STATUS indicator TALK indicator TONE OFF indicator (orange) Indicator (orange) (orange) When the call tone is When the doctor call Status set to "off" is enabled Standby Long interval flashing Slow flashing... -
Page 6: Screen View (Residential/Tenant Station)
PART NAMES AND FUNCTIONS SCREEN VIEW (Residential/tenant station) The status is displayed. "CALLING ENTRANCE1": When there is a call from entrance 1 "IN-USE ENTRANCE1": During communication with entrance 1 Displays while screen is being adjusted. : Backlight adjustment Displays during recording or playing :... -
Page 7: Using The Station
USING THE STATION OPERATING METHOD (Residential/tenant station) To operate this unit, check the symbol and then press the appropriate operation button. This unit does not have touch-panel operation. Main symbols and function descriptions Symbol Function description Do not press on the LCD or subject it to high impact. To manually record The LCD glass could break which could result in an injury. -
Page 8: Setting The Date And Time
USING THE STATION Setting the date and time In standby mode, press the [ MENU] button. • During initial setup, skip step 2 and go to step 3. Press the [] or [] button to select "DATE/TIME", then press the [ MENU] button. -
Page 9: Receiving Calls
USING THE STATION RECEIVING CALLS Answering a call When a call is received from an entrance station, guard station, or When done communicating, press the [ OFF] button. door station, a call tone will sound and the STATUS LED flashes. The STATUS LED will turn off. -
Page 10: Door Release
USING THE STATION Door release Press the [ ] button while in communication with the entrance Door release is activated at the entrance station. is displayed station. for approx. 5 sec. at the residential/tenant station. (This does not exactly correspond to the door release status of the entrance station.) •... -
Page 11: Calling
USING THE STATION CALLING Calling guard stations When calling all of the guard stations Move the cursor to the guard station to be called and press the Press the [ GUARD] button while in standby mode. MENU] button. The STATUS LED flashes and calls the indicated guard station. -
Page 12: Monitoring
USING THE STATION MONITORING In standby mode, press the [ MONITOR] button to display NOTES: 1. If there is an operation such as a call, monitoring ends and the video from an individual door station (if equipped). Audio is call operation begins. 2. -
Page 13: Operation During Communication And Monitoring
USING THE STATION OPERATION DURING COMMUNICATION AND MONITORING ZOOM/WIDE switching Press the [ ZOOM/WIDE] button when video is displayed. • Switching between zoom ⇔ wide occurs each time the button is pressed. [Wide view] [Zoom view] NOTES: 1. When the caller is not shown in the center of the picture, the zoom view can be moved up, down, left, and right. -
Page 14: Night Illumination
USING THE STATION Night illumination At night, the illuminator LED turns on during an entrance station or individual door station calling and communicating. When a call is made from an entrance station or individual Lighting up the illuminator LED when monitoring an door station individual door station 1. -
Page 15: Recording And Playing (Residential/Tenant Station)
USING THE STATION RECORDING AND PLAYING (Residential/tenant station) Automatic recording If a call is received from an entrance station or individual door NOTES: 1. The automatic recording function cannot be cancelled. station, recording starts automatically. During recording, the 2. Pictures recorded at individual door stations are recorded symbol flashes on the screen. -
Page 16: Playing Recordings
USING THE STATION Playing recordings If there are new recordings, the STATUS LED flashes with a long interval during standby mode. In addition, the operations shown below are also possible on the play- waiting screen. • [ MONITOR] button: To display the next (more recent date/time) recording. Press and hold the button to view the first picture of each recording in succession from oldest to newest. -
Page 17: Saving Recordings
USING THE STATION Saving recordings 10 recordings can be saved (out of a maximum of 40 recordings). Press the [ MONITOR] button. Saved recordings cannot be overwritten. 07/16 JA N/01/2011 18:45 Display the recording to be saved on the play-waiting screen. (Refer to section Press the [ MENU] button to display the save/erase selection... -
Page 18: Alarms And Related Info
USING THE STATION ALARMS AND RELATED INFO Emergency alarm Press and lock the emergency alarm switch (or when there is a Press the [ TALK] button to communicate with the guard line-off activation). station. The STATUS LED will turn on. After communication, the emergency alarm will begin to sound again. -
Page 19: External Calls
USING THE STATION External calls When a separately-installed sensor is activated or the CALL Press the [ OFF] button or [ REC/PLAY] button ([ OFF] button is pressed, the alarm sounds, and the warning screen button for GT-2H-L/GT-2H) to stop the alarm sound. displays on the monitor and flashes. -
Page 20: Canceling Security Setting After Arrival (Residential/Tenant Station)
USING THE STATION Canceling security setting after arrival (Residential/tenant station) The setting will be canceled when the security PIN is correct. When the ABSENCE SECURITY setting in is set, if an • If the security PIN is not correct, "WRONG SECURITY PIN." will individual door is opened, a screen will display and the alarm display. -
Page 21: Changing Settings (Residential/Tenant Station)
USING THE STATION CHANGING SETTINGS (Residential/tenant station) The screen may vary depending on the equipment being used. Using the MENU In standby, press the [ MENU] button. Press the [], [], [], and [] buttons on the "SETTINGS" screen to select the item to be confirmed, then press the [ Press the [] or [] button to select "SETTINGS", then press MENU] button. -
Page 22: Call Tone Switching
USING THE STATION CALL TONE switching Individual call tones can be selected for entrance stations, individual On the separate "CALL TONE" screens for "ENTRANCE/ door stations, and guard stations from 5 sound types. DOOR/GUARD", select the desired call tones. The selected call tone sounds. -
Page 23: External Call Sound Time Duration Setting
USING THE STATION External call sound time duration setting Select the external call sound time duration. The default setting is "10 Select the sound time on the "UTILITY-CALL TIMER" screen. MIN.". Press the [ MENU] button to save the setting. After performing steps 1 and 2 in section , select "UTILITY"... -
Page 24: Security Pin Setting
USING THE STATION SECURITY PIN setting The security PIN can be set to be used when performing PRESENCE After "CHANGE SECURITY PIN?" displays on the SECURITY and ABSENCE SECURITY settings. "SECURITY PIN" screen, press the [ MENU] button. The default setting is "DISABLE". When "ENABLE" is selected, the SECURITY PIN SECURITY PIN default setting for the security PIN is [], [], [], and []. -
Page 25: Departure Timer, Arrival Timer Setting
USING THE STATION DEPARTURE TIMER, ARRIVAL TIMER setting With ABSENCE SECURITY, the delay time from when an action Select "DEPARTURE TIMER" or "ARRIVAL TIMER" on the causing a warning response is detected to when a warning is sent can "ABSENCE SECURITY" screen, then press the [ MENU] button. -
Page 26: For Proper Use Of The Station
FOR PROPER USE OF THE STATION TECHNICAL PRECAUTIONS • Cleaning: • The video image may distort when the door release is activated. Clean the units with a soft cloth dampened with a neutral This is not a station malfunction. household cleanser. Do not use any abrasive cleaner or cloth. •... -
Page 27: Regulations
WARRANTY Aiphone warrants its products to be free from defects of material and workmanship under normal use and service for a period of 2 years after delivery to the ultimate user and will repair free of charge or replace at no charge, should it become defective upon which examination shall disclose to be defective and under warranty.