Roland TR-08 - Rhythm Composer Manual
- User manual (35 pages) ,
- Connection manual (3 pages)
Advertisement
- 1 Introduction
- 2 Returning to the Factory Settings (Factory Reset)
- 3 Panel Descriptions
- 4 Playing/Recording a Rhythm Pattern
- 5 Muting or Soloing an Instrument
- 6 Copying a Pattern
- 7 Recording or Playing a Rhythm Track
- 8 Menu Mode
- 9 Storing or Recalling the Tempo/Shuffle Settings
- 10 Fixed Battery Operation Mode
- 11 Main Specifications
- 12 Intellectual Property Right
- 13 Videos
- 14 Documents / Resources
Introduction
- The TR-08 can operate on batteries or on USB bus power. If you are using batteries, insert four AA batteries, making sure that the batteries are oriented correctly.
- If you handle batteries improperly, you risk explosion and fluid leakage. Make sure that you carefully observe all of the items related to batteries that are listed in "USING THE UNIT SAFELY" and "IMPORTANT NOTES" (leaflet "USING THE UNIT SAFELY").
- When turning the unit over, be careful so as to protect the buttons and knobs from damage. Also, handle the unit carefully; do not drop it.
- When the batteries run low, the indication "Bt. Lo" appears in the display. Replace the battery as soon as possible.
Using the TR-08 in conjunction with the DK-01 Boutique Dock (accessory)
⇒ For installation/removal/angle adjustment, refer to the DK-01's Owner's Manual.
Playing the TR-08 via MIDI or USB
You can also play the TR-08 via MIDI or USB. For details, refer to "Connecting Your Equipment."
Connecting Your Equipment
- To prevent malfunction and equipment failure, always turn down the volume, and turn off all the units before making any connections.

- Micro USB (
![]() ) port
) port
![]()
Use a commercially available USB 2.0 cable (A-microB) to connect this port to your computer. It can be used to transfer USB MIDI and USB audio data. You must install the USB driver when connecting the TR-08 to your computer. Download the USB driver from the Roland website. For details, refer to Readme.htm which is included in the download.
⇒ https://www.roland.com/support/- Do not use a micro USB cable that is designed only for charging a device. Charge-only cables cannot transmit data.
- [VOLUME] knob
Adjusts the volume. - PHONES jack
Connect headphones (sold separately) here. - OUTPUT jack
Connect this jack to your amp or monitor speakers. - MIX IN jack
This is the audio input jack. Sound from the connected device is output from the OUTPUT jack and PHONES jack. - MIDI connectors
![]()
If you connect the TR-08 to another MIDI device using commercially available MIDI cables, the TR-08 can play in synchronization with the MIDI device.


Turning the TR-08 On
- [POWER] switch
This turns the power on/off.
- After you've made connections correctly, be sure to turn on the power in the order of the TR-08 first, and then the connected system. Powering-on in the incorrect order may cause malfunctions or damage. When turning the power off, power-off the connected system first, and then the TR-08.
- Before turning the unit on/off, always be sure to turn the volume down. Even with the volume turned down, you might hear some sound when switching the unit on/off. However, this is normal and does not indicate a malfunction.
Returning to the Factory Settings (Factory Reset)
Here's how to return the TR-08 to its factory-set state.
- While holding down the [2] button, turn on the power.
The [TAP] button blinks.
If you decide to cancel the factory reset, turn off the power. - Press the [TAP] button to execute the factory reset.
- When all buttons blink, turn the TR-08's power off, then on again.
Data Backup/Restore
Backup
- Connect your computer to the TR-08's USB port via USB cable.
- While holding down the [START/STOP] button, turn on the power.
It takes about one minute to prepare the drive. The STEP NO [1]–[16] indicators show the progress. - Open the "TR-08" drive on your computer.
The backup files are located in the "BACKUP" folder of the "TR-08" drive. - Copy the backup files into your computer.
- After copying is completed, eject the USB drive.
Windows 10/8/7
Right-click on the "TR-08" icon and execute "Eject."
Mac OS
Drag the "TR-08" icon to the Trash icon in the Dock. - Turn the TR-08 power off.
Restore
- As described in the procedure for "Backup" Step 1–3, open the "TR-08" drive on your computer.
- Copy the TR-08 backup files into the "RESTORE" folder of the "TR-08" drive.
- After copying is completed, eject the USB drive and then press the [TAP] button.
- After the LEDs have completely stopped blinking, turn off the power.
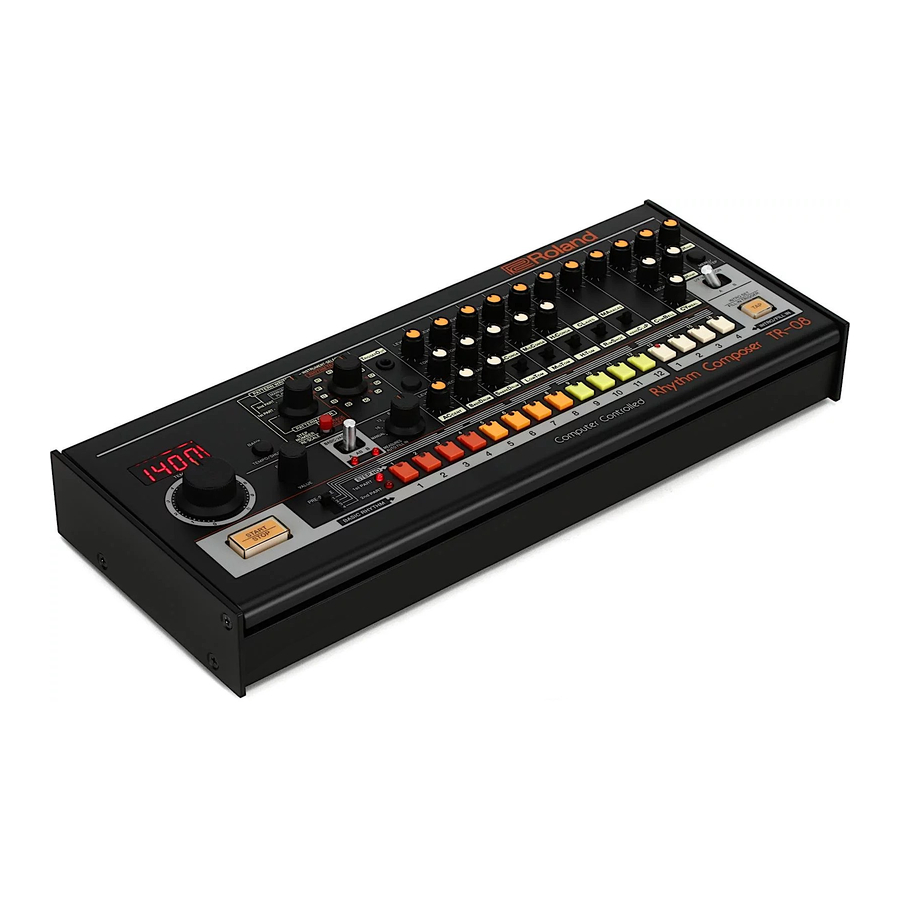
Panel Descriptions

- Display/TEMPO section
The current tempo is shown in the display.Controller Explanation [TEMPO] dial Adjusts the tempo. [BANK] (TEMPO/SHUFFLE) button Hold down the [BANK] button and press a [1]–[16] button to select a bank.
Continue holding down the [BANK] button and press a [1]–[16] button once again to select a number.
* If you release the [BANK] button without specifying a number, the previous pattern remains.[FINE] (VALUE) knob Finely adjusts the tempo.
You can also press the [BANK] button to switch to the decimal point display. Turning this knob while holding down the [BANK] button adjusts the amount of shuffle (rhythmic bounce). - Mode switch/Select switch/[CLEAR] button
Controller Explanation Mode switch PATTERN CLEAR
This mode lets you clear a rhythm pattern.
PATTERN WRITE 1st PART
This mode lets you write to the 1st part.
PATTERN WRITE 2nd PART
This mode lets you write to the 2nd part.
MANUAL PLAY
This mode lets you play manually.
PLAY
This mode lets you play a rhythm track that you composed.
COMPOSE
This mode lets you compose a rhythm track.Select switch Selects an instrument.
AC (ACCENT), BD (BASS DRUM), SD (SNARE DRUM), LT (LOW TOM), MT (MID TOM), HT (HI TOM), RS (RIM SHOT), CP (HAND CLAP), CB (COWBELL), CY (CYMBAL), OH (OPEN HIHAT), CH (CLS'D HIHAT)[CLEAR] button Clears the recorded content from an individual instrument, or clears a rhythm pattern. - TRIGGER OUT section
Controller Explanation TRIGGER OUT jack The TRIGGER OUT jack outputs a trigger pulse. This can control an external device connected via a mini-plug (mono).
* Do not use a stereo mini-plug cable. It will not work correctly.TRIGGER OUT button Use this to input a trigger out signal during step-write, or for tap write input. - [ACCENT] knob
Adjusts the strength of the accent. - INST edit section
Here you can adjust the character of each instrument.
You can use 11 different instruments (BD–CH) in a pattern.Controller Explanation [LEVEL] knob Adjusts the volume of the instrument. [TONE] knob In the case of the bass drum and snare drum, this adjusts the tension of the head. In the case of the cymbal, this adjusts the character of the sound. [TUNING] knob Adjusts the pitch of a tom or conga. [DECAY] knob Adjusts the decay.
Turn the knob toward the left for a crisp sound, or toward the right for a more extended sound.[SNAPPY] knob Controls the sound of a snare drum's wire snare.
Turn the knob toward the left for a sound without the wire snare.Instrument select switch Selects an instrument. It is not possible to play or write both of these instruments simultaneously.
LOW CONGA ⇔ LOW TOM, MID CONGA ⇔ MID TOM, HI CONGA ⇔ HI TOM, CLAVES ⇔ RIM SHOT, MARACAS ⇔ HAND CLAP - Sequencer section
Controller Explanation [BASIC-VARIATION] switch This switch selects a variation of the basic rhythm.
The A (or B) position repeats the A (or B) rhythm pattern. The AB position alternately repeats rhythm patterns A and B.Measures selector Selects the interval at which a fill-in is automatically inserted (auto fill-in).
MANUAL (a fill-in is not inserted automatically)
16, 12, 8, 4, 2 (units of measures)[I/F-VARIATION] switch Selects the variation of intro and fill-in. [START/STOP] button Plays/stops the rhythm pattern. [PRE-SCALE] switch Selects the note length of a step.
1: 8th note triplet
2: 16th note triplet
3: 16th note
4: 32nd note1st PART/2nd PART indicator Indicates which part is currently playing. [1]–[12] button STEP NO [1]–[12] / BASIC RHYTHM [1]–[12]
For each step, these buttons turn on/off the instrument that is selected by the select switch.
These buttons select a rhythm pattern that is written into BASIC RHYTHM.[13]–[16] button STEP NO [13]–[16] / INTRO/FILL IN [1]–[4]
For each step, these buttons turn on/off the instrument that is selected by the select switch.
These buttons select a rhythm pattern that is written into INTRO/FILL IN.[TAP] button When using the intro, this button turns the intro on/off.
To use a fill-in, press this button at the location where you want to insert a fill-in. - [MENU/SUB STEP] button
This button accesses menu mode.
While writing a pattern, you can enter a sub-step by holding down the [MENU/SUB STEP] button and pressing a [1]–[16] button.
Playing/Recording a Rhythm Pattern
The recorded performance data is called a "rhythm pattern."
The TR-08 has 256 rhythm patterns, and two variations (A and B) for each rhythm pattern.
Playing a Rhythm Pattern
Selecting PATTERN PLAY mode
- Set the mode switch to MANUAL PLAY.
One of the INTRO/FILL IN [1]–[4] indicators is lit, and one of the BASIC RHYTHM [1]–[12] indicators is blinking.
Selecting a rhythm pattern
- Press a BASIC RHYTHM [1]–[12] button to select the basic rhythm.
The indicator of the selected rhythm pattern is blinking. - Set the [BASIC-VARIATION] switch.
If you select AB, A (first measure) and B (second measure) play alternately.
Playing a rhythm pattern
- Press the [START/STOP] button.
The STEP NO indicators light successively from left to right. - Use the [LEVEL] knob of each instrument to adjust the volume balance, and use the rear panel [VOLUME] knob to adjust the overall volume.
Playing patterns consecutively
When selecting a pattern, you can select multiple patterns by pressing two buttons at the same time. The patterns you've selected will play consecutively. The currently-playing pattern blinks.
Adjusting the Tempo
- Use the [TEMPO] dial or the [FINE] knob to adjust the playback speed (40.00–300.00 BPM).
- To stop, press the [START/STOP] button once again.
Intro / Fill-In Operations
You can add an intro before the basic rhythm plays, or insert a fill-in while the basic rhythm plays.
Adding an intro
- Press an INTRO/FILL IN [1]–[4] button to select an intro rhythm.
- Set the [I/F-VARIATION] switch.
- Press the [TAP] button.
The indicator of the selected intro blinks.
To cancel the intro, press the [TAP] button once again. - Press the [START/STOP] button.
The intro plays for one measure, and then the basic rhythm plays.
Inserting a fill-In
Manually
- Set the measure selector to "MANUAL."
- Press the [START/STOP] button.
- Press an INTRO/FILL IN [1]–[4] button to select a fill-in rhythm.
- Set the [I/F-VARIATION] switch.
- Press the [TAP] button when you want to insert a fill-in.
If the first beat is playing, the fill-in is inserted starting at the second beat; if the second or subsequent beat is playing, the fill-in is inserted starting at the next measure.
Using auto fill-in
- Press a BASIC RHYTHM [1]–[12] button to select a basic rhythm.
- Set the [BASIC-VARIATION] switch to the desired position.
- Use the measure selector to specify the interval at which a fill-in is inserted.
2 (every two measures), 4 (every four measures), 8 (every eight measures), 12 (every 12 measures), 16 (every 16 measures) - Press an INTRO/FILL IN [1]–[4] button to select a fill-in rhythm.
- Press the [START/STOP] button.
A fill-in is automatically inserted at the specified interval of measures. To cancel auto fill-in, set the measure selector to MANUAL.
- You can rhythm-pattern-write an intro/fill-in during playback by holding down the [TAP] button and pressing the [1]–[16] buttons.
- Even while auto fill-in is specified, you can use the [TAP] button to insert a fill-in.

Recording a Rhythm Pattern
On the TR-08, the process of recording or editing a one-measure pattern is called "rhythm pattern write." You can write a rhythm pattern using either of the following two methods.
Step Write (Step Recording)
Create a pattern by specifying the steps at which each instrument will sound.
Selecting a position and clearing it
"Position" refers to A or B of each rhythm pattern.
- Set the mode switch to "PATTERN CLEAR."
- Press a BASIC RHYTHM [1]–[12] button (or a INTRO/FILL IN [1]–[4] button) to select a basic rhythm (intro/ fill-in).
- Set the [BASIC-VARIATION] switch (or the [I/F-VARIATION] switch) to A or B.
- Press the [CLEAR] button.
Specifying the number of steps and selecting the pre-scale
Here's how to specify the number of steps for a part, and select the number of steps in a beat (PRE-SCALE).
The Clear operation automatically sets this to 16 steps.
On the TR-08, one measure is divided into subdivisions that are assigned to the STEP NO [1]–[16] buttons, allowing you to write them. These divisions are called steps.
If one measure is divided into 16, one measure equals 16 steps.
- Set the mode switch to "PATTERN WRITE 1st PART."
- Press the [START/STOP] button.
- Set the [PRE-SCALE] switch to the desired position.
For each setting, the indication (scale) on the panel shows the number of steps in one beat. Press the [CLEAR] button to apply the PRE-SCALE value.

- Hold down the [CLEAR] button and press a STEP NO [1]–[16] button to specify the number of steps.
When you specify this, the same number of steps is automatically specified for A and B of the same basic rhythm (or intro/fill-in), regardless of the position of the variation switch at this time.
If a 16-step rhythm pattern is written to A, and you then attempt to write a 12-step rhythm pattern to B, be aware that specifying this number of steps for B will also set A to 12 steps.
In this case, you can return to the previous state by once again specifying 16 steps.

Entering backbeats
By holding down the [MENU/SUB STEP] button and pressing a STEP NO [1]–[16], you can enter a note that is skewed 1/2 step later.
Writing instruments separately
Use the STEP NO [1]–[16] buttons to specify the steps at which you want an instrument to sound.
- The positions of each instrument's knobs and switch are not memorized.
- Use the select switch to select an instrument.
- Use the STEP NO [1]–[16] buttons to specify the steps at which you want the selected instrument to sound.
- To write the steps for another instrument or for the accent, repeat steps 9–10 to write the rhythm pattern.
- When you've finished writing the rhythm pattern, press the [START/STOP] button.
Watching the [1]–[16] buttons
The [1]–[16] buttons are arranged in the order in which playback time flows (from left to right).
If a button is pressed, a note is sounded at that step.
When you're writing a pattern, these buttons operate as step number buttons, not as rhythm select buttons.

Recording with the 1st part and 2nd part
- Start by clearing the position.
⇒ "Selecting a position and clearing it" - Set the mode switch to "PATTERN WRITE 1st PART."
- Press the [START/STOP] button.
- Set the [PRE-SCALE] switch to the desired position, and press the [CLEAR] button.
- Set the mode switch to "PATTERN WRITE 2nd PART."
- Hold down the [CLEAR] button and press a STEP NO [1]–[16] button to specify the number of steps (the steps that follow from the 1st part).
At this time, the flow of the steps indicated by the LEDs changes, flowing from step 1 of the 1st part to the specified number of steps of the 2nd part. - Set the mode switch to "PATTERN WRITE 1st PART."
- Use the select switch to select an instrument.
- Use the STEP NO [1]–[16] buttons to specify the steps at which you want a note to play.
- Set the mode switch to "PATTERN WRITE 2nd PART."
- Use the STEP NO [1]–[16] buttons to specify the subsequent steps.
- To write the steps for another instrument or for the accent, repeat steps 7–11.
The steps flow repeatedly between the 1st part ⇔ 2nd part. If the mode switch is set to 1st part, only the 1st part can be written. In the same way if the mode switch is set to 2nd part, only the 2nd part can be written. - When you've finished writing each instrument, press the [START/STOP] button.
Using the 2nd part
The Clear operation clears both the 1st part and the 2nd part (at this time, the 1st part is set to 16 steps and the 2nd part is set to 0 steps).
In order to use the 2nd part, you must specify the number of steps. The number of steps can be freely distributed to the 1st part and the 2nd part.
- The 1st part and 2nd part together make up one pattern. You can't use just the 2nd part by itself.
- For the 2nd part as well, variations A and B within the same basic rhythm (or intro/fill-in) have the same number of steps.
- By holding down the [CLEAR] button and pressing the [TAP] button, you can set the number of steps for the 2nd part to 0.
Random pattern generation function
- While writing/playing a pattern, hold down the [MENU] button and press the [TAP] button.
The generated pattern is not written automatically.
Hold down the [MENU] button and long-press the [TAP] button to write the pattern. In pattern play mode, an intro/fill-in is generated.
Tap Write (Realtime Recording)
You can create a pattern by using the [TAP] button to record each instrument in real time.
- Start by clearing the position.
⇒ "Selecting a position and clearing it" - Set the mode switch to "PATTERN WRITE 1st PART."
- Press the [START/STOP] button.
- Set the [PRE-SCALE] switch to the desired position, and press the [CLEAR] button.
- Use the select switch to choose the instrument that you want to use as a metronome (for example, RS: Rim Shot).
- Press the STEP NO [1]–[16] button that will start the beat (Sounding the Metronome step).
- Use the select switch to specify an instrument that you want to write by tapping.
- Press the [TAP] button at the desired timing.
The LEDs light to indicate the step numbers that are closest to the timing of each tap. - To write the steps for other instruments or for the accent, repeat steps 7–8.
- When you've finished writing, once again select the instrument that you selected in step 5, and clear the notes that you had been using as the metronome.
- Press the [START/STOP] button.
Memory
Within the same basic rhythm (or intro/fill-in), A and B have the same number of steps and the same pre-scale.
Muting or Soloing an Instrument
Muting an Instrument
- Hold down the [BANK/TEMPO/SHUFFLE] button and press the [TRIGGER OUT] button.
- Continue holding down the [BANK/TEMPO/SHUFFLE] and [TRIGGER OUT] buttons, and use [2]–[12] to select the instrument that you want to mute.
Soloing an Instrument
- Hold down the [BANK/TEMPO/SHUFFLE] button and press the [TRIGGER OUT] button.
- Continue holding down the [BANK/TEMPO/SHUFFLE] and [TRIGGER OUT] buttons, and use [TAP] to choose "SOLO."
- Continue holding down the [BANK/TEMPO/SHUFFLE] and [TRIGGER OUT] buttons, and use [2]–[12] to select the instrument that you want to solo.
Copying a Pattern
- Continue holding down the [TAP] button during the copy operation. The operation is cancelled if you release the [TAP] button.
- Set the mode switch to either "1stPart" or "2ndPart."
- With the copy-destination pattern selected, hold down the [TAP] button.
- (Continuing to hold down the [TAP] button) Press a [1]--[16] button to select the copy-source pattern.
- (Continuing to hold down the [TAP] button) Press the [START/STOP] button to execute the copy.
Copying a Pattern Between A-B
- Set the mode switch to either "1stPart" or "2ndPart."
- With the pattern that you want to copy selected, hold down the [TAP] button.
- (Continuing to hold down the [TAP] button) Use the [VALUE] knob to make the display indicate "A-b" or "b-A."
- (Continuing to hold down the [TAP] button) Press the [START/STOP] button to execute the copy.
Recording or Playing a Rhythm Track
About composing
You can compose (assemble) a rhythm track by successively switching between rhythm patterns during playback.
About memory (storage)
A track does not store the actual rhythm patterns that are played. Instead, it contains the rhythm select switch numbers (basic rhythm, intro/fill-in) that are written in the rhythm patterns, the number of measures, and the order in which they are played; this data is stored for each measure.
During track play, you'll need to set the basic (or I/F) variation switch as it was when you composed the track.
Moving a measure
- Hold down the [START/STOP] button and press a [1]–[10] button to select the move-destination.
Press the [16] button to move the measure to the last measure. - Release the [START/STOP] button to confirm the operation.
You can also select the destination by turning the [FINE] (VALUE) knob.
Composing a Rhythm Track
Selecting/clearing a track
- From the stopped condition, set the mode switch to the rhythm track "COMPOSE" position.
- Set the select switch to the desired position.
- Press the [CLEAR] button.
Composing (when the compose mode is "OrG")
- Specify measure 1, and press the [START/STOP] button.
The rhythm starts. - While listening to the rhythm, switch between the BASIC RHYTHM [1]–[12] buttons (or the INTRO/FILL IN [1]–[4] buttons and [TAP] button).
- When the last measure to be composed has played, press the [START/STOP] button before that measure ends.
The rhythm stops. Even if the notes are interrupted, they have been stored to the end of the measure.
The measure at which you pressed the [START/STOP] button will be the last measure.
Editing a portion (measure) of a rhythm pattern that you composed
- Use the select switch to select a track, and press the [START/STOP] button.
- The moment that the measure that you want to edit is playing, switch to the rhythm pattern.
- To edit a fill-in rhythm, use the intro/fill-in switch to make the switch instead of using the [TAP] button.
- It's not possible to change only the number of measures in a composed rhythm pattern. If you want to change the number of measures, you must re-compose from the beginning.
Copying measures (Copy)
- Keep holding down the [TAP] button during the copy operation. The operation is cancelled if you release the [TAP] button.
- At the beginning of the copy-destination measure, hold down the [TAP] button.
The display indicates "![]() ."
."
Example: If you select measure 5, the data is pasted between measure 4 and measure 5. - (Continuing to hold down the [TAP] button) Press the [START/STOP] button, and select the starting measure of the copy-source.
The screen indicates the measure number.
Use the [1]–[10] buttons or the [VALUE] knob to make the selection.
Press the [16] button to move the measure to the last measure. - (Continuing to hold down the [TAP] button) Press the [START/STOP] button, and select the ending measure of the copy-source.
Use the [1]–[10] buttons or the [VALUE] knob to make the selection.
Press the [16] button to select the last measure. - (Continuing to hold down the [TAP] button) Press the [START/STOP] button to execute the copy operation.
 ."
."Inserting measures (Ins)
- Keep holding down the [TAP] button during the insert operation. The operation is cancelled if you release the [TAP] button.
- At the location where you want to insert measures, hold down the [TAP] button and turn the [FINE] (VALUE) knob to select "
![]() ".
".
Example: If you select measure 5, the data is inserted between measure 4 and measure 5. - (While continuing to hold down the [TAP] button) press the [START/STOP] button and select the insert-source measure.
The screen indicates the measure number.
Press one of the [1]–[10] buttons or turn the [FINE] (VALUE) knob to select the last measure that will be inserted.
Press the [16] button to move the measure to the last measure. - (Continuing to hold down the [TAP] button) Press the [START/STOP] button to execute the insert operation.
 ".
".Deleting measures (Del)
- Keep holding down the [TAP] button during the delete operation. The operation is cancelled if you release the [TAP] button.
- At the measure that you want to delete, hold down the [TAP] button and turn the [FINE] (VALUE) knob to select "
![]() "
" - (Continuing to hold down the [TAP] button) Press the [START/STOP] button to select the ending measure.
The screen indicates the measure number.
Press one of the [1]–[10] buttons or turn the [FINE] (VALUE) knob to select the last measure that will be deleted.
Press the [16] button to move the measure to the last measure. - (Continuing to hold down the [TAP] button) Press the [START/STOP] button to execute the delete operation.
 "
"Composing
(when the compose mode is " ")
")
- Select the track that you want to compose, and clear it.
⇒ "Selecting a position and clearing it" - Press the [START/STOP] button.
The rhythm starts. - Use the BASIC RHYTHM [1]–[12] buttons (or the INTRO/FILL IN [1]–[4] buttons) to select a rhythm pattern.
- Press the [TAP] button to advance the measure.
- Repeat steps 3–4.
- When you've entered the last measure that you want to compose, press the [START/STOP] button.
Playing a Rhythm Track
- Set the mode switch to rhythm track "PLAY."
- Set the basic variation switch to the position of the first measure.
- Press the [START/STOP] button.
- When the last measure has ended, press the [START/STOP] button.
Playback continues repeating until you stop it.
When you switch rhythm tracks
If you operate the select switch while a track is playing, the currently-playing rhythm pattern plays to its end, and then playback moves to the first measure of the newly selected track.
Menu Mode
- Press the [MENU] button.
- Use the [VALUE] knob to select an item.
- Press the [TAP] button.
Each time you press the [TAP] button, you'll switch between selecting an item and editing its value.
| Item (Parameter) | Value | Explanation | |||
 (COMP) |  | Adjusts the level of compression applied to BD and SD. | |||
 (GAIN) |  | Adjusts the gain. Use the [2]–[12] buttons to select the instrument. | |||
 (TUNE) |  | Adjusts the tuning (pitch) of each instrument. This can be set for BD, RS, CP, CB, OH, and CH. | |||
 (DECAY) | | Adjusts the decay length. This can be set for SD, LT, MT, HT, RS, CP, CB, and CH. | |||
 (PAN) |  | Adjusts the pan (left/right position) of each instrument. | |||
 (BD TYPE) |  | Selects the type of BD (Normal, Long Decay). | |||
 (HiHat Link) |  | If this is On, the settings of OH and CH (Tune and Level settings) are linked. When they are linked, the settings for CH are ignored. | |||
 (MIDI Channel) |  | Specifies the MIDI transmit/receive channel. | |||
 (MIDI clock source) |  | If MIDI clock is input from the MIDI IN connector or the USB port, the tempo automatically synchronizes to MIDI clock. If MIDI clock is input simultaneously from the MIDI IN connector and the USB port, the USB port takes priority. | |||
 | The tempo operates according to the TR-08's own setting. Use this setting if you don't want to synchronize with an external device. | ||||
 | The tempo synchronizes to MIDI clock being input from the MIDI IN connector. | ||||
 | The tempo synchronizes to MIDI clock being input from the USB port. | ||||
 (Soft Thru) | | Specifies whether data received from the MIDI IN connector will be retransmitted from the MIDI OUT connector (On) or will not be retransmitted (OFF). | |||
 (Auto off) |  | The power does not turn off automatically. | |||
 (min) (min) | The power turns off automatically after 30 minutes. * Auto Off does not occur while USB-connected. | ||||
 (LED demo) |  (min) (min) | Specifies the time until the unit enters LED demo mode. | |||
 (Compose mode) |  | Lets you record using the same operations as on the TR-808. In this mode, the measures will proceed when you start; record by switching patterns as the measures proceed. | |||
 | Lets you record using the same operations as on the TR-909. After starting, select a pattern. When you press the [TAP] button, the selected pattern is written to the current measure, and you proceed to the next measure. | ||||
 (Track Param) |  | Automatically recalls the tempo/shuffle settings when a track is selected. | |||
 (Level Curve) |  | Specifies the curve of the level knob. The level curve setting is applied when you operate the [LEVEL] knob after making this setting. | |||
 (USB MIX output) | | Specifies whether each instrument is output from USB MIX. Instruments for which the corresponding [2]–[12] button is blinked are output; instruments for which the button is lit are not output. | |||
 (Parallel Out) | | The output of the OUTPUT jack (stereo mini) is split between left and right channels, and the specified sounds are output via parallel output. Sounds for which you press the main keys ([2]–[12]) to make them blink while making this setting are output from the right channel, and sounds whose key is lit are output in parallel from the left channel. * If you want to output in stereo, make all buttons light (default). |
- Use the [VALUE] knob to edit the value.
- When you've finished making settings, press the [MENU] button to exit MENU.
Changing the Tempo
- Turn the [TEMPO] knob.
- Pressing the [BANK/TEMPO/SHUFFLE] button switches to the fine tempo setting. Pressing the knob again returns to the normal tempo setting.
Storing or Recalling the Tempo/Shuffle Settings
You can store the tempo and shuffle settings in the track.
Recalling Tempo/Shuffle
- With the mode switch set to "PLAY" or "COMPOSE," hold down the [BANK/TEMPO/SHUFFLE] button and press the [TAP] button.
- If Track Param is set to Auto, the settings are automatically recalled when the track is selected.
Storing Tempo/Shuffle
- With the mode switch set to "COMPOSE," hold down the [BANK/TEMPO/SHUFFLE] button and long-press [TAP].
Fixed Battery Operation Mode
This mode prevents the unit from switching to bus power even if it is connected to a USB port. This allows the unit to be used even with a USB port that does not supply power.
- While holding down the [9] button, turn on the power.
Main Specifications
Roland TR-08: Rhythm Composer
| Power Supply | Rechargeable Ni-MH battery (AA, HR6) x 4, Alkaline battery (AA, LR6) x 4, USB bus power |
| Current Draw | 500 mA (USB bus power) |
| Dimensions | 308 (W) x 130 (D) x 51 (H) mm 12-1/8 (W) x 5-1/8 (D) x 2-1/16 (H) inches |
| Weight | 1.3 kg (including batteries, Boutique Dock) 2 lbs 14 oz |
| Accessories | Boutique Dock: DK-01, Owner's Manual, DK-01 Owner's Manual, Leaflet "USING THE UNIT SAFELY," Alkaline battery (AA, LR6) x 4 |
- This document explains the specifications of the product at the time that the document was issued. For the latest information, refer to the Roland website.
Intellectual Property Right
The copyright of content in this product (the sound waveform data, style data, accompaniment patterns, phrase data, audio loops and image data) is reserved by Roland Corporation.
Purchasers of this product are permitted to utilize said content (except song data such as Demo Songs) for the creating, performing, recording and distributing original musical works.
Purchasers of this product are NOT permitted to extract said content in original or modified form, for the purpose of distributing recorded medium of said content or making them available on a computer network.

VideosRoland TR-08 Quick Start Demo Video
Roland TR-08 hidden features Video
Documents / Resources
References
Download manual
Here you can download full pdf version of manual, it may contain additional safety instructions, warranty information, FCC rules, etc.
Advertisement
Thank you! Your question has been received!


Need Assistance?
Do you have a question about the TR-08 that isn't answered in the manual? Leave your question here.