
Related Manuals for Extron electronics TouchLink TLP Pro 320C


Summary of Contents for Extron electronics TouchLink TLP Pro 320C
- Page 1 User Guide TouchLink ® TLP Pro 320C TouchLink Pro Touchpanel Control Systems 68-2516-01 Rev. A 07 15...
- Page 2 Safety Instructions Safety Instructions • English Инструкция по технике безопасности • Русский WARNING: This symbol, , when used on the product, is intended ПРЕДУПРЕЖДЕНИЕ: Данный символ, , если указан to alert the user of the presence of uninsulated dangerous voltage на...
- Page 3 Risque d’explosion. Ne pas remplacer la pile par le mauvais type de pile. Débarrassez-vous des piles utilisées selon le mode d’emploi. Copyright © 2015 Extron Electronics. All rights reserved. Trademarks All trademarks mentioned in this guide are the properties of their respective owners.
- Page 4 Conventions Used in this Guide Notifications In this user guide, the following are used: Potential risk of severe injury or death. WARNING: AVERTISSEMENT : Risque potentiel de blessure grave ou de mort. CAUTION: Risk of minor personal injury. Risque de blessure mineure. ATTENTION : ATTENTION: •...
-
Page 5: Table Of Contents
Contents Introduction Setup Menu ............1 ............21 About the TLP Pro 320C .........1 Status Screen ............22 Features ..............2 Network Screen ............23 Application Diagram ..........3 Display Screen ............26 Requirements ............3 Audio Screen ............27 Software .............3 Advanced Screen ..........28 Hardware ............3 Calibration Screen ..........29 Installation Overview Configuration Software... - Page 6 TLP Pro 320C • Contents...
-
Page 7: Introduction
Introduction This guide describes the function, installation, and operation of the Extron TLP Pro 320C TouchLink Pro Touchpanel. Unless otherwise stated, the terms “TLP Pro” and “touchpanel” refer to the TLP Pro 320C. The TLP Pro 320C is ideal for any AV application requiring a compact, Cable Cubby touchpanel with a fully customizable interface. -
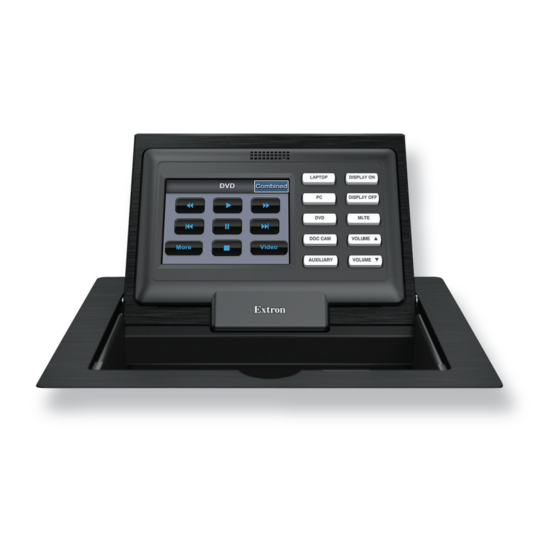
Page 8: Features
Features 3.5 inch flip-up LCD touchscreen — with 320x240 resolution and 18-bit color depth. Faster processing and more memory — allows for quicker configuration uploads and more storage for GUI pages. Ten customizable backlit buttons Compatible with the full range of Extron IPL Pro and IPCP Pro control processors — allows easy integration into existing systems. -
Page 9: Application Diagram
Application Diagram This diagram shows a typical application for the TLP Pro 320C touchpanel. RS-232 MODEL 80 OVER DTP Extron RS-232 Tx Rx Tx Rx DTP HDMI 330 Rx DTP HDMI 330 Rx LINK OUTPUTS POWER AUDIO 0.7A MAX Receiver DTP IN HDMI FLAT PANEL... -
Page 10: Installation Overview
Installation Overview Before starting, download and install the latest versions of the following software: GUI Designer — for designing layouts for Extron TouchLink Pro touchpanels and third party touch interfaces. Global Configurator Plus and Professional — for setting up and configuring the control processor and touchpanel. - Page 11 Connect cables to the touchpanel. The unit can be powered using a 12 VDC power supply or a Power over Ethernet (PoE) power injector. If required, connect the power supply (see Power Connector on page 17). Network and Power over Ethernet Connector Connect the network cable (see page 19).
-
Page 12: Mounting
Mounting This section describes how to mount the TLP Pro 320C Cable Cubby. It covers: • Planning • Tools Required for Installation • Included Parts • Ensure Adequate Under-table Clearance for Retractors • Cutting the Table • Running Cables • Installing Cable Retractors (Optional) •... -
Page 13: Tools Required For Installation
Tools Required for Installation Square Safety Glasses Vacuum Cleaner Marking Pen Phillips Screw Driver 1/4" Hex Nut Driver Tape Measure Figure 2. Tools Required to Install the TLP Pro 320C Included Parts Open the shipping container and verify that all the following components are present: Pass-thru AAPs Blank AAPs Table Clamps... -
Page 14: Ensure Adequate Under-Table Clearance For Retractors
Ensure Adequate Under-table Clearance for Retractors Retractors are optional accessories for handling cables with the TLP Pro 320C. If you are using retractors, ensure that there is sufficient room beneath the table to accommodate them. Horizontal mounting provides maximum legroom and protects the retractors from accidental damage. - Page 15 ATTENTION: • The opening in the table for the Cable Cubby should be cut only by licensed and bonded craftspeople. Exercise care to prevent scarring or damaging the furniture. • L’ouverture dans la table pour le Cable Cubby devrait être coupée seulement par des artisans autorisés et qualifiés.
-
Page 16: Running Cables
Running Cables Run all cables necessary to support the AC connector, the cables stored in the cubby, and all planned AAP connectors. Run the cables below the table and through the hole that was cut (Cutting the Surface). Leave enough slack in the cables to connect or in the previous step route them before the cubby is installed in the table. -
Page 17: Installing Power Modules (Optional)
Installing Power Modules (Optional) WARNING: AVERTISSEMENT : • Switch off all electrical power before connecting the AC conduit to a junction box, and keep power off until installation is complete. • Débranchez toutes les sources d’alimentation électrique avant de connecter le conduit d’alimentation à... -
Page 18: Preparing And Installing The Aap Assemblies
Preparing and Installing the AAP Assemblies The AAP assembly organizes the AAPs onto a frame that can easily be inserted or removed from the TLP Pro 320C enclosure. Pass-through and blank AAP plates are provided with the TLP Pro 320C. Active or passive AAPs must be purchased separately. For the complete range of available AAPs, see www.extron.com. -
Page 19: Inserting The Aap Assemblies
Attach the AAP loosely to the bracket with the supplied #4-40 captive washer nuts. NOTE: At this time, captive washer nuts should be hand tightened; otherwise it is difficult to attach the brackets to the frame of the TLP Pro 320C (see Inserting the AAP Assemblies below). -
Page 20: Mounting The Tlp Pro 320C Enclosure
Mounting the TLP Pro 320C Enclosure Mount the cable cubby enclosure in the table. CAUTION: The flanged edges of the top of the surface enclosure are sharp. These edges are also soft and may be easily nicked or bent. Exercise caution when handling the enclosure to prevent personal injury or damage to the enclosure. -
Page 21: Panel Features
Panel Features This section discusses: • Front Panel Features • Connectors Front Panel Features With the lid open, remove the front panel bezel, as shown in figure 10, using the Extron removal tool. Insert the removal tool in the slot about one inch from the top corner and loosen the bezel away from the screen. - Page 22 Figure 9 Figure 11 A A B B E E F F G G Figure 11. TLP Pro 320C Front Panel with Bezel Removed With the lid down, the ambient light sensor (figure 11, ), the LCD screen ( ), and illumination LED ( , below right) are disabled.
-
Page 23: Connectors
Connectors The cable connections are located in a panel on the bottom of the TLP Pro 320C: Power Connector LAN/PoE Figure 12. Cable Connectors for TLP Pro 320C The TLP Pro 320C can use a 12 VDC desktop power supply and is also Power over Ethernet (PoE 802.3af, class 3) compliant. - Page 24 ATTENTION: • Always use a power supply provided by or specified by Extron. Use of an unauthorized power supply voids all regulatory compliance certification and may cause damage to the supply and the end product. • Utilisez toujours une source d’alimentation fournie ou recommandée par Extron. L’utilisation d’une source d’alimentation non autorisée annule toute conformité...
-
Page 25: Network And Power Over Ethernet Connector
Network and Power over Ethernet Connector Connect the TLP Pro 320C to the LAN using a twisted pair cable, terminated with an RJ-45 connector. Use a straight-through Ethernet cable to connect the panel to a switch or router. Use a crossover cable to connect the panel directly to a computer. An Extron IPL Pro Control Processor must also be connected to the same network domain as the TouchLink Touchpanel. - Page 26 ATTENTION: • The TLP Pro 320C is intended for connection to a Power over Ethernet circuit for intra-building use only and are considered to be part of a Network Environment 0 per IEC TR62101. • Le TLP Pro 320C est conçu pour une connexion à un circuit PoE pour une utilisation intérieure seulement et est considéré...
-
Page 27: Setup Menu
Setup Menu When the TLP Pro 320C is powered on, the currently loaded project is displayed. To access the setup menu, remove the front panel bezel and press the button (see figure Menu on page 16). There are five available screens: •... -
Page 28: Status Screen
Status Screen This screen opens by default. To access the screen from any other part of the Setup Status menu, press the icon in the top left corner and then press the button. Menu Status The image below shows the entire screen. -
Page 29: Network Screen
Network Screen The image below shows the entire screen. Because of size of the touchscreen, you Network can only see part of the screen at any time. Flick the touchscreen with your finger to navigate up or down within the screen. Network Revert Apply... - Page 30 Edit the IP address by pressing the appropriate text box on the Network screen. A numeric keypad opens with the current IP address displayed ( IP Address 192.168.254.251 Cancel Figure 18. Numeric Keyboard To delete the entire existing number, press the white circle with an X ( To delete individual digits, use the backspace key ( Enter the IP address by pressing the numbered keys.
- Page 31 If you set DHCP to in step 1, you cannot edit the IP Address Subnet Mask , or values. However, you can edit the Gateway DNS Server Hostname The default is formed from the product name and the last three pairs of digits in Hostname the MAC address.
-
Page 32: Display Screen
Display Screen The image below shows the entire screen. Because of size of the touchscreen, you Display can only see part of the screen at any time. Flick the touchscreen with your finger to navigate up or down within the screen. Exit Display Resolution... -
Page 33: Audio Screen
Audio Screen The image below shows the entire screen. Because of size of the touchscreen, you can Audio only see part of the screen at any time. Flick the touchscreen with your finger to navigate up or down within the screen. Exit Audio MASTER - 99... -
Page 34: Advanced Screen
Advanced Screen The image below shows the entire screen. Because of size of the touchscreen, you Advanced can only see part of the screen at any time. Flick the touchscreen with your finger to navigate up or down within the screen. Exit Advanced PRIMARY CONTROLLER... -
Page 35: Calibration Screen
Press the slider to enable PIN use. The Enter New PIN numeric keypad opens: Enter New PIN Cancel Figure 23. Numeric Keypad for Setting PIN Set the PIN. The PIN is a 4-digit number. Each digit can have any value from . -
Page 36: Configuration Software
Configuration Software This section of the user guide provides information about: • Configuration Software • TLP Pro 320C Web Page • Updating the Firmware Configuration Software Use Toolbelt to provide device information, firmware updates, and configuration of network settings, system utilities (reset, reboot), and user management (username and password) for TouchLink Pro devices. -
Page 37: Installing Gui Designer, Global Configurator, And Toolbelt
Installing GUI Designer, Global Configurator, and Toolbelt NOTE: Use GUI Designer and Global Configurator Plus and Professional to configure the TLP Pro 320C. GUI Designer, Global Configurator Plus and Professional, and Toolbelt can be downloaded from www.extron.com. Select the tab ( ) and click the ) option in Download Software... -
Page 38: Using The Software
Using the Software Use the appropriate software help file for step-by-step instructions and more detailed information. The Global Configurator Help File also includes an introduction to the software and sections on how to start and configure a project. GUI Designer Use the GUI Designer software to design the screen layout for the touchpanel. -
Page 39: Updating Firmware
Updating Firmware Firmware for the TLP Pro 320C can be upgraded in one of two ways: • Updating Firmware Using the Touchpanel Web Page (see below) • Updating Firmware Using Toolbelt (see below) Before starting, consult your IT team and ensure that the touchpanel has a unique IP address. Downloading Firmware Power on a computer that is connected to the same network as the touchpanel. -
Page 40: Reference Material
Reference Material This section describes: • Network Port Requirements • Reset Modes • Configurable Buttons • Licensed Third-Party Software Used in the Touchpanels Network Port Requirements Network administrators may find it useful to know which ports, protocols, and services are used by the IP Link Pro control processors, TouchLink Pro Touchpanels, Global Configurator Plus and Professional software with Toolbelt, and TouchLink for iPad (for IP Link Pro control sytems). -
Page 41: Touchlink Pro Touchpanels
TouchLink Pro Touchpanels Ports and Protocols for Control Processors Inbound/ Port Protocol Service Description Outbound Inbound HTTP Port redirects to HTTPS Outbound NTP service Inbound HTTPS Default Web pages, TouchLink for Web Inbound/ 4502 Discovery Broadcast network discovery Outbound Inbound/ 4503 Internal system messaging Outbound... -
Page 42: Reset Modes
Reset Modes The TLP Pro 320 C touchpanel has three reset modes: • Use Factory Firmware (see below). • Reset All IP Settings (see page 36). • Reset to Factory Defaults (see page 36). To initiate these modes, press the button, which is found on the front panel after Reset figure... -
Page 43: Reset All Ip Settings
Reset All IP Settings Purpose Reset All IP Settings mode enables you to reset IP settings and port maps to factory defaults. Activation To reset all IP settings: Hold down the button for about 6 seconds until the Reset LED blinks twice (once Reset at 3 seconds, again at 6 seconds). -
Page 44: Installing Or Replacing Buttons
Installing or Replacing Buttons The TLP Pro 320C has ten dedicated, customizable function buttons to provide quick access to key functions. The buttons must be associated with their function by configuring them with Global Configurator Plus or Professional (see the Global Configurator Help File). The unit ships with the following default set of buttons installed: Laptop Display On... -
Page 45: Licensed Third-Party Software Used In The Touchpanels
Licensed Third-Party Software Used in the Touchpanels The touchpanels use various licensed third-party software packages during operation. To view details about third-party packages and associated licensing, click the License Information TLP Pro 320C Web page button on the (see on page 32). To view a copy of a listed package license, in the License Information window, click the link in the License column for the relevant package. - Page 46 Extron Electronics makes no further warranties either expressed or implied with respect to the product and its quality, performance, merchantability, or fitness for any particular use. In no event will Extron Electronics be liable for direct, indirect, or consequential damages resulting from any defect in this product even if Extron Electronics has been advised of such damage.