
Related Manuals for Korg Pa5X


Summary of Contents for Korg Pa5X
- Page 1 Pa5X QUICK GUIDE PRISE EN MAIN SCHNELLSTART GUIDA RAPIDA GUÍA RÁPIDA 快速入门指南 MAN0010152...
- Page 3 ENGLISH...
-
Page 4: Important Safety Instructions
Important safety instructions ▪ ▪ Read these instructions. Unplug this apparatus during lightning storms or when unused for long periods of ▪ Keep these instructions. time. ▪ Heed all warnings. ▪ Refer all servicing to qualified service per- ▪ Follow all instructions. sonnel. - Page 5 WARNING – Do not ingest bat- tery, chemical burn hazard. This product contains a coin/button cell battery. If the coin/button cell battery is swallowed it can cause severe internal burns in just 2 hours and can lead to death. Keep new and used batteries away from chil- dren.
-
Page 6: Other Notices
Windows are registered trademarks of Automatic power-off Microsoft Corporation. Waves MaxxAudio® is a To avoid wasting power, Pa5X will by default au- trademark of Waves Audio Ltd. All other trade- tomatically enter standby mode after two hours marks or registered trademarks are the prop- of non-active use (playing, pressing buttons or erty of their respective holders. - Page 7 61-note semi-weighted keyboards, are designed for a completely authentic feel and full control of expression. Robust and reliable, Pa5X is excellent as a live instrument, but it is also a pow- erful creative tool in studio, helping you in writing songs or soundtracks, while generating a produced sound that makes the perfect demo or ready-to-use me- dia music.
- Page 8 And the Vocal Remover will let you sing along with any MP3 Song. There is more, much more, and we invite you to explore Pa5X in depth. Pa5X is the most evocative, powerful, easy-to-use complete Professional Arranger ever...
- Page 9 Before starting to play… |7 Before starting to play… What’s in the box After you get your Pa5X, please check that all the listed items are included in the package. If any of them is missing, please contact your KORG dealer imme- diately.
-
Page 10: Making A Safety Copy Of Your Data
You can download the most up-to-date operating system from our web site (www.korg.com/us/support/download/). Please, read the instructions supplied with the operating system. You can see which version of the operating system is installed in your Pa5X by going to the File... -
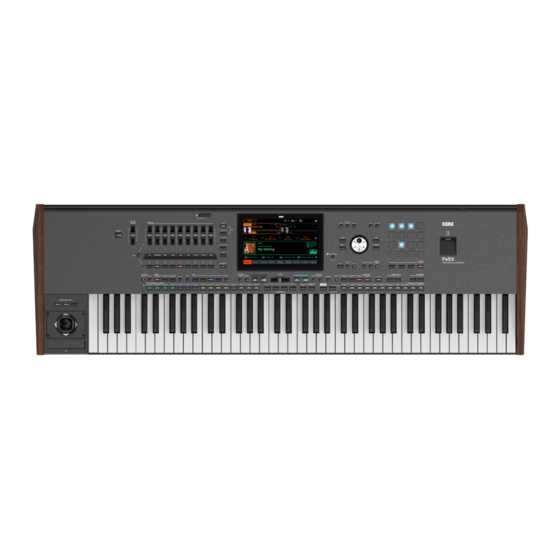
Page 11: The Front Panel
The front panel The front panel is where you can find the instrument’s controls. Music stand A music stand is included with your Pa5X. PaAS amplification system You can install the (optional) PaAS amplification system. When installed, control the output volume of the speakers via the MASTER VOLUME slider. - Page 12 10| Overview of the instrument Guide for the music stand and PaAS amplification system Headphones Keyboard...
-
Page 13: The Control Panel
The control panel |11 The control panel The control panel is the part of the front panel where you can find the instru- ment’s controls. Tempo area Sliders and switches area Display Navigation area The Matrix Players area Styles, Pads and Sounds area Markers area Display... - Page 14 12| Overview of the instrument Navigation area Use these controls to go through the menus, pages and parameters, and change the value of the selected parameter . Sounds area Sounds are what you can play on the keyboard. Here you can choose Sound sets saved as Keyboard Sets in a dedicated library.
- Page 15 The control panel |13 Players area Styles and Songs can be played back by the two onboard Players. You can assign different elements to each Player, to have another Style or Song ready to play at the end of the current one. You can mix the two Players with the X-FADER. SongBook area The SongBook is a database of ‘songs’, called SongBook Entries.
- Page 16 14| Overview of the instrument The Matrix You can use this programmable matrix of big, easy accessible keys to trigger ele- ments and functions (Pads, Chord Sequences, Track Play/Mute, etc.). USB connector Use this socket (that will appear as HOST-F) to connect an USB memory device, like an USB pendrive, or other musical instruments to be used as controllers.
-
Page 17: The Rear Panel
The rear panel |15 The rear panel The rear panel is where you can find the various connections. Guide for the music stand and PaAS amplification system Connectors Power connector Audio inputs Use these connectors to connect a microphone, a guitar or another musical in- strument. - Page 18 MIDI ports Use these ports to connect Pa5X to external controllers (master keyboard, MIDI guitar, wind controller, MIDI accordion, MIDI pedalboard…), to a series of expand- ers, or to a computer with a MIDI interface.
- Page 19 HOST socket (HOST-F) is available on the front panel. Video out Connect Pa5X to a TV or video monitor, to read lyrics and chords on a bigger display. Power connector Use this socket to plug in the supplied IEC power cable.
- Page 20 18| Overview of the instrument Plug the other end of the cable to an AC power outlet. Be sure to use a compat- ible plug. Never force the plug into the socket! WARNING: Connect the plug to an AC socket of matching voltage! Please read the safety information at the beginning of this manual.
-
Page 21: Connecting The Pedals
PEDAL > DAMPER connector to connect a damper pedal, like the (op- tional) KORG PS-1, PS-3 or DS-1H. The DS-1H pedal supports all the nuances of half-pedaling on some acoustic piano sounds. You can experiment how it works by gradually pressing it down, and gradually releasing it, while playing the Concert Grand Sound. - Page 22 20| Setting up the pedals and the audio connections What if the pedals do not behave correctly? If needed, you might have to calibrate the pedals to use their full range of values, without any ‘dead spot’. Also, this procedure allows to choose a pedal’s polarity, in case you are using a pedal working in reverse.
- Page 23 Connecting the pedals |21 When the following dialog appears, release the pedal. Touch the lower (now highlighted) button in the display to confirm the mini- mum value. Check if the pedal is working properly. In case it isn’t, repeat the procedure.
-
Page 24: Turning The Instrument On
22| Powering up Powering up Turning the instrument on Connecting the power cable Plug the supplied power cable into the POWER socket on the back of the instru- ment, and the cable plug into a wall power socket. When the cable is connected, the instrument is in standby. WARNING: When the instrument is in standby, it is still connected to the power line. -
Page 25: Tilting The Display
Tilting the display |23 Tilting the display For optimal visibility under any seating position, the display’s tilt angle can be adjusted. Lifting the display Press the UNLOCK button to unlatch the display. Keep the UNLOCK button pressed, and lift the display. Open the safety bracket by detaching it from the top back of the display. - Page 26 24| Powering up While still keeping the UNLOCK button pressed, adjust the tilt angle, and fix the bracket to one of the stops in the bottom of the display housing. CAUTION: Do not apply excessive pressure, or you risk to break it! Release the UNLOCK button to fix the display to the current position.
-
Page 27: Closing The Display
Tilting the display |25 Closing the display Keep the UNLOCK button pressed, and lift the display. Lift the safety bracket, and put it back to the closed position. Still keeping the UNLOCK button pressed, accompany the display down to its housing. Release the UNLOCK button, and gently press the center of the top border... -
Page 28: Adjusting The Display Brightness
26| Powering up Adjusting the display brightness The display brightness can be adjusted to match the ambient’s light. > Keep the SHIFT and MENU buttons pressed, and use the DIAL to adjust the display brightness. You can also adjust the display (and the strip display) brightness in the Settings >... -
Page 29: Listening To The Demo Songs
Listening to the Demo Songs |27 Listening to the Demo Songs You can listen to some songs we prepared, to let you understand what this in- strument can do. > Access the Demo mode > Press the DEMO buttons together. >... - Page 30 28| Choosing and playing the musical resources Choosing and playing the musical resources Opening a Select window When you press the STYLE, SONG, or one of the KEYBOARD SET LIBRARY but- tons, the corresponding Select window appears. Select window can also be opened by touching the name of the correspond- ing element (Style, Song, Keyboard Set, Mic or Guitar Preset…) in the display.
- Page 31 Opening a Select window |29 For example, this is the Select window when browsing for a Keyboard Set: Groups Type Selected Keyboard Set Upper level (folders Current Pages Lower level (individual corresponding to Categories) directory elements) If you are lost while browsing though the data, you can return to the folder con- taining the selected element by touching the Locate ( button.
- Page 32 30| Choosing and playing the musical resources Choosing your preferred Keyboard Set Choosing the ‘My Setting’ Keyboard Set > Press the MY SETTING button to choose your preferred sounds. The My Setting Keyboard Set My Setting is a special Keyboard Set, where you can save your preferred set- tings for things like Keyboard sounds, effects, control sliders and switches, the assignable switches.
- Page 33 Playing and controlling the sound |31 Playing and controlling the sound Playing the keyboard The instrument’s keyboard is like a piano keyboard. Just play it! With some Sounds, you can press the keys while they are down, and the sound might vary (for example, you might hear more vibrato).
-
Page 34: Using The Joystick
32| Choosing and playing the musical resources Using the Matrix The Matrix of programmable buttons can do several different things (triggering Pads, Chord Sequences, Track Play/Mute, etc.). Touch one or more of them to select the desired function. If they are on/off switches, touch them again to turn them off. - Page 35 Starting and stopping the Styles |33 Starting and stopping the Styles You can manually start and stop the automatic accompaniment, by using the controls in the PLAYER 1 PLAYER 2 section. Stop/ Play/Stop Go to Start > Set the right mix >...
- Page 36 34| Choosing and playing the musical resources > Stop the accompaniment > Press the PLAY/STOP button again. > As an alternative, you can presse the STOP/GO TO START ( ) button. > Start and stop both Players at the same time You can start both Players at the same time, to mix them with the X-FADER while...
- Page 37 Starting, stopping and controlling the Songs |35 Starting, stopping and controlling the Songs You can manually start and stop the Songs, by using the controls in the PLAYER PLAYER 2 section. Stop/ Play/Stop Go to Start > Set the right mix >...
- Page 38 36| Choosing and playing the musical resources With an MP3 Song: File path In Play: Remaining time Tempo variation Elapsed time Fast Rewind/Fast Forward controls In Stop: Total song length > Fast Forward the Song > Touch the FAST FORWARD ( button once to jump to the next measure (MIDI Song) or to the next second (MP3 Song).
- Page 39 Starting, stopping and controlling the Songs |37 > Start and stop both Players at the same time You can start both Players at the same time, to mix them with the X-FADER while playing. > Keep the SHIFT button pressed, and press any of the two PLAY/STOP buttons to start both Players at the same time.
- Page 40 A deterioration that DECLARATION OF CONFORMITY (FOR USA) might arise can be a sound signal emitted. Responsible Party: KORG USA INC. This will stop when the electromagnetic dis- turbance ceases. Address: 316 SOUTH SERVICE ROAD, MELVILLE...
- Page 41 FRANÇAIS...
-
Page 42: Consignes Importantes De Sécurité
Consignes importantes de sécurité ▪ ▪ Veuillez lire ces consignes. Débranchez cet appareil en cas d’orage ou s’il doit rester inutilisé durant une période ▪ Conservez ces consignes. assez longue. ▪ Tenez compte de tous les avertissements. ▪ Pour tout dépannage ou entretien, veuillez ▪... - Page 43 AVERTISSEMENT – La pile ne peut pas être ingérée: il y a risque de brûlures par produits chimiques. Ce produit contient une pile bouton. L’ingestion de la pile bouton peut provoquer de très graves brûlures internes en 2 heures à peine pouvant entraîner le décès de la per- sonne.
-
Page 44: Autres Remarques
Google Inc. MS-DOS et Windows sont des Coupure d’alimentation automatique marques déposées de Microsoft Corporation. Pour économiser l’énergie, le Pa5X se met auto- Waves MaxxAudio® est une marque commer- matiquement hors tension (en veille) après deux ciale de Waves Audio Ltd. Les autres marques heures d’inactivité... - Page 45 époques et cultures ainsi que la place nécessaire pour vos propres ajouts. Le Pa5X est facile à jouer grâce au système Pa5X KORG (DNC) qui permet au musicien d’introduire de subtiles nuances et articulations sonores d’une grande expressivité.
- Page 46 La fonction “Vocal Remover” vous permet de chanter vous-même sur des morceaux MP3. Pour découvrir tout le reste, nous vous invitons à explorer le Pa5X en profon- deur. Le Pa5X est l’arrangeur professionnel le plus évocateur, le plus puissant, le plus simple à...
-
Page 47: Contenu Du Carton
MIDI. Options Après l’achat du Pa5X, vous pouvez y ajouter les options suivantes: > L’élégant pied de clavier KORG ST-SV1-BK, recommandé pour votre sécurité... - Page 48 Cette opération écrase toutes les données utilisateur! Charger le système d’exploitation Votre Pa5X peut être mis à jour avec les nouvelles versions du système d’exploi- tation. Vous pouvez télécharger le système d’exploitation le plus récent de notre site web (www.korg.com/us/support/download/). Veuillez lire les instructions accompagnant le système d’exploitation.
- Page 49 Façade La façade abrite les commandes de l’instrument. Pupitre Votre Pa5X est livré avec un pupitre. Système d’amplification PaAS Le système d’amplification PaAS est disponible en option. S’il est installé, vous pouvez régler le volume des haut-parleurs avec le curseur MASTER VOLUME.
- Page 50 10 | Aperçu de l’instrument Guide pour pupitre et système d’amplification PaAS Casque Clavier...
-
Page 51: Panneau De Commandes
Panneau de commandes | 11 Panneau de commandes Le panneau de commandes de l’instrument permet de l’exploiter. Tempo Curseurs et commutateurs Ecran Navigation Matrice Lecteurs Zone de Styles, pads et Sons marqueurs Ecran Touchez l’écran tactile pour interagir avec l’instrument. L’écran peut être incliné pour une lisibilité... - Page 52 12 | Aperçu de l’instrument Zone de navigation Ces contrôleurs permettent de naviguer dans les menus, les pages et les para- mètres ainsi que de changer le réglage du paramètre sélectionné. Zone de sons Les sons correspondent à ce que vous entendez quand vous jouez sur le clavier. Vous pouvez sélectionner des séries de sons sauvegardées sous forme de “Key- board Sets”...
- Page 53 Panneau de commandes | 13 Zone des lecteurs Les deux lecteurs internes peuvent reproduire des morceaux et des Styles. Vous pouvez assigner différents éléments à chaque lecteur pour pouvoir lancer direc- tement un autre Style ou morceau à la fin de celui en cours. Vous pouvez mixer les deux lecteurs avec le X-FADER.
- Page 54 14 | Aperçu de l’instrument Matrice Vous pouvez utiliser cette matrice programmable constituée de grands boutons facilement accessibles pour déclencher des éléments et des fonctions (pads, suites d’accords, réglage Play/Mute d’une piste etc.). Prise USB Utilisez cette prise (HOST-F) pour brancher un support de mémoire USB comme une clé...
-
Page 55: Panneau Arrière
Panneau arrière | 15 Panneau arrière Le panneau arrière permet d’effectuer diverses connexions. Guide pour pupitre et système d’amplification PaAS Prises Prise d’alimentation Entrées audio Utilisez ces prises pour brancher un microphone, une guitare ou un autre instru- ment. Le mini-jack STEREO permet de brancher directement la sortie audio d’un lecteur multimédia, d’un smartphone ou d’une tablette. - Page 56 Prises MIDI Ces prises MIDI permettent de relier le Pa5X à des contrôleurs externes (clavier maître, guitare MIDI, contrôleur à vent, accordéon MIDI, pédalier MIDI…), à une série d’expandeurs ou à un ordinateur avec interface MIDI.
- Page 57 HOST2-R). Une autre prise HOST (HOST-F) est disponible en façade. Sortie vidéo Branchez le Pa5X à un écran TV ou vidéo pour afficher les paroles et les accords sur grand écran. Prise d’alimentation Branchez le câble d’alimentation IEC fourni à cette prise.
- Page 58 18 | Aperçu de l’instrument Branchez l’autre extrémité du câble à une prise secteur. Veillez à utiliser une fiche compatible. Ne forcez jamais une fiche dans une prise! AVERTISSEMENT: Branchez la fiche à une prise secteur ayant une tension adé- quate! Veuillez lire les informations relatives à...
- Page 59 PEDAL > DAMPER peut accueillir une pédale de maintien (sustain) comme la KORG PS-1, PS-3 ou DS-1H. La pédale DS-1H détecte toutes les nuances de jeu de pédale restituées avec certains sons de piano acoustique. Vous pouvez tester son fonctionnement en la pressant progressivement puis en la relâchant...
- Page 60 20 | Configuration des pédales et connexions audio Que faire si une pédale ne fonctionne pas correctement? Il peut être nécessaire de calibrer les pédales pour exploiter toute leur course sans “points morts”. Cette procédure permet aussi de choisir la polarité de la pédale au cas où...
- Page 61 Connexion de pédales | 21 Quand la fenêtre suivante apparaît, relâchez la pédale. Touchez le bouton (éclairé à son tour) pour confirmer la valeur mini- mum. Vérifiez si la pédale fonctionne correctement. Si ce n’est pas le cas, recom- mencez cette procédure. Appuyez sur le bouton EXIT pour retourner à...
-
Page 62: Mise Sous Tension De L'instrument
22 | Mise sous tension Mise sous tension Mise sous tension de l’instrument Connexion du câble d’alimentation Branchez le câble d’alimentation fourni à la prise POWER en face arrière ainsi qu’à une prise secteur. Quand le câble est branché, l’instrument est en veille. AVERTISSEMENT: Quand l’instrument est en veille, il reste branché... - Page 63 Incliner l’écran | 23 Incliner l’écran Pour une visibilité optimale dans n’importe quelle position assise, vous pouvez régler l’inclinaison de l’écran. Soulever l’écran Appuyez sur le bouton UNLOCK pour déverrouiller l’écran. Maintenez le bouton UNLOCK enfoncé et soulevez l’écran. Déployez la béquille de sécurité en la détachant de la partie haute de l’ar- rière de l’écran.
- Page 64 24 | Mise sous tension Tout en maintenant le bouton UNLOCK enfoncé, réglez l’inclinaison de l’écran et fixez la béquille dans l’une des séries d’encoches pratiquées dans le logement de l’écran. ATTENTION: N’exercez pas de pression excessive: cela risquerait de l’endom- mager! Relâchez le bouton UNLOCK...
- Page 65 Incliner l’écran | 25 Abaisser l’écran Maintenez le bouton UNLOCK enfoncé et soulevez l’écran. Soulevez la béquille de sécurité et rabattez-la. Maintenez toujours le bouton UNLOCK enfoncé et abaissez l’écran dans son logement. Relâchez le bouton UNLOCK et appuyez doucement sur le centre du bord supérieur de l’écran pour le verrouiller en position initiale.
-
Page 66: Régler La Luminosité De L'écran
26 | Mise sous tension Régler la luminosité de l’écran Vous pouvez régler la luminosité en fonction de la lumière ambiante. > Maintenez les boutons SHIFT et MENU enfoncés et actionnez la molette pour régler la luminosité de l’écran. Vous pouvez aussi régler la luminosité de l’écran (et des affichages de com- mande) à... - Page 67 Ecouter des morceaux de démonstration | 27 Ecouter des morceaux de démonstration Vous pouvez écouter quelques morceaux de démonstration pour découvrir les possibilités de cet instrument. > Passer en mode Demo > Appuyez simultanément sur les boutons DEMO. > Ecouter tous les morceaux de démonstration >...
- Page 68 28 | Choisir et écouter les ressources musicales Choisir et écouter les ressources musicales Ouvrir une fenêtre de sélection Avec une pression sur le bouton STYLE, SONG ou un des boutons KEYBOARD LIBRARY, vous ouvrez la fenêtre de sélection correspondante. fenêtre de sélection peut aussi être ouverte en touchant le nom de l’élé- ment correspondant (Style, morceau, Keyboard Set, voix, preset de guitare etc.)
- Page 69 Ouvrir une fenêtre de sélection | 29 A titre d’exemple, la fenêtre de sélection suivante permet de sélectionner un Keyboard Set: Groupes Type Keyboard Set selectionné Niveau supérieur (dossiers Répertoire Pages Niveau inférieur correspondant aux catégories) actuel (éléments individuels) Vous pouvez toujours quitter cette fenêtre d’une pression sur le bouton EXIT en touchant la commande Exit...
- Page 70 30 | Choisir et écouter les ressources musicales Choisir votre série de sons favorite Choisir le Keyboard Set ‘My Setting’ > Appuyez sur le bouton MY SETTING pour choisir vos sons favoris. Keyboard Set ‘My Setting’ My Setting est un Keyboard Set (série de sons) spécial dans lequel vous pouvez sauvegarder vos réglages initiaux favoris pour les sons de clavier, les effets, les commutateurs et curseurs de contrôle, les commutateurs assignables etc.
- Page 71 Utiliser et piloter des sons | 31 Utiliser et piloter des sons Jouer sur le clavier Le clavier de l’instrument est comme un clavier de piano: il suffit de jouer dessus! Avec certains sons, une pression supplémentaire sur les touches modifie le son (en accentuant le vibrato, par exemple).
- Page 72 32 | Choisir et écouter les ressources musicales Utiliser la matrice La matrice de boutons programmables peut avoir différentes fonctions (déclen- chements de pads ou de suites d’accords, activation/coupure de piste etc.). Tou- chez-en un ou plusieurs pour activer la fonction voulue. S’ils agissent comme boutons on/off, touchez-les de nouveau pour les couper.
- Page 73 Lancer et arrêter des Styles | 33 Lancer et arrêter des Styles Vous pouvez lancer et arrêter manuellement l’accompagnement automatique en utilisant les commandes de la section PLAYER 1 PLAYER Stop/ Play/Stop Go to Start > Régler le mixage > Vérifiez que le X-FADER est à...
- Page 74 34 | Choisir et écouter les ressources musicales > Lancer les deux lecteurs simultanément Vous pouvez lancer les deux lecteurs simultanément et les mélanger avec le X-FADER durant la lecture. > Maintenez le bouton SHIFT enfoncé et appuyez sur un des deux boutons PLAY/STOP pour lancer les deux lecteurs simultanément.
- Page 75 Lancer, arrêter et piloter les morceaux | 35 Lancer, arrêter et piloter les morceaux Vous pouvez lancer et arrêter manuellement les morceaux en utilisant les com- mandes de la section PLAYER 1 PLAYER Stop/ Play/Stop Go to Start > Régler le mixage >...
- Page 76 36 | Choisir et écouter les ressources musicales Morceau MP3: Hiérarchie En lecture: Temps résiduel Variation de Temps écoulé Recul/avance rapide A l’arrêt: Longueur totale du tempo morceau > Avance rapide dans le morceau > Appuyez une fois sur le bouton FAST FORWARD ( pour sauter à...
- Page 77 Lancer, arrêter et piloter les morceaux | 37 > Lancer les deux lecteurs simultanément Vous pouvez lancer les deux lecteurs simultanément et les mélanger avec le X-FADER durant la lecture. > Maintenez le bouton SHIFT enfoncé et appuyez sur un des deux boutons PLAY/STOP pour lancer les deux lecteurs simultanément.
- Page 78 En cas de radiations électromagnétiques, DÉCLARATION DE CONFORMITÉ (ÉTATS-UNIS) la qualité audio peut être temporairement Responsible Party: KORG USA INC. dégradée. Cette dégradation peut, exemple, générer un signal sonore. Celui-ci Address: 316 SOUTH SERVICE ROAD, MEL- s’arrête dès que les interférences électroma-...
- Page 79 DEUTSCH...
-
Page 80: Wichtige Sicherheitshinweise
Wichtige Sicherheitshinweise ▪ ▪ Lesen Sie sich diese Hinweise durch. Lösen Sie im Falle eines Gewitters oder wenn das Instrument längere Zeit nicht verwendet ▪ Bewahren Sie diese Hinweise auf. werden soll, den Netzanschluss. ▪ Befolgen Sie alle Warnungen. ▪ Überlassen Sie alle Wartungsarbeiten einem ▪... - Page 81 WARNUNG – Verschlucken Sie niemals die Batterie – es besteht chemische Verbrennungsgefahr. Dieses Instrument enthält eine Knopfbatterie. Das Verschlucken der Knopfbat- terie kann innerhalb von 2 Stunden ernste Verbrennungen verursachen, die zum Tod führen können. Bewahren Sie Knopfbatterien niemals in Der Blitz in einem gleichwinkligen Drei- Reichweite von Kleinkindern auf.
- Page 82 Software sind ©2007 „The FreeType Project“ Sie alle wichtigen Einstellungen daher intern (www.freetype.org). Alle Rechte vorbehalten. oder auf einem externen USB-Datenträger. KORG haftet nicht für Schäden, die auf den Ver- Haftungsausschluss lust von Daten zurückzuführen sind. Die in dieser Bedienungsanleitung erwähnten Informationen wurden mehrmals überprüft.
- Page 83 76er- oder 61er-Tastatur sorgen für eine ebenso authentische wie expressive Ansprache. Das Pa5X ist zudem so robust und zuverlässig, dass es sich bedenkenlos für den Bühneneinsatz eignet. Natürlich macht es auch im Studio eine gute Figur, wo es Ihnen beim Komponieren neuer Songs und Filmmusiken hilft.
- Page 84 Stimmenausblendung erlaubt sogar das Singen zu einem fertig produzierten MP3-Song. Das Pa5X bietet noch zahlreiche weitere große und kleine Details, die Sie unbe- dingt entdecken müssen. Spätestens dann werden Sie zugeben, dass das Pa5X ein rundum gelungenes Arranger-Keyboard ist. Wir wünschen Ihnen viel Spaß...
- Page 85 Ein eleganter KORG ST-SV1-BK Ständer, der perfekt zum Design des Instru- ments passt und diesem einen sicheren Halt bietet. VORSICHT: Der Pa5X Professional Arranger sollte bei Bedarf nur auf ein KORG ST-SV1-BK Stativ gestellt werden. Die Verwendung anderer Stative kann zu Sta- bilitätsproblemen und Verletzungen führen.
-
Page 86: Wiederherstellen Der Werksdaten
Neue Systemversionen finden Sie unter www.korg.com/us/support/download/. Hinweise zum Laden des neuen Betriebssystems werden gemeinsam mit den Daten ins Netz gestellt. Um zu erfahren, welche Systemversion Ihr Pa5X enthält, müssen Sie zu einer „File“-Seite springen und im Seitenmenü den „System Info“-Befehl wählen. - Page 87 Frontplatte | 9 Vorstellung des Instruments Frontplatte Die Frontplatt enthält die Bedienelemente. Notenpult Zum Lieferumfang des Pa5X gehört ein Notenpult. PaAS Lautsprecherleiste Die optionale Lautsprecherleiste PaAS können Sie selbst installieren. Die Laut- stärke der Lautsprecher wird mit dem MASTER VOLUME-Regler eingestellt.
- Page 88 10 | Vorstellung des Instruments Aufhängung für das Notenpult und PaAS-Verstärkersystem Kopfhörer Tastatur...
- Page 89 Bedienfeld | 11 Bedienfeld Das Bedienfeld enthält die Regler und Taster für die Bedienung des Instruments. Temposektion Fader- und Tastersektion Display Navigationsbereich Die Matrix Player-Sektion Styles, Pads und Marker Klangfarbenanwahl Display Das berührungsempfindliche Display zeigt alle für die Bedienung wichtigen Informationen an.
- Page 90 12 | Vorstellung des Instruments Navigationsbereich Mit diesen Bedienelementen können Sie Menüs, Display-Seiten und Parameter aufrufen sowie den angewählten Parameter editieren. Klangfarbenanwahl Die Klangfarben können über die Tastatur gespielt werden. Hier wählen Sie eine Klangfarbengruppe (ein sog. „Keyboard Set“) mit der gewünschten Klangfarbe. Styles, Pads und Marker Mit „Styles“...
- Page 91 Bedienfeld | 13 Player-Sektion Die beiden Player dienen zum Abspielen von Styles und Songs. Den Playern kön- nen unterschiedliche Elemente zugordnet werden, damit der neue Style bzw. Song gleich im Anschluss startbereit ist. Mit dem X-FADER kann man die Aus- gabe der beiden Player mischen.
- Page 92 14 | Vorstellung des Instruments Die Matrix Die programmierbare Tastermatrix erlaubt das Triggern von Elementen und Aktivieren von Funktionen (PADs, Akkordsequenzen, Aktivierung/Stummschal- ten von Spuren usw.). USB-Anschluss An diesen Port (intern heißt er HOST-F) kann ein USB-Datenträger wie ein Spei- cherstick (USB) oder ein anderes Instrument, das als Controller fungieren soll, angeschlossen werden.
- Page 93 Rückseite | 15 Rückseite Auf der Rückseite befinden sich die Anschlussbuchsen des Instruments. Aufhängung für das Notenpult und PaAS-Verstärkersystem Anschlüsse Netzanschluss Audio-Eingänge Hier können Sie ein Mikrofon, eine Gitarre oder ein anderes Instrument anschlie- ßen. An die praktische STEREO-Miniklinkenbuchse kann ein Player, ein Smart- phone oder ein Smartphone/Tablet angeschlossen werden.
- Page 94 An die DAMPER-Buchse kann ein Dämpferpedal angeschlossen werden. Die ASSIGNABLE-Buchse ist für ein Schwellpedal oder einen Fußtaster gedacht. MIDI-Anschlüsse Über seine MIDI-Buchsen kann das Pa5X mit externen Steuerquellen (Master- keyboard, MIDI-Gitarre, MIDI-Blasinstrument, MIDI-Akkordeons usw.), Klanger- zeugern und einem Computer mit MIDI-Schnittstellen verbunden werden.
- Page 95 Instrument, das als Controller fungieren soll (HOST1-R, HOST2-R). Auf der Vorderseite gibt es einen weiteren HOST-Port (HOST-F). Video-Ausgang Über diese Buchse kann das Pa5X zwecks Anzeige der Liedtexte und Akkorde an einen Fernseher oder Monitor angeschlossen werden. Netzanschluss...
- Page 96 18 | Vorstellung des Instruments Verbinden Sie das andere Kabelende mit einer geeigneten Steckdose. Eventuell benötigen Sie einen anderen Netzstecker. Schieben Sie den Stecker niemals mit Gewalt in eine Steckdose! WARNUNG: Schließen Sie den Stecker an eine Steckdose mit der richtigen Spannung an! Bitte lesen Sie sich zunächst die Vorsichtsmaßnahmen ganz vorne durch.
- Page 97 Anschließen der Pedale und Herstellen der Audioverbindungen Anschließen der Pedale Anschließen des Dämpferpedals Schließen Sie ein (optionales) Dämpferpedal wie das KORG PS-1, PS-3 oder DS-1H an die PEDAL > DAMPER-Buchse an. Bei bestimmten Flügelklangfarben arbeitet das DS-1H-Pedal stufenlos. Nach Anwahl der „Concert...
- Page 98 20 | Anschließen der Pedale und Herstellen der Audioverbindungen Was tun, wenn die Pedale nicht funktionieren? Eventuell müssen die Pedale nach einer Weile „kalibriert“ werden, wenn ihr Regelweg plötzlich eingeschränkt zu sein scheint. Für Fußtaster kann man hier bei Bedarf eine andere Polarität wählen. Gehen Sie zur Seite „Settings >...
- Page 99 Anschließen der Pedale | 21 Wenn folgende Meldung erscheint, dürfen Sie das Pedal freigeben/hochklap- pen. Drücken Sie den unteren Button (der jetzt heller dargestellt wird), um zu bestätigen, dass die Spielhilfe den Mindestwert sendet. Überprüfen Sie, ob sich das Pedal jetzt erwartungsgemäß verhält. Wenn nicht, müssen Sie diesen Vor- gang noch einmal wiederholen.
-
Page 100: Einschalten Des Instruments
22 | Einschalten Einschalten Einschalten des Instruments Anschließen des Netzkabels Verbinden Sie das beiliegende Netzkabel mit der POWER-Buchse auf der Rück- seite und schließen Sie das andere Ende an eine Steckdose an. Nach Anschließen des Kabels befindet sich das Instrument im Bereitschaftsbe- trieb. - Page 101 Neigen des Displays | 23 Neigen des Displays Das Display kann bei Bedarf angehoben (oder abgesenkt) werden. Anheben des Displays Drücken Sie den UNLOCK-Taster, um das Display zu entriegeln. Halten Sie den UNLOCK-Taster gedrückt, während Sie das Display anheben. Öffnen Sie die Stütze, indem Sie sie von der Rückseite des Displays herun- terklappen.
- Page 102 24 | Einschalten Halten Sie UNLOCK gedrückt, während Sie die gewünschte Neigung einstel- len. Verankern Sie die Stütze in einer der Kerben innerhalb des Display-Fachs. VORSICHT: Gehen Sie behutsam vor, um keinen Schaden anzurichten! Geben Sie den UNLOCK-Taster frei, um das Display in der aktuellen Position zu halten.
- Page 103 Neigen des Displays | 25 Absenken des Displays Halten Sie den UNLOCK-Taster gedrückt, während Sie das Display anheben. Klappen Sie die Stütze hinter dem Display hoch. Halten Sie den UNLOCK-Taster gedrückt, während Sie das Display langsam absenken. Geben Sie den UNLOCK-Taster frei und drücken Sie behutsam in der Mitte auf den oberen Display-Rand, um das Display zu verriegeln.
-
Page 104: Einstellen Der Display-Helligkeit
26 | Einschalten Einstellen der Display-Helligkeit Bei bestimmten Lichtverhältnissen muss eventuell die Display-Helligkeit geän- dert werden. > Halten Sie den SHIFT- und MENU-Taster gedrückt, während Sie mit dem DATENRAD die Helligkeit ändern. Die Helligkeit des Displays (und des Display-Streifens) kann auch auf der Seite „Settings >... -
Page 105: Anhören Der Demosongs
Anhören der Demosongs | 27 Anhören der Demosongs Das Instrument enthält ab Werk ein paar Demosongs, die seine wichtigsten Funk- tionen veranschaulichen. > Aufrufen des Demo-Modus’ > Drücken Sie DEMO gleichzeitig. > Anhören der Demosongs > Drücken Sie nach Aufrufen des Demo-Modus’ keinen Taster. Alle Demosongs werden der Reihe nach abgespielt. - Page 106 28 | Anwahl und Einsatz der Musik-Ressourcen Anwahl und Einsatz der Musik-Ressourcen Öffnen eines Anwahlfensters Wenn Sie STYLE, SONG oder einen der KEYBOARD SET LIBRARY-Taster drü- cken, erscheint das zugehörige Anwahlfenster. Anwahlfenster kann man auch aufrufen, indem man den Namen eines Ele- ments (Style, Song, Keyboard Set, Stimmen- oder Gitarreneffekt usw.) im Display drückt.
- Page 107 Öffnen eines Anwahlfensters | 29 Nachstehend sehen Sie beispielsweise das Anwahlfenster für Keyboard Sets: Gruppen Ausgewähltes Keyboard Set Obere Ebene Offene Seiten Untere Ebene (Kategorie-Ordner) Verzeichnis (Einzelelemente) Um das Fenster wieder zu verlassen, drücken Sie entweder den EXIT-Taster oder den [Exit]-Befehl oben links im Display. Styles und Songs können wahlweise mit Player 1 oder 2 abgespielt werden.
- Page 108 30 | Anwahl und Einsatz der Musik-Ressourcen Anwahl von Keyboard Sets Aufrufen des ‘My Setting’-Keyboard Sets > Drücken Sie den SETTING-Taster, um Ihre bevorzugten Klangfarben zu verwenden. Über das ‘My Setting’-Keyboard Set „My Setting“ ist ein spezielles Keyboard Set, in dem man folgende Aspekte sichern kann: Klangfarben der Tastaturparts, Effekte sowie die Funktionen der Regler und definierbaren Taster.
- Page 109 Spielen und Beeinflussen der Klangfarben | 31 Spielen und Beeinflussen der Klangfarben Spielen auf der Tastatur Die Tastatur dieses Instruments ähnelt jener eines Klaviers. Spielen Sie doch mal ein paar Noten! Bei bestimmten Klangfarben ändert sich ein Aspekt (z.B. die Vibrato-Intensität), wenn man eine angeschlagene Taste noch weiter hinunterdrückt.
- Page 110 32 | Anwahl und Einsatz der Musik-Ressourcen Verwendung der Matrix Die programmierbare Tastermatrix kann flexibel belegt werden (Spielen von PADs, Akkordsequenzen, Aktivieren/Stummschalten von Spuren usw.). Drücken Sie einen Taster, um die zugeordnete Funktion auszulösen. Handelt es sich um eine An/Aus-Funktion, müssen Sie ihn erneut drücken, um die Funktion wieder zu deaktivieren.
- Page 111 Starten und Anhalten eines Styles | 33 Starten und Anhalten eines Styles Die Begleitautomatik kann mit den Tastern in der PLAYER 1- oder PLAYER 2-Sektion bedient werden. Stop/ Play/Stop Go to Start > Einstellen der Abmischung > Schieben Sie den X-FADER komplett zum Player, den Sie hören möchten.
- Page 112 34 | Anwahl und Einsatz der Musik-Ressourcen > Anhalten der Begleitung > Drücken Sie den PLAY/STOP )-Taster erneut. > Alternativ hierzu können Sie den STOP/GO TO START ( )-Taster betätigen. > Simultanes Starten bzw. Anhalten beider Player Bei Bedarf können beide Player gleichzeitig gestartet und dann mit dem X-FA- „gemischt“...
- Page 113 Starten, Anhalten und Steuern von Songs | 35 Starten, Anhalten und Steuern von Songs Die Songs können mit den Tastern in der PLAYER 1- oder PLAYER 2-Sektion bedient werden. Stop/ Play/Stop Go to Start > Einstellen der Abmischung > Schieben Sie den X-FADER komplett zum Player, den Sie hören möchten.
- Page 114 36 | Anwahl und Einsatz der Musik-Ressourcen Im Falle eines MP3-Songs: Dateipfad Während der Wiedergabe: Tempovariation Verstrichene Zeit Zurück-/ Vorspulen Verbleibende Zeit Wiedergabe angehalten: Gesamt- länge des Songs > Vorspulen > Drücken Sie den FAST FORWARD ( )-Taster ein Mal, um zum nächsten Takt (MIDI-Song) bzw.
- Page 115 Starten, Anhalten und Steuern von Songs | 37 > Simultanes Starten bzw. Anhalten beider Player Bei Bedarf können beide Player gleichzeitig gestartet und dann mit dem X-FA- „gemischt“ werden. > Halten Sie den SHIFT-Taster gedrückt, während Sie einen der beiden PLAY/ STOP )-Taster drücken, um beide Player gleichzeitig zu starten.
- Page 116 Strahlungen können KONFORMITÄTSERKLÄRUNG (für die USA) sich nachteilig auf die Audiowiedergabe aus- Responsible Party: KORG USA INC. wirken. In bestimmten Fällen führt dies zur Ausgabe eines unerwünschten Signals. Diese Address: 316 SOUTH SERVICE ROAD, MEL- Phänomen verschwindet jedoch, sobald die VILLE elektromagnetischen Störung behoben wird.
- Page 117 ITALIANO...
- Page 118 Avvertenze importanti sulla sicurezza ▪ ▪ Leggete le istruzioni. Scollegate lo strumento dalla presa di cor- rente durante i temporali, o nel caso non ne ▪ Conservate le istruzioni. sia previso l'uso per un lungo periodo. ▪ Rispettate tutte le avvertenze. ▪...
- Page 119 ATTENZIONE - Rischio di ustione chimica: non ingerite la batteria! Questo prodotto contiene una batteria a bottone. L’ingerimento di questo tipo di batteria può causare gravissime ustioni interne in circa due ore, e provocare la morte. Tenete le batterie nuove e usate lontano dal- la portata dei bambini.
-
Page 120: Altre Avvertenze
Windows sono marchi registrati di Microsoft Spegnimento automatico Corporation. Waves MaxxAudio® è un marchio Per evitare sprechi di energia, Pa5X entrerà au- registrato di Waves Audio Ltd. Tutti gli altri mar- tomaticamente in modalità standby dopo due chi e marchi registrati sono proprietà dei rispet- ore di funzionamento senza attività... - Page 121 Solido e affidabile, Pa5X è un ottimo strumento live, ma si rivela anche un grande strumento da studio, dove offre un valido aiuto creativo nella composizione di canzoni o colonne sonore, e dove il suo suono ‘prodotto’...
- Page 122 Pa5X. Microfono e chitarra possono essere collegati agli ingressi audio dedicati, ed elaborati con gli eccellenti effetti incorporati. Pa5X porta con sé tutta la nostra lunga esperienza nella realizzazione di armonizzatori per la voce e di effetti per chitarra.
- Page 123 Prima di iniziare a suonare… |7 Prima di iniziare a suonare… Cosa c’è nella scatola Una volta ricevuto il vostro Pa5X, controllate che nell’imballo si trovino tutti gli oggetti elencati di seguito. Se dovesse mancarne qualcuno, vi preghiamo di con- tattare immediatamente il rivenditore KORG.
- Page 124 ATTENZIONE: Non installate un sistema operativo diverso da quello ufficiale for- nito da KORG per Pa5X. L’installazione di un sistema operativo creato per model- li diversi o scaricati da siti web non ufficiali può causare perdita di dati e danni permanenti allo strumento.
-
Page 125: Pannello Frontale
Pannello frontale Il pannello frontale contiene i controlli dello strumento. Leggio Il leggio è fornito di serie con Pa5X. Sistema di amplificazione PaAS È possibile installare il sistema di amplificazione (opzionale) PaAS. Se installato, controllate il volume degli altoparlanti tramite il cursore MASTER VOLUME. - Page 126 10| Panoramica sullo strumento Guida per il leggio e il sistema di amplificazione PaAS Cuffie Tastiera...
-
Page 127: Pannello Di Controllo
Pannello di controllo |11 Pannello di controllo Il pannello di controllo è la parte del pannello frontale in cui si trovano i controlli dello strumento. Controlli di Tempo Area cursori e Controlli di pulsanti Display La Matrix navigazione Area dei Area di Style, Pad Area dei Sound Player... - Page 128 Area dei Sound Nella lingua di Pa5X, i Sound sono i suoni che vengono suonati sulla tastiera. In questa sezione si possono scegliere le combinazioni di Sound salvate sotto for- ma di Keyboard Set nella libreria dedicata.
- Page 129 Pannello di controllo |13 Area dei Player I due Player incorporati permettono di suonare Style e Song. È possibile asse- gnare elementi diversi a ogni Player, per avere uno Style o una Song pronta a suonare al termine dello Style o della Song attuale. È possibile mixare i due Player con l’X-FADER.
- Page 130 14| Panoramica sullo strumento La Matrix È possibile usare questa matrice programmabile di tasti (grandi e facili da ‘col- pire’) per richiamare elementi musicali e funzioni (Pad, Chord Sequence, Track Play/Mute, ecc.). Connettore USB Usate questa presa (che apparirà come HOST-F nel display) per collegare un di- spositivo di memoria USB, ad esempio una pendrive USB, oppure altri strumenti...
-
Page 131: Pannello Posteriore
Pannello posteriore |15 Pannello posteriore Il pannello posteriore contiene la maggior parte delle connessioni. Guida per il leggio e il sistema di amplificazione PaAS Connettori Connettore di alimentazione Ingressi audio Usate questi connettori per collegare un microfono, una chitarra o qualsiasi altro strumento musicale. - Page 132 (footswitch). Porte MIDI Usate queste porte per collegare Pa5X a controller esterni (tastiera master, chi- tarra MIDI, controller a fiato, fisarmonica MIDI, pedaliera MIDI…), ad una serie di expander, o ad un computer dotato di interfaccia MIDI.
- Page 133 Pannello posteriore |17 Porte USB Usate queste prese per collegare Pa5X ad un personal computer o ad un tablet (DEVICE) o per collegare fino a due dispositivi di memoria USB, quali una pen- drive USB, oppure un altro strumento musicale da utilizzare come controller (HOST1-R, HOST2-R).
- Page 134 18| Panoramica sullo strumento Collegate l’altra estremità del cavo ad una presa di corrente standard. Assicuratevi di star utilizzando una spina compatibile. Mai forzare la spina nella presa! ATTENZIONE: Collegate la spina ad una presa di corrente del giusto voltaggio! Vi preghiamo di leggere attentamente le precauzioni contenute all’inizio di que- sto manuale.
- Page 135 PEDAL > DAMPER per collegare un pedale damper, ad esem- pio uno dei modelli (opzionali) KORG PS-1, PS-3 o DS-1H. Il pedale DS-1H consente, con alcuni suoni di pianoforte acustico, di avere tutte le sfumature del mezzo-pe- dale. Potete sperimentarne il funzionamento premendolo gradualmente, e poi...
- Page 136 20| Configurare i pedali e le connessioni audio E se i pedali non funzionano correttamente? Se necessario, ricalibrate i pedali, in modo da poter sfruttare interamente la loro escursione, senza nessun ‘punto morto’. Inoltre, nel caso il pedale funzionasse al contrario, questa procedura consente di cambiarne la polarità.
- Page 137 Collegare i pedali |21 Quando compare la successiva finestra di dialogo, rilasciate il pedale. Toccare il pulsante inferiore (ora evidenziato) nel display per confermare il valore minimo. Verificate che il pedale stia funzionando correttamente. Nel caso non stesse funzionando bene, ripetete la procedura. Premete il pulsante EXIT per tornare alla pagina precedente.
-
Page 138: Accendere Lo Strumento
22| Accensione Accensione Accendere lo strumento Collegare il cavo di alimentazione Collegate il cavo di alimentazione fornito di serie al ricettacolo di alimentazione POWER che si trova nel pannello posteriore dello strumento, e collegate l’altra estremità alla presa a muro. Una volta collegato il cavo di alimentazione, lo strumento è... - Page 139 Inclinare il display |23 Inclinare il display Per garantire la migliore visibilità in qualsiasi posizione, magari anche da seduti, è possibile regolare l’inclinazione del display. Regolare l’inclinazione del display Premete il pulsante UNLOCK per sbloccare il display. Tenete premuto il pulsante UNLOCK e sollevate il display.
- Page 140 24| Accensione Mentre continuate a tenere premuto il pulsante UNLOCK, regolate l’inclina- zione del display, poi fissate la staffa ad uno dei fermi che si trovano sul fondo all’alloggiamento del display. ATTENZIONE: Non forzate il display o la staffa, o c’è il rischio di romperli! Rilasciare il pulsante UNLOCK per fissare il display alla posizione corrente.
- Page 141 Inclinare il display |25 Chiudere il display Tenete premuto il pulsante UNLOCK e sollevate il display. Sollevate la staffa di sicurezza, e richiudetela sul retro del display. Mentre continuate a tenere premuto il pulsante UNLOCK, accompagnate il display nel suo alloggiamento. Rilasciate il pulsante UNLOCK e premete delicatamente il centro del bordo...
-
Page 142: Regolare La Luminosità Del Display
26| Accensione Regolare la luminosità del display La luminosità del display può essere regolata, per adattarla alla luce ambiente. > Tenete premuti i pulsanti SHIFT e MENU e usate il DIAL per regolare la lumi- nosità del display. È inoltre possibile regolare la luminosità del display (e dello strip-display) nella pagina Settings >... - Page 143 Ascoltare i brani dimostrativi |27 Ascoltare i brani dimostrativi Potete ascoltare alcuni brani dimostrativi, che abbiamo preparato per farvi capi- re cosa può fare questo strumento. > Accedete alla modalità Demo > Premete insieme i pulsanti DEMO. > Ascoltare tutti i brani dimostrativi >...
- Page 144 28| Scegliere e suonare le risorse musicali Scegliere e suonare le risorse musicali Aprire una finestra di selezione Quando si preme il pulsante STYLE, SONG o uno dei pulsanti della sezione KEYBOARD SET LIBRARY, compare la corrispondente finestra di selezione. finestra di selezione può...
- Page 145 Aprire una finestra di selezione |29 Per esempio, questa è la finestra di selezione che appare quando si cerca una Keyboard Set: Gruppi Tipo Keyboard Set selezionata Livello superiore (cartelle Directory Pagine Livello inferiore corrispondenti alle categorie) corrente (singoli elementi) È...
- Page 146 30| Scegliere e suonare le risorse musicali Scegliere la Keyboard Set preferita Scegliere la Keyboard Set ‘My Setting’ > Premete il pulsante MY SETTING per scegliere i propri suoni preferiti. La Keyboard Set My Setting La My Setting è una Keyboard Set speciale, in cui è possibile salvare le im- postazioni preferite per i suoni di tastiera, gli effetti, la programmazione dei cursori e dei tasti della sezione CONTROL, i pulsanti assegnabili della sezione ASSIGNABLE SWITCH.
- Page 147 Suonare e controllare il suono |31 Suonare e controllare il suono Suonare sulla tastiera La tastiera dello strumento è come quella del pianoforte. Semplicemente, quindi – suonateci sopra! Con alcuni suoni è possibile premere più forte i tasti mentre sono già premuti, e il suono potrebbe variare (ad esempio, si potrebbe sentire un vibrato più...
- Page 148 32| Scegliere e suonare le risorse musicali Usare la Matrix La matrice di tasti programmabili può svolgere diversi compiti (avviare Pad, se- quenze di accordi, mettere le tracce in play o in mute, ecc.). Toccate uno o più tasti per selezionare la funzione desiderata. Se si tratta di interruttori, toccateli nuovamente per disattivare la funzione assegnata.
- Page 149 Avviare e fermare gli Style |33 Avviare e fermare gli Style Potete avviare o fermare manualmente l’accompagnamento automatico, usando i controlli della sezione PLAYER 1 PLAYER Stop/ Play/Stop Go to Start > Bilanciate i Player > Portate completamente il cursore X-FADER verso il Player che desidera- te ascoltare.
- Page 150 34| Scegliere e suonare le risorse musicali > Fermate l’accompagnamento > Premete di nuovo il pulsante PLAY/STOP > In alternativa, potete premere il pulsante STOP/GO TO START ( ). > Avviare e fermare insieme entrambi i Player È possibile avviare insieme entrambi i Player, e poi mixarli con il cursore X-FADER. >...
- Page 151 Avviare, fermare e controllare le Song |35 Avviare, fermare e controllare le Song È possibile avviare e fermare manualmente le Song, usando i controlli della se- zione PLAYER 1 PLAYER Stop/ Play/Stop Go to Start > Bilanciate i Player > Portate completamente il cursore X-FADER verso il Player che desidera-...
- Page 152 36| Scegliere e suonare le risorse musicali Con una Song MP3: Percorso del file In Play: Tempo rimanente Variazione Tempo Controlli di Fast Rewind / Fast Forward In Stop: Lunghezza totale del del Tempo trascorso brano > Avanzamento veloce del brano >...
- Page 153 Avviare, fermare e controllare le Song |37 > Avviare e fermare insieme entrambi i Player È possibile avviare insieme entrambi i Player, e poi mixarli con il cursore X-FADER. > Tenete premuto il pulsante SHIFT e premete uno qualsiasi dei due pulsanti PLAY/STOP( per avviare insieme i due Player.
- Page 154 DICHIARAZIONE DI CONFORMITÀ batteria o sulla sua confezione appare un sim- (SOLO USA) bolo chimico. Responsabile: KORG USA INC. In caso di radiazioni elettromagnetiche la qua- Indirizzo: 316 SOUTH SERVICE ROAD, MELVILLE lità dell’audio potrebbe venire momentanea- Telefono: 1-631-390-6500 mente degradata.
- Page 155 ESPAÑOL...
-
Page 156: Instrucciones De Seguridad Importantes
Instrucciones de seguridad importantes ▪ ▪ Lea estas instrucciones. Desenchufe el aparato durante tormentas eléctricas o cuando no se use durante largos ▪ Guarde estas instrucciones. períodos de tiempo. ▪ Observe todas las advertencias. ▪ Acuda a un Servicio Oficial con personal ▪... - Page 157 ADVERTENCIA: No ingerir la batería, peligro de quemaduras químicas. Este producto contie- ne una pila de botón. Si se ingiere la pila de botón se pueden cau- sar graves quemaduras internas en sólo 2 horas y puede conducir a la muerte. Mantenga las pilas nuevas y usadas, alejadas de los niños.
- Page 158 Marcas Registradas Apagado automático Mac y iOS son marcas registradas de Apple Para evitar el gasto energético, Pa5X por defec- Computer, Inc. es una marca registrada Android to entrará en espera automáticamente después MS DOS y Windows son marcas Google Inc.
- Page 159 épocas y culturas, dejando un amplio espacio para sus propias expansiones. Pa5X es fácil de controlar, a través del sistema DNC (Defined Nuance Control) de KORG, lo que permite al intérprete introducir de manera precisa y expresiva los matices más sutiles y articulación del sonido.
- Page 160 Y el Eliminador Vocal le permitirá cantar junto con cualquier Canción MP3. Hay más, mucho más, y le invitamos a explorar Pa5X en profundidad. Pa5X es el interactivo profesional más completo, evocador, potente y fácil de usar jamás...
- Page 161 Antes de empezar a tocar… |7 Antes de empezar a tocar… Contenido de la caja Después de recibir su Pa5X, compruebe que todos los elementos siguientes es- tán incluidos en el embalaje. Si falta alguno de los siguientes elementos, llame a su distribuidor Korg inmediatamente.
-
Page 162: Restaurar Una Copia De Seguridad
Puede descargar el sistema operativo más ac- tualizado desde nuestro sitio web (www.korg.com/us/support/download/). Por favor, lea las instrucciones suministradas con el sistema operativo. Puede ver qué versión del sistema operativo está instalada en su Pa5X yendo a las páginas File... -
Page 163: Panel Frontal
Panel frontal El panel frontal es donde puede encontrar los controles del instrumento. Atril de partituras Un atril viene estándar con su Pa5X. PaAS sistema de amplificación Puede instalar el sistema de amplificación PaAS (opcional). Una vez instalado, controle el volumen de los altavoces mediante el botón MASTER VOLUME. - Page 164 10| Descripción del instrumento Guía para el atril y sistema de amplificación PaAS Auriculares Teclado...
-
Page 165: Panel De Control
Panel de control |11 Panel de control El panel de control es la parte del panel frontal donde puede encontrar los con- troles del instrumento. Área de Tempo Área de deslizantes Pantalla Área Navegación La Matriz Área de Reproductor Área de Estilos, Pads Área de sonidos y Marcadores Pantalla... - Page 166 12| Descripción del instrumento Área de navegación Utilice estos controles para ir a los menús, páginas y parámetros y cambiar el valor del parámetro seleccionado. Área de sonidos Los Sonidos son lo que puede tocar en el teclado. Aquí puede elegir conjuntos de sonidos guardados como conjuntos de teclado (Keyboard Sets) en una librería dedicada.
- Page 167 Panel de control |13 Área de los Reproductores Las Canciones y Estilos pueden ser reproducidas con los dos Reproductores. Puede asignar diferentes elementos a cada reproductor, para tener otro Estilo o Canción lista para reproducir al final de la actual. Puede mezclar los dos repro- ductores con el X-FADER.
- Page 168 14| Descripción del instrumento La Matriz Puede utilizar esta matriz programable de teclas grandes y de fácil acceso para activar elementos y funciones (Pads, Secuencias de acorde, Track Play/Mute, etc.). USB conector Use este conector para conectar un dispositivo de almacenamiento USB, como un pendrive (aparecerá...
-
Page 169: El Panel Posterior
El Panel posterior |15 El Panel posterior El panel posterior es donde puede encontrar las distintas conexiones. Guía para el atril y sistema de amplificación PaAS Conectores Conector de alimentación Entradas de Audio Utilice estos conectores para conectar un micrófono, guitarra u otro instrumen- to musical. - Page 170 Puertos MIDI Utilice estos conectores para conectar su Pa5X a controladores externos (te- clado maestro, guitarra MIDI, controlador de viento, acordeón MIDI, pedalera MIDI...), a una serie de expansores, o a un ordenador con interfaz MIDI.
- Page 171 HOST-2R). Otro HOST (HOST-F) está disponible en el panel frontal. Video out Puede conectar Pa5X a un TV o monitor de vídeo para mostrar las letras y acor- des. Conector de alimentación Conecte aquí el cable de alimentación IEC suministrado.
- Page 172 18| Descripción del instrumento Conecte el otro extremo del cable a una toma de corriente de CA. Asegúrese de usar un enchufe compatible. ¡Nunca fuerce el enchufe en la toma! AVISO: ¡Conecte el enchufe a una toma de CA de voltaje correcto! Por favor, lea la información de seguridad al principio de este manual.
- Page 173 PEDAL > DAMPER para conectar un pedal damper, como el (opcional) KORG PS1, PS3 o DS1H. El pedal DS1H es compatible con todos los ma- tices de medio pedal en algunos sonidos de Piano de cola. Puede experimentar cómo funciona presionando gradualmente hacia abajo, y soltando poco a poco,...
- Page 174 20| Configuración de los pedales y conexiones de audio ¿Y si los pedales no se comportan correctamente? Si es necesario puede que necesite calibrar los pedales para usar el rango com- pleto, sin ‘puntos muertos’. Este procedimiento también permite elegir la polari- dad del pedal si éste funciona al revés.
- Page 175 Conectar los pedales |21 Cuando aparezca el siguiente diálogo, suelte el pedal. Toque el botón lower (resaltado) en la pantalla para confirmar el mínimo valor. Compruebe el funcionamiento del pedal. Si no funciona bien repita el pro- cedimiento. Pulse el botón EXIT para volver a la página anterior.
-
Page 176: Encender El Instrumento
22| Encendido Encendido Encender el instrumento Conexión de la alimentación Enchufe el cable de alimentación suministrado al enchufe POWER en la parte posterior del instrumento, y el cable a un enchufe de pared. Cuando se conecta el cable, el instrumento está en Standby. AVISO: Cuando el instrumento está... - Page 177 Inclinación de la pantalla |23 Inclinación de la pantalla Para una visibilidad óptima en cualquier posición del asiento, puede ajustarse el ángulo de inclinación de la pantalla. Levantar la pantalla Presione el botón UNLOCK para desbloquear la pantalla. Mantenga pulsado el botón UNLOCK y levante la pantalla. Abra el soporte de seguridad separándolo de la parte superior posterior de la pantalla.
- Page 178 24| Encendido Mantenga pulsado el botón UNLOCK, ajuste el ángulo de inclinación y fije el soporte a uno de los topes en la parte inferior de la carcasa de la pantalla. PRECAUCIÓN: ¡No aplique una presión excesiva, o corre el riesgo de romperla! Suelte el botón UNLOCK para fijar la pantalla a la posición actual.
- Page 179 Inclinación de la pantalla |25 Cerrar la pantalla Mantenga pulsado el botón UNLOCK y levante la pantalla. Levante el soporte de seguridad y vuelva a colocarlo en la posición cerrada. Manteniendo presionado el botón UNLOCK, acompañe la pantalla hasta de- jarla en su carcasa.
-
Page 180: Ajuste Del Brillo De La Pantalla
26| Encendido Ajuste del Brillo de la pantalla El Brillo se puede ajustar para que se adapte a la luz ambiental. > Mantenga pulsado los botones SHIFT y MENU y utilice el DIAL para ajustar el brillo de la pantalla. También puede ajustar el brillo de la pantalla (y la pantalla auxiliar) en la página Settings >... - Page 181 Escuchar las canciones Demo |27 Escuchar las canciones Demo Puede escuchar algunas canciones que hemos preparado, para demostrar lo que este instrumento puede hacer. > Para entrar en Modo Demo > Pulse simultáneamente los botones DEMO. > Escuche todas las canciones Demo >...
- Page 182 28| Elegir y tocar recursos musicales Elegir y tocar recursos musicales Abrir una ventana de selección Cuando presiona uno de los botones STYLE, SONG KEYBOARD SET aparece la ventana de selección correspondiente. La ventana Selección también se puede abrir tocando el nombre del elemento correspondiente (Estilo, Canción, Teclado, Preset de Voz o Guitarra...) en la pan- talla.
- Page 183 Abrir una ventana de selección |29 Por ejemplo, esta es la ventana de Selección cuando se busca un Keyboard Set: Grupos Tipo Keyboard Set seleccionado Nivel superior (carpetas Carpeta Páginas Nivel inferior corresponden a Categorías) abierta (elementos individuales) Siempre puede salir de esta ventana pulsando el botón EXIT, o tocando el co- mando Exit en la esquina superior izquierda de la pantalla.
- Page 184 30| Elegir y tocar recursos musicales Elegir su conjunto de Sonidos preferido Elegir el conjunto de teclado ‘My Setting’ > Presione el botón MY SETTING para elegir sus sonidos y ajustes preferidos. El Conjunto de Teclado My Setting My Setting es un conjunto de teclado (Keyboard Set) especial, donde pue- de guardar su configuración preferida para cosas como Sonidos de teclado, Efectos, transposición, conmutadores asignables y deslizantes.
- Page 185 Tocar y controlar los Sonidos |31 Tocar y controlar los Sonidos Tocar el teclado El Teclado del instrumento es como un teclado de piano. ¡Hay que tocarlo! Con algunos de los sonidos, puede presionar las teclas pulsadas, y el sonido pue- de variar (por ejemplo, podría oír más vibrato).
- Page 186 32| Elegir y tocar recursos musicales Usando la Matriz La matriz de botones programables puede hacer varias cosas diferentes (activar pads, secuencias de acorde, reproducir o parar pistas, etc.). Toque uno o más de ellos para seleccionar la función deseada. Si están encendidos, tóquelos de nuevo para apagarlos.
- Page 187 Iniciar y parar los Estilos |33 Iniciar y parar los Estilos Puede iniciar y detener manualmente el acompañamiento automático, utilizando los controles de la sección PLAYER 1 PLAYER Parar/ Iniciar/ Ir Inicio Parar > Establecer la mezcla adecuada > Mueva el X-FADER completamente hacia el reproductor que quiere escu- char.
- Page 188 34| Elegir y tocar recursos musicales > Parar el acompañamiento > Pulse el botón PLAY/STOP nuevamente. > Como alternativa, puede presionar el botón STOP/GO TO START ( ). > Iniciar y parar ambos reproductores al mismo tiempo Puede iniciar ambos reproductores al mismo tiempo, para mezclarlos con el X-FADER mientras toca.
- Page 189 Iniciar, parar y controlar las Canciones |35 Iniciar, parar y controlar las Canciones Puede iniciar y detener manualmente las canciones, utilizando los controles de la sección PLAYER 1 PLAYER Parar/ Iniciar/ Ir Inicio Parar > Establecer la mezcla adecuada > Mueva el X-FADER completamente hacia el reproductor que quiere escu-...
- Page 190 36| Elegir y tocar recursos musicales Con una canción MP3: Ruta de archivo Reproducción: tiempo restante Variación Tempo Controles avance Tiempo transcurrido rápido / Rebobinado Parado: Longitud Total Canción > Avance Rápido de la canción > Toque el botón FAST FORWARD ( una vez para saltar al siguiente com- pás (canción MIDI) o al segundo siguiente (canción MP3.
- Page 191 Iniciar, parar y controlar las Canciones |37 > Iniciar y parar ambos reproductores al mismo tiempo Puede iniciar ambos reproductores al mismo tiempo, para mezclarlos con el X-FADER mientras toca. > Mantenga pulsado el botón SHIFT y pulse cualquiera de los dos botones PLAY/STOP para comenzar ambos reproductores al mismo tiempo.
- Page 192 DECLARACIÓN DE CONFORMIDAD En caso de radiaciones electromagnéticas (PARA USA) puede ocurrir un deterioro temporal de la ca- Parte Responsable: KORG USA INC. lidad de prestaciones de audio. Un deterioro que pudiera surgir puede ser una señal de so- Dirección:...
- Page 193 中文...
- Page 194 重要安全说明 ▪ ▪ 请阅读本说明。 ▪ ▪ 在闪电暴雨或者长时间不使用时, 请拔掉设备 插头。 ▪ ▪ 保存好这些说明。 ▪ ▪ 所有维修均请由专业维修人员进行。 当设备受 ▪ ▪ 注意所有警告。 到任何损坏, 如电源线或插头损坏、 液体溅入 ▪ ▪ 按照说明操作。 或物体落入设备中、 设备遭受雨淋或受潮、 无 ▪ ▪ 不要在潮湿的地方使用该设备。 法正常工作或曾摔落时, 需要进行维修。 ▪ ▪ 只能用干布清洁。 ▪ ▪ 警告 – 该设备应连接到带有保护接地连接的电 源插口。...
- Page 195 警告 – 请勿吞食电池, 有化学灼伤 危险。 本产品包含纽扣电池。 如果吞食硬币/纽扣电池, 它会在 2 小时内造成严重的内部灼伤, 并可 能导致死亡。 将新电池和用过的电池放在儿童无法接触到的 地方。 如果电池仓没有关紧, 请停止使用产品并 将其放置在远离儿童的地方。 如果您认为电池可能已被吞下或放入身体的任 何部位, 请立即就医。 等边三角形内带有箭头的闪电符号旨在提醒 用户注意产品外壳内存在未绝缘的“危险电 压” , 其强度可能足以对人员构成电击危险。 ▪ ▪ 警告 – 内部有日期/时间锂纽扣电池。 如果电池 更换不当, 有爆炸的危险。 仅可替换为相同或 等效的类型。 内部日期/时间锂纽扣电池可由用 等边三角形内的感叹号旨在提醒用户注意产 户更换。 品随附的文献中存在重要的操作和维护 (维 ▪...
- Page 196 巾) 可能会划伤并损坏屏幕。 还建议使用电脑擦拭 未带有序列号的KORG产品, 一经售出将失去制造 布, 前提是它们是专为 LCD 屏幕设计的。 商/分销商的保修资格。 此要求是为了您自己的保 请勿直接在 LCD 屏幕上喷洒任何液体。 始终先将 护和安全。 溶液涂抹在布上, 然后清洁屏幕。 服务和用户协助 木制侧面板 如需服 务, 请联系离您最 近的KORG授权 服 务中 键盘的侧面板采用天然木材制成, 每台键盘的花纹 心。 有关KORG产品的更多信息以及用于键盘的软 都独一无二。 使用的越多, 它就会变得越漂亮。 如 件和附件, 请与当地的KORG授权分销商联系。 如 果您发现面板有任何不规整的地方, 其实这都是源 需最新信息, 请使用您的网络浏览器访问我们的网 自于天然木材的独特魅力点。...
- Page 197 内置音色基于我们的 EDS-X (Enhanced Definition Synthesis-eXpanded) 音色引 擎, 范围从超逼真的原声乐器到电子老式键盘、 经典合成器等等, 为媒体和电影制作 添加梦幻音效和特殊效果。 我们还集成了来自不同时代和文化的乐器, 为您自己的 扩展留出充足的空间。 Pa5X 易于控制, 通过 KORG 的 DNC (Defined Nuance Control) 系统, 使演奏者能够 准确而富有表现力地展现最微妙的细微差别和音色清晰度。 推子、 开关、 实时控制 的真实和虚拟矩阵、 操纵杆和功能区控制器, 能够立即调节音色的所有参数。 音色由精心设计的效果链处理, 包括每个播放器和键盘音色的最终效果。 音频输 出还有最终母带效果, 令乐器的音色听上去 “融合” 和 “专业” , 这是KORG与Waves Audio长期合作的结果,...
- Page 198 6 | 介绍 您可以使用功能齐全的音序器录制 MIDI 歌曲。 更简单的是, 只需将您唱歌和播放的 内容 (包括 MP3 歌曲) 录制为 MP3 文件, 然后在您喜欢的任何地方收听即可。 歌曲和伴奏可以保存到板载 SongBook 中, 类似于数据库的条目, 很容易与平板电 脑上的外部乐谱阅读器同步。 因此, 您可以使用数字曲谱来控制您的 Pa5X。 话筒和吉他可以连接到专用的音频输入并使用出色的内置效果进行处理。 我们在人 声和声和吉他效果方面的长期经验让您如虎添翼。 人声消除器可让您直接将任何 MP3 歌曲变成无人声伴奏。 还有更多、 更多, 我们邀请您深入探索 Pa5X。 Pa5X 是有史以来最令人回味、 功能强 大、 易于使用的完整专业编曲键盘。 用全新的Pa5X享受您的音乐生活!...
- Page 199 安全毛毡 (仅限Pa5X88, 用在ST-SV1 BK架子上) 您可以下载的内容 用您的网络浏览器访问我们的网站 (www.korg.com/us/support/download/), 以下 载最新的软件、 完整手册、 视频手册和 MIDI 驱动程序。 您可以添加什么 购买Pa5X之后, 您可能想添加以下其他不错的配件: ▪ > 优雅的KORG ST-SV1-BK键盘架, 安全舒适, 与您的编曲键盘完美匹配。 注意: Pa5X 专业编曲键盘仅适用 KORG ST-SV1-BK 支架。 使用其他支架可能会导致 不稳定并造成损害。 ▪ > PaAS放大系统, 增加了三路放大系统、 一对集成扬声器和一个低音反射箱。 ▪ > KORG 产品中坚固的踏板和脚踏开关之一。 制作数据的安全副本 如果您想自定义您的音乐资源, 我们建议您经常备份您的数据。 按FILE按钮进入...
- Page 200 Factory▪Restore 命令。 警告: 此操作将覆盖所有用户数据! 加载操作系统 您的 Pa5X 可以随着操作系统的新版本发布而不断更新。 您可以从我们的网站 (www.korg.com/us/support/download/) 下载最新的操作系统。 请阅读操作系统 随附的说明。 要查看 Pa5X 现在安装的操作系统版本, 可以进入 File 页面选择 页面菜单▪ 的 Sys- tem▪Info 命令。 提示: 确保您的 Pa5X 始终包含最新版本的操作系统。 这可能包含新功能和错误修 复。 警告: 请勿安装 KORG 为Pa5X 提供的官方操作系统以外的操作系统。 尝试安装为 不同型号创建或从非官方网站下载的操作系统可能会导致数据丢失和乐器永久性损 坏。 KORG 不对操作系统安装不当造成的任何损害负责。...
- Page 201 前面板 | 9 乐器概述 前面板 前面板是您可以找到乐器控件的地方。 乐谱架 Pa5X附带一个乐谱架。 PaAS 放大系统 您可以安装 (可选) PaAS 放大系统。 安装后, 通过 MASTER▪VOLUME 滑块控制扬声 器的输出音量。 连接耳机时, 扬声器会自动关闭。 您还可以通过取消选择 Settings▪>▪Audio/Video▪>▪ MP3/Speakers 页面中的 Speakers 复选框来手动停用它们。 耳机接口 将一副耳机连接到此输出。 您可以使用阻抗16~200Ω (建议使用50Ω) 的耳机。 键盘 使用键盘弹奏音符和和弦。 根据SPLIT指示灯的状态, 键盘可以是整体或拆分成不 同的音色。...
- Page 202 10 | 乐器概述 乐谱架和 PaAS 放大系统指南 耳机 键盘...
- Page 203 控制面板 | 11 控制面板 控制面板是前面板的一部分, 您可以在其中找到乐器的控件。 节奏区 滑块和开关区 显示 导航区 矩阵 播放器区 样式、 打击垫和标记区 音色区 显示 使用此触摸屏显示器与乐器进行交互。 显示器可以倾斜以获得最佳可视化效果。 显 示屏周围有控件, 可帮助您选择各种元素。...
- Page 204 12 | 乐器概述 导航区 使用这些控件可以浏览菜单、 页面和参数并更改所选参数的值。 音色区 音色是您可以在键盘上弹奏出来的内容。 在这里, 您可以选择在专用库中保存为 “ 键盘组” 的音色组。 样式、 打击垫和标记区 伴奏提供带有虚拟乐队的自动伴奏。 标记可以跳转到歌曲中保存的点。 您可以播放 音色 (通过键盘设置选择) 和打击垫以及伴奏和歌曲。 播放器区 两个板载播放器可以播放伴奏和歌曲。 您可以为每个播放器分配不同的元素, 以便 在当前播放器的结尾准备播放另一种伴奏或歌曲。 您可以使用 X-FADER 混合两个播 放器。...
- Page 205 控制面板 | 13 SongBook区 SongBook 是一个 “歌曲” 数据库, 称为 SongBook 条目。 它们中的每一个都是当前 情况的快照, 包括所选的伴奏、 歌曲、 键盘设置、 打击垫、 和弦序列以及音色和吉他效 果。 您可以快速访问SongBook (Book) 中的所有歌曲或歌曲选择列表 (Set List) 。 节奏区 使用这些按钮控制伴奏和歌曲的速度。 您可以按 CONTROL▪ >▪ SWITCH▪ 9 按钮在 STYLE/SONG 模式下打开或关闭节拍器, 跟着节拍器练习。 矩阵 这个大型可编程矩阵采用易于访问的按键组成, 用于触发各种元素和功能 (打击垫、 和弦序列、 音轨播放/静音等) 。...
- Page 206 14 | 乐器概述 USB接头 使用此接口 (将显示为 HOST-F) 连接 USB 存储设备, 例如 USB 随身碟或其他用作 控制器的乐器。 xxx 您还可以使用它来连接一个小型 USB 灯来了亮控制面板或乐 谱架。 请注意, 乐器背面还有两个端口。...
- Page 207 后面板 | 15 后面板 后面板是您可以找到各种连接的地方。 乐谱架和 PaAS 放大系统指南 接头 电源线接头 音频输入 使用这些接口连接话筒、 吉他或其他乐器。 方便的 STEREO 迷您插孔可用于直接连 接音频输出媒体播放器、 智能手机或平板电脑。 音频输出 使用 LEFT/RIGHT 插孔将立体音色频信号发送到调音台、 PA 系统、 一组有源监听器 或您的高保真系统。 还提供四个独立的音频输出 (1~4)。...
- Page 208 16 | 乐器概述 踏板接头 使用DAMPER接头连接制音踏板, ASSIGNABLE 接头用于连接连续踏板或脚踏开 关。 MIDI 端口 使用这些端口将 Pa5X 连接到外部控制器 (主键盘、 MIDI 吉他、 风控制器、 MIDI 手风 琴、 MIDI 踏板等) 、 一系列扩展器或带有 MIDI 接口的电脑。 电池和 microSD 插槽 这个开口包含时钟电池和 microSD 卡槽。...
- Page 209 后面板 | 17 USB 端口 使用这些端口将您的 Pa5X 连接到个人电脑或平板电脑 (DEVICE) 或最多连接两个 USB 存储设备, 例如 USB 随身碟或其他用作控制器的乐器 (HOST1-R, HOST2-R)。 另一个 HOST 插口 (HOST-F) 在前面板上可用。 视频输出 将 Pa5X 连接到电视或视频监视器, 以在更大的显示屏上阅读歌词与和弦。 电源线接头 此插口插入随附的 IEC 电源线。...
- Page 210 18 | 乐器概述 将电缆的另一端插入交流电源插口。 请务必使用兼容的插头。 切勿强行将插头插入 插口! 警告: 将插头连接到匹配电压的交流插口! 请阅读本手册开头的安全信息。...
- Page 211 DS-1H。 DS-1H 踏板支持某些原声钢琴音色的所有半踏板变化。 您可以在播放 Con- cert▪Grand 音色的同时, 通过逐渐踩下并逐渐释放踏板来试验它的工作原理。 如果您需要更改踏板的极性并进行校准, 请进入Settings▪ >▪ Controllers▪ >▪ Foot页 面。 连接踏板或脚踏开关 使用 PEDAL▪ >▪ ASSIGNABLE 接头连接一个脚踏开关踏板, 如 (可选) KORG PS-1, PS-3或DS-1H 或连续踏板, 如 (可选) KORG XVP-20 音量踏板或 EXP-2 表情踏板。 默认情况下, 此接头将用作表情踏板。 如果您想更改分配的功能或需要更改踏板的 极性并对其进行校准, 请进入 Settings▪>▪Controllers▪>▪Foot 页面。...
- Page 212 20 | 设置踏板和音频连接 如果踏板动作不正确怎么办? 如果需要, 您可能需要校准踏板以使用它们的全部值范围, 没有任何 “死点” 。 此外, 此程序允许选择踏板的极性, 以防您使用反向工作的踏板。 1▪ 进入 Settings▪>▪Controllers▪>▪Foot 页面。 2▪ 触摸踏板区域的Calibration按钮进行校准, 使Pedal/Footswitch▪ Calibration 对话框出现。 3▪ 完全踩下踏板并在继续按下的同时触摸上部 (突出显示) 按钮以确认最大值。...
- Page 213 连接踏板 | 21 4▪ 当出现以下对话框时, 松开踏板。 5▪ 触摸显示屏中的下部 (现在突出显示) 按钮以确认最小值。 检查踏板是否工作正 常。 如果不是, 请重复该过程。 6▪ 按EXIT按钮返回上一页。...
- Page 214 22 | 通电 通电 打开乐器 连接电源线 将随附的电源线插入乐器背面的 POWER 插口和电缆插头插入墙上的电源插口。 连接电缆后, 乐器处于待机状态。 警告: 当乐器处于待机状态时, 它仍然连接到电源线。 触摸乐器内部可能很危险。 要 完全断开乐器的电源, 请从墙上的电源插口拔下电源插头。 打开或关闭电源 ▪▪ > 打开乐器 ▪ > 按POWER ( )按钮打开乐器 (即 “退出待机” ) 。 打开乐器后, 等待欢迎屏幕消 失, 然后显示屏上将显示主页面。 ▪▪ > 关闭乐器 (待机) ▪ > 按住...
- Page 215 倾斜显示器 | 23 倾斜显示器 为了在任何座位下都能获得最佳可见度, 可以调整显示器的倾斜角度。 抬起显示器 1▪ 按 UNLOCK 按钮解锁显示屏。 2▪ 按住 UNLOCK 按钮并抬起显示屏。 3▪ 将安全支架从显示器的顶部背面拆下, 打开它。...
- Page 216 24 | 通电 4▪ 在保持 UNLOCK 按钮按下的同时, 调整倾斜角度并固定支架到显示器外壳底部 的一个挡块。 注意: 不要施加过大的压力, 否则您可能会破坏它! 5▪ 松开UNLOCK按钮, 将显示固定到当前位置。...
- Page 217 倾斜显示器 | 25 关闭显示屏 1▪ 按住 UNLOCK 按钮并抬起显示屏。 2▪ 提起安全支架并将其放回关闭位置。 3▪ 仍然按住 UNLOCK 按钮, 将显示器一直放在外壳上。 4▪ 松开 UNLOCK 按钮, 然后轻轻按下顶部边框的中心显示锁定在初始位置。...
- Page 218 26 | 通电 调整显示亮度 可以调整显示亮度以匹配环境光。 ▪ > 按住 SHIFT 和 MENU 按钮并使用 DIAL 调节显示亮度。 您还可以在Settings▪>▪General▪Controls▪>▪Interface页面中调整显示 (和彩色条显 示) 亮度。...
- Page 219 听示范歌曲 | 27 听示范歌曲 您可以听听我们准备的一些歌曲, 让您了解这个乐器的作用。 ▪▪ > 进入Demo模式 ▪ > 同时按下 DEMO 按钮。 ▪▪ > 聆听所有示范歌曲 ▪ > 进入Demo模式后, 不要按任何按钮。 将播放所有示范歌曲。 ▪▪ > 选择一首示范歌曲 ▪ > 触摸显示屏上的选项之一 (Songs, Sounds, Styles), 然后选择其中一首示范歌 曲。 ▪▪ > 退出▪Demo▪模式 ▪ > 按 DEMO 按钮之一。...
- Page 220 28 | 选择和播放音乐资源 选择和播放音乐资源 打开选择窗口 当您按下 STYLE, SONG或KEYBOARD▪ SET▪ LIBRARY之一按钮, 对应的选择窗口出 现。 选择窗口也可以通过触摸对应的名称打开元素 (伴奏、 歌曲、 键盘设置、 音色或吉他 预设等) 。 轻触选择一种伴奏或歌曲 轻触以选择键盘组...
- Page 221 打开选择窗口 | 29 例如这是浏览键盘组时的选择 窗口: 组 类型 选定的键盘组 上层 (分类对应的文件夹) 当前目录 页面 下层 (单个元素) 您可以随时通过按 EXIT 按钮或触摸显示屏左上角的Exit 命令。 您可以使用播放器 1 或播放器 2 播放伴奏或歌曲。 因此, 如果您愿意, 您可以为每 个演奏者分配一个伴奏或歌曲, 并让另一个演奏者为下一个音乐选择做好准备。 您 还可以与不同的播放器混合伴奏和歌曲。 您可以通过移动 X-FADER 来选择哪个播放器具有焦点或当两个播放器都停止时按 相应的 PLAY/STOP( 按钮。...
- Page 222 30 | 选择和播放音乐资源 选择您喜欢的键盘组 选择 ‘My Setting’ 键盘组 ▪ > 按 MY▪SETTING 按钮选择您喜欢的音色。 ‘My Setting’ 键盘组 My▪ Setting▪ 是一个特殊的键盘组, 您可以在其中保存您喜欢的键盘音色、 效果、 控制滑块和开关 (可分配的开关) 等设置。 该键盘组在乐器打开时自动选择, 并会 自动为您配置乐器。 您可以在这里写下您喜欢的键盘组。 按住 MY▪SETTING 按钮约一秒钟, 直到 Write 对话框出现, 然后触摸Write 按钮以确认保存到内存。...
- Page 223 播放和控制音色 | 31 播放和控制音色 弹奏键盘 本乐器的键盘就跟钢琴键盘一样。 直接上手弹奏吧! 对于某些音色, 您可以在按下琴键后再往下按, 此时音色可能会有所变化 (例如您可 能会听到更多颤音) 。 使用踏板 踏板根据其编程方式实现不同的功能。 制音踏板就是这样 – 制音踏板, 在您松开踏 板之前一直保持音符延音。 可分配踏板 (或脚踏开关) 可能会根据 Settings▪ >▪ Con- trollers▪>▪Foot 页面中的编程方式而改变. 使用控制滑块和开关 根据选择的模式, CONTROL 滑块和开关可以控制不同的内容, 例如不同音色的音 量、 风琴拉杆或一些可分配的功能。 它们的工作方式由滑块下方的条状显示显示。 使用可分配的开关 根据选择的键盘设置和分配的功能, 这些控件可以实现不同的功能。 使用 DNC 音 色,...
- Page 224 32 | 选择和播放音乐资源 使用矩阵 可编程按钮矩阵可以实现多种不同的功能 (触发打击垫、 和弦序列、 音轨播放/静音 等) 。 触摸其中一个或多个以选择所需的功能。 如果它们是开/关开关, 请再次触摸 它们以将其关闭。 开关的颜色可能会发生变化, 具体取决于分配的功能和选定的播放器。 使用操纵杆 左右移动操纵杆通常会改变音色的音高。 向前移动通常会添加调制音效, 但这取决 于所选的音色。 对于机械电风琴, 向前推动操纵杆会改变旋转扬声器的速度。 拉回 时的效果取决于所选的音色。 尽情实验吧! 使用功能区控件 在功能区控件上从左到右扫动通常会改变音色的亮度和/或音高, 但它的作用方式取 决于所选的音色。...
- Page 225 开始和停止伴奏 | 33 开始和停止伴奏 您可以使用PLAYER▪1 或 PLAYER▪2 部分中的控件手动启动和停止自动伴奏。 Stop/ Play/Stop Go to Start ▪▪ > 设置正确的混音 ▪ > 将 X-FADER 完全移向您想听的播放器。 播放器 1 将其完全移至左侧, 播放器 2 将其移至右侧。 将其移动到中间位置以混合两个播放器。 ▪ > ▪▪ > 开始伴奏 1▪ 按PLAY/STOP ) 按钮。 2▪ 用左手演奏一些和弦, 同时用右手演奏旋律。 在播放伴奏时, 请注意显示屏中的各种指示。 选定的伴奏元素...
- Page 226 34 | 选择和播放音乐资源 ▪▪ > 同时启动和停止两个播放器 您可以同时启动两个播放器, 演奏时将它们与 X-FADER 混合。 ▪ > 按住SHIFT按钮并按下两个中的任意一个PLAY/STOP▪ 按钮同时启动两个 播放器。 ▪ > 按住 SHIFT 按钮并按下 PLAY/STOP▪( 两个按钮中的任意一个按钮同时停止 两个播放器。...
- Page 227 开始、 停止和控制歌曲 | 35 开始、 停止和控制歌曲 您可以使用 PLAYER▪1 或 PLAYER▪2 部分中的控件手动开始和停止歌曲。 Stop/ Play/Stop Go to Start ▪▪ > 设置正确的混音 ▪ > 将 X-FADER 完全移向您想听的播放器。 播放器 1 将其完全移至左侧, 播放器 2 将 其移至右侧。 将其移动到中间位置以混合两个播放器。 ▪ > ▪▪ > 启动播放器 ▪ > 按PLAY▪( 按钮。 播放歌曲时,...
- Page 228 36 | 选择和播放音乐资源 使用 MP3 歌曲: 文件路径 快退/快进控制 播放时: 剩余时间 节奏变化 已用时间 停止时: 歌曲总长度 ▪▪ > 快进歌曲 ▪ > 触摸 FAST FORWARD ( ) 按钮一次可跳到下一小节 (MIDI 歌曲) 或下一秒 (MP3 歌曲) 。 ▪ > 持续触摸 FAST▪FORWARD▪( ) 按钮可连续滚动歌曲。 到达所需位置后松开。 ▪▪ > 倒带歌曲 ▪...
- Page 229 开始、 停止和控制歌曲 | 37 ▪▪ > 同时启动和停止两个播放器 您可以同时启动两个播放器, 演奏时将它们与 混合。 X-FADER ▪ > 按住SHIFT按钮并按下两个中的任意一个PLAY/STOP▪ 按钮同时启动两个 播放器。 ▪ > 按住 SHIFT 按钮, 然后按下 PLAY/STOP▪ 两个按钮中的任意一个按钮同时 停止两个播放器。...
- Page 230 Unauthorized changes or modification to this system can void the user’ s authority to oper- ate this equipment. 符合性声明 (美国) Responsible Party: KORG USA INC. Address: 316 SOUTH SERVICE ROAD, MELVILLE Telephone: 1-631-390-6500 Equipment Type: Professional Arranger Model: Pa5X This device complies with Part 15 of FCC Rules.
- Page 232 Address KORG ITALY SpA Via Cagiata, 85 60027 Osimo (AN) Italy www.korg.com © KORG Italy 2022. All rights reserved PART NUMBER: MAN0010152 (M4)