NCR 7350 Instructions Manual
Narrow core receipt printer kit
Hide thumbs
Also See for 7350:
- Kit instructions (6 pages) ,
- Installation instructions manual (47 pages)
Advertisement
Quick Links
Advertisement

Related Manuals for NCR 7350


Summary of Contents for NCR 7350
- Page 1 Kit Instructions 7350 Narrow Core (R5N) Receipt Printer 7350-K914 Issue A...
- Page 2 NCR, therefore, reserves the right to change specifications without prior notice. All features, functions, and operations described herein may not be marketed by NCR in all parts of the world. In some instances, photographs are of equipment prototypes. Software screen images are representative, and in some cases, may not match a customer’s installed software exactly.
-
Page 3: Revision Record
Revision Record Issue Date Remarks May 2021 First Issue... -
Page 5: Kit Contents
7350 Narrow Core (R5N) Receipt Printer Upgrade This publication provides procedures for installing a 7350 (R5N) Receipt Printer in an NCR SelfServ™ Checkout (7350) Narrow Core unit that is upgraded to an NCR FastLane SelfServ™ Checkout (7357) R6LN Plus. Kit Contents Part Number... -
Page 6: Installation Procedure
7350 Narrow Core (R5N) Receipt Printer Upgrade Installation Procedure To install the Receipt Printer, follow these steps: 1. Turn off the NCR SelfServ Checkout software and hardware systems. 2. Unlock and open the Core Door. For more information, refer to Opening Core Door on page 4. - Page 7 7350 Narrow Core (R5N) Receipt Printer Upgrade 11. Close and lock the Core Door. For more information, refer to Closing Core Door page 16. 12. Run the CADD/ADD Configuration Utility to ensure that the device is updated with the latest firmware.
- Page 8 7350 Narrow Core (R5N) Receipt Printer Upgrade Opening Core Door To open the Core Door, follow these steps: 1. Insert key into lock on door latch and turn key counterclockwise. 2. Remove key and then press the keylock to unlatch and open the door.
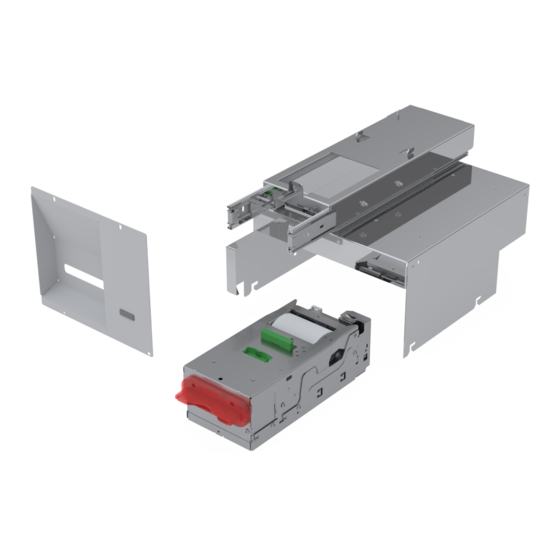
- Page 9 7350 Narrow Core (R5N) Receipt Printer Upgrade Removing Receipt Printer To remove the Receipt Printer, follow these steps: 1. Rack out the Printer Shelf from the unit. 2. Disconnect the power cord and interface cable from the printer. 3. Remove two (2) nuts to detach the Printer Bracket from the shelf, as shown in the image below.
- Page 10 7350 Narrow Core (R5N) Receipt Printer Upgrade Removing Printer Shelf Assembly To remove the Printer Shelf Assembly, follow these steps: Note: Ensure that the Receipt Printer is removed. For more information, refer to Removing Receipt Printer on the previous page.
- Page 11 7350 Narrow Core (R5N) Receipt Printer Upgrade b. Slide the I/O Box-PSU Bracket Assembly towards you to disengage the hooks from the core floor. 3. Remove and set aside four (4) screws to detach the Printer Shelf Assembly from the core wall, as shown in the image below.
- Page 12 7350 Narrow Core (R5N) Receipt Printer Upgrade Removing Coupon Chute and Proximity Sensor Assembly To remove the Coupon Chute Assembly, follow these steps: 1. Detach the Coupon Bin Throat from the back of the Core Door by removing two (2) screws.
- Page 13 7350 Narrow Core (R5N) Receipt Printer Upgrade 2. Detach the existing Coupon Chute from the back of the Core Door by removing four (4) hex nuts. Note: Set aside the screws for reinstallation.
- Page 14 7350 Narrow Core (R5N) Receipt Printer Upgrade Installing Printer Shelf Assembly To install the Printer Shelf Assembly, follow these steps: 1. Attach the Printer Shelf Assembly in the Core Cabinet by reusing four (4) screws. Note: Do not tighten the two (2) screws on the right side.
- Page 15 7350 Narrow Core (R5N) Receipt Printer Upgrade b. Slide the I/O Box-PSU Bracket forward to the hooks on the core floor to lock the bracket in place. c. Tighten the two (2) screws on the right side to secure both I/O Box-PSU Bracket and Printer Shelf Assembly to the core wall.
- Page 16 7350 Narrow Core (R5N) Receipt Printer Upgrade Installing Receipt Printer To install the Receipt Printer in the unit, follow these steps: 1. Do the following: a. Align the bottom slots of the Receipt Printer with the tab hooks on the Printer Shelf.
- Page 17 7350 Narrow Core (R5N) Receipt Printer Upgrade Installing Coupon Chute and Proximity Sensor Assembly To install the Coupon Chute Assembly, follow these steps: 1. Install the Proximity Sensor Assembly to the Chute Assembly using two (2) M3 screws, as shown in the image below.
- Page 18 7350 Narrow Core (R5N) Receipt Printer Upgrade 2. Attach the Coupon Chute with Proximity Sensor Assembly to the back of the Core Door, by reusing four (4) hex nuts, as shown in the image below. 3. Attach the Coupon Bin Throat to the back of the Core Door by reusing two (2)
- Page 19 7350 Narrow Core (R5N) Receipt Printer Upgrade 4. Route the Proximity Sensor cable along the Core Door and then connect to the E- box, as shown in the image below.
- Page 20 7350 Narrow Core (R5N) Receipt Printer Upgrade Closing Core Door To close the Core Door, follow these steps: 1. Close the Core Door and then push the door latch until it closes 2. Insert key into the door latch lock and turn key counterclockwise.