Advertisement
Quick Links
Download this manual
See also:
User Manual
D
igital Camera
Quick Guide
82-132-00021
Specifications
Image Sensor:
3.1M CCD color sensor
Resolution:
Fine: 2272 x 1704 (H/W enhancement);
High: 2048 x 1536 ;
Low: 1024 x 768
Internal Memory: 16MB Flash
External Memory: SD/MMC card slot
Interface: USB/Video out
Flash Mode: Auto/Red-eye/On/Off
File Format: JPEG/DCF/AVI
Self-timer: 10-second delay
Shutter Range: 1/15~1/2500 sec.
Lens: Fixed, f=6.7mm (45mm for 135 camera)
Aperture Ratio: F5.6
Digital Zoom: 2X/4X
View Finder: Yes
LCD Display: 1.5" TFT LCD
Power: 2 x 1.5V AA alkaline batteries
Dimensions: 83 x 31 x 63 mm
Weight: 100g (without battery )
System Requirements
Mass Storage:
Win98se/Me/2000/XP ; Mac OS 9.x and 10.1 above
PC Camera:
Win98se/Me/2000/XP
© All rights reserved. Information in this document is
subject to change without notice. Companies, names,
and data used in examples are fictitious unless
otherwise noted. No part of this document may be
reproduced or transmitted in any form or by any means,
electronic or mechanical, for any purpose.
EN
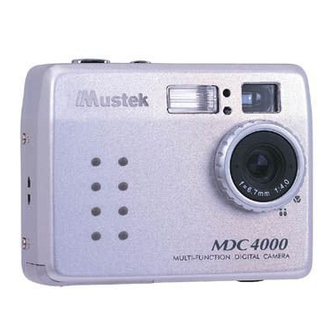
Identifying the Parts
1.
Power button
16. Resolution/Up
2.
Shutter button
button
3.
Self-timer LED
17. Flash/Right/
4.
Flash
Multi-image button
5.
Photo Sensor
18. Self-timer/
6.
Viewfinder
Down button
7.
Speaker
19. Microphone
8.
Video port
20. Battery indicator
9.
USB port
21. Resolution indicator
10. Macro select dial
22. Flash indicator
11. Lens
23. Self-timer indicator
12. Mode button
24. Picture remaining
13. LCD On/Off
25. Memory card
14. LCD display
indicator
15. Menu/Left/
26. Macro mode
Exit button
27. Zoom indicator
28. Long Exposure
Indicator
Preparation
Loading Batteries
Attaching the Strap
Inserting the SD/MMC Card
Camera Operating Modes
Record Mode
Press
button
Playback Mode
Without USB connection
Power On
Mass Storage Mode/Console
Press
button
PC Camera Mode
With USB connection
(Not Available for MAC)
NOTE: Please do not copy any files into the DCIM folder
of your camera. Otherwise it may cause camera
unstable or crash.
ES
Partes de la cámara
1.
Botón de
16. Botón de resolución /
encendido
arriba
2.
Obturador
17. Botón de flash /
3.
LED del
derecha /
temporizador
multi-imagen
4.
Flash
18. Botón de
5.
Fotosensor
temporizador / abajo
6.
Visor
19. Micrófono
7.
Altavoz
20. Indicador de batería
8.
Puerto de vídeo
21. Indicador de
9.
Puerto USB
resolución
10. Botón de macro-
22. Indicador de flash
selección
23. Indicador del
11. Objetivo
temporizador
12. Botón de modo
24. Imágenes disponibles
13. LCD encendido /
25. Indicador de la tarjeta
apagado
de memoria
14. Pantalla LCD
26. Modo macro
15. Botón de menú /
27. Indicador del zoom
izquierda / salir
28. Indicador de
exposición larga
Preparación
Colocar las pilas
Fijar la correa
Insertar la tarjeta SD/MMC
Conexión a un ordenador
Modo de grabación
Pulse el botón
Modo de reproducción
Sin conexión USB
Encendido
Modo de almacenamiento
masivo/Console
Pulse el botón
Modo Cámara de PC
Con conexión USB
NOTA: No copie ningún archivo en la carpeta DCIM de
la cámara. De lo contrario, ésta puede volverse
inestable o dejar de responder.
DE
Bedienungselemente
17. Taste Blitzlicht/
1.
Ein-/ Aus-Taste
Rechts/Mehrere
2.
Auslöser
Bilder
3.
Selbstauslöser-LED
18. Taste
4.
Blitzlicht
Selbstauslöser/
5.
Fotosensor
Abwärts
6.
Sucher
19. Mikrofon
7.
Lautsprecher
20. Batterieanzeige
8.
Video-Schnittstelle
21. Auflösungsanzeige
9.
USB-Schnittstelle
22. Blitzlichtanzeige
10. Makroobjektiv
23. Anzeige für
11. Linse
Selbstauslöser
12. Modustaste
24. Noch mögliche
13. LCD Ein/Aus
Aufnahmen
14. LCD-Bildschirm
25. Anzeige für
15. Taste Menü/Links/
Speicherkarte
Beenden
26. Makro-Modus
16. Taste Auflösung/
27. Zoom-Anzeige
Aufwärts
28. Anzeige für lange
Belichtungszeit
Vorbereitung
Batterien aufladen
Trageschlaufe befestigen
SD/MMC-Karte einlegen
Modi und Funcktionen
Aufnahmemodus
Taste
drücken
Ansichtsmodus
Ohne USB-Verbindung
Einschalten
Speichermodus/Console
Taste
drücken
PC-Kameramodus
Mit USB-Verbindung
Hinweis: Bitte kopieren Sie keine Dateien in den
Ordner DCIM der Kamera. Anderenfalls kann sie instabil
werden oder "abstürzen".
NL
De onderdelen identificeren
1.
Aan/uit knop
16. Knop Resolutie/Naar
boven
2.
Sluiterknop
17. Knop Flitser/Rechts/
3.
LED zelfontspanner
Meerdere beelden
4.
Flitser
18. Knop Zelfontspanner/
5.
Fotosensor
Naar beneden
6.
Zoeker
19. Microfoon
7.
Luidspreker
20. Batterij-indicator
8.
Videopoort
21. Resolutie-indicator
9.
USB-poort
22. Flitserindicator
10. Selectieknop Macro
23. Zelfontspannerindicator
11. Lens
24. Resterende foto's
12. Modusknop
25. Geheugenkaartindicator
13. LCD aan/uit
26. Modus Macro
14. LCD-scherm
27. Zoomindicator
15. Knop Menu/Links/
28. Indicator lange
Einde
belichting
Voorbereidsel
Batterijen plaatsen
De draagriem vastmaken
De SD/MMC-kaart plaatsen
Werkingsmodi van de camera
Opnamemodus
Drukknop
Playbackmodus
Zonder USB-aansluiting
Aan
Modus Massaopslag/Console
Drukknop
Modus PC-camera
Met USB-aansluiting (Niet
beschikbaar voor MAC)
OPMERKING: Kopieer geen bestanden in de map DCIM
van uw camera. Anders kan de camera onstabiel
worden of crashen.
FR
Présentation de l'appareil
16. Bouton Résolution /
1.
Bouton de mise sous
Vers le haut
tension
17. Bouton Flash / Droite /
2.
Bouton de
Multi-images
déclenchement de
l'obturateur
18. Bouton Retardateur /
3.
Voyant du retardateur
Vers le bas
19. Microphone
4.
Flash
20. Indicateur du niveau
5.
Capteur photo
des piles
6.
Viseur
21. Indicateur de la
7.
Haut-parleur
résolution
8.
Port vidéo
22. Indicateur de flash
9.
Port USB
23. Indicateur du
10. Bouton de sélection
retardateur
macro
24.
Photos restantes
11. Objectif
25. Indicateur de la carte
12. Bouton Mode
de mémoire
13. Mise sous / hors
26. Mode Macro
tension de l'écran
27. Indicateur de zoom
LCD
28. Indicateur d'exposition
14. Écran LCD
prolongée
15. Bouton Menu /
Gauche / Quitter
Préparation
Insertion des piles
Mise en place de la courroie
Insertion de la carte SD/MMC
Modes et Fonctions
Mode «Enregistrement»
Appuyez sur le
bouton
.
Mode «Lecture»
Sans connexion USB
Mise en route
Mode «Stockage de masse»
/Console
Appuyez sur le
bouton
.
Mode«Appareil-photo pour PC»
Avec connexion USB
REMARQUE : Ne copiez aucun fichier dans le dossier
DCIM de votre appareil-photo. Dans le cas contraire,
votre appareil pourrait devenir instable ou ne plus
fonctionner.
PT
Identificação dos componentes
1.
Botão de
17. Botão do flash/
alimentação
direita/multimagem
2.
Botão do obturador
18. Botão do
temporizador/para
3.
LED do temporizador
baixo
automático
4.
Flash
19. Microfone
20. Indicador do estados
5.
Sensor da fotografia
das baterias
6.
Visor
21. Indicador de
7.
Altifalante
resolução
8.
Porta do vídeo
22. Indicador do flash
9.
Porta USB
23. Indicador do
10. Disco de selecção da
temporizador
macro
automático
11. Objectiva
24. Número de
12. Botão do modo
fotografias restantes
13. LCD ligado/desligado
25. Indicador do cartão
14. LCD
de memória
15. Botão do menu/
26. Modo da macro
esquerda/sair
27. Indicador do zoom
16. Botão de resolução/
28. Indicador de
para cima
exposição longa
Preparação
Introduzir as baterias
Colocar a correia
Introduzir o cartão SD/MMC
Modos de funcionamento da câmara
Modo de gravação
Prima o botão
Modo de reprodução
Sem a ligação USB
Ligar
Modo de armazenamento
em massa/Console
Prima o botão
Modo de câmara compatível
com PC
Com ligação USB (não está
disponível para o MAC)
NOTA: Não copie qualquer ficheiro para a pasta DCIM
da câmara. Caso contrário, pode tornar a câmara
instável ou até bloquear.
IT
Identificazione delle parti
1.
Pulsante di
15. Pulsante menu/
accensione
sinistra/esci
2.
Pulsante
16. Pulsante risoluzione/
Otturatore
sopra
3.
LED autoscatto
17. Pulsante flash/destra/
4.
Flash
immagini multiple
5.
Esposimetro
18. Pulsante autoscatto/
6.
Mirino
sotto
7.
Altoparlante
19. Microfono
8.
Porta video
20. Indicatore carica della
9.
Porta USB
batteria
10. Pulsante di
21. Indicatore risoluzione
selezione macro
22. Indicatore flash
11. Obiettivo
23. Indicatore autoscatto
12. Pulsante della
24. Contatore fotografie
modalità
disponibili
13. Accensione/
25. Indicatore scheda
Spegnimento
di memoria
display LCD
26. Modalità macro
14. Display a
27. Indicatore zoom
cristalli liquidi
28. Indicatore di
esposizione lunga
Preparazione
Caricamento delle batterie
Fissaggio della cinghia
Inserimento della scheda SD/MMC
Connessione a un computer
Modalità Registrazione
Premere il pulsante
Modalità Riproduzione
Senza collegamento USB
Accensione
Modalità Memorizzazione
/Console
Premere il pulsante
Modalità PC
Con collegamento USB
NOTA: Non copiare alcun file nella cartella DCIM della
fotocamera. In caso contrario, la fotocamera può
diventare instabile o smettere di funzionare.
SW
Oversigt over knapper og funktioner
16. Opløsning/op, knap
1.
Tænd/sluk-knap
17. Blitz/højre/
2.
Lukkerknap
multibillede, knap
3.
Lampe for
18. Selvudløser/ned,
selvudløser
knap
4.
Blitz
19. Mikrofon
5.
Lysføler
20. Batteriindikator
6.
Viewfinder
21. Opløsningsindikator
7.
Högtalare
22. Blitzindikator
8.
Videoport
23. Indikator for
9.
USB-port
selvudløser
10. Makrodrejeknap
24. Antal resterende
11. Linse
billeder
12. Funktionsknap
25. Indikator for
(Mode)
hukommelseskort
13. LCD tændt/slukket
26. Makrofunktion
14. LCD-display
27. Zoomindikator
15. Menu/venstre/afslut,
28. Indikator för
knap
långtidsexponering
Forberedelse
Isætning af batterier
Påsætning af remmen
Isætning af SD/MMC-kort
Kamerafunktioner
Optagefunktion
Tryk på knappen
Afspilningsfunktion
Uden USB-
tilslutning
Tænd
Harddiskfunktion/Console
Tryk på knappen
Pc-kamerafunktion
Med USB-tilslutning (ikke
tilgængelig til Mac)
BEMÆRK: Pas på ikke at kopiere filer til
kameramappen DCIM, da kameraet ellers kan blive
ustabilt eller defekt.
Advertisement

Related Manuals for Mustek MDC 4000


Summary of Contents for Mustek MDC 4000
-
Page 1: Identificazione Delle Parti
igital Camera Identifying the Parts Quick Guide Power button 82-132-00021 Shutter button Self-timer LED Flash Photo Sensor Viewfinder Speaker Video port USB port 10. Macro select dial 11. Lens 12. Mode button 13. LCD On/Off 14. LCD display 15. Menu/Left/ Exit button Preparation Loading Batteries... - Page 2 igitalkamera Identifiera komponenterna Lynvejledning Strömbrytare 82-132-00021 Avtryckare Lysdiod för självutlösare Blixt Fotosensor Sökare Højttaler Videoport USB-port 10. Väljarratt för makro 11. Lins 12. Lägesknapp 13. LCD på/av 14. LCD-display 15. Knapp för meny/ Förbereidelse Sätta i batterierna Sätta fast remmen Ladda SD/MMC-kortet Kamerans driftslägen Strömbrytare på...