Advertisement
- 1 What's Included
- 2 Controls Overview
- 3 Quick Set-Up
- 4 The Display
- 5 Setting A Light Alarm
- 6 Previewing the Alarm
- 7 Turning the Alarm On/Off
- 8 Snooze/Display Dimmer
- 9 Programmable Snooze and Dimmer
- 10 Sleep Mode
- 11 Using Light Modes
- 12 Charging Devices Via USB Port
- 13 Battery Back-Up
- 14 Maintenance
- 15 IMPORTANT SAFETY INSTRUCTIONS
- 16 Documents / Resources
What's Included

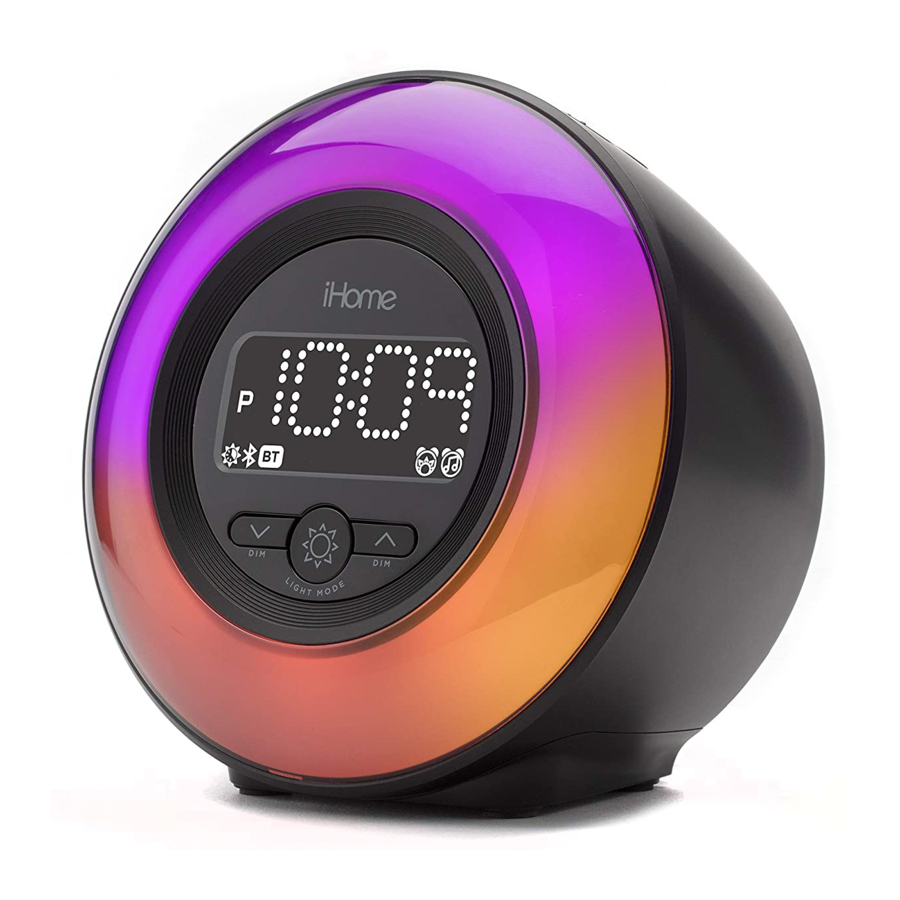
Controls Overview

Rear Controls

Light Modes
Press Light Mode to cycle through colors.
Use DIM Buttons to adjust the brightness.

Quick Set-Up
Connecting the Unit

Select the proper plug for your location. Insert correct plug into adapter and twist to lock into place. To switch plugs, press button tab and twist plug to release.
- Remove the battery pull tab from the bottom of the unit before use.
- Connect the included AC adapter to the DC jack located on the back of the unit, and connect the other end to a working wall outlet.
Setting Your Clock

Note: By default, the unit is set to a 24 hour clock display. To adjust to 12 hours, press the Light Alarm or Sound Alarm Button while in Time Set mode.
- Press and hold the Time Set Button until the display flashes.
- Press the – or + Buttons to adjust selections and tap Time Set to confirm.
- Do this for time, year, month and date.
- All done!
Hour Adjust Switch:
The unit ships with the Hour Adjust switch (located on the bottom of the unit) in 0 position. To adjust time for Summer Time and Standard Time, slide switch from 0 to +1 to add an hour or from 0 to -1 to subtract an hour.
Connecting to Bluetooth

- Press the Power Button.
- Press and hold the Play/Bluetooth Pairing Button until the display flashes.
- Select 'iHome iBT294' from your Bluetooth device's menu to connect.
The Display

Setting A Sound Alarm
- Press and hold the Sound Alarm Button for 2 seconds until the alarm time display and alarm icon flash. A beep sounds.
- Press the – or + Buttons to adjust the alarm time to the desired time (hold for rapid setting).
- Press the Sound Alarm Button to confirm the alarm time setting. The alarm schedule will flash:
7 (every day), 5 (weekdays) or 2 (weekend only). Press the – or + Buttons to select the desired alarm schedule. - Press the Sound Alarm Button to confirm the alarm schedule. The wake-to source will flash.
- Press the – or + Buttons to select a wake-to alarm source: Bluetooth or Tone: Wake to Bluetooth: Press the Sound Alarm Button to confirm. Wake to Tone: Press the Sound Alarm Button to confirm. Press the – or + Buttons to select a tone (T1-T4).
- Press the Sound Alarm Button to confirm wake-to source. The alarm volume will flash.
- Press the – or + Buttons to adjust the alarm volume.
- Press the Sound Alarm Button to confirm alarm volume and exit alarm setting mode. 2 beeps will confirm alarm setting is complete. The alarm icon on the display indicates alarm is armed.
Setting A Light Alarm
- Press and hold the Light Alarm Button for 2 seconds until the alarm time display and alarm icon flash. A beep sounds.
- Press the – or + Buttons to adjust the alarm time to the desired time (hold for rapid setting).
- Press the Light Alarm Button to confirm the alarm time setting. The alarm schedule will flash:
7 (every day), 5 (weekdays) or 2 (weekend only). Press the – or + Buttons to select the desired alarm schedule. - Press the Light Alarm Button to confirm the alarm schedule. The wake-to source will flash.
- Press – or + Buttons to select a wake-to light mode: Dawn, Fade, Fast, Stop, Beat, Sky, or Nite.
- Press the Light Alarm Button to confirm alarm settings and exit alarm setting mode. 2 beeps will confirm alarm setting is complete. The alarm icon on the display indicates alarm is armed.
Previewing the Alarm
Press and release the Light Alarm Button or Sound Alarm Button to view the current alarm settings.
Turning the Alarm On/Off
- Press and release the corresponding Alarm Button (Light or Sound) twice within 5 seconds to toggle the alarm ON and OFF, indicated by the related white alarm indicator
- When the alarm sounds, press the corresponding Alarm Button (Light or Sound) or the Power Button to disable the alarm and reset it to come on at the same time the next day.
Snooze/Display Dimmer
Snooze: When the alarm is sounding, press the Snooze/Dimmer Button to snooze for 9 minutes.
Dimmer: Press the Snooze/Dimmer Button (when alarm is NOT sounding) to adjust display brightness.
Programmable Snooze and Dimmer
Adjust the snooze duration and set a schedule for your clock backlight to automatically dim and brighten at certain times of the day.
- Press and hold the Snooze/Dimmer Button until the display starts to flash.
- Use the + or - Buttons to adjust the snooze duration from 1-29 minutes. Press the Snooze/Dimmer Button again to confirm.
Now it's time to set the display dimmer schedule: - Use the + or - Buttons to set the AUTO dimmer to ON or OFF. Press Snooze/Dimmer Button to confirm. (Note: Choosing OFF will simply exit the setting.)
- Use the + or - Buttons to choose the BRIGHTNESS level for daytime hours. Press Snooze/Dimmer Button again to confirm.
- Use the +/- Buttons to set the TIME you want the daytime dimmer to take effect. Press Snooze/Dimmer Button again to confirm.
- Use the +/- Buttons to choose the BRIGHTNESS level for nighttime hours. Press Snooze/Dimmer Button again to confirm.
- Use the +/- Buttons to set the TIME you want the nighttime dimmer to take effect. Press Snooze/Dimmer Button again to confirm.
- Done! The
![]() icon will appear on the display when Dimmer Schedule is active.
icon will appear on the display when Dimmer Schedule is active.
Sleep Mode
To set a sleep timer:
- Press the Sleep Button as needed to cycle to the desired sleep timer duration: 120, 90, 60, 30, 15 minutes, or OFF.
- Press and release the Sleep Button during Sleep Mode to review the remaining sleep time.
Using Light Modes
Press the Light Mode Button repeatedly to cycle through 6 different modes:


- Fade
- Fast
- Stop
- Beat
- Sky
- Nightlight
- OFF
Use DIM Buttons to adjust the brightness.
Use the Color Quick Select Buttons to select Fade/Fast, One Color, Sky, or Nightlight.
Charging Devices Via USB Port
Connect the standard end of a USB cable (not included) to the USB Port on the back of the unit, and connect the other end to the charging port on your device.
Monitor the charging on your device. Some devices use a proprietary charging method and will not charge using the USB port. If this happens, you must charge your device using the charger that came with it.

Note: Unit must be plugged into working outlet in order to charge devices.
Battery Back-Up
The unit uses a CR-2450 back-up battery to provide continuous alarm operation and clock settings in the event of a temporary power failure. Remove the battery pull tab before use. When the battery icon on the clock display is flashing, it is time to replace the back-up battery. The battery compartment is located on the bottom of the unit.

- Make sure the AC adapter is connected, or you will lose your time and alarm settings during battery replacement.
- Use a Phillips screwdriver to open the battery compartment door.
- Insert a fresh CR-2450 battery, checking that the polarity match the markings on the unit. Replace the compartment door. Do not overtighten.

- Do not ingest the battery, Chemical Burn Hazard. This product contains a coin/button cell battery. If the coin/button cell battery is swallowed, it can cause severe internal burns in just 2 hours and can lead to death.
- Keep new and used batteries away from children. If the battery compartment does not close securely, stop using the product and keep it away from children. If you think batteries mtight have been swallowed or placed inside any part of the body, seek immediate medical attention.
![]()
RISK OF EXPLOSION IF BATTERY IS REPLACED BY AN INCORRECT TYPE. DISPOSE OF USED BATTERIES ACCORDING TO THE INSTRUCTIONS.

Maintenance
- Remove plastic protective film from the clock display.
- Place the unit on a level surface away from sources of direct sunlight or excessive heat.
- Protect your furniture when placing your unit on a natural wood and lacquered finish. A cloth or other protective material should be placed between it and the furniture.
- Clean your unit with a soft cloth moistened only with mild soap and water. Stronger cleaning agents such as thinner or similar materials can damage the surface of the unit.
IMPORTANT SAFETY INSTRUCTIONS
Please heed all warnings, read and follow all instructions and keep these instructions handy for future reference.
- Do not use this product near water, and clean only with dry cloth.
- Do not block any ventilation openings. Install in accordance with the manufacturer's instructions.
- Heat – This product should be situated away from heat sources such as radiators, heat registers, stoves or other appliances (including amplifiers) that produce heat.
- Only use attachments/accessories specified by the manufacturer.
- Unplug this product during lightning storms or when unused for long periods of time.
- Damage Requiring Service – This product should be serviced by qualified service personnel when:
- Plug has been damaged.
- Objects have fallen into or liquid has been spilled into the enclosure.
- The unit has been exposed to rain. The unit has been dropped or the enclosure damaged.
- The unit exhibits a marked change in performance or does not operate normally.
- No naked flame sources, such as lighted candles, should be placed on this product.
- Attention should be drawn to the environmental aspects of battery disposal.
- This product is suitable for use in tropical and/or moderate climates.
![]()
To reduce the risk of fire or electric shock, do not expose this product to rain or moisture.- Do not dispose of batteries in the household trash or fire.
- The mains plug of power adaptor is used as the disconnect device, it shall remain readily operable.


This product bears the selective sorting symbol for waste electrical and electronic equipment (WEEE).

This means that this product must be handled pursuant to European Directive 2012/19/EU in order to be recycled or dismantled to minimize its impact on the environment. For further information, please contact your local or regional authorities.
Electronic products not included in the selective sorting process are potentially dangerous for the environment and human health due to the presence of hazardous substances.
| AC adapter Information for ErP (EU) requirement | |
| Manufacturer's name and address |
SDI Technologies Inc. 1299, Main Street, Rahway, NJ 07065, U.S.A. |
| Model | AK18WG-0500200DP |
| Input voltage | AC100-240V |
| Input AC frequency | 50/60Hz |
| Output voltage | DC5V |
| Output current | 2A |
| Output power | 10W |
| Average active efficiency | 83.5% |
| Efficiency at low load (10%) | 76.01% |
| No-load power consumption | 0.05W |
© 2020 SDI Technologies, Inc. All rights reserved.
Questions? Visit www.ihomeintl.com

Documents / Resources
References
Download manual
Here you can download full pdf version of manual, it may contain additional safety instructions, warranty information, FCC rules, etc.
Download IHome POWERCLOCK GLOW iBT294 - Bluetooth Speaker Quick Start Guide
Advertisement
Thank you! Your question has been received!


Need Assistance?
Do you have a question about the POWERCLOCK GLOW that isn't answered in the manual? Leave your question here.