
Related Manuals for Milwaukee 8960-20


Summary of Contents for Milwaukee 8960-20
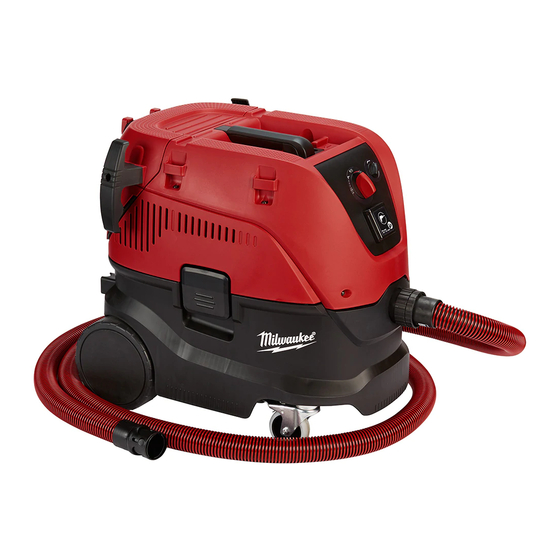
- Page 1 REPAIR INSTRUCTIONS for Model 8960-20 No. 8960-20 8 Gallon Dust Extractor MILWAUKEE TOOL www.milwaukeetool.com 13135 W. LISBON RD., BROOKFIELD, WI 53005 58-92-8960 042017 Drwg. 1...
-
Page 2: Table Of Contents
Index Construction A. Safety issues B. Technical data C. Construction / function Troubleshooting E. Service / repair Spare parts G. Electrical diagrammes... - Page 3 These show you the location pairs are carried out. Further workbench or the like with the of the individual parts and the repair manuals of the 8960-20 necessary power supply sequence in which they are may be necessary for repairs available.
-
Page 4: Safety Issues
Safety issues Observe national safety For your own safety. directives and regulations for the electrical engineer- ing trade, in particular: IEC 60335-2-69 EN 60335-2-69 DIN VDE 105 part 1: operation of electrical power installations. DIN VDE 0701/0702: Repairs should only be repair, modification and made by someone who has testing of electrical installa-... -
Page 5: Technical Data
Technical data Model 8960-20 Possible Voltage 110-120 Power P W HP 890/7,4A 1,2 Connected Load for Appliance Socket 550/4,6A Mains Frequency 50/60 Fuse Protection Grade (moist, dust) IPX4 Protection Class (electrical) Maximum Airflow* l/s m³/h CFM 70 252 148 Maximum Vacuum... -
Page 6: Construction / Function
Construction Hatchback Solenoid actuator Filter cleaning system Motor unit Full tank sensor Flow sensor PCBA Buzzer alarm Control panel Control panel Motor speed control Rotary on/off switch Socket for power tools... - Page 7 Construction Main filter element, PTFE Floater - full tank sensor for liquids Container clamp Air flow cover AntiStatic grounding clip 30 ltr container...
- Page 8 Function Airflow...
- Page 9 Function Automatic filter cleaning system Even with extremely fine dust the automatic filter cleaning function allows you to work constantly with the same suction performance without having to manually clean the filter. A powerful reversed air pulse is activated every 15 seconds keeping the air flow on a high level. The air pulse is created by a solenoid connected to a piston with double-valve.
-
Page 10: Troubleshooting
Troubleshooting Motor not working with switch set to ”I” Check: - Mains voltage present? - Power cord plugged into socket? - Switch set to “I” ? Connect motor directly to Replace motor. Check if machine is working mains. Is motor working? correctly. - Page 11 Troubleshooting Motor not working with switch set to ”AUTO/TOOL” Check: - Mains voltage present? - Power cord plugged into wall socket? - Switch set to “AUTO/TOOL” ? - Load with > 60W plugged into socket? Connect motor directly to Replace motor. Check if machine is working mains.
-
Page 12: Service / Repair
Service / repair 0. Disassembly 1. Change motor unit 2. Change power cord 3. Replace rotary switch 4. Replace power socket 5. Change hatch back clamp 6. Change H-class/HEPA filter 7. Change pressure switch 8. Change solenoid 9. Change castor wheels... -
Page 13: Disassembly
Disassembly WARNING: The upper section of the machine TIP: Unless otherwise contains live components. Contact with live stated a TX20 bit is components leads to serious or even fatal needed for the screws. injuries. Always disconnect the mains plug before disassembly. - Page 14 Disassembly WARNING: The upper section of the machine contains live components. Contact with live components leads to serious or even fatal injuries. Always disconnect the mains plug before disassembly. Open the hatch back and take out the filter (fig.3). Disconnect and dismount Hatch back Unscrew the cable relief using a TX10 bit (fig.1).
- Page 15 Disassembly WARNING: The upper section of the machine contains live components. Contact with live components leads to serious or even fatal injuries. Always disconnect the mains plug Disconnect and dismount Hatch back before disassembly. (continued) Disconnect the two solenoid wires from the grounding (fig.2) and the PCBA (fig.3).
- Page 16 Disassembly Disconnect and dismount Hatch back (continued) Dismount the hatch back by pressing the hinge in each side (fig.4).
- Page 17 Disassembly TIP: Before disconnecting wires check if a letter is placed in the plastic next to the connector. This letter will refer to a letter on the PCBA and in the electrical diagrammes. Example: Detail from electrical diagramme:...
-
Page 18: Change Motor Unit
Change motor unit WARNING: The upper section of the machine contains live components. Contact with live components leads to serious or even fatal injuries. Always disconnect the mains plug before disassembly. Motor connection to PCBA Full tank sensor connection to PCBA Motor connection to swicth Disassemble the handle, top cover, filter and hatch back as described in previous Section E.0. -
Page 19: Change Power Cord
Change power cord Disassemble the handle, top cover, filter and hatch back as described in previous Section E.0. Disconnect the wires on power cord from their connection points on switch and earth grounding (fig.1-3). Unscrew the cable relief (use TX10 bit) and pull the cord out of the relief hole (fig.4). Install new power cord of same type as original. -
Page 20: Replace Rotary Switch
Replace rotary switch WARNING: The upper section of the machine contains live components. Contact with live components leads to serious or even fatal injuries. Always disconnect the mains plug before disassembly. Disassemble the handle and top cover as described in previous Section E.0. Take off control panel and disconnect the wires on the switch (fig.1). -
Page 21: Replace Power Socket
Replace power socket WARNING: The upper section of the machine contains live components. Contact with live components leads to serious or even fatal injuries. Always disconnect the mains plug before disassembly. Disassemble the handle and top cover as described in previous Section E.0. Take of control panel and disconnect the wires on the power socket (fig.1). -
Page 22: Change Hatchback Clamp
Change hatchback clamp Disassemble the handle and top cover as described in previous Section E.0. Unscrew the two plastic covers on the hatch back (fig.1). Dismount the clamp by pressing the outer metal pin ”A” from left side (fig.2). Notice position of the spring (fig.3). -
Page 23: Change H-Class/Hepa Filter
Change H-class/HEPA filter Open the container clamps (fig.1) and turn motor head upside down. Unscrew and remove the orange filter cover (fig.2). Take off H-class/HEPA filter and dispose it in a safe manner. WARNING: Filter might be contaminated by hazardous dust. Wear a P2 breathing mask and avoid spreading harmful dust. -
Page 24: Change Pressure Switch
Change pressure switch WARNING: The upper section of the machine contains live components. Contact with live components leads to serious or even fatal injuries. Always disconnect the mains plug before disassembly. Disassemble the handle and top cover as described in previous Section E.0. If the pressure difference 20-30 mbar over the ’+’... -
Page 25: Change Solenoid
Change solenoid WARNING: The upper section of the machine contains live components. Contact with live components leads to serious or even fatal injuries. Always disconnect mains plug before disassembly. Disassemble the handle and top cover as described in previous Section E.0. Unscrew the two plastic covers on the hatch back (fig.1). -
Page 26: Change Castor Wheels
E.11 Change castor wheels Unscrew the defect wheel including the bushing connected to the container. Mount the parts in the order laid out in fig.1: bushing (which must flush with the container surface), washer, wheel, screw. To improve the stregth and fixation of the castor wheel it is recommended to use Loctite or similar between the bushing and the screw. -
Page 27: Spare Parts
Spare parts FIG. DESCRIPTION OF PART NO. REQ. Rotary Knob O-Ring 2.9 x 19 ST Screw Rotary Switch Potentiometer Assembly O-Ring Turning Knob Assembly Outlet Receptacle Control Panel Kit Handle Kit K50 x 45 Screw Top Cover 5 x 18 Screw Hatch Door Cord Strap Kit Hatch Door Clamp Kit... - Page 28 Spare parts FIG. DESCRIPTION OF PART NO. REQ. Hatch Door Frame Assembly 5 x 18 Screw Solenoid Kit PT35 x 18 Screw Cord Clamp Hatch Door Filter Gasket Kit Main Filter FIG. DESCRIPTION OF PART NO. REQ. Foam Pad Hatch Door Hinge (Set of two) Reed Sensor Assembly Circuit Board Assembly 3.5 x 18 Screw...
- Page 29 Spare parts FIG. DESCRIPTION OF PART NO. REQ. Sound Filter 3.5 x 18 Screw Cord Clamp Distribution Strip Container Clamp Power Cord Base Plate Assembly Kit Anti-Static Ground Clip Assembly Floater with Magnet K50 x 18 Screw Air Flow Cover Kit Container Gasket...
- Page 30 Spare parts WARNUNG: Dieses Gerät enthält gesundheitsgefährliche Stäube. Entleerung und Wartung einschließlich Entfernung des Staubbeutels dürfen nur von sachkundigen Personen vorgenommen werden, die geeignete persönliche Schutz- ausrüstung tragen. Nicht einschalten bevor das komplette Filtersystem installiert und die Funktion der Volumenstrom- kontrolle überprüft worden ist.
- Page 31 Spare parts FIG. DESCRIPTION OF PART NO. REQ. Hose Quick System Hose Sleeve Hose Sleeve Curved Hand Tube Power Tool Adapter Floor Nozzle Universal Nozzle Brush Attachment Wet/Dry Floor Nozzle Industrial Floor Nozzle w/ Brush Vacuum Hose Adapter (Not Shown) 1 DEK26 Adapter (Not Shown) DE Adapter (Not Shown) FIG.
-
Page 32: Electrical Diagrammes
Electrical diagrammes Socket Reed switch PCBA Motor Speed Main switch / Mode selector Solenoid For 120V US For 100-120V... - Page 33 Electrical diagrammes PCBA TYPE P2...
- Page 34 Electrical diagrammes Wire overview...