Advertisement
Introduction
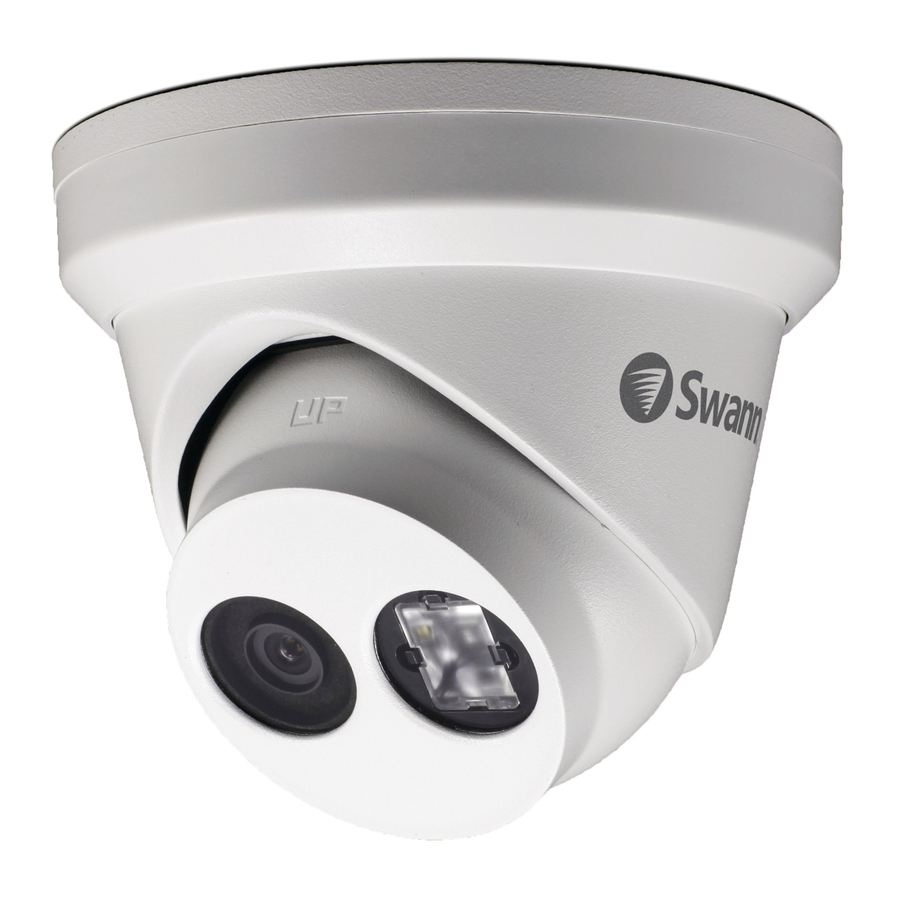
Congratulations on the purchase of your Swann Ultra HD Camera.
- The camera has a cutting edge EXIR infrared LED that emits a rectangular pattern for a more crisp & even night vision image
- See everything with Swann's 4K Ultra HD Day/ Night camera in a super wide 75° field of view, allowing you to see detail you might otherwise miss
- With discreet dome styling & sturdy aluminium construction, the camera suits any conditions with weather resistant rating of IP67 for indoor & outdoor use
- This camera can only be used in combination with Swann's Ultra HD Network Video Recorders including NVR8-8000™ & NVR16-8000™ for cutting-edge IP surveillance in amazing 4K
Important instructions
- Make sure the camera is fixed correctly and stable if fastened in place.
- Never place strain of any kind on the network cable connection. It's designed to clip into the Ethernet port, but it won't support weight and can be broken.
- Do not operate if wires and terminals are exposed.
Please note: Have a look at the camera location tips included with your NVR, to select the best location for your camera (the camera location tips provided here are for general purpose only).
Important note: All jurisdictions have specific laws and regulations relating to the use of cameras. Before using any camera for any purpose, it is the buyer's responsibility to be aware of all applicable laws and regulations that prohibit or limit the use of cameras.
Connecting the Camera
To connect the camera to your NVR, simply connect the supplied Ethernet cable to the LAN connection on the camera then plug the other end of the cable into one of the IP camera inputs on the back of your NVR.

![]() Please note: The power connector is provided as an alternative power option if required. Your NVR will provide power over the Ethernet cable when connected and a separate power adapter is not required.
Please note: The power connector is provided as an alternative power option if required. Your NVR will provide power over the Ethernet cable when connected and a separate power adapter is not required.
Mounting the Camera

The camera can be mounted onto a flat surface using the screws and wall plugs provided. The surface must have sufficient strength to hold the camera.
- Rotate the dome ring counter clockwise and lift it up to remove it from the camera.
- Position the dome base in the location you want to mount to then mark the mounting holes on the surface to position the screws (mounting template included). Using the appropriate screws for the surface you are mounting to, screw the dome base into place.
- To adjust the camera to the desired focal position, use a Phillips head screwdriver to loosen the lock screw.
- The dome enclosure can be rotated left or right and the dome camera can be aimed in almost any direction from wherever you choose to mount it. Check the image on your NVR and make adjustments as necessary to ensure the best coverage.
- Make sure the camera's focal position is always facing up (you will see UP indented on the camera) otherwise the image will be upside down. When finished, tighten the lock screw to secure the camera's position.
- Rotate the dome ring counter clockwise (if mounted horizontally) or clockwise (if mounted vertically) to lock it in place.
Camera Location Tips
- Take into consideration what you want to monitor and where you'll get the best view of it.
- How you're going to connect the camera to your monitoring system; remember that cables and connections should be kept out of the weather.
- How to keep the camera out of harm's way. It's recommended to mount your camera at an elevated position.
- Place your camera as close to the area of interest as practicable. The best position is from about 13ft/4m above looking slightly down, keeping in mind the details you are looking for.
- Although the sky looks nice when you look at the live view from your camera, it is an unlikely direction for an offender to approach. Make sure your camera has minimal sky in it as the light in daylight can make the foreground of the image darker.
- Think about the most likely way a potential offender may approach your home, use your camera to give you the best coverage of these areas.
- The camera's casing is resistant to different weather conditions and tampering. It would take an overwhelming event to damage the housing.
- Even though the camera is weather and water- resistant, prolonged exposure to adverse weather conditions such as sunlight or excessive moisture, may eventually damage the internal components of the camera and adversely affect its performance.
- Run cables inside a wall cavity or other protected enclosure, and ensure that all wiring and connectors are insulated and protected from moisture.
- Don't put your cable near live electrical wiring. AC electricity generates radio "noise" which can interfere with the signal from your camera.
Limited Warranty - Terms & Conditions
Swann Communications warrants this product against defects in workmanship and material for a period of one (1) year from its original purchase date. You must present your receipt as proof of purchase for warranty validation. Any unit which proves defective during the stated period will be repaired without charge for parts or labour or replaced at the sole discretion of Swann. The end user is responsible for all freight charges incurred to send the product to Swann's repair centres. The end user is responsible for all shipping costs incurred when shipping from and to any country other than the country of origin.
The warranty does not cover any incidental, accidental or consequential damages arising from the use of or the inability to use this product. Any costs associated with the fitting or removal of this product by a tradesman or other person or any other costs associated with its use are the responsibility of the end user. This warranty applies to the original purchaser of the product only and is not transferable to any third party. Unauthorized end user or third party modifications to any component will render all warranties void. By law some countries do not allow limitations on certain exclusions in this warranty. Where applicable by local laws, regulations and legal rights will take precedence.
For Australia: Our goods come with guarantees which cannot be excluded under Australian Consumer Law. You are entitled to a replacement or refund for a major failure and for compensation for any other reasonably foreseeable loss or damage. You are also entitled to have the goods repaired or replaced if the goods fail to be of acceptable quality.
Helpdesk & Technical Support
Technical Support E-mail: tech@swann.com
Technical Support Website: support.swann.com
Telephone Helpdesk USA Toll Free 1-800-627-2799
USA Parts & Warranty 1-800-627-2799 (M-F, 9am-5pm US PT)
AUSTRALIA 1800 788 210
NEW ZEALAND Toll Free 0800 479 266 UK 0808 168 9031

Documents / ResourcesDownload manual
Here you can download full pdf version of manual, it may contain additional safety instructions, warranty information, FCC rules, etc.
Advertisement
Thank you! Your question has been received!


Need Assistance?
Do you have a question about the 4K Ultra HD Security Camera that isn't answered in the manual? Leave your question here.