Table of Contents
Advertisement
Available languages
Available languages
Quick Links
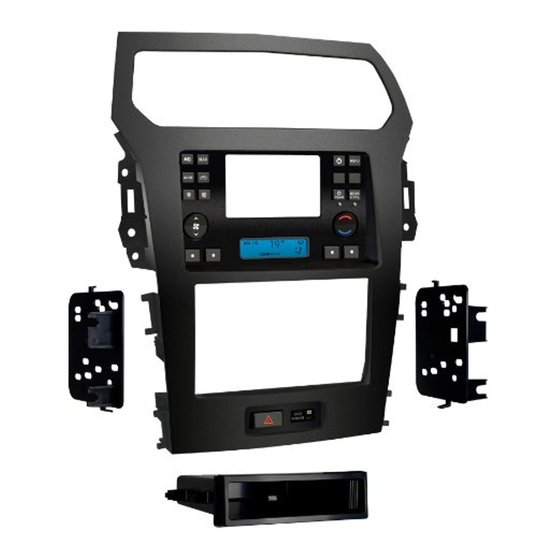
INSTALLATION INSTRUCTIONS FOR PART 99-5828CH
Ford Explorer 2011-up
KIT FEATURES
• ISO DIN head unit provision with pocket
• DDIN head unit provision
• Painted Charcoal Grey
KIT COMPONENTS
• A) Radio Trim panel • B) Radio Brackets • C) Pocket • D) (4) #8 x 3/8" Phillips screws for pocket
• E) (2) #4 x 1/2" Phillips screws for A/C Vent to Housing
• F) (4) #8 x 3/8" Phillips screws for OE Display to Housing • G) (2) Panel clips
B
A
F
METRA. The World's best kits.
(Without Ford MyTouch)
99-5828CH
C
G
metraonline.com
®
D
E
U.S. PATENT # D756,347
Table of Contents
Dash Disassembly
– Ford Explorer 2011-up ......................................... 2
Kit Assembly
– ISO DIN head unit provision with pocket ............... 3
– DDIN head unit provision ...................................... 3
– Rear A/C controls & LCD color adjustment ............ 4
WIRING & ANTENNA CONNECTIONS (sold separately)
Wiring Harness: • AX-ADBOX1 Interface
• AX-ADBOX2 Interface • AX-ADFD02 Harness
Antenna Adapter: • 40-EU10 Multi-App Antenna Adapter
TOOLS REQUIRED
• Panel removal tool • Phillips screwdriver
• Socket Wrench • Torx screwdrivers
CAUTION: Metra recommends disconnecting the negative battery
terminal before beginning any installation. All accessories,
switches, and especially air bag indicator lights must be plugged
in before reconnecting the battery or cycling the ignition.
NOTE: Refer to the instructions included with the aftermarket radio.
IMPORTANT NOTE: The factory radio must be powered off before
starting disassembly.
© COPYRIGHT 2017 METRA ELECTRONICS CORPORATION
Advertisement
Table of Contents

Related Manuals for Metra Electronics 99-5828CH


Summary of Contents for Metra Electronics 99-5828CH
- Page 1 INSTALLATION INSTRUCTIONS FOR PART 99-5828CH U.S. PATENT # D756,347 Table of Contents Ford Explorer 2011-up (Without Ford MyTouch) 99-5828CH Dash Disassembly – Ford Explorer 2011-up ......... 2 KIT FEATURES Kit Assembly • ISO DIN head unit provision with pocket – ISO DIN head unit provision with pocket ....3 •...
-
Page 2: Dash Disassembly
99-5828CH Dash Disassembly IMPORTANT NOTE: The factory radio 4. Remove (4) 9/32” screws securing must be powered off before starting the radio chassis. (Figure D) disassembly. Omitting this step will 5. Remove (2) Torx screws from the disable the menu function. -
Page 3: Kit Assembly
99-5828CH Kit Assembly ISO DIN head unit provisions Double DIN head unit provisions 1. Attach the provided clips to the posts on 1. Attach the provided clips to the posts on either side of the hazard assembly on the either side of the hazard assembly on the back of the radio trim panel. - Page 4 INSTALLATION INSTRUCTIONS FOR PART 99-5828CH Controlling the Rear Air Conditioning: Color Adjustment: 1. To turn on the rear a/c press the REAR power 1. Press and hold the bottom left hot key for button. The LED will begin to blink.
-
Page 5: Herramientas Requeridas
INSTRUCCIONES DE INSTALACIÓN PARA LA PIEZA 99-5828CH U.S. PATENT # D756,347 APLICACIONES Indice Ford Explorer 2011y mas (sin Ford MyTouch) 99-5828CH Desmontaje del tablero – Ford Explorer 2011 y mas ........2 Ensamble del kit – Provisión de unidad central ISO DIN con cavidad ..3 CARACTERÍSTICAS DEL KIT... -
Page 6: Desmontaje Del Tablero
99-5828CH Desmontaje del tablero NOTA IMPORTANTE: El radio de la fábrica 4. Quite los (4) tornillos de 9/32” que debe estar apagado antes de iniciar el sujetan el chasís del radio. (Figura D) desmontaje. La omisión de este paso se 5. -
Page 7: Ensamble Del Kit
99-5828CH Ensamble del kit Provisiones de unidad central DDIN Provisiones de unidad central ISO DIN 1. Inserte los dos clips del panel de la fábrica a la 1. Inserte los dos clips del panel de la fábrica carcasa de la radio. La fábrica clips se pueden a la carcasa de la radio. - Page 8 INSTRUCCIONES DE INSTALACIÓN PARA LA PIEZA 99-5828CH Control del aire acondicionado trasero: Ajuste de color: 1. Presione y mantenga la parte inferior izquierda 1. Para encender el aire acondicionado trasero, presione el botón de encendido REAR (sección tecla de acceso rápido para el 5-segundos trasera).