Table of Contents
Advertisement
Available languages
Available languages
Quick Links
Advertisement
Chapters
Table of Contents

Related Manuals for Sunrise Medical QUICKIE Sedeo Pro Advanced


Summary of Contents for Sunrise Medical QUICKIE Sedeo Pro Advanced
- Page 1 S eat ing System Systè me d ’a ss i s e 000690860.02 Zit syste em Seating manual Sedeo Pro Advanced Manuel d’utilisation du système d’assise Sedeo Pro Advanced UP Handleiding zitting Sedeo Pro Advanced/Advanced UP Rev.A...
- Page 2 R & D to production. Options or accessories shown are available at extra cost. Description du fauteuil Nous, la société SUNRISE MEDICAL, sommes certifiés ISO 13485, ce qui garantit la qualité de nos produits à tous les stades, du développement jusqu'à la production. Les options ou accessoires illustrés sont disponibles en option.
-
Page 3: Table Of Contents
If you have any queries about the use, maintenance or safety of your seating system, please contact your local 1.0 User information ................4 approved Sunrise Medical service agent. If you do not 1.1 This user manual ��������������������������������������������������������������������������������4 know of an approved dealer in your area or have any 1.2 For further information ... -
Page 4: User Information
1.0 User information Congratulations on choosing a Sunrise Medical wheelchair. Sunrise Medical’s high-quality mobility products are designed to enhance independence and make your everyday life easier. As a part of our ongoing product improvement initiative, Sunrise Medical reserves the right to change specifications and design without notice. -
Page 5: For Further Information
1.2 For further information Please contact your local, authorized Sunrise Medical dealer if you have any questions regarding the use, maintenance or safety of your wheelchair. In case there is no authorized dealer in your area or you have any questions, contact Sunrise Medical either in writing or by telephone. -
Page 6: Safety
2.0 Safety Fig. 2.1 Follow the instructions carefully next to these warning symbols! Not paying careful attention to these instructions could result in physical injury or damage to the wheelchair or the environment. Where ver possible, safety information is provided in the relevant chapter. 2.1 Seating related symbols and labels used on the product The signs, symbols and instructions affixed to the wheelchair comprise part of the safety facilities. -
Page 7: Safety: Moving Parts
2.3 Safety: Moving parts 2.5 Safety: Trays Safety: Vent tray DANGER! A wheelchair has moving and rotating parts. Contact with DANGER! moving parts may result in serious physical injury or damage Using a vent tray will affect the stability and overall weight of to the wheelchair. -
Page 8: General Description Sedeo Pro Advanced
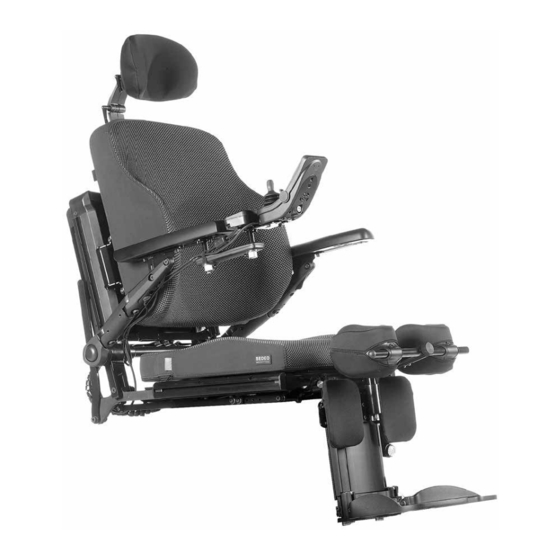
3.0 General Description Sedeo Pro Advanced Fig. 3.1 This wheelchair is equipped with Sedeo Pro Advanced seating system. The Sedeo Pro Advanced seating system provides good support for the head, torso, arms and legs. Optimal body support ensures maximum independence for the wheelchair user. The wheelchair must be adjusted by a qualified specialist. - Page 9 Benefits of a Daily Standing The use of any stand-up device should be done only under the prescription and supervision of a medical professional. At the outset, it is recommended that your introduction to regular standing be closely monitored by your Physical or Occupational Therapist.
-
Page 10: Setting Up The Seating System
4.0 Setting up the seating system Fig. 4.1 The average wheelchair user does not exist. This is why Sunrise Medical wheelchairs can be adjusted according to specific needs of the user. In this, we make a distinction between wheelchair settings and wheelchair seating adjustment options. -
Page 11: Pre-Set Seat Depth
Sedeo Pro Advanced with a standing function (Sedeo Pro Advanced UP). DANGER! We strongly recommend that you contact your Sunrise Medical approved service agent to adjust the seat depth, because adjusting the seat depth will affect the centre of gravity. - Page 12 Seat cushion depth (Fig 4.6) Fig. 4.6 For the standard seat cushion position, use the holes in Fig. 4.7. The cushion can be positioned one position more to the front to create extra seat depth. Fig. 4.7 Fig. 4.7.1 Sedeo Pro Advanced/Advanced UP Rev.A...
-
Page 13: Pre-Set Armrests
4.3 Pre-set armrests Fig. 4.8 Pre-set armrest height Pre-set reclining flip back armrests Armrest height Fine or gross adjustment, it is a two-part process: Part 1 (Fig. 4.8) 1. Loosen (A) in order to adjust (B). Fig. 4.9 Part 2 (Fig. 4.9) 2. -
Page 14: Pre-Set Seat Width
4.4 Pre-set seat width Fig. 4.13 Pre-set the armrest width: NOTE: Only if the armrest width adjustment of Fig.4.11 & 4.12 is not enough, the armrest axle can be moved out. • Loosen the two screws (5.0mm Allen key) on the traversing tube as shown in (Fig. -
Page 15: Pre-Set Leg Rests And Footplates (Sedeo Pro Advanced
4.6 Pre-set Leg Rests and footplates (Sedeo Pro Advanced UP) Fig. 4.17 4.6.1 Pre-set lower leg length (Fig 4.17): • Loosen bolts and take them out (2x bottom ones) at both sides of the footplates. (C). • Put footplates in desired position. •... -
Page 16: Back Adjustments
Foam and cover can accommodate a total of 1” width growth. If more than 1” of width growth is needed, new foam and cover must be ordered in the next size. Please contact your dealer or Sunrise Medical. Sedeo Pro Advanced/Advanced UP Rev.A... -
Page 17: Jay J3 Back
4.7.3 JAY J3 Back Fig. 4.25 Mounting and adjusting the JAY J3 should be done without the user in the power chair. Remove the foam and cover from the back shell until the mounting and adjustments are complete. Once complete, replace foam and cover to the shell assembly. -
Page 18: Pre-Set Headrest
4.8 Pre-set headrest Fig. 4.26 DANGER! / WARNING! • If a headrest is part of the options selected for the user/chair, never drive the chair without the headrest attached. • Never use the chair without a headrest if a person is transported with the chair in a vehicle. -
Page 19: Hemiplegia Armrest
4.9 Hemiplegia armrest (Fig 4.30) Fig. 4.30 1. Pull (A) out of the locked position and twist (B) into the desired position. NOTE / CAUTION! Ensure that (B) is properly secured! 4.10 Side guard Fig. 4.31 Side guard height (Fig 4.31) 1. -
Page 20: Swing-Away Controller Bracket
4.11 Swing-away controller bracket The joystick is mounted with a mechanism that allows the joystick to be locked in a forward or retracted position, and can accommodate a mid-line mount so the joystick can be located in the centre of the wheelchair. Swing-away, (Fig. -
Page 21: Seating Positioning Accessories
5.0 Seating positioning accessories 5.1 Lap strap / seating positioning belt DANGER! • This product is only to be used to position a single person in a wheelchair. • Lap straps are not suitable for transit purposes, approved occupant restraint systems must be used. •... - Page 22 Positioning an person with a lap strap DANGER! • Always make sure that the lap strap is correctly secured and adjusted prior to use. • Too loose a strap could cause the user to slip down and cause serious injury. •...
-
Page 23: Stand Up Functions (Q700
5.2 Stand Up Functions (Q700-UP) Fig. 5.8 WARNING! • The chest strap may only be assembled and adapted by an authorized dealer. • Before operating the stand-up function the chest strap and the positioning belt, supplied as standard has to be buckled in accordance with these user instructions. - Page 24 Adaptation/Adjustment: Fig. 5.11 Seat the user into the wheelchair. • Feed the buckle on the chest strap through the loop, (Fig. 5.11). • Pull the chest strap so that it fully supports the users upper body firmly and comfortably, (Fig. 5.12). •...
-
Page 25: Using The Seating System
Fig. 6.1 6.1 Getting in and out of the wheelchair (Transferring) Sunrise Medical recommend that you consult your healthcare professional for assistance in developing your personal front or side transfer technique to best suit your needs and avoid any personal injury. -
Page 26: Making A Transfer
6.2 Making a transfer Sunrise Medical recommend that you consult your healthcare professional for assistance in developing your personal front or side transfer technique to best suit your needs and avoid any personal injury. Preparing for a forward transfer: DANGER! It is dangerous to transfer on your own. -
Page 27: Powered) Seating Options
The wheelchair may be equipped with a feature that allows the powerchair to be driven up to 4.5kph/3mph when the seat is elevated, this feature is called C-Me. For guidance with user weight limits and recommended chair configuration when using C-Me, please refer to your Sunrise Medical authorized dealer. Fig. 6.7 DANGER! •... -
Page 28: Seat Memory Position
6.6 Electric Lie Down function The control system on the Q700-UP has five predefined The Quickie Sedeo Pro Advanced has an electric lie down seat memory positions. Each memory location has a set of function. This function makes it possible for the user to lie factory seat positioning presets: down in the wheelchair. -
Page 29: Maintenance And Cleaning
Velcro • If a broken or loose component is found, discontinue use fasteners! immediately and contact your authorised Sunrise Medical Where upholstery cannot be removed, clean regularly to supplier for replacement. -
Page 30: General Cleaning Instructions
7.4 General cleaning instructions: Cleaning controls: Should the control of your wheelchair become soiled or dirty, CAUTION! it can be wiped with a damp cloth with a dilute disinfectant • You should remove stains on your seat as soon as possible. until clean. -
Page 31: Disposal
8.0 Disposal The symbols below mean that in accordance with local laws and regulations your product should be disposed of separately from household waste. When this product reaches the end of its life, take it to the local collection point designated by local authorities. The separate collection and recycling of your product at the time of disposal will help conserve natural resources and ensure that it is recycled in a manner that protects the environment. -
Page 32: Trouble Shooting
9.0 Trouble shooting Accessing the Emergency Seat Movement Mode 1. There is a specific “Emergency Seat Mode” activation If the wheelchair is not working, as it should, check the switch attached to the inner plastic cover of the right side following points. - Page 33 Recommended process to move the seat from standing to seated within the emergency mode When in Emergency Seating Mode select the Forward Tilt function by deflecting the joystick left/right until you see it described in the display. Pull the joystick back and bring the seat into a horizontal position.
-
Page 34: Technical Specifications
10.0 Technical specifications: 10.1 Applicable norms / standards EN-ISO10993-5: 2009 Biological evaluation of medical devices. EN 1021 1&2 Assessment of the ignitability of upholstered furniture. Ignition source: smouldering cigarette/ match lame equivalent. Sedeo Pro Advanced/Advanced UP Rev.A... -
Page 35: Technical Specifications: Sedeo Pro Advanced Seating System
10.2 Technical specifications: Imperial system values Metric system values Sedeo Pro Advanced seating system & alternative Minimum Maximum Minimum Maximum Seat angle adjustment Powered tilt with COG adjustment optional 0° - 50° 0° - 50° Effective seat depth 400 mm 560 mm 15.7”... -
Page 36: Warranty
* Means the Sunrise Medical facility from which the product was purchased. Additional Notes For Australia Only: For goods provided by Sunrise medical Pty Ltd in Australia, our goods come with a guarantee by Sunrise Medical that cannot be excluded under Australian Consumer Law. - Page 37 Pour toute question relative à l’utilisation, à l’entretien ou à la sécurité de votre système d'assise, contactez 1.0 Informations utilisateur ............38 votre revendeur agréé Sunrise Medical. Si vous ne 1.1 À propos du présent manuel d'utilisation ��������������������������������������38 connaissez aucun revendeur dans votre région ou si 1.2 Informations complémentaires ...
-
Page 38: Informations Utilisateur
Dans le cadre d'une initiative d'amélioration continue de produit, Sunrise Medical se réserve le droit de modifier les spécifications et le modèle sans préavis. Toutefois, toute modification d’informations aux utilisateurs existants sera communiquée clairement si essentiel à leur sécurité. -
Page 39: Informations Complémentaires
1.2 Informations complémentaires Adressez-vous à votre service après-vente Sunrise Medical, compétent et agréé, pour toute question concernant l’utilisation, la maintenance ou la sécurité de votre fauteuil roulant. S’il n’y a aucun revendeur près de chez vous ou si vous avez des questions, contactez-nous par courrier ou par téléphone à... -
Page 40: Sécurité
2.0 Sécurité Fig. 2.1 Respectez toujours scrupuleusement les consignes apparaissant en regard des symboles d'avertissement. Le non-respect des instructions peut causer des blessures physiques, l'endommagement du fauteuil roulant ou la dégradation de l'environnement. Dans la mesure du possible, les informations relatives à la sécurité sont fournies dans le chapitre consacré... -
Page 41: Sécurité : Organes Mobiles
• Le support pour respirateur doit être installé et contrôlé par un revendeur agréé Sunrise Medical. Sécurité : Tablette escamotable : DANGER ! • Le poids maximal autorisé sur la tablette est de 2,5 kg. -
Page 42: Description Général Du Système Sedeo Pro Advanced
3.0 Description général du système Sedeo Pro Advanced Fig. 3.1 Ce fauteuil est équipé d'un système d'assise Sedeo Pro Advanced. Le système d'assise Sedeo Pro Advanced assure un bon soutien de la tête, du torse, des bras et des jambes. Un soutien optimal permet à l'utilisateur de bénéficier d'une indépendance maximale. - Page 43 Avantages d'une verticalisation quotidienne L'utilisation d'un appareil de verticalisation doit impérativement faire suite à une prescription médicale et se dérouler sous la supervision d'un professionnel de santé. Les premiers temps de votre introduction à la verticalisation, il est préférable que votre kinésithérapeute ou ergothérapeute soit présent.
-
Page 44: Configuration Du Système D'assise
Fig. 4.1 Il n'existe pas de profil commun à tous les utilisateurs de fauteuil roulant. C'est pourquoi les fauteuils Sunrise Medical peuvent être ajustés en fonction des besoins des utilisateurs. À cet égard, nous faisons la distinction entre les paramètres de configuration du fauteuil et les options de réglage d'assise. -
Page 45: Réglage De La Profondeur D'assise
Parce que la profondeur d'assise a un impact sur le centre de gravité, nous recommandons de faire appel à votre technicien agréé Sunrise Medical pour ce réglage. 4.2.1 Sedeo Pro Advanced (Standard), (Fig. 4.4) • Munissez-vous d'une clé hexagonale de 5,0 mm. - Page 46 Profondeur du coussin d'assise (Fig. 4.6) Fig. 4.6 Pour le coussin d'assise standard, utilisez les orifices indiqués à la Fig. 4.7. Pour obtenir plus de profondeur, vous pouvez positionner le coussin un cran vers l'avant. Fig. 4.7 Fig. 4.7.1 Sedeo Pro Advanced/Advanced UP Rév.A...
-
Page 47: Accoudoirs Pré-Réglés
4.3 Accoudoirs pré-réglés Fig. 4.8 Réglage de la hauteur des accoudoirs Pré-réglage des accoudoirs relevables Hauteur de l'accoudoir Quel que soit le degré de réglage requis, le processus se fait en deux étapes : Partie 1 (Fig. 4.8) Fig. 4.9 1. -
Page 48: Réglage De La Largeur D'assise
4.4 Réglage de la largeur d'assise Fig. 4.13 Réglage de la largeur des accoudoirs : REMARQUE : Si le réglage de la largeur de l’accoudoir des Fig.4.11 et 4.12 ne suffit pas (et uniquement dans ce cas-là), vous pouvez légèrement sortir l’accoudoir de son axe. •... -
Page 49: (Sedeo Pro Advanced
4.6 Pré-réglage des repose-jambes et palettes (Sedeo Pro Fig. 4.17 Advanced UP) 4.6.1 Réglage de la longueur du segment jambier (Fig. 4.17) : • Desserrez les vis et sortez-les (2 vis du bas) des deux côtés des palettes. (C). • Placez les palettes à la position désirée. •... -
Page 50: Réglages Du Dossier
2,5 cm de largeur en plus. Pour une largeur supérieure à 2,5 cm, il conviendra de commander une mousse et une housse de plus grande taille. Dans ce cas, contactez votre revendeur Sunrise Medical. Sedeo Pro Advanced/Advanced UP Rév.A... -
Page 51: Dossier Jay J3
4.7.3 Dossier JAY J3 Fig. 4.25 Pendant le montage et le réglage du dossier JAY J3, l’utilisateur ne peut pas être assis dans le fauteuil roulant. Retirez la mousse et la housse de la coque du dossier pour procéder au montage et au réglage. Quand vous avez terminé, replacez la mousse et la housse. -
Page 52: Pré-Réglage De L'appui-Tête
4.8 Pré-réglage de l'appui-tête Fig. 4.26 DANGER/AVERTISSEMENT ! • Si l'appui-tête a été commandé spécifiquement pour l'utilisateur/le fauteuil, n'utilisez jamais le fauteuil sans l'appui-tête. • L'appui-tête doit impérativement être en place si l'utilisateur est transporté dans son fauteuil à bord d'un véhicule motorisé. Hauteur de l'appui-tête (Fig. -
Page 53: Accoudoir Pour Personne Hémiplégique
4.9 Accoudoir pour personne hémiplégique (Fig. 4.30) Fig. 4.30 1. Tirez sur (A) pour le sortir de la position verrouillée, et pivotez (B) à position désirée. REMARQUE/ATTENTION ! Vérifiez que (B) est bien en place. 4.10 Protège-vêtement Fig. 4.31 Hauteur du protège-vêtement (Fig. 4.31) 1. -
Page 54: Support De Boîtier De Commande Escamotable
4.11 Support de boîtier de commande escamotable Le manipulateur est monté avec un mécanisme qui permet de le verrouiller en position avancée ou rétractée, compatible avec un support de positionnement du manipulateur au centre du fauteuil. Support escamotable (Fig. 4.33). •... -
Page 55: Accessoires De Positionnement
5.0 Accessoires de positionnement 5.1 Ceinture de bassin / ceinture de positionnement DANGER ! • Ce produit doit servir exclusivement à positionner une seule personne dans un fauteuil roulant. • Les ceintures de bassin ne conviennent pas pour le transport ; un système de retenue homologué... - Page 56 Positionnement correct avec une ceinture de bassin DANGER ! • Toujours vérifier que la ceinture sous-abdominale est bien fixée et correctement réglée avant d'utiliser le fauteuil. • Une ceinture trop lâche peut entraîner la glisse de l'utilisateur et causer des blessures graves. •...
-
Page 57: Fonctions De Verticalisation (Q700
5.2 Fonctions de verticalisation (Q700-UP) Fig. 5.8 AVERTISSEMENT ! • La ceinture thoracique doit être montée et ajustée exclusivement par un revendeur agréé. • Avant d'actionner la fonction de verticalisation, la ceinture thoracique et la ceinture de positionnement, fournies avec le matériel, doivent être ajustées et bouclées conformément aux consignes d'utilisation. - Page 58 Adaptation/Réglage : Fig. 5.11 Placez le patient dans le fauteuil. • Faites passer la boucle de la ceinture thoracique à travers l'anneau (Fig. 5.11). • Tirez sur la ceinture thoracique de sorte à assurer un soutien ferme et confortable du buste (Fig. 5.12). •...
-
Page 59: Utilisation Du Système D'assise
6.0 Utilisation du système d'assise Fig. 6.1 6.1 Monter et descendre du véhicule (Transfert) Sunrise Medical vous recommande de consulter un spécialiste qui vous aidera à développer une technique personnelle pour monter et descendre d’un fauteuil roulant, frontalement ou latéralement. Vous éviterez ainsi tout risque d’accident et d'éventuelles blessures. -
Page 60: Monter Et Descendre Du Fauteuil
6.2 Monter et descendre du fauteuil Sunrise Medical vous recommande de consulter un spécialiste qui vous aidera à développer une technique personnelle pour monter et descendre d’un fauteuil roulant, frontalement ou latéralement. Vous éviterez ainsi tout risque d’accident et d'éventuelles blessures. -
Page 61: Options D'assise (Électriques)
C-Me. Pour obtenir des conseils sur les limites de poids de l’utilisateur et la configuration du fauteuil recommandée lors de l’utilisation du C-Me, veuillez consulter votre revendeur agréé Sunrise Medical. DANGER ! • L'utilisation des options d'assise électriques peut influer sur la stabilité du Fig. -
Page 62: Positions De Siège Mémorisées
6.4 Positions de siège mémorisées 6.6 Fonction de position couchée électrique Le système de commande du Q700-UP possède cinq Le Quickie Sedeo Pro Advanced possède une fonction de positions de siège mémorisées. Chaque position est mise en position couchée électrique. Cette fonction permet associée à... -
Page 63: Entretien Et Nettoyage
à l’intérieur des coussins et de fermer les attaches en Velcro immédiatement l'utilisation du fauteuil et contacter un avant de les laver. revendeur Sunrise Medical agréé pour le faire remplacer. Si la toile n'est pas amovible, nettoyez-la régulièrement pour • Vérifier toutes les sangles Velcro afin de garantir une bonne éviter l'accumulation de saletés. -
Page 64: Instructions Générales De Nettoyage
7.4 Instructions générales de nettoyage : Nettoyage des commandes : Si les commandes de votre fauteuil roulant sont sales, vous ATTENTION ! pouvez les nettoyer avec un chiffon humide et un désinfectant • Il est préférable de retirer les taches sur votre siège le plus dilué. -
Page 65: Enlèvement
8.0 Enlèvement Le symbole ci-dessous signifie que votre produit doit être mis au rebut séparément de vos autres déchets ménagers, conformément aux réglementations et lois locales. Lorsque le produit atteint la fin de son cycle de vie, veuillez l'emmener aux points de ramassage conçus à... -
Page 66: Dépannage
9.0 Dépannage Accéder au mode Assise d'urgence 1. Le fauteuil est doté d'un commutateur d'activation « mode Si le fauteuil ne fonctionne pas normalement, vérifiez ce qui Assise d'urgence » relié au cache intérieur en plastique suit. de l'accoudoir rabattable droit (Fig. 9.1). Il arrive que ce •... - Page 67 Procédure recommandée pour passer le siège de la position debout à la position assise en mode d’urgence En mode Assise d'urgence, sélectionnez la fonction Bascule avant. Pour cela, actionnez le joystick vers la droite ou la gauche jusqu'à apparition de la fonction à l'écran.
-
Page 68: Caractéristiques Techniques
10.0 Caractéristiques techniques : 10.1 Normes en vigueur EN-ISO10993-5 : 2009 Évaluation biologique des dispositifs médicaux. EN 1021-1 et 2 Évaluation de l’inflammabilité des matières rembourrées. Source d'allumage : cigarette en combustion / flamme équivalente à celle d'une allumette. Sedeo Pro Advanced/Advanced UP Rév.A... -
Page 69: Caractéristiques Techniques
10.2 Caractéristiques techniques : Valeurs du système Valeurs du système impérial Système d'assise SEDEO Pro Advanced métrique et valeurs alternatives Minimum Maximum Minimum Maximum Réglage de l’angle d’inclinaison du siège Bascule d’assise électrique avec ajustement du centre de gravité en option 0°... -
Page 70: Garantie
La garantie ne couvre que les vices de fabrication. 2. Pour faire jouer la garantie, veuillez contacter le service client Sunrise Medical afin de préciser la nature du problème. En cas d'utilisation du produit dans une zone située en dehors du territoire du service après-vente (revendeur) Sunrise Medical, les... - Page 71 �����������������������������������������������������������������������������73 2.0 Veiligheid .................. 74 2.1 De symbolen en labels op het product die verband houden Sunrise Medical B.V. met de zitting ���������������������������������������������������������������������������������74 2.2 Veiligheid: Temperatuur �����������������������������������������������������������������74 Groningenhaven 18-20 2.3 Veiligheid: Bewegende delen ���������������������������������������������������������75 3433 PE NIEUWEGEIN 2.4 Veiligheid: Verstikkingsgevaar ...
-
Page 72: Gebruikersinformatie
Wij streven naar voortdurende verbetering van onze producten. Daarom houdt Sunrise Medical zich het recht voor specificaties en ontwerp zonder kennisgeving te wijzigen. Wijzigingen in informatie bedoeld voor bestaande gebruikers worden echter duidelijk gecommuniceerd indien deze essentieel zijn voor de veiligheid. -
Page 73: Voor Meer Informatie
1.2 Voor meer informatie Neem contact op met uw plaatselijke erkende Sunrise Medical dealer, indien u vragen heeft over het gebruik, onderhoud of de veiligheid van uw rolstoel. Is er geen erkende dealer in uw regio of u heeft nog vragen, neem dan schriftelijk of... -
Page 74: Veiligheid
2.0 Veiligheid Fig. 2.1 Volg de aanwijzingen naast deze waarschuwingssymbolen nauwgezet op! Wanneer deze instructies niet nauwkeuring in acht worden genomen, kan dit leiden tot fysiek letsel, schade aan de rolstoel of schade aan de omgeving. Waar mogelijk wordt in het betreffende hoofdstuk veiligheidsinformatie verschaft. -
Page 75: Veiligheid: Bewegende Delen
Het is niet ontworpen om bijv. een zuurstoffles op te zetten. Het gebruik van deze onderdelen kan onstabiliteit van uw rolstoel veroorzaken. • Het ventilatorblad moet worden geïnstalleerd en onderhouden worden door een erkende Sunrise Medical dealer. Veiligheid: Wegklapbaar werkblad: GEVAAR! •... -
Page 76: Algemene Beschrijving Sedeo Pro Advanced
3.0 Algemene beschrijving SEDEO Pro Advanced Fig. 3.1 Deze rolstoel is voorzien van een Sedeo Pro Advanced zitsysteem. Het Sedeo Pro Advanced zitsysteem biedt uitstekende ondersteuning voor het hoofd, bovenlichaam, armen en benen. Optimale ondersteuning van het lichaam waarborgt maximale onafhankelijkheid voor de rolstoelgebruiker. - Page 77 Voordelen van een dagelijkse sta-oefening Het gebruik van apparaten om een patiënt te laten staan, mag uitsluitend plaatsvinden volgens voorschrift en onder toezicht van een medische beroepsbeoefenaar. Het wordt aanbevolen in de beginperiode uw regelmatige sta-oefeningen nauwgezet te laten volgen door uw fysio- of ergotherapeut.
-
Page 78: Instellen Van Het Zitsysteem
4.0 Instellen van het zitsysteem Fig. 4.1 Er bestaat geen gemiddelde rolstoelgebruiker. Daarom kunnen rolstoelen van Sunrise Medical worden aangepast aan de specifieke behoeften van de gebruiker. Daarbij maken we een onderscheid tussen rolstoelinstellingen en opties om de zitting van de rolstoel aan te passen. De rolstoel wordt éénmalig ingesteld bij de eerste keer dat de rolstoel wordt gebruikt. -
Page 79: Vooraf Instellen Van De Diepte Van De Zitting
(Sedeo Pro Advanced UP). GEVAAR! We adviseren nadrukkelijk contact op te nemen met een door Sunrise Medical erkende servicemonteur om de zitdiepte aan te passen, omdat de aanpassing van de zitdiepte het zwaartekrachtpunt beïnvloedt. 4.2.1 SEDEO Pro Advanced (Standaard), (fig. 4.4) Fig. - Page 80 Diepte zitkussen (fig. 4.6) Fig. 4.6 Gebruik voor de standaardpositie van het zitkussen de gaten zoals getoond in fig. 4.7. Om extra zitdiepte te creëren, kan het kussen één positie meer naar de voorzijde worden geplaatst. Fig. 4.7 Fig. 4.7.1 Sedeo Pro Advanced/Advanced UP Rev.A...
-
Page 81: Armsteunen
4.3 Armsteunen Fig. 4.8 Vooraf instellen van de armsteunen: Instellen opklapbare, meebewegende armsteunen Hoogte armsteun Zowel bij een grote of een kleine aanpassing bestaat het proces uit twee delen: Deel 1 (Fig. 4.8) Fig. 4.9 1. Draai (A) los om (B) te kunnen aanpassen. Deel 2 (Fig. -
Page 82: Vooraf Instellen Van De Zitbreedte
4.4 Vooraf instellen van de zitbreedte Fig. 4.13 Vooraf instellen van de breedte van de armsteunen: OPMERKING: Uitsluitend als de aanpassing van de breedte van de armsteun zoals getoond in fig.4.11 & 4.12 niet toereikend is, kan de as van de armsteun worden verwijderd. •... -
Page 83: (Sedeo Pro Advanced
4.6 Vooraf ingestelde beensteunen en voetenplaten (Sedeo Fig. 4.17 Pro Advanced UP) 4.6.1 Vooraf instellen van de onderbeenlengte (Fig. 4.17): • Draai de bouten (2x bouten onderzijde) los en verwijder ze van beide zijden van de voetplaat. (C). • Zet de voetplaat in de gewenste positie. •... -
Page 84: Aanpassingen Rugleuning
2,5 cm (1”) in de breedte groter worden. Als er meer dan 2,5 cm (1”) groei in de breedte nodig is, moeten nieuw schuim en een nieuwe hoes in een grotere maat worden besteld. Neem contact op met uw dealer of Sunrise Medical. Sedeo Pro Advanced/Advanced UP Rev.A... -
Page 85: Jay J3 Rugleuning
4.7.3 JAY J3 Rugleuning Fig. 4.25 Het bevestigen en aanpassen van de JAY J3 moet worden gedaan zonder dat de gebruiker in de rolstoel zit. Verwijder het schuim en de hoes van de schaal van de rugleuning totdat de bevestiging en de aanpassingen helemaal klaar zijn. -
Page 86: Vooraf Ingestelde Hoofdsteun
4.8 Vooraf ingestelde hoofdsteun Fig. 4.26 GEVAAR/WAARSCHUWING! • Als de hoofdsteun onderdeel uitmaakt van de opties die voor de gebruiker zijn geselecteerd, rijd dan niet in de stoel zonder dat de hoofdsteun is bevestigd. • Gebruik de rolstoel nooit zonder hoofdsteun als een persoon in de rolstoel wordt vervoerd in een voertuig. -
Page 87: Hemiplegie Armlegger
4.9 Hemiplegie armlegger (Fig. 4.30) Fig. 4.30 1. Trek (A) uit de vergrendelde positie en draai (B) in de gewenste positie. OPMERKING/OPGELET! Controleer of (B) goed vast zit! 4.10 Zijkant Fig. 4.31 Hoogte zijkussen (fig. 4.31) 1. Draai (A) los 2. -
Page 88: Wegzwenkbare Beugel Voor De Bediening
4.11 Wegzwenkbare beugel voor de bediening De joystick is bevestigd met een mechanisme waardoor hij in een voorwaartse of teruggetrokken positie kan worden vergrendeld. Ook is plaatsing in het midden van de rolstoel mogelijk. Wegzwenkbaar (Fig. 4.33). • Om de joystick weg te zwenken, duwt u tegen de binnenkant van de joystick en om hem naar buiten te laten draaien. -
Page 89: Accessoires Voor Positionering
5.0 Accessoires voor positionering 5.1 Heupgordel / positioneringsgordel GEVAAR! • Dit product mag uitsluitend worden gebruikt om één persoon in een rolstoel in positie te houden. • Heupgordels zijn niet geschikt als veiligheidsgordel tijdens transport. Hiervoor moeten goedgekeurde veiligheidsgordels worden gebruikt. Fig. - Page 90 Positionering van een persoon met een heupgordel GEVAAR! • Controleer voor gebruik altijd of de heupgordel op de juiste wijze is bevestigd en op maat is gemaakt. • Wanneer de gordel te los zit, kan de gebruiker naar beneden glijden. Dit kan leiden tot ernstig letsel. •...
-
Page 91: Sta-Op Functies (Q700
5.2 Sta-op functies (Q700-UP) Fig. 5.8 WAARSCHUWING! • De borstgordel mag alleen door een erkende dealer worden aangebracht en aangepast. • Voordat de 'sta-op'-functie wordt gebruikt, moeten de borstgordel en positioneringsgordel (die standaard worden meegeleverd) volgens de gebruiksinstructies worden vastgemaakt. •... - Page 92 Aanpassing: Fig. 5.11 Laat de gebruiker in de rolstoel zitten. • Doe de gordel van de gesp door de lus (Fig. 5.11). • Trekt de borstgordel zodanig aan dat deze het bovenlichaam van de gebruiker stevig maar comfortabel ondersteunt (Fig. 5.12). •...
-
Page 93: Gebruik Van Het Zitsysteem
6.0 Gebruik van het zitsysteem Fig. 6.1 6.1 Verplaatsing in en uit de rolstoel (Overplaatsen) Sunrise Medical adviseert dat u samen met uw arts of therapeut de voor u meest geschikte in- en uitstaptechniek (voorwaarts of zijwaarts) ontwikkelt om persoonlijk letsel te vermijden. -
Page 94: Overplaatsen
6.2 Overplaatsen Sunrise Medical adviseert dat u samen met uw arts of therapeut de voor u meest geschikte in- en uitstaptechniek (voorwaarts of zijwaarts) ontwikkelt om persoonlijk letsel te vermijden. Voorbereiding voor een voorwaartse overplaatsing: GEVAAR! Het kan gevaarlijk zijn om zelf in- en uit de rolstoel te stappen. -
Page 95: Elektrisch Aangedreven) Zitopties
4,5km kan worden gereden terwijl de zitting in een verhoogde positie is. Deze optie wordt C-Me genoemd. Voor richtlijnen over het maximale gebruikersgewicht en de configuratie van de rolstoel wanneer de C-Me wordt gebruikt, verwijzen we naar uw erkende Sunrise Medical dealer. GEVAAR! Fig. 6.7 •... -
Page 96: Zitsysteem Geheugenfunctie
6.4 Zitsysteem geheugenfunctie 6.6 Elektrische lig-functie Het bedieningssysteem van de Q700-UP beschikt over vijf De Quickie Sedeo Pro Advanced heeft een elektrische lig- vooraf ingestelde 'geheugenposities'. Af fabriek zijn er functie. Dankzij deze functie kan de rolstoelgebruiker in zijn of op iedere geheugenlocatie vooraf bepaalde stoelposities haar rolstoel liggen. -
Page 97: Onderhoud En Reiniging
Reinig geregeld de bekleding die niet verwijderd kan worden. op met uw erkende Sunrise Medical leverancier voor Zo voorkomt u dat vuil zich ophoopt. Reinig de bekleding met vervanging. -
Page 98: Algemene Reinigingsinstructies
7.4 Algemene reinigingsinstructies: Reinigen van het bedieningssysteem: Wanneer het bedieningssysteem van uw rolstoel vuil is OPGELET! geworden, kan het worden schoongemaakt met een vochtige • Vlekken op uw zitting kunt het beste zo snel mogelijk doek met daarop een verdund desinfecterend middel. verwijderen. -
Page 99: Verwijdering
8.0 Verwijdering Het hieronder vermelde symbool betekent dat uw product aan het einde van zijn levensduur in overeenstemming met lokale wet- en regelgeving afgevoerd dient te worden, gescheiden van huishoudelijk afval. Wanneer dit product niet langer gebruikt kan worden, breng het dan naar het door de plaatselijke overheid aangewezen plaatselijke afvalverzamelpunt. Gescheiden afvalverwerking en recycling van uw product ondersteunt het behoud van grondstoffen en er wordt gegarandeerd dat het op een milieuvriendelijke wijze wordt gerecycled. -
Page 100: Mogelijke Problemen
9.0 Mogelijke problemen Toegang tot de “Emergency Seat Mode” 1. Op de binnenste plastic afdekking van de rechterarmsteun Als de rolstoel niet naar behoren functioneert, controleer dan bevindt zich een specifieke schakelaar “Emergency Seat de volgende punten: Mode” (Fig. 9.1). De schakelaar is mogelijk met een label •... - Page 101 Aanbevolen procedure om de zitting van staande naar zittende positie te wijzigen in de noodmodus Selecteer in de Noodbewegingsmodus de functie Voorwaarts kantelen door de joystick naar links/rechts te bewegen totdat u deze functie in het scherm ziet staan. Trek de joystick terug en breng de zitting in horizontale positie.
-
Page 102: Technische Specificaties
10.0 Technische specificaties: 10.1 Toepasselijke normen/standaarden EN-ISO10993-5: 2009 Biologische evaluatie van medische apparatuur. EN 1021 1&2 Beoordeling van de ontvlambaarheid van gestoffeerde meubelen. Ontstekingsbron: smeulende sigaret/vlam lucifer of equivalent. Sedeo Pro Advanced/Advanced UP Rev.A... -
Page 103: Technische Specificaties: Sedeo Pro Advanced Zitsysteem
10.2 Technische specificaties: Waarden metrieke Waarden imperiale Sedeo Pro Advanced zitsysteem stelsel stelsel & alternatief Minimum Maximum Minimum Maximum Aanpassing zithoek Elektrische kantelverstelling met aanpassing zwaartekrachtpunt optioneel 0° - 50° 0° - 50° Effectieve diepte zitsysteem 400 mm 560 mm 15,7”... -
Page 104: Garantie
De garantie geldt slechts voor fabricagefouten. 2. Om de garantie ten uitvoer te brengen, kunt u contact opnemen met de klantenservice van Sunrise Medical met de exacte gegevens over het probleem. Indien u het product gebruikt buiten het gebied dat wordt gedekt door de klantenservice van Sunrise Medical, wordt de reparatie of vervanging uitgevoerd door een ander servicepunt welke door de fabrikant wordt aangewezen. - Page 105 Sedeo Pro Advanced/Advanced UP Rev.A...
- Page 106 Sedeo Pro Advanced/Advanced UP Rev.A...
- Page 107 Sedeo Pro Advanced/Advanced UP Rev.A...
- Page 108 F: +31 (0)30 – 60 55 880 Sunrise Medical Aps E: info@sunrisemedical.nl Mårkærvej 5-9 www.SunriseMedical.nl 2630 Taastrup Denmark Sunrise Medical HCM B.V. +45 70 22 43 49 Vossenbeemd 104 info@sunrisemedical.dk 5705 CL Helmond Sunrisemedical.dk The Netherlands T: +31 (0)492 593 888 Sunrise Medical Australia E: customerservice@sunrisemedical.nl...