Wolf CSO30TM Steam Oven Manual
- Use and care manual (56 pages) ,
- Quick reference manual (2 pages) ,
- Use & care manual (68 pages)
Advertisement
Customer Care
The model and serial number are printed on the enclosed product registration card. Both numbers are also listed on the product rating plate. For warranty purposes, you will also need the date of installation and name of your authorized Wolf dealer. Record this information below for future reference.
If your product ever needs attention, be sure to use a Wolf factory certified service provider recommended by our customer care center, or select one from our list of providers available at wolfappliance.com/locator. All factory certified service providers are carefully selected and thoroughly trained by us.
| SERVICE INFORMATION |
| Model Number |
| Serial Number |
| Date of Installation |
| Certified Service Name |
| Certified Service Number |
| Authorized Dealer |
| Dealer Number |
Important Note
To ensure this product is installed and operated as safely and efficiently as possible, take note of the following types of highlighted information throughout this guide:

Highlights information that is especially important.

Indicates a situation where minor injury or product damage may occur if instructions are not followed.

States a hazard that may cause serious injury or death if precautions are not followed.
Throughout this guide, dimensions in parentheses are millimeters unless otherwise specified.
With your purchase, you receive one of the strongest warranties in the appliance industry. Take a moment to read the full warranty statement. It's also important to register your Wolf appliance to ensure that you don't miss out on exclusive owner benefits, such as; assurance that you will be taken care of in the unlikely event that service becomes necessary during the warranty period, and a proof-of-purchase record in case of a home insurance claim. You may register by one of the following options:
- Mail in the completed Wolf product registration card.
- Register online at wolfappliance.com/register and create a personalized My Sub-Zero/Wolf account using the serial number on your product.
- Register by phone by calling Wolf Customer Care at 800-222-7820.
As a Wolf owner, you can count on ongoing support, day in and day out. Our customer care center is available 24 hours a day, seven days a week and staffed by knowledgeable product experts at our factory in Madison, Wisconsin. Should the need arise, simply call 800-222-7820 and speak with one of our product experts. They will help troubleshoot any issues you might have.
We are confident this guide will answer your questions about the features, operation, and maintenance of your Wolf, but if you have additional questions, please contact us at 800-222-7820 or visit us online at wolfappliance.com.
SAFETY PRECAUTIONS
This oven was built to achieve recognized standards in technology and safety regulations and is designed for use in the home for preparing food. It is not intended for use by persons with reduced physical, sensory or mental capabilities, or lack of experience and knowledge, unless supervised or unless they have been given instruction concerning the use of the appliance by a person responsible for their safety. Proper use is essential to avoid damage or accidents.
Installation and connection to power supply must be performed by a qualified electrician in accordance with provided installation instructions.
Before first use, please fill the water tank and perform related duties as outlined in the 'Prior to use' section.
Please retain this guide for future reference. If you sell the appliance or pass it on to a third party, please ensure these instructions accompany the appliance, together with the instructions on installation.
CALIFORNIA PROPOSITION 65
This product may contain chemicals known to the state of California to cause cancer or reproductive harm.
IMPORTANT SAFEGUARDS
- When using electrical appliances, basic safety precautions should always be followed including the following:
- Read all instructions.
- Do not touch hot surfaces. Use handles or knobs.
- To protect against electrical shock, do not immerse cord or plug in water or other liquid.
- Close supervision is necessary when any appliance is used by or near children.
- Unplug from outlet when not in use and before cleaning. Allow to cool before putting on or taking off parts.
- Do not operate any appliance with a damaged cord or plug, or after the appliance malfunctions or has been damaged in any manner. Return appliance to the nearest authorized service facility for examination, repair or adjustment.
- The use of accessory attachments not recommended by the appliance manufacturer may cause injuries.
- Do not use outdoors.
- Do not let cord hang over edge of table or counter, or touch hot surfaces.
- Do not place on or near a hot gas or electric burner, or in a heated oven.
- Extreme caution must be used when moving an appliance containing hot oil or other hot liquids.
- Always attach plug to appliance first, then plug cord into the wall outlet. To disconnect, turn any control to "off", then remove plug from wall outlet.
- Do not use appliance for other than intended use.
- Save these instructions.
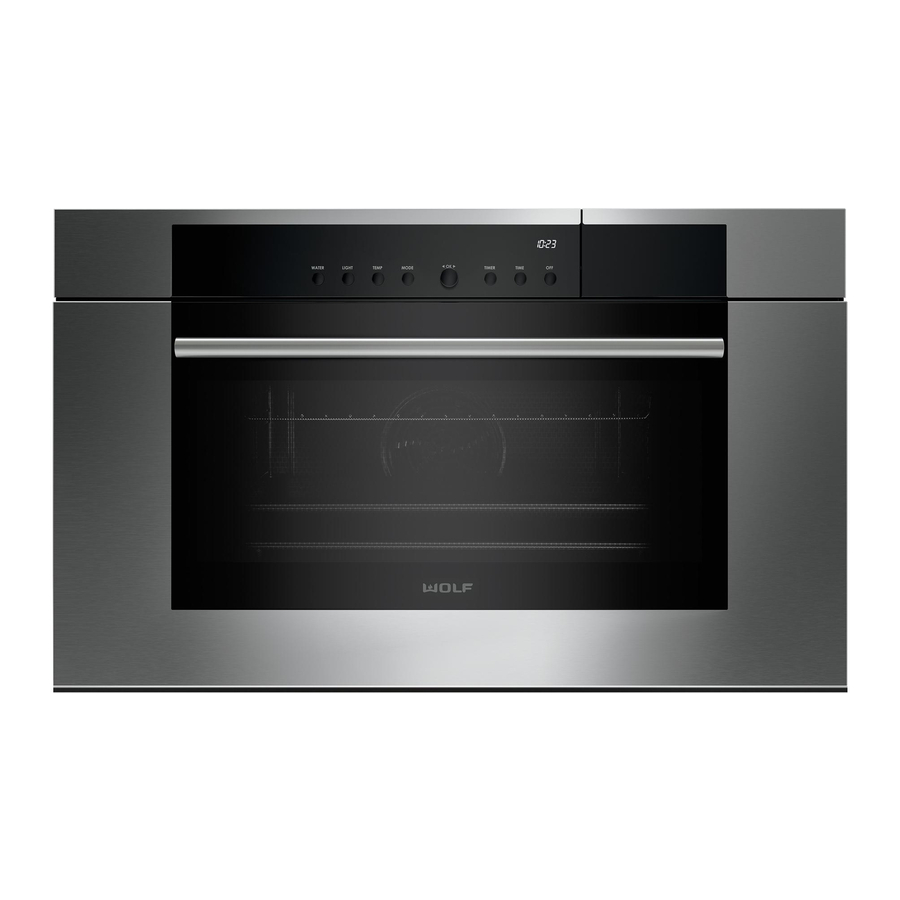
CONVECTION STEAM OVEN FEATURES

Convection steam oven (CSO30TM shown).
| FEATURE | |
| 1 | Product Rating Plate |
| 2 | Control Panel and Display |
| 3 | Control Knob |
| 4 | Adjustable Oven Racks |
| 5 | Convection Fan |
| 6 | Temperature Probe Receptacle |
| 7 | Halogen Lighting |
| 8 | Water Tank Access Door |
Getting Started
We know you are eager to start cooking, but before you do, please take some time to read this use & care guide. Whether you are an occasional cook or an expert chef, it will be to your benefit to familiarize yourself with the safety practices, features, operation and care recommendations of your Wolf convection steam oven.
To ensure the best results, review cooking modes and special features.
OVEN OPERATION
Control Panel
The control panel and control panel display are streamlined and easy to use. The control knob (OK) and buttons are used to set cooking modes and access all the features of your convection steam oven for exceptional results.
The knob is used on its own and in combination with the buttons to make selections. All selections are confirmed by pressing OK.

Control panel.
CONTROL PANEL INDICATORS
| INDICATOR | |
 | Oven temperature is set. |
 | Temperature probe is in use. |
 | Steam mode is activated. |
 | Reheat mode is activated. |
 | Auto Steam Bake mode is activated. |
 | Convection mode is activated. |
 | Convection Humid mode is activated. |
 | Convection Steam mode is activated. |
 | Timer is set. |
 | Operating time is activated. |
 | Switch-off time is activated. |
 | Clock is set. |
User Settings
The user settings allow the user to select preferences for language, childproof lock, time display, acoustic signal, illumination, water hardness, temperature unit, contrast, time format, factory settings and water door control.
The control panel can be locked through user settings. To use the oven by temporarily disabling the lock, press and continue to hold OFF, then press OK. The lock will automatically reactivate 10 minutes after the oven has been turned off.
Setting user settings:
- With oven off, press OK and turn knob to USER SETTINGS, then press OK.
- Turn knob to scroll through options, then press OK.
- Follow instructions on the display, then press OK.
SELECT COOKING MODE
- Press MODE multiple times until desired cooking mode is displayed, then press OK.
SELECT TEMPERATURE
- Press TEMP.
- Turn knob to desired temperature, then press OK.
To adjust temperature during cooking, press TEMP and turn the knob to the desired temperature, then press OK.
WATER TANK
The water tank holds enough water for 1.5 hours of continuous steam, typically enough for 4–5 cooking sessions. Use fresh, cold tap water. Do not use demineralized, filtered or distilled water.
Always press WATER to open the water door. Attempting to access the water tank manually will cause damage.
When the oven is turned off, water is pumped back into the tank once the water temperature is below 175°F (80°C). If the tank needs to be refilled during cooking, limit the amount of water to less than two cups to prevent overflow when water is pumped back into the tank.
To fill water tank:
- Press WATER.
- Remove and fill the water tank.
- Reinstall tank and close the water door manually.
PRIOR TO USE
Use the test strip provided to determine water hardness. The oven defaults to hard water. Refer to User Settings to adjust hardness.
To ensure all residual oil from the manufacturing process has been removed, the oven must go through the following procedure:
- Clean oven thoroughly with hot water and a mild deter-gent. Rinse and dry with a soft cloth.
- Turn on ventilation. Some smoke and odor is normal.
- Fill and install the water tank.
- Select Auto Steam Bake mode and 410°F (210°C). Heat oven (empty) for 30 minutes.
AFTER EACH USE
- Press OFF. For modes utilizing steam, do not remove the water tank until 'WATER IS BEING PUMPED OFF' no longer appears on the display.
- Open oven door to the "at-rest" position and allow to cool. Once cool, wipe interior dry before closing the door. Refer to the illustration below.

Door "at-rest" position.

TIME
It is very important the correct time is set if a timed cook feature is used. Time must be reset after a power outage.
Setting time:
- With oven off, press TIME.
- Turn knob to set the hour, then press OK.
- Turn knob to set the minutes, then press OK.
TIMER
The timer can be set for a maximum of 9 hours and 59 minutes. Once the timer is set, the countdown is illuminated on the display. The timer is independent from the oven. Setting the timer does not affect operating time or switch-off time.
Setting timer:
- Press TIMER.
- Turn knob to set duration, then press OK.
To reset, press TIMER and turn the knob to select desired duration, then press OK. To cancel, press TIMER twice, then press OK.
OPERATING TIME
The operating time feature automatically turns the oven off at a specified time. The oven will begin to heat immediately and will turn off at the desired switch-off time.
If the temperature probe is used, the probe will override the switch-off time and turn the oven off when set temperature is reached.
Setting controls:
- Select desired cooking mode and temperature.
- Press TIME.
- Turn knob to select desired operating time, then press OK.
To adjust the operating time, press TIME and turn the knob to select the desired time, then press OK.
DELAYED START
The delayed start feature automatically turns the oven on and off at specified times. The oven will remain idle until the desired start time and will turn off at the desired switch-off time. The clock must be set to the correct time for delayed start to function properly.
If the temperature probe is used, the probe will override the switch-off time and turn the oven off when set temperature is reached. If the probe temperature is not reached before the switch-off time, it will not extend operating time.
Setting controls:
- Select desired cooking mode and temperature.
- Press TIME and turn knob to select desired operating time (do not press OK).
- Press TIME and turn knob to select desired switch-off time, then press OK.
To adjust the switch-off time, press TIME twice and turn the knob to select the desired time, then press OK.
TEMPERATURE PROBE
Use only the black temperature probe shipped with this appliance. Refer to the illustration below.

Temperature probe.
The temperature probe measures the internal temperature of food while cooking. It can be used with all cooking modes except Gourmet.
Setting controls:
- Select desired cooking mode and temperature.
- Place probe in the thickest part of the food being cooked, then insert connector into the receptacle. Refer to the illustration below.

Probe receptacle.
- Press TEMP (do not press OK).
- Press TEMP and turn knob to select desired doneness, then press OK.

The probe temperature will appear on the display once it is above 85°F (30°C).
The probe and probe receptacle will be very hot. Handle with care.
OVEN RACK POSITION
The oven racks can be placed in any of the four positions labeled on the right front face of the convection steam oven. Refer to the illustration below.
The recipes in Recipes mode reference rack position for best results.

Rack position.
Cooking Modes
| MODE | INDICATOR | RANGE | PROBE | USES |
| Steam |  | 85 – 210°F (30 – 100°C) | ● | Use Steam mode for foods you would have heated in a saucepan and for all foods that would benefit from gentle handling such as fish and seafood, vegetables and rice. |
| Reheat |  | 210 – 300°F (100 – 150°C) | ● | Reheat mode uses steam and hot air to rehydrate food gently. Use to reheat any food you would have reheated in the oven, range or microwave. |
| Auto Steam Bake |  | 210 – 445°F (100 – 230°C) | ● | By heating with steam first, then using convection heat to finish baking, baked goods acquire a tender interior and an exterior with natural shine, without the need for an egg wash. Use for breads, buns, cakes and pastries whether fresh, par-baked or frozen. Do not preheat. |
| Convection |  | 85 – 445°F (30 – 230°C) | ● | The convection fan distributes heat evenly for consistent results and browning. Cooking temperatures may be 25° less, and times may be 25% faster than traditional ovens, saving time and energy. Use Convection mode for a variety of foods, including muffins, biscuits and roasts. |
| Convection Humid |  | 85 – 445°F (30 – 230°C) | ● | In Convection Humid mode, oven ventilation is sealed so the moisture produced during cooking remains in the oven. Use for cakes, casseroles, grain dishes, lasagna and meats. |
| Convection Steam |  | 85 – 445°F (30 – 230°C) | ● | Steam transfers energy to food more efficiently than hot air alone, which speeds up cooking time. Food retains its own moisture. Use Convection Steam mode to cook foods that are tender inside and roasted or crisped outside. Press MODE to activate or deactivate steam. |
| Gourmet | — | — | Use to prepare specified foods; fresh, refrigerated or frozen. Select the food and desired doneness and the sensor adjusts time, temperature and humidity so no baking instructions are required. Preset temperature and range are dependent on food and desired doneness. | |
| Slow Roast | 85 – 300°F (30 – 150°C) | ● | Use to keep meats tender by slow roasting. Insert temperture probe into the prepared meat, select a Slow Roast setting and completion time, and come home to a perfectly cooked meal. | |
| Recipes | 85 – 445°F (30 – 230°C) | ● | Use to prepare entire meals from appetizers and entrees to desserts. Select food, number of portions and level of browning. The sensor adjusts the rest. Recipes mode is ideal for quick meals or to prepare a variety of foods for a party. | |
| My Recipes | 85 – 445°F (30 – 230°C) | ● | Use My Recipes to store cooking instructions for ten of your favorite recipes, and replace or edit them at any time. | |
| Keep Warm | 175°F (80°C) | ● | Keep Warm uses a combination of convection and steam heat to keep foods warm until it's time to serve. | |
| Cleanse | 85 – 445°F (30 – 230°C) | Cleanse uses steam to clean baby bottles and canning jars, and is faster and safer than conventional methods. |
GOURMET
Use Gourmet to prepare any of the foods listed below; fresh, refrigerated or frozen. Select the food and desired doneness and the sensor adjusts time, temperature and humidity so no baking instructions are required.
| FOOD | CODE |
| Fresh Appetizers | A1 |
| Frozen Appetizers | A2 |
| Baked Dish | A3 |
| Soufflé | A4 |
| Baked Potatoes | A5 |
| Frozen Potato Products | A6 |
| Braising Meat | A7 |
| Fresh Pizza | A8 |
| Frozen Pizza | A9 |
| Custard | A10 |
| Bread | A11 |
| Yeast Pastry with Filling | A12 |
| Cake | A13 |
| Torte | A14 |
Setting Gourmet:
- Press OK twice and turn knob to select desired food, then press OK.
- Follow instructions on the display, then press OK.
SLOW ROAST
Setting Slow Roast:
- Press OK and turn knob to Slow Roast, then press OK.
- Turn knob to select desired food and doneness (if applicable), then press OK.
- Preset probe temperature will appear on the display. To adjust probe temperature, press TEMP and turn knob to desired temperature, then press OK.
Slow Roast operating time can be adjusted from 2.5 to 4.5 hours. To adjust time, press TIME and turn the knob to the desired duration, then press OK.
To select a desired switch-off time, refer to Delayed Start.
RECIPES MODE
Use Recipes mode to prepare entire meals from appetizers and entrees to desserts. Refer to the chart below and recipes.
| FOOD | CODE |
| Appetizers | R1 |
| Fish in Puff Pastry | R2 |
| Fish Rolls | R3 |
| Beef Stroganoff | R4 |
| Beef Pot Roast | R5 |
| Pork Loin in Puff Pastry | R6 |
| Pasta Gratin | R7 |
| Eggplant Gratin | R8 |
| Flan | R9 |
| Pears in Red Wine | R10 |
| Rolls | R11 |
| Muffins | R12 |
| Cake | R13 |
| Focaccia | R14 |
Setting Recipes:
- Press OK and turn knob to Recipes, then press OK.
- Turn knob to select desired recipe, then press OK.
- Follow instructions on the display, then press OK.
MY RECIPES MODE
Use My Recipes to store cooking instructions for ten of your favorite recipes. If the recipe utilizes the temperature probe, insert the probe into the receptacle before entering settings.
Setting My Recipes:
- Press OK and turn knob to My Recipes, then press OK.
- Turn knob to select desired recipe number, then press OK.
- Select desired mode, temperature, time and probe temperature (if applicable), then press OK.
- Press OK to Save recipe.
To remove a saved recipe, press OK and turn the knob to My Recipes, then press OK. Turn the knob to select the desired recipe, then press OK. Turn knob until Clear is displayed, then press OK.
KEEP WARM MODE
Setting Keep Warm:
- Press OK and turn knob to Keep Warm, then press OK.
CLEANSE MODE
Setting Cleanse:
- Press OK and turn knob to Cleanse, then press OK.
- Turn knob to select desired option, then press OK.
Recipes
R1 APPETIZERS
Cook time—20 minutes
1 17.5-oz package puff pastry sheets
2 Tbsp olive oil
4 Tbsp fresh oregano, chopped
3 Tbsp fresh thyme, chopped
1⁄2 cup Parmesan cheese, shredded
Unfold one sheet puff pastry on cutting board. Brush with olive oil. Sprinkle oregano, thyme and cheese over oil. Unfold the second sheet and carefully lay on top of herbs.
Press down lightly. Using pastry or pizza cutter, cut pastry into 1⁄2 -inch strips. Tightly twist strips, keeping filling inside. Line solid pan with parchment paper and lay strips on paper, about one inch apart. Allow pastry to stand 15 minutes before placing in the oven. Slide pan into oven on rack position 1. Close oven door. Set oven to Recipes R1. Press OK. When oven chimes, remove pan from oven. Cut each appetizer into thirds. Serve immediately.
Makes 42 appetizers.
For more than one sheet of appetizers, use 2 racks at rack position 1 and 3. Timing is the same.
R2 FISH IN PUFF PASTRY
Cook time—25 minutes
1 red pepper
1 small zucchini
1⁄2 17.5-oz package puff pastry sheets
1⁄4 cup parsley, chopped
Kosher salt and freshly ground black pepper
4 2-oz fillets firm fish, cut into 3 x 2-inch portions
Cut red pepper into quarters. Remove seeds and cut each quarter lengthwise into four 1⁄4 -inch strips. Set aside. Cut ends off zucchini and cut lengthwise into 1⁄4 -inch slices. Set aside.
Line solid pan with parchment paper. Unfold and lay cool puff pastry onto cutting board. Cut into four equal squares. Stack one zucchini slice and four pepper strips on each square, laying them across connecting opposite corners. Sprinkle each with 1 Tbsp parsley. Season with salt and pepper. Lay one fillet on each stack and season again with salt and pepper. Pull two free corners of pastry over the fish and press lightly. Carefully place puff pastry bundles on parchment paper. Slide pan on rack position 1. Close oven door. Set oven to Recipes R2. Press OK. When oven chimes, remove pan from oven. Serve immediately.
Makes 4 servings.
R3 FISH ROLLS
Cook time—10 minutes
8 thin fish fillets, such as sole, flounder or turbot
Kosher salt and freshly ground black pepper
1 oz pine nuts, toasted
3 1⁄3 oz arugula
Lay fish on cutting board. Season both sides with salt and pepper. Spread approximately 1 1⁄2 tsp pine nuts and 1⁄3 oz arugula on each fish. Roll fillets from pointed end. Secure with toothpicks. Grease perforated pan with nonstick spray and place fish bundles on pan. Slide pan on rack position 2. Close oven door. Set oven to Recipe R3. Press OK. When oven chimes, remove fish from oven and serve immediately.
Makes 4 to 6 servings.
R4 BEEF STROGANOFF
Cook time—47 minutes
1 3⁄4 lb beef chuck roast, cut into 1⁄4 x 1⁄2 -inch strips
2 tsp kosher salt
1 tsp freshly ground black pepper
1 Tbsp beef bouillon granules
1 yellow pepper, sliced into 1⁄4 -inch strips
1 red pepper, sliced into 1⁄4 -inch strips
8 oz mushrooms, sliced 1⁄4 -inch thick
2 small yellow onions, sliced thin
2 1-oz packages dry gravy mix
1 Tbsp cornstarch
2 tsp paprika
1 1⁄2 cup heavy cream
1⁄4 cup tomato paste
Cooked egg noodles, optional
Season beef with salt and pepper. Place beef in 13 x 9-inch baking dish. Mix in bouillon, peppers, mushrooms and onions.
Place oven rack in rack position 2. Place dish on rack. Close oven door. Set oven to Recipe R4 with six people. Press OK. When oven chimes, remove dish from oven and carefully pour liquid into 2-cup measuring cup and set aside. Return dish back in oven and press OK to continue cooking.
To make sauce: In 2-quart saucepan whisk gravy mixes, cornstarch and paprika. Mix in cream and tomato paste. Whisk in reserved 1 3⁄4 cups juice, adding water if needed to equal 1 3⁄4 cups. Place on Wolf cooktop over medium heat. Bring to a boil to thicken, stirring constantly.
When oven chimes, remove dish from oven and mix in sauce. Serve alone or over egg noodles.
Makes 5 to 6 servings.
R5 BEEF POT ROAST
Cook time—2 hours
2 1⁄2 lb beef chuck roast, cut into 3 pieces
2 carrots, peeled and quartered
1⁄2 small celery root or celeriac, peeled and quartered
2 small yellow onions, quartered
1 bay leaf
2 whole cloves
8 black peppercorns
4 cup vegetable stock
Place beef, vegetables and spices in 4-quart casserole dish. Pour vegetable stock over all.
Place oven rack in rack position 2. Place dish on rack. Close oven door. Set oven to Recipe R5. Press OK. When oven chimes, remove dish from oven and serve warm.
Makes 5 to 6 servings.
R6 PORK LOIN IN PUFF PASTRY
Cook time—30 minutes
1⁄2 17.5-oz package puff pastry sheets
2 Tbsp stone ground mustard
1 lb pork tenderloin
Kosher salt and freshly ground black pepper
Unfold pastry sheet on cutting board and cut in half. Spread 1 Tbsp mustard evenly across each pastry sheet. Cut pork in half lengthwise. Season with salt and pepper. Place one pork piece in the middle of each sheet, leaving one inch on each long end. Fold ends over the pork and tightly roll the sides around the pork, placing seam on the bottom under the pork. Line solid pan with parchment paper. Carefully place puff pastry bundles on paper. Slide pan on rack position 2. Close oven door. Set oven to Recipes R6. Press OK. When oven chimes, remove pan from oven. Remove bundles from paper using a metal spatula. Serve immediately.
Makes 4 to 6 servings.
R7 PASTA GRATIN
Cook time—30 minutes
3 cup uncooked pasta (shells or elbow macaroni)
2 small yellow onions, sliced 1⁄2 -inch thick
8 oz mushrooms, sliced
3 oz sliced dried ham or prosciutto, sliced 1⁄2 -inch thick
1 cup flat leaf parsley, coarsely chopped
5 oz Italian or Parmesan cheese, shredded, divided
2 cup vegetable stock
1 cup heavy cream
Kosher salt and freshly ground black pepper Dash nutmeg
Combine pasta, onions, mushrooms, ham, parsley and half Italian cheese into a greased 4-quart casserole. Stir in stock, cream, salt, pepper and nutmeg. Pour over pasta. Sprinkle remaining cheese on top. Position oven rack to rack position 1. Place uncovered casserole on rack. Close oven door. Set oven to Recipes R7. Press OK. When oven chimes, remove casserole from oven. Cover. Allow casserole to stand for 15 minutes. Serve warm.
Makes 6 1 1⁄2 -cup servings.
R8 EGGPLANT GRATIN
Cook time—approximately 30 minutes
1 14 oz can tomatoes
1 clove garlic, minced
1 Tbsp fresh oregano, chopped (or 1 tsp dry)
1 Tbsp fresh thyme, chopped (or 1 tsp dry)
1 Tbsp olive oil
Kosher salt and freshly ground black pepper
2 medium eggplants
1 cup grated Italian cheese
Place tomatoes in 3-quart bowl. Crush with fork or potato masher. Mix in garlic, herbs and olive oil. Season with salt and pepper. Spread 1⁄2
cup tomato sauce in bottom of 2 1⁄2 -quart greased casserole. Slice the top off each eggplant and cut into 1⁄2 -inch slices. Place slices evenly over tomatoes in dish. Spread remaining tomato mixture over eggplant slices. Sprinkle cheese on top. Place oven rack on rack position 2. Place dish on rack. Close oven door. Set oven to Recipe R8. Press OK. When oven chimes, remove dish from oven and serve immediately.
Makes 4 to 6 servings.
R9 FLAN
Cook time—approximately 25 minutes
1⁄2 cup sugar, divided
1⁄2 cup orange juice
2 1⁄8 cup heavy cream or half & half
1 vanilla bean, split lengthwise
3 eggs, beaten
To make sauce: In 1 1⁄2 -quart saucepan on Wolf cooktop over medium heat, place 1⁄4 cup sugar. Continue to heat three minutes or until sugar turns light brown. Gradually pour orange juice into pan and allow to reduce in half. Remove and pour evenly into four 6-oz ramekin dishes. Set aside.
In 2-quart saucepan over medium heat, place cream, remaining sugar and vanilla bean. Bring to a simmer, stirring constantly. Whisk eggs in 2-quart bowl. Slowly pour cream into eggs, a little at a time, beating after each addition. Pour mixture through a fine strainer evenly into the dishes over the orange sauce. Place dishes on perforated pan. Carefully slide on rack position 1. Close oven door. Set oven to Recipes R9. Press OK. When oven chimes, remove from oven. Allow to cool completely. Chill for at least two hours. To serve, run a knife around the edge of each dish. Turn flans upside down onto plate and pour any remaining sauce from dish over the top
Makes 4 servings.
R10 PEARS IN RED WINE
Cook time—approximately 15 minutes
1 cup red wine
1⁄4 cup sugar
Seeds from 1 vanilla bean
5 or 6 pears, cut in half, seeds removed
In 13 x 9-inch baking dish, combine red wine, sugar and seeds from vanilla bean. Place pears, cut side down into wine mixture. Place oven rack on rack position 2. Place dish in cold oven on rack. Close oven door. Set oven to Recipes R10. Press OK. When oven chimes, remove pan from oven. Allow to cool slightly before serving warm.
Makes 10 to 12 servings.
R11 ROLLS
Cook time—approximately 33 minutes
3 1⁄4 cup flour 2 Tbsp sugar
1.25-oz package active dry yeast
1 tsp salt
1 cup very warm milk, 120–130°F
4 Tbsp butter, melted
2 Tbsp milk
1 tsp sugar
1 Tbsp butter, melted
In mixer bowl with dough hook, place flour, sugar, dry yeast and salt. Mix ingredients together on low speed for two minutes. Pour in warm milk and 4 Tbsp melted butter. Continue to mix for five minutes or until dough begins to form and pull away from the bowl. Remove dough hook and cover with damp cloth. Allow to rise at room temperature 1–1 1⁄2 hours or until doubled in bulk.*
On lightly floured surface, divide dough into 12 equal portions. Shape into balls and place in greased 12 x 8-inch glass dish. Cover with damp cloth and allow to rise about one hour or until doubled in bulk.
Place oven rack on rack position 2. Place dish on rack. Close oven door. Set oven to Recipes R11. Press OK. Mix remaining milk, sugar and butter. When oven chimes, brush rolls with mixture. Press OK again. When oven chimes again, remove rolls and cool slightly before serving. Serve warm.
Makes 12 rolls.
*Dough can be placed in a covered container in the refrigerator overnight. When ready to use, allow dough to set at room temperature for about one hour to warm before forming into rolls.
To check if the dough has doubled in bulk, stick two fingers into the dough about one inch down and quickly remove them. If the finger indents remain, then the dough has doubled in bulk. If the finger indents disappear, then the dough still needs to rise longer.
R12 MUFFINS
Cook time—approximately 35 minutes
For muffins:
2 cup flour
2⁄3 cup sugar
2 tsp baking powder
1⁄2 tsp baking soda
1⁄2 tsp salt
1⁄4 tsp cinnamon
2 eggs
1 cup buttermilk
1⁄2 cup butter, melted
1 Tbsp lemon zest
1⁄2 tsp vanilla
1⁄4 cup plain yogurt
1 cup blueberries
For streusel:
1⁄2 cup flour
1⁄4 cup butter, softened
1⁄4 cup sugar
1⁄4 cup walnuts, chopped
1 Tbsp lemon zest
In large mixing bowl with flat beater on low speed, combine flour, sugar, baking powder, baking soda, salt and cinnamon. In separate bowl, whisk together eggs, buttermilk, cooled butter, zest, vanilla and yogurt. Add egg mixture to mixing bowl and mix for 20 seconds, or until just combined. Remove bowl from mixer and hand mix blueberries into batter. Spray jumbo muffin pans with nonstick spray or use jumbo muffin pan liners. Divide batter evenly into 12 muffin cups.
To make streusel: Place flour butter, sugar, walnuts and lemon zest in small mixing bowl. Combine with hands or pastry blender until crumbly. Spoon mixture evenly on tops of muffins.
Place pan or muffin liners on perforated pan. Slide into cold oven on rack position 1. Close oven door. Set oven to Recipes R12. Press OK. When oven chimes, remove pan from oven. Allow to cool five minutes before removing from pan. Serve warm or cool and store in airtight container.
Makes 10 to 12 servings.
R13 CAKE
Cook time—approximately 1 hour
6 eggs, separated
1 cup sugar
1⁄4 cup water
1 tsp lemon extract
1 tsp lemon zest
1 cup cake flour
1⁄2 tsp cream of tarter
1⁄2 tsp salt
Frosting or fresh fruit, optional
In large mixing bowl with flat beater on low speed, place egg yolks and sugar. Beat at medium speed for two minutes or until thick. Add water, lemon extract and zest. Beat until combined for one minute. Add flour and beat on low speed until combined. Set aside.
In another large clean mixing bowl with wire whisk, pour egg whites. Whip at high speed for about 30 seconds until frothy, but not stiff. Add cream of tartar and salt. Continue to whip whites to stiff peaks, but not dry.
Gently fold egg whites into egg yolk batter. Pour into ungreased 9-inch tube pan.
Place oven rack on rack position 1. Close oven door. Set oven to Recipes R13. Press OK. When oven chimes to indicate preheat is complete, place pan in middle of rack. Press OK. When oven chimes to indicate baking time is over, remove oven. Allow to cool 10 minutes before removing from pan. With long metal spatula loosen the cake from the sides and middle of cake. Push cake out of removable bottom and carefully loosen the cake from the bottom. Frost cake or serve with fresh fruit.
Makes 10 to 12 servings.
R14 FOCACCIA
Cook time—approximately 40 minutes
4 1⁄4 cup bread flour
1.25-oz package active dry yeast
2 tsp Italian seasoning
1 tsp sugar
1 tsp salt
1 1⁄3 cup warm water, 105–115°F
1 Tbsp olive oil
Extra olive oil
Coarse sea salt
In mixer bowl with dough hook, place flour, dry yeast, seasoning, sugar and salt. Mix ingredients together on low speed for two minutes. Pour in water and oil. Continue to mix for five minutes or until dough begins to form and pull away from the bowl.* Increase speed to medium and knead the dough for 2–4 more minutes to form dough. Remove dough hook and cover with damp cloth. Allow to rise at room temperature two hours or until doubled in bulk.**
On lightly floured surface, roll dough into a flattened ball. Place in greased 8-inch glass pie plate. Spread dough to fill the plate. Coat top with olive oil. Using fingers, poke holes about one inch into dough evenly across dough. Cover with dry cloth and allow to rise one hour. Coat top with olive oil again and poke holes evenly across dough. Sprinkle top with coarse sea salt.
Position oven rack to rack position 1. Place dish on rack. Close oven door. Set oven to Recipes R14. Press OK. When oven chimes, remove pan from oven. Remove from dish immediately.
Makes 1 loaf bread.
*If dough is too dry, add additional water, one tablespoon at a time, until dough becomes moist. If dough is too moist, add additional flour, one tablespoon at a time, until dough becomes more dry.
**To check if the dough has doubled in bulk, stick two fingers into the dough about one inch down and quickly remove them. If the finger indents remain, then the dough has doubled in bulk. If the finger indents disappear, then the dough still needs to rise longer.
CARE RECOMMENDATIONS
DESCALE
Depending on water conditions, the oven may need to be descaled every 6–18 months. When the oven needs to be descaled, 'Boiler scaled up—please descale' will appear on the display. The duration between notifications is based on the water hardness specified in user settings.
Only use Durgol® Swiss Steamer descaling solution and follow the manufacturers instructions. Durgol® can be ordered online at subzerowolfstore.com.
Setting Descale:
- With oven off, press OK and turn knob to Descale, then press OK. 'Add 1 pt (0.5 L) descaler—and press OK' appears on the display.
- Remove water tank and pour entire Durgol® Swiss Steamer descaling solution contents into the tank, then reinstall water tank and press OK.
- After approximately 30 minutes, 'Pour away descaler—Add 2 pt (1 L) water' appears on the display. Remove tank, turn on faucet, then pour descaler down the drain.
![]()
Failure to dilute descaling solution before discarding may discolor sink and drain.
- Fill tank with warm tap water and reinstall. 'Descale appliance—1st rinsing cycle' appears on the display. After approximately 45 minutes, 'Pour away water— Descaling completed' appears on the display.
- Depending on the level of soil in the rinse water, the oven will determine whether additional rinse cycles are necessary. Follow instructions on the display.
- Once rinse cycles are complete, remove, empty and dry the water tank then wipe all stainless steel surfaces.
OVEN DOOR REMOVAL
The oven door can be removed for a thorough cleaning.
To remove, open the oven door completely. Rotate both hinge latches forward to the open position. Close the door to the "at-rest" position, then lift up and out. Refer to the illustrations below.

Oven door hinge latch.

Door "at-rest" position.
To reinstall, insert door hinges into the frame openings. Open the oven door completely and rotate both hinge latches back to the closed position.
RACK GUIDE REMOVAL
To remove rack guides, unscrew the knurled nut on the front of the rack guide. Pull the rack guide to the side of the threaded stud and remove from the front. Refer to the illustration below.

Rack guide removal.
| CLEANING | |
| Stainless steel | Use a nonabrasive stainless steel cleaner and apply with a soft lint-free cloth. To bring out the natural luster, lightly wipe surface with a water-dampened microfiber cloth followed by a dry polishing chamois. Always follow the grain of stainless steel. |
| Door front | Spray glass cleaner on a cloth to clean. |
| Control panel | Use a spray degreaser to remove fingerprints and food soil. Spray on a cloth before wiping panel. Do not spray cleaners directly on the control panel. |
| Interior | For general cleaning, initiate Steam mode at 175°F (80°C) for 30 minutes. This will loosen fat and cooking debris from the oven. Turn the oven off and wipe the interior with a cloth. Use a damp cloth and lemon juice to wipe away water and blue tarnish spots. Do not use a steam cleaner. |
| Oven racks and rack guides | Oven racks and rack guides can be cleaned in the dishwasher. |
| Stainless steel pans | The solid and perforated stainless steel pans can be cleaned in the dishwasher. |
| Water tank | Watermarks and calcium build-up can be removed using a standard descaler. Do not clean the water tank in the dishwasher. |
| Temperature probe | Clean with a damp cloth and mild detergent. Do not submerge in water or place in the dishwasher. |
TROUBLESHOOTING
OPERATION
Oven does not operate.
- Verify power is on.
- Verify electrical power to oven and home circuit breaker is on.
Oven temperature issue.
- Contact Wolf customer care at 800-222-7820 for recommendations.
Illumination is not working.
- The light bulb is defective, call Wolf factory certified service.
Oven starts making noise during operation.
- The oven may emit switching and pumping sounds during operation. Such sounds are normal.
Oven pans are difficult to remove.
- Some combinations of heat, moisture and food place-ment may cause the oven pans to warp, but will return to their original shape when cool.
'Do not remove water tank' appears on the display.
- Water in the boiler is not pumped off until the water temperature drops below 175°F (80°C).
'Boiler scaled up, please descale!' appears on the display.
- Descale oven.
'Appliance blocked, descaling necessary' appears on the display.
- Descale the oven. If the message does not disappear after descaling, contact Wolf factory certified service.
Service
- Maintain the quality built into your product by contacting Wolf factory certified service. For the name of the nearest Wolf factory certified service, check the contact & support section of our website, wolfappliance.com or call Wolf customer care at 800-222-7820.
- When contacting service, you will need the model and serial number of your product. Both numbers are listed on the product rating plate.
- For warranty purposes, you will also need the date of installation and name of your authorized Wolf dealer.
Wolf Appliance Residential Limited Warranty
FOR RESIDENTIAL USE
FULL TWO YEAR WARRANTY
For two years from the date of original installation, this Wolf Appliance product warranty covers all parts and labor to repair or replace, under normal residential use, any part of the product that proves to be defective in materials or workmanship. All service provided by Wolf Appliance under the above warranty must be performed by Wolf factory certified service, unless otherwise specified by Wolf Appliance, Inc. Service will be provided during normal business hours.*
LIMITED FIVE YEAR WARRANTY
For five years from the date of original installation, Wolf Appliance will repair or replace the following parts that prove to be defective in materials or workmanship: gas burners (excludes appearance), electric heating elements, blower motors (ventilation hoods), electronic control boards, magnetron tubes and induction generators. If the owner uses Wolf factory certified service, the service provider will repair or replace these parts with the owner paying for all other costs, including labor. If the owner uses non-certified service, the owner must contact Wolf Appliance, Inc. (using the information below) to receive repaired or replacement parts. Wolf Appliance will not reimburse the owner for parts purchased from non-certified service or other sources.
TERMS APPLICABLE TO EACH WARRANTY
The warranty applies only to products installed for normal residential use. The warranty applies only to products installed in any one of the fifty states of the United States, the District of Columbia or the ten provinces of Canada. This warranty does not cover any parts or labor to correct any defect caused by negligence, accident or improper use, maintenance, installation, service or repair.
THE REMEDIES DESCRIBED ABOVE FOR EACH WARRANTY ARE THE ONLY ONES THAT WOLF APPLIANCE, INC. WILL PROVIDE, EITHER UNDER THIS WARRANTY OR UNDER ANY WARRANTY ARISING BY OPERATION OF LAW. WOLF APPLIANCE, INC. WILL NOT BE RESPONSIBLE FOR ANY CONSEQUENTIAL OR INCIDENTAL DAMAGES ARISING FROM THE BREACH OF THIS WARRANTY OR ANY OTHER WARRANTY, WHETHER EXPRESS, IMPLIED OR STATUTORY.
Some states do not allow the exclusion or limitation of incidental or consequential damages, so the above limitation or exclusion may not apply to you. This warranty gives you specific legal rights and you may also have other legal rights that vary from state to state.
To receive parts and/or service and the name of Wolf factory certified service nearest you, contact Wolf Appliance, Inc., P.O. Box 44848, Madison, WI 53744; check the contact & support section of our website, wolfappliance.com, email us at customerservice@subzero.com or call 800-222-7820.
*Stainless steel (doors, panels, handles, product frames and interior surfaces) are covered by a limited 60-day parts and labor warranty for cosmetic defects.
*Replacement filters for ventilation hood recirculating kits are not covered by the product warranty.
Wolf, Wolf & Design, Wolf Gourmet, W & Design and the color red as applied to knobs are registered trademarks and service marks of Wolf Appliance, Inc. Sub-Zero, Sub-Zero & Design, Dual Refrigeration, The Living Kitchen, Great American Kitchens The Fine Art of Kitchen Design, and Ingredients are registered trademarks and service marks of Sub-Zero, Inc. All other trademarks or registered trademarks are property of their respective owners in the United States and other countries.

Documents / Resources
References
Download manual
Here you can download full pdf version of manual, it may contain additional safety instructions, warranty information, FCC rules, etc.
Advertisement
Thank you! Your question has been received!


Need Assistance?
Do you have a question about the CSO30TM that isn't answered in the manual? Leave your question here.