ADT ADT7AIO Series Quick User Manual
Hide thumbs
Also See for ADT7AIO Series:
- Installation and setup manual (2 pages) ,
- Quick user manual (32 pages)
Table of Contents
Advertisement
Advertisement
Table of Contents

Related Manuals for ADT ADT7AIO Series


Summary of Contents for ADT ADT7AIO Series
- Page 1 ADT7AIO/ADT5AIO Series Security Systems Systèmes de sécurité Quick User Guide Guide d'utilisation rapide Ready To Arm-Chime System Automation Ready To Arm A r m Aw ay Armed Stay Arm Custom Zones Scene 10:40 AM January 10, 2019 800-24123V1 3/19 Rev. A Part 1 Ref: ADT7AIO/ADT5AIO...
- Page 2 AVIS DE COMPATIBILITÉ DU SYSTÈME Votre système de sécurité ADT est conçu pour être utilisé avec des périphériques fabriqués ou approuvés par Resideo Technologies, Inc., par l’intermédiaire de sa filiale Ademco Inc. (« Resideo »). Votre système de sécurité Resideo n’est pas conçu pour être utilisé...
- Page 3 IMPORTANT SECURITY NOTICE Your wireless key (key fob) is similar to your keys or access card. If lost or stolen, another person can compromise your security system. Immediately notify your Dealer/Installer of a lost or stolen key fob. The Dealer/Installer will then remove the wireless key programming from the security system.
- Page 4 - 4 -...
-
Page 5: Table Of Contents
Table of Contents General Information ................... 7 Information générale ..................7 System Status LED Functions ..............7 Fonctions des DEL de l'état du système ........... 7 Navigating Menus ..................8 Navigation à travers les menus ..............8 Function Icons ..................9 Icônes d’fonction .................. - Page 6 Table of Contents Events Feature ....................28 Fonctions Activités ..................28 ®) Activate Automation Devices (Z-Wave ............29 ®) Activer les dispositifs d’Automation (Z-Wave ..........29 ® Configure Wi-Fi ..................... 30 ® Configuration Wi-Fi ..................30 Help Videos ..................... 32 Vidéos d'aide ....................
-
Page 7: General Information
General Information / Information générale The ADT7AIO/ADT5AIO are wireless Control Units that allow you to perform system arming and disarming functions, as well as to monitor the status of your security system. Les ADT7AIO/ADT5AIO sont des unités de commande sans fil qui vous permettent d'armer et de désarmer un système, ainsi que de surveiller l'état de votre système de sécurité. -
Page 8: Navigating Menus
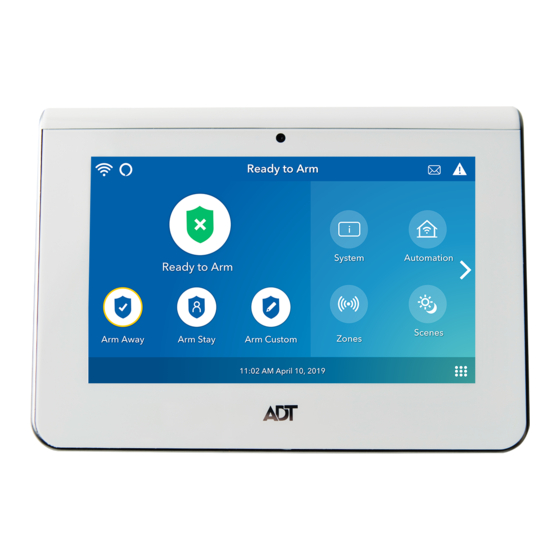
General Information / Information générale (Continued) Navigating Menus / Navigation à travers les menus System Status is displayed at the top of the home screen and the time and date are displayed at the bottom. The Security Screen displays the system status and selection “icons”. -
Page 9: Function Icons
General Information / Information générale (Continued) Function Icons / Icônes d’fonction Selection Function Used to Arm the system in Away mode. Utilisée pour armer le système en mode Total. Arm Away (Arm Total) Used to Arm the system in Stay mode. Utilisée pour armer le système en mode Partiel. -
Page 10: Panic Icons
Permet d'accéder aux renseignements sur le Wi-Fi Enables or disables Alexa voice operation mode. Active ou désactive les Alexa commandes vocales. View notifications from ADT. Affichage des notifications ADT. Provides access to Panic icons. Donne accès aux icônes de panique. -
Page 11: Master User Tools Icons
General Information / Information générale (Continued) Master User Tools Icons / Icônes d’outils de l’utilisateur maître Selection Function Provides Master User access to manage (add/remove) Users. Refer to the Assign User Codes section. Users Offre un accès d’utilisateur maître pour gérer (Utilsateurs) (ajouter/supprimer) des utilisateurs. - Page 12 General Information / Information générale (Continued) Master User Tools Icons / Icônes d’outils de l’utilisateur maître Provides access to Help Videos feature. Refer to the Help Videos section. Permet d’accéder à la fonction Vidéos d'aide. Consultez la Help Videos section Vidéos d'aide. (Vidéos d'aide) - 12 -...
-
Page 13: Touchpads/Touchscreens
General Information / Information générale (Continued) Touchpads/Touchscreens Your system may be equipped with up to eight Wireless Touchpads or Wireless Touchscreens. Information about the the WLTP100 Wireless Touchpad is provided below. The WTS700 Wireless Touchscreen duplicates the information provided by the Control’s touchscreen. For additional information about the WTS700 Wireless Touchscreen, refer to the Quick User Guide P/N 800-24128. - Page 14 General Information / Information générale (Continued) Item or Key Function Display Window/ Liquid Crystal Display (LCD) displays protection point identification, system status, and messages. Fenêtre d'affichage L'écran à cristaux liquides (ACL) affiche l'identification du point de protection, l'état du système et les messages. No AC power or battery is very low.
- Page 15 General Information / Information générale (Continued) Item or Key Function STAY/ Stay key Used to Arm the system in Stay mode. PARTIEL Touche Partiel Utilisée pour armer le système en mode Partiel. Off key OFF/ Disarms burglary portion of the system, silences alarms and ARRÊT audible trouble indicators, and clears visual display after problem's correction.
- Page 16 General Information / Information générale (Continued) Item or Key Function CHIME/ Chime key Turns CHIME mode on and off. When on, the opening of CARRILON windows or doors while the system is disarmed will sound 3 beeps at the touchpad(s). Touche Carrilon Active et désactive le mode CARILLON.
-
Page 17: Quick Guide To Wltp100 Touchpad System Functions
General Information / Information générale (Continued) Quick Guide to WLTP100 Touchpad System Functions For additional information regarding system functions refer to the full User Guide P/N 800-24122. Guide rapide des fonctions système du touchpad WLTP100 Pour plus d'informations sur les fonctions système, reportez-vous au Guide de l'utilisateur complet N/P 800-24122. - Page 18 General Information / Information générale (Continued) Enter 4-digit Master code + (walk) Walk Test/Essai par déplacement Code à chiffres + (Test par d éplacement Communication Enter 4-digit Master code + Test/Test de Code à chiffres + communication Press + Desired panic function within 10 secs. The (programmed) panic keys will illuminate.
-
Page 19: Arm The System
Arm the System / Armement du système Select arming mode. Arm Away (when you’re out) OR Arm Stay (when you’ll be home) OR Arm INSTANT entry delay on/off Arm Custom (bypass selected zones) Sélectionnez le mode d'armement. Arm. Total (lorsque vous êtes absent) OU Arm. -
Page 20: Disarm The System
Disarm the System / Désarmement du système Select Disarm icon. Sélectionnez sur l'icône Désarmer. Disarm (Desarmer) Enter user code. Entrez un code d’utilisateur. Clear • System disarms What Happens • Entry Delay beeps stop (if beeps enabled) • Le système se désarme Ce qui se produit •... -
Page 21: Bypass Zones
Bypass Zones / Contournement de zones NOTE: Bypassed zones are unprotected. NOTE : Les zones contournées ne sont pas protégées. Select Zones icon. Zones Sélectionnez sur l'icône Zones. Select zones to bypass from list. Sélectionner parmi la liste les zones à contourner. Select BYPASS. -
Page 22: Panic Alarms
Consulte seu instalador sobre os tipos de alarme de pânico programados em seu sistema. Select the Panic Icon. Sélectionnez sur l'icône Urgence Select the desired panic icon. Alarm message is sent to ADT. Fire Appuyez sur l'icône d'urgence applicable. (Feu) Un message d’alarme est transmis au ADT. Police Personal - 22 -... -
Page 23: Assign User Codes
Assign User Codes / Assignation de codes d’utilisateur Select the Tools Icon. Sélectionnez sur l'icône Tools (Outils). Tools (Outils) Enter Master User code. Entrez un code d’utilisateur. Clear Select Users icon. Sélectionnez sur l'icône Users (Utilsateurs). Users (Utilsateurs) To assign a User, or revise a User code, select the desired option then select Edit or Add new EDIT Pour assigner un code Utilsateurs, un code d'invité... - Page 24 Assign User Codes / Assignation de codes d’utilisateur Select Authority Level (if applicable). Authority Level Standard User Sélectionnez le niveau d'autorité (s’il y a lieu). Select Authority Level for this User (if applicable). User Select Save. Arm Only Sélectionnez le niveau d'autorité pour cet utilisateur (s’il Guest y a lieu).
-
Page 25: Settings
Settings / Ajustes Select the Tools Icon. Sélectionnez sur l'icône Tools (Outils). Tools (Outils) Enter Master User code. Entrez un code d’utilisateur. Clear Select the Settings icon. Sélectionnez sur l'icône Settings (Réglages). Settings (Reglages) Adjust screen brightness and Voice/Chime volume. Régler la brillance de l'écran et le volume vocal/du carillon. -
Page 26: Advanced Features
Advanced Features / Fonctions avancées Several advanced User features are available. Refer to the full User Guide for additional information regarding these features. Plusieurs fonctions Utilisateur avancées sont disponibles. Consultez le guide de l'utilisateur complet pour obtenir des informations supplémentaires au sujet de cette fonction. -
Page 27: Voice Command
Voice Command / Commande vocale Voice Command offers control of Security Functions, Z-Wave devices and Video functions by speaking in plain language. User-selected trigger phrases spoken near the Controller alert the system to listen for further instructions. Refer to the full User Guide for additional information regarding this feature. -
Page 28: Events Feature
Events Feature / Fonctions Activités Select the Events Icon. Sélectionnez sur l'icône Activités. Events (Activités) - 28 -... -
Page 29: Activate Automation Devices (Z-Wave)
Activer les dispositifs d’automatisation (Z-Wave) Z-Wave device (for Lights, Locks, Thermostats and Garage Doors), inclusion and exclusion is via the ADT app. Refer to the system’s User Guide for additional information (p/n 800-24122 or later). Les dispositifs Z-Wave (éclairage, verrous, thermostats et portes de garage) sont inclus ou exclus par l’application ADT. -
Page 30: Configure Wi-Fi
Configure Wi-Fi / Configuration Wi-Fi Connect the control to your local network router. Branchez le contrôleur à votre routeur de réseau local. Select the Tools Icon. Sélectionnez sur l'icône Tools (Outils). Tools (Outils) Enter Master User code. Entrez un code d’utilisateur. Clear Select the WiFi Settings Icon. - Page 31 Configure Wi-Fi / Configuration Wi-Fi a. Enter the required information. Manually Connect to Select the Network a. Saisissez les renseignements requis. b. Sélectionnez OK. Follow the prompts. Suivez les messages-guides. - 31 -...
-
Page 32: Help Videos
Help Videos / Vidéos d'aide Select the Tools Icon. Sélectionnez sur l'icône Tools (Outils). Tools (Outils) Enter Master User code. Entrez un code d’utilisateur. Clear Select the Help Videos Icon. Sélectionnez sur l'icône Vidéos d'aide. Help Videos (Vidéos d'aide) Select from the displayed options to play Help Videos associated with the Security System. -
Page 33: Amazon Alexa
The Alexa feature must be enabled by your Installer. If the Alexa App does not appear on your Control Panel or the Touchscreen contact ADT to enable the feature. Refer to the full User Guide for additional information about this feature. -
Page 34: Test The System
Test the System (to be conducted weekly) Tester le système (à effectuer chaque semaine) Disarm the system and close all protected windows and doors. The status LED should be lit Green. NOTE: Alarm messages are NOT sent to your alarm monitoring company during these tests. Désarmez le système et fermez toutes les fenêtres et portes protégées. -
Page 35: Wireless Keys (Key Fobs)
Wireless Key (Key Fob) Functions Each wireless key button has a preprogrammed function. Ask your installer to identify the functions assigned for each button. NOTES: • One or more buttons may have been programmed as a panic function. • To activate a button function, press and hold the button for 1-2 seconds. Une fonction a été... - Page 36 ADT Se cu r it y Se rv i c e s 15 0 1 Y am at o R o ad Bo c a R at o n , F L 3 34 3 1 © 2 01 9 AD T S e cu rit y S erv ic e s Ê800-24123V1vŠ...