Table of Contents
Advertisement
Quick Links
HT994SJ-AHP_BUSAJJK
DVD DIGITAL THEATER SYSTEM
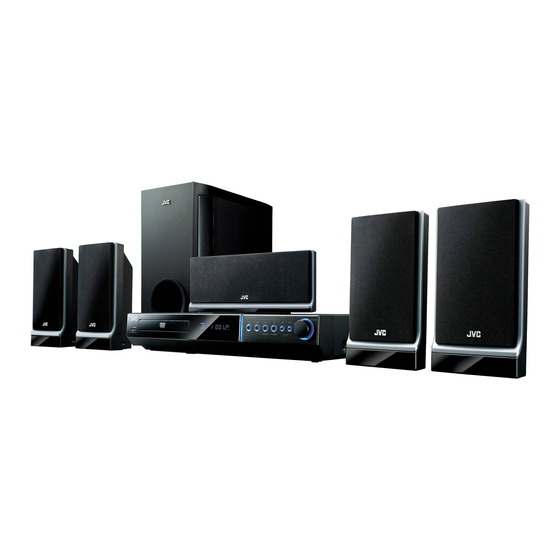
TH-G41
Consists of XV-THG41 and SP-THG51F,
SP-THG61C and SP-THG50W
TUNING
TUNING
iPod is a trademark of Apple Inc., registered in the U.S. and other countries.
iPhone is a trademark of Apple Inc.
INSTRUCTIONS
For Customer Use:
Enter below the Model No. and
Serial No. which are located on
the rear of cabinet. Retain this
information for future reference.
Model No.
Serial No.
LVT2052-001A
[J]
Advertisement
Table of Contents

Related Manuals for JVC TH-G41


Summary of Contents for JVC TH-G41
- Page 1 HT994SJ-AHP_BUSAJJK DVD DIGITAL THEATER SYSTEM TH-G41 Consists of XV-THG41 and SP-THG51F, SP-THG61C and SP-THG50W TUNING TUNING INSTRUCTIONS iPod is a trademark of Apple Inc., registered in the U.S. and other countries. iPhone is a trademark of Apple Inc. For Customer Use: Enter below the Model No.
- Page 2 CAUTION RISK OF ELECTRIC SHOCK DO NOT OPEN CAUTION: TO REDUCE THE RISK OF ELECTRIC SHOCK DO NOT REMOVE COVER (OR BACK) NO USER-SERVICEABLE PARTS INSIDE REFER SERVICING TO QUALIFIED SERVICE PERSONNEL. This lightning flash with arrowhead symbol within an equilateral triangle is intended to alert the user to the presence of uninsulated dangerous voltage within the product’s enclosure that may be of sufficient magnitude to constitute a risk of electric...
-
Page 3: Important Safety Instructions
IMPORTANT SAFETY INSTRUCTIONS CAUTION: PLEASE READ AND OBSERVE ALL WARNINGS AND INSTRUCTIONS IN THIS OWNER’S MANUAL. AND THOSE MARKED ON THE PRODUCT. RETAIN THIS BOOKLET FOR FUTURE REFERENCE. This product has been designed and manufactured to assure personal safety. Improper use can result in electric shock or fire hazard. -
Page 4: Table Of Contents
Contents Introduction ....2-5 About the Symbol Display ....2 Symbol Used in this Manual ....2 Screen Saver . -
Page 5: Introduction
Introduction To ensure proper use of this product, please read this owner’s manual carefully and retain it for future reference. This manual provides information on the operation and maintenance of your DVD player. Should the unit require service, contact an authorized service location. About the Symbol Display “... -
Page 6: Types Of Playable Discs
Types of Playable Discs (8 cm / 12 cm disc) Audio CD (8 cm / 12 cm disc) In addition, this unit plays DVD±R/RW and CD-R/RW, Dual disc that contains audio titles, MP3, WMA, and/or JPEG files. Notes: • Depending on the conditions of the recording equipment or the CD-R/RW (or DVD±R/RW) disc itself, some CD-R/RW (or DVD±R/RW) discs may not be played on the unit. -
Page 7: Front Panel
Front Panel a 1 1 / / ' ' (STANDBY/ON) Switches the unit ON and OFF. b Disc Tray Insert a disc here. c AUDIO IN The AUDIO IN port means you can connect a audio device to play through the surround sound speakers. -
Page 8: Remote Control
Remote Control AUDIO (1 1 / / ' ' ) Switches the unit ON and OFF. FUNCTION Selects the function (DVD/CD, FM) INPUT Changes the input source ( AUX, AUX OPT, AUDIO IN, OSD IPOD, IPOD, HDMI SLEEP Sets the System to turn off automatically at a specified time. -
Page 9: Installation And Setup
Installation and Setup TV Connection Make one of the following connections, depending on the capabilities of your existing equipment. Tips: Depending on your TV and other equipment you wish to connect, there are various ways you could connect the DVD/CD Receiver. Use one of the connections described below. -
Page 10: Optional Equipment Connection
Optional Equipment Connection Rear of DVD/CD Receiver (not supplied) (not supplied) OPTICAL Auxiliary device DVD Player (or Digital Device, etc) AUX IN connection (A) Connect a Output of auxiliary device to the AUX AUDIO Input (L/R) Connector. OPTICAL IN connection (O) Connect an optical output of DVD Player (or Digital Device etc) to the OPTICAL IN connector. -
Page 11: Hdmi Connection
HDMI Connection About HDMI HDMI (High Definition Multimedia Interface) supports both video and audio on a single digital connection for an easy all- digital output to an HDMI or DI-equipped TV. Connection to an HDMI TV requires an HDMI cable while connection to a DVI-equipped TV requires a DVI adapter besides a HDMI cable. -
Page 12: Speaker System Connection
Speaker System Connection Connect the speakers using the supplied speaker cables. To obtain the best possible surround sound, adjust the speaker parameters (volume, distance, etc.). Notes: • Be sure to match the speaker cable to the appropriate terminal on the components: + to + and –... -
Page 13: Displaying Disc Information On-Screen
Displaying Disc Information on-screen You can display various information about the disc loaded on-screen. 1. Press DISPLAY to show various playback information. The displayed items differ depending on the disc type or playing status. 2. You can select an item by pressing v / V and change or select the setting by pressing b / B. -
Page 14: General Operation
General Operation 1. Press SETUP. The Setup menu appears. 2. Use v / V to select the desired option then press B to move to the second level. The screen shows the current setting for the selected item, as well as alternate setting(s). -
Page 15: Audio
AUDIO Each DVD disc has a variety of audio output options. Set the player’s AUDIO options according to the type of audio system you use. Dynamic Range Control (DRC) With the DVD* format, you can hear a program’s soundtrack in the most accurate and realistic presentation, thanks to digital audio technology. -
Page 16: Initial Settings
5.1 Speaker Setup Test Press b / B to test the signals of each speaker. Adjust the volume to match the volume of test signals memorized in the system. Front Left (Front L) → Center→ Front Right (Front R) → Rear Right (Rear R) → Rear Left (Rear L) → SubWoofer LOCK (Parental Control) Initial Setting the Area Code:... -
Page 17: Operations
Operation General features Buttons Operations Z (OPEN / CLOSE) Opens or closes the disc tray. X (PAUSE) During playback, press X to pause playback. Press X repeatedly to play Frame-by-Frame. . / > During playback, press . or > to go to the next chapter/track or to return to the beginning of the current chapter/track. -
Page 18: Additional Features
Additional features Time Search To start playing at any chosen time on the disc: 1. Press DISPLAY during playback. 2. Press v / V to select the time clock icon and “--:--:--” appears. 3. Input the required start time in hours, minutes, and seconds from left to right. -
Page 19: Playing An Audio Cd Or Mp3/Wma File
Playing an Audio CD or MP3/WMA file This unit can play Audio CDs or MP3/WMA files. MP3/ WMA/ Audio CD Once you insert an MP3/WMA files recording media or Audio CD a menu appears on the TV screen. Press v / V to select a track/file and then press PLAY or ENTER, and playback starts. -
Page 20: Programmed Playback
Programmed Playback The program function enables you to store your Favourite tracks from any disc in the receiver memory. A program can contain 30 tracks. 1. Insert a disc. Audio CD and MP3/WMA Discs: 2. To add a music(s) on the program list, press PROG/MEMO to enter the program edit mode ( mark appears on the menu). -
Page 21: Viewing A Jpeg File
Viewing a JPEG file This unit can play discs with JPEG files. Before playing JPEG recordings, read the notes on JPEG Recordings on the right. 1. Insert a disc and close the tray. The PHOTO menu appears on the TV screen. 2. -
Page 22: Using Ipod
• Be careful not to put iPod dock strongly into the unit when connecting or disconnecting it. But the cable may be damaged. • JVC is not responsible for any loss of data on an iPod when used with this system. • This system can receive analog sound from the... -
Page 23: Presetting The Radio Stations
Presetting the Radio Stations You can preset 50 stations for FM. Before tuning, make sure that you have turned down the volume. 1. Press FUNCTION on the remote control until FM appears in the display window. 2. Press and hold TUNING.(-/+) for about two seconds until the frequency indication starts to change, then release. -
Page 24: Sleep Timer Setting
Sleep Timer Setting Press SLEEP/DIMMER one or more times to select delay time between 10 and 180 minutes, after the player will turn off. To check the remaining time, press To cancel the sleep function, press repeatedly until “SLEEP 10” appears, and then press SLEEP/DIMMER once again while “SLEEP 10”... -
Page 25: Reference
Language Codes Use this list to input your desired language for the following initial settings: Disc Audio, Disc Subtitle, Disc Menu. Language Code Language Abkhazian 6566 Fiji Afar 6565 Finnish Afrikaans 6570 French Albanian 8381 Frisian Ameharic 6577 Galician Arabic 6582 Georgian Armenian... -
Page 26: Troubleshooting
Troubleshooting Check the following guide for the possible cause of a problem before contacting service. Symptom No power. • The power cord is disconnected. The power is on, but • No disc is inserted. the DVD/CD Receiver does not work. •... - Page 27 Symptom • The antenna is positioned or connected Radio stations cannot poorly. be tuned in. • The signal strength of the stations is too weak (when tuning in with automatic tuning). • No stations have been preset or preset stations have been cleared (when tuning by scanning preset stations).
-
Page 28: Specifications
Specifications Power supply Power consumption Net Weight External dimensions (W x H x D) Operating conditions Operating humidity Laser Video system Frequency response (audio) Signal-to-noise ratio (audio) Dynamic range (audio) Harmonic distortion (audio) Video output COMPONENT VIDEO OUT HDMI OUT Tuning Range Intermediate Frequency Signal-to Noise Ratio... - Page 29 ARRANTY (Only in U.S.A.) ARRANTY (Only in U.S.A.)
- Page 30 0409SKMLGEEGL...