Table of Contents
Advertisement
Quick Links
HW994SJ-AHP_BUSAJJK
DVD DIGITAL THEATER SYSTEM
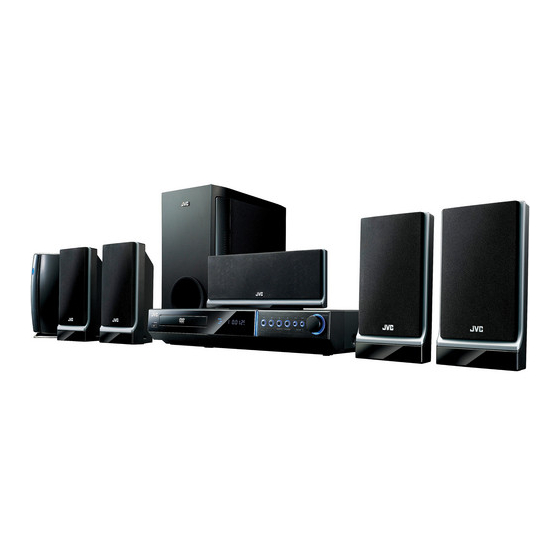
TH-G51J
Consists of XV-THG51, SP-THG51F,
SP-THG61C, SP-THG50W and RX-THG51
TUNING
TUNING
iPod is a trademark of Apple Inc., registered in the U.S. and other countries.
INSTRUCTIONS
For Customer Use:
Enter below the Model No. and
Serial No. which are located on
the rear of cabinet. Retain this
information for future reference.
Model No.
Serial No.
LVT2054-001A
[J]
Advertisement
Table of Contents

Related Manuals for JVC TH-G51J


Summary of Contents for JVC TH-G51J
- Page 1 HW994SJ-AHP_BUSAJJK DVD DIGITAL THEATER SYSTEM TH-G51J Consists of XV-THG51, SP-THG51F, SP-THG61C, SP-THG50W and RX-THG51 TUNING TUNING iPod is a trademark of Apple Inc., registered in the U.S. and other countries. For Customer Use: Enter below the Model No. and Serial No. which are located on INSTRUCTIONS the rear of cabinet.
- Page 2 CAUTION: The apparatus shall not be exposed to water CAUTION (dripping or splashing) and no objects filled with liquids, such as vases, shall be placed on the apparatus. RISK OF ELECTRIC SHOCK DO NOT OPEN CAUTION concerning the Power Cord CAUTION: TO REDUCE THE RISK OF ELECTRIC SHOCK Most devices are recommended be placed on a...
- Page 3 NOTE TO CABLE/TV INSTALLER: This reminder is provided to call the cable TV system installer’s attention to Article 820-40 of the National Electric Code (U.S.A.). The code provides guidelines for proper grounding and, in particular, specifies that the cable ground shall be connected to the grounding system of the building, as close to the point of the cable entry as practical.
- Page 4 IMPORTANT SAFETY INSTRUCTIONS CAUTION: PLEASE READ AND OBSERVE ALL WARNINGS AND INSTRUCTIONS IN THIS OWNER’S MANUAL. AND THOSE MARKED ON THE PRODUCT. RETAIN THIS BOOKLET FOR FUTURE REFERENCE. This product has been designed and manufactured to assure personal safety. Improper use can result in electric shock or fire hazard.
-
Page 5: Table Of Contents
Contents Introduction ....2-5 LOCK (PARENTAL CONTROL) ..14 • Initial Setting the Area Code ..14 About the Symbol Display . -
Page 6: Introduction
Introduction To ensure proper use of this product, please read this Notes on Discs owner’s manual carefully and retain it for future reference. Handling Discs This manual provides information on the operation Do not touch the playback side of the disc. Hold the and maintenance of your DVD player. -
Page 7: Types Of Playable Discs
Types of Playable Discs Regional Code This unit has a regional code printed on the rear of the (8 cm / 12 cm disc) unit. This unit can play only DVD discs labelled as the same as the rear of the unit or “ALL”. Audio CD (8 cm / 12 cm disc) Notes on Regional Codes... -
Page 8: Front Panel
Front Panel d e f g h i a 1 1 / / ' ' (STANDBY/ON) g X X (PAUSE) Switches the unit ON and OFF. Pause playback. FM MODE b Disc Tray This will change the tuner from stereo to mono Insert a disc here. -
Page 9: Remote Control
Remote Control 0-9 numerical buttons: Selects AUDIO (1 1 / / ' ' ) numbered options in a menu. Switches the unit ON and OFF. FUNCTION SURROUND Selects the surround mode. Selects the function (DVD/CD, FM) INPUT SCAN MODE Sets the output resolution for HDMI Changes the input source ( AUX, and COMPONENT VIDEO OUT AUX OPT, AUDIO IN, OSD IPOD,... -
Page 10: Installation And Setup
Installation and Setup TV Connection Video connection Connect the MONITOR OUT jack from the DVD/CD Make one of the following connections, depending on Receiver to the VIDEO IN jack on the TV using the the capabilities of your existing equipment. video cable (V). -
Page 11: Optional Equipment Connection
Optional Equipment Connection iPod connection (I) Connect the iPod and the unit with iPod docking Rear of DVD/CD Receiver station.(I). iPod (not supplied) (supplied) (not VIDEO supplied) AUDIO (L) AUDIO (R) Rear of DVD/CD Receiver OPTICAL Notes: Auxiliary device DVD Player •... -
Page 12: Hdmi Connection
HDMI Connection HDMI compatible TV HDMI About HDMI HDMI (High Definition Multimedia Interface) supports both video and audio on a single digital connection for an easy all- digital output to an HDMI or DI-equipped TV. Connection to an HDMI TV requires an HDMI cable while connection to a DVI-equipped TV requires a DVI adapter besides a HDMI cable. -
Page 13: Setup The Wireless System
Setup the wireless system Setting an ID of Wireless When the unit is manufactured, the ID is already set. Note: If an interference occurs or you use a new Wireless If there is a product with a strong electromagnetic field Receiver, an ID should be set again. -
Page 14: Speaker System Connection
Speaker System Connection Caution: • The left and right speakers can be installed on a Connect the speakers using the supplied speaker wall. cables. • When installing the speakers on a wall, be sure to To obtain the best possible surround sound, adjust the have the speakers installed by qualified personnel. -
Page 15: Displaying Disc Information On-Screen
Displaying Disc Information Initial Settings on-screen By using the Setup menu, you can make various adjustments to items such as picture and sound. You can display various information about the disc You can also set a language for the subtitles and the loaded on-screen. -
Page 16: General Operation
DISPLAY General Operation 1. Press SETUP. The Setup menu appears. TV Aspect 4:3 – Select when a standard 4:3 TV is connected. 16:9 – Select when a 16:9 wide TV is connected. 2. Use v / V to select the desired option then press Display Mode B to move to the second level. -
Page 17: Audio
AUDIO 5.1 Speaker Setup Make the following settings for the built-in 5.1 channel Each DVD disc has a variety of audio output options. surround decoder. Set the player’s AUDIO options according to the type of audio system you use. 1. Press ENTER, and the 5.1 Speaker Setup menu appears. -
Page 18: Lock (Parental Control)
5.1 Speaker Setup Rating Blocks playback of rated DVDs based on their Test contents. Not all discs are rated. Press b / B to test the signals of each speaker. Adjust 1. Select “Rating” on the LOCK menu then press B. the volume to match the volume of test signals 2. -
Page 19: Operations
Operation General features Buttons Operations Discs Z (OPEN / CLOSE) Opens or closes the disc tray. X (PAUSE) During playback, press X to pause playback. Press X repeatedly to play Frame-by-Frame. . / > During playback, press . or > to go to the next chapter/track or to return to the beginning of the current chapter/track. -
Page 20: Additional Features
Additional features Time Search To start playing at any chosen time on the disc: 1. Press DISPLAY during playback. 2. Press v / V to select the time clock icon and “--:--:--” appears. 3. Input the required start time in hours, minutes, and seconds from left to right. -
Page 21: Playing An Audio Cd Or Mp3/Wma File
Playing an Audio CD or ID3 TAG When playing a file containing information such as MP3/WMA file track titles, you can see the information by pressing DISPLAY. (Song, Artist, Album, Genre, Comment) This unit can play Audio CDs or MP3/WMA files. MP3/ WMA/ Audio CD Once you insert an MP3/WMA files recording media or Audio CD a menu appears on the TV screen. -
Page 22: Programmed Playback
Programmed Playback Repeat Programmed Tracks 1. Press REPEAT when playing a disc. The repeat The program function enables you to store your icon appears. Favourite tracks from any disc in the receiver memory. 2. Press REPEAT to select a desired repeat mode. A program can contain 30 tracks. -
Page 23: Viewing A Jpeg File
Viewing a JPEG file Still Picture 1. Press PAUSE/STEP during the slide show. This unit can play discs with JPEG files. The DVD/CD Receiver will now go into the PAUSE Before playing JPEG recordings, read the notes on mode. JPEG Recordings on the right. 2. -
Page 24: Using Ipod
Press PAUSE/STEP (X) or PLAY (B) to may be damaged. continue playback. • JVC is not responsible for any loss of data on an Skipping to the next/previous file iPod when used with this system. Press SKIP (>) to move to the next file. -
Page 25: Presetting The Radio Stations
Presetting the Radio Stations Listening to the Radio You can preset 50 stations for FM. Before tuning, Preset radio stations in the DVD/CD Receiver’s make sure that you have turned down the volume. memory first (see “Presetting radio stations” on the left). -
Page 26: Sleep Timer Setting
Sleep Timer Setting Enjoying audio form an external source You can set the DVD/CD Receiver to turn off automatically at a specified time. You can enjoy audio form an external source through your unit. 1. Press SLEEP to set the desired sleep time. Press INPUT repeatedly to select the desired input The SLEEP indicator and the sleep time appears in the source. -
Page 27: Reference
Language Codes Use this list to input your desired language for the following initial settings: Disc Audio, Disc Subtitle, Disc Menu. Language Code Language Code Language Code Language Code Abkhazian 6566 Fiji 7074 Lingala 7678 Singhalese 8373 Afar 6565 Finnish 7073 Lithuanian 7684... -
Page 28: Troubleshooting
Troubleshooting Check the following guide for the possible cause of a problem before contacting service. Correction Symptom Cause • Plug the power cord securely into the No power. • The power cord is disconnected. wall outlet. • Insert a disc. (Check that the DVD or, The power is on, but •... - Page 29 Symptom Cause Correction • The antenna is positioned or connected • Connect the antenna securely. Radio stations cannot poorly. be tuned in. • Adjust the antennas and connect an external antenna if necessary. • The signal strength of the stations is too •...
-
Page 30: Specifications
Specifications Power supply 120 V ~ 60 Hz Power consumption 110 W Net Weight 4 kg External dimensions (W x H x D) 430 x 72 x 307 mm Operating conditions Temperature: 5°C to 35°C, Operation status: Horizontal Operating humidity 5% to 85% Laser Semiconductor laser, wavelength 650 nm... - Page 31 ARRANTY (Only in U.S.A.) ARRANTY (Only in U.S.A.)
- Page 32 0409SKMLGEEGL...