
Related Manuals for Cisco 79 Series


Summary of Contents for Cisco 79 Series
- Page 2 Phone features Connecting your Phone Handset overview Extension mobility (Hot-Desking) – Logging in and out Placing calls and Answering calls Putting calls on hold Using directories Transferring calls Call forwarding your extension ...
- Page 3 Easy Navigation Context Sensitive Soft Keys. Line Buttons. Voicemail and Voicemail to Email* Directories Call capture for missed, received & placed calls. Extension Mobility Log into any phone, Flexible working from any office. Call Transfer. Between all offices.
-
Page 4: Connecting Your Phone
Connecting Your Phone 6 Press Button to Lower stand (Can adjust angle)) 2 Connect Headset (Optional) 1 Connect Handset. Notes: Make sure you connect to handset socket not headset. Long straight part of lead goes to 5 Connect Power Brick. phone (Not required if you have a PoE Switch) - Page 5 Once connected, power the phone up and it will display the following sequence Cisco logo while powering up “Obtaining IP Address” “Attempting VPN connection” “VPN connected” “Registering” Connection complete. The phone displays the correct date and time. The phone may already be logged in for you in which case it shows your phone number and line description and is ready to use.
-
Page 6: Handset Overview
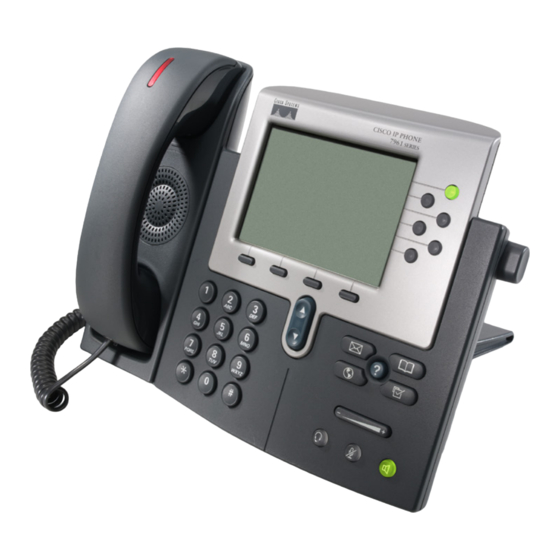
Handset Overview Your DDI External Number SoftKeys Your Line Button Other Lines and/or speed dials Voicemail Directories Settings Services eg extension mobility Speaker Button OK/Select Button... - Page 7 Log in to make your phone active: 1. Press the Services button on the telephone. 2. Select extension mobility. 3. Enter your User ID and PIN (sent to you by email). If you don’t have these please email fixme@gricom.co.uk 4. Press ‘submit’. 5.
- Page 8 Place a call: Option 1: Lift handset and dial as per standard phone. Dialling will be delayed to give you the option to correct the digits dialled. Option 2 (recommended): Start dialling on keypad. You can correct numbers with << key as you dial.
- Page 9 Press the Directories button and select the option you want: For call history: select missed, received or placed calls and then scroll down list. View details of call by pressing Details softkey. Place a call to a number by highlighting the number and pressing Dial softkey or OK button Note if you have other people’s lines on your handset you will see their missed calls.
- Page 10 To blind transfer a call: During a call, press the Trnsfer soft key, the caller is placed on hold. Enter the number to transfer the call to, wait until it rings then press the Trnsfer soft key to complete the transfer. To introduce a transferred call: During a call, press the Trnsfer soft key, the caller is placed on hold.
- Page 11 To create a conference call: During a call, press the More soft key and then the Confrn soft key to open a new line and put the first party on hold. Place a call to another number. When the call connects, press Confrn again to add the new party to the call. Once the conference is in progress press More then ConfList to see who is on the call.
- Page 12 Enrol and Set Up: Press the Messages button on the handset. Enter the default PIN number sent to you and listen to instructions. When requested say your name eg John Smith. Press # the press # again to keep name. Press 1 to record a personal greeting.
- Page 13 An optional feature, where your desk number is linked to your mobile. The feature allows you to pick up desk calls on both your desk phone and your mobile, and to interchange between the two as you please. To Activate (if the feature is configured) Select the More softkey and then Mobility Select the Enable Mobile Connect by pressing the Select softkey To Deactivate...
- Page 14 If the phone doesn’t connect or loses the connection, try the following: No Power Make sure your power brick is connected properly and switched on or you have a Power over Ethernet (PoE) connection to your phone. “Ethernet Disconnected” Your phone is not connected to a live router or data switch. Make sure the internet connection cable is in the right socket and plugged into your router or wall socket correctly.
- Page 15 Email support requests for faults or configuration changes to: fixme@gripcom.co.uk State name, extension number and DDI on email Phone GRiP Communications on 0345 034 6699...