Hauppauge WinTV-PVR-150 Installation And Reference Manual
Hauppauge wintv-pvr-150 tv tuners: install guide
Hide thumbs
Also See for WinTV-PVR-150:
- Quick installation manual (4 pages) ,
- Connection manual (3 pages) ,
- Reference manual (48 pages)

Related Manuals for Hauppauge WinTV-PVR-150


Summary of Contents for Hauppauge WinTV-PVR-150
- Page 1 WinTV-PVR-150 WinTV-PVR-250 WinTV-PVR-350 WinTV-PVR-usb2 Installation and Reference Manual...
- Page 2 WinTV-PVR Installation and Reference Manual FCC Statement Radio Interference Statement: The WinTV boards have been tested and found to comply with the limits for a Class B digital device, pursuant to part 15 of the FCC Rules. These limits are designed to provide reasonable protection against harmful interference in a residential installation.
- Page 3 Phone: (+44) 207 378 1997 Fax: (+44) 207 357 9171 Tech support: (+44) 207 378 0202 email: sales@hauppauge.co.uk www.hauppauge.co.uk Hauppauge Computer Works, Inc. 91 Cabot Court, Hauppauge, NY 11788 USA Phone: (+1) 631.434.1600 Fax: (+1) 631.434.3198 Tech support: (+1) 631.434.3197 www.hauppauge.com...
-
Page 4: Table Of Contents
WinTV-PVR-350 under Windows 98SE ...1-6 Installing the WinTV-PVR-250/350 under Windows Me ...1-8 Installing the WinTV-PVR-250/350 under Windows 2000 ...1-9 Finding the WinTV-PVR-150/250/350 driver in Device Manager ...1-12 Installing the Application Software How to install the application software for Windows 98SE & Me...2-1 How to install the application software for Windows XP ...2-4... - Page 5 WinTV-PVR Installation and Reference Manual Pause Mode Pause Mode ...4-1 Pause buffer ...4-1 Pause button ...4-2 Replay button ...4-3 Skip ahead button...4-3 Rewind button ...4-3 Fast forward button ...4-4 Slow motion button ...4-4 Record Mode Timer counter ...5-1 Record timer...5-1 Record button ...5-1 VCD record button ...5-2 Play button ...5-2...
- Page 6 Warranty Warranty...B-1 Trademarks: WinTV and the Hauppauge logo are registered trademarks of Hauppauge Computer Works, Inc. Microsoft is a registered trademark and Windows and the Microsoft logo are trademarks of Microsoft Corporation. IBM and PC are trademarks of International Business Machines Corporation.
- Page 7 WinTV-PVR Installation and Reference Manual...
-
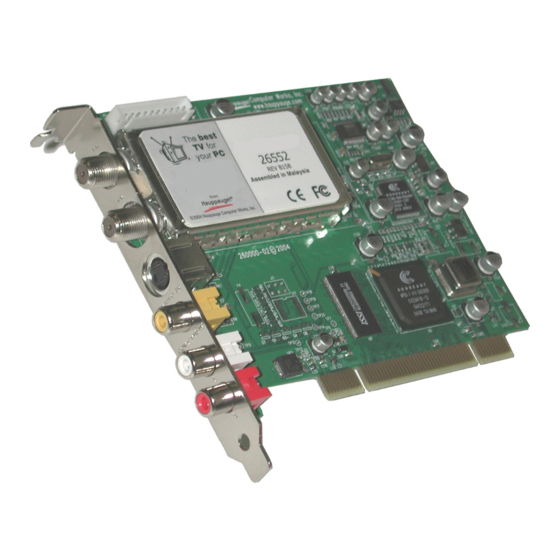
Page 8: Wintv-Pvr 150/250/350 Board Diagram
Introduction This manual covers all of the WinTV-PVR models for displaying TV on your PC’s VGA screen. It covers, but is not limited to, the following mod- els: WinTV-PVR-150, WinTV-PVR-250, WinTV-PVR-350 & WinTV-PVR-usb2 References to the WinTV-PVR apply to all models. The Windows driver... -
Page 9: Installing The Wintv-Pvr Board In Your Pc
The WinTV-PVR is a Plug & Play device designed for Microsoft Windows ® XP/2000/98SE/Me. The WinTV-PVR-150 currently only works under Windows XP . Plug & Play simplifies the installation and hardware setup of WinTV by having hardware settings assigned by Windows. - Page 10 WinTV-PVR board. Since there are several different models with differ- ent features and functions, your board may not have all of the compo- nents installed. WinTV-PVR-150/250/350 board Installing the WinTV-PVR in your PC Switch off the computer. The manufacturer of your PC supplies instruc- tions on removing the PC cover.
-
Page 11: Connecting The Wintv-Pvr-Usb2 Cables
Plug the WinTV board into the PCI slot, and screw the WinTV’s metal cover plate to the PC. Replace the computer cover. Now your ready to connect your cables. Connect the WinTV-PVR-usb2 cables Remote control Left &Right Audio Inputs receiver TV Connector FM radio for antenna or... -
Page 12: Installing The Wintv-Pvr Driver Under Windows Xp
The S-Video and Composite video inputs and the L&R audio inputs can be used to bring audio/video from a VCR, camcorder, DVD player or satellite TV receiver. Installing the WinTV-PVR-150/250/350 driver under WindowsXP After installing the WinTV-PVR in your PC and booting into Windows, the Found New Hardware Wizard will appear. - Page 13 Note: If the Hardware Installation dialog box opens, click Continue Anyway: When the window (Windows has finished installing the software that your new hardware device requires) opens. Click Finish. This completes the PVR driver installation for Windows XP . Continue to Chapter 2 to install the application software. On those WinTV models equipped with remote control, after rebooting your PC the Remote Control will be enabled.
- Page 14 WinTV-PVR Installation and Reference Manual Installation CD-ROM in your PC’s CD-ROM drive and make sure Install the software automatically (Recommended) is checked. Then click NEXT. When the Hardware Installation dialog box opens, click Continue Anyway. Click Finish. This will complete the driver installation for Windows XP . Continue to Chapter 2 to install the application software.
- Page 15 WinTV-PVR Installation and Reference Manual drive. Click Next. Select Search for the best driver for your device (Recommended). Click Next. Select CD-ROM drive and click Next. The Copying Files window will open and you will see a number of files being copied to your hard disk drive...
-
Page 16: Installing The Wintv-Pvr-250/350 Under Windows Me
WinTV-PVR Installation and Reference Manual Note: If a message stating “Windows was unable to locate a driver for this device”, you did not wait long enough for the WinTV Installation CD- ROM to be read. Click Back and then click Next again for the CD to be recognized. -
Page 17: Installing The Wintv-Pvr-250/350 Under Windows 2000
drive. When the Add New Hardware Wizard opens, select Automatic search for a better driver device (Recommended). Click Next. The Copying Files window will open and you will see a number of files being copied to your hard disk drive When the window (Windows has finished installing the software that your new hardware device requires) opens. - Page 18 WinTV-PVR Installation and Reference Manual Next, the (Install the Device drivers) window will open. Insert the WinTV Installation CD-ROM in your PC’s CD-ROM drive and make sure Search for a suitable driver for my device (Recommended) is checked. Click Next Next, the (Locate Driver Files) window will open.
- Page 19 WinTV-PVR Installation and Reference Manual Click Yes. The Copying Files window will open and you will see a number of files being copied to your hard disk drive Next, when the (Completing the Found New Hardware Wizard) win- dow opens, click Finish. This completes the PVR driver installation for Windows 2000.
-
Page 20: Finding The Wintv-Pvr-150/250/350 Driver In Device Manager
WinTV-PVR Installation and Reference Manual Finding the WinTV-PVR-150/250/350 driver in Device Manager Windows Me Windows XP Windows 98SE Windows 2000 1-12... -
Page 21: Installing The Application Software
Installing the WinTV-PVR Application Software Installing the application software for WindowsXP After the WinTV driver has been installed, you need to run WinTV Setup to complete the installation. Click on the My Computer icon on your desktop and then click on your CD-ROM drive letter. - Page 22 WinTV-PVR Installation and Reference Manual Click Install Next, the Welcome window will open. Click, Next You are now Ready to Install the application software. Click, Next The Copying Files window will open and you will see a number of files being copied to your hard disk drive.
-
Page 23: Running The Wintv Application
The WinTV2000 application Always-on-top Full screen TV Volume volume slidebar Pref Preferences menu Menu Setup Menu Configure Snapshot Snapshot viewer window Double click on Snap each "thumbnail" to Snapshot see image full size. Button Click and hold your right mouse button to see image options. -
Page 24: Setting Up Your Tv Channels
WinTV-PVR Installation and Reference Manual You can also click on Start/Programs/Hauppauge WinTV and then the WinTV2000 icon to start WinTV. Setting up your TV channels The first time you run WinTV, you will be asked to scan for TV channels. -
Page 25: Wintv-Pvr Remote Control
In the Edit channel window, click your mouse in the Channel name box, then type in your desired name. You can also add a description. When finished, click OK. WinTV-PVR remote control The WinTV-PVR’s remote control software is installed automatically during the installation of the WinTV applications. -
Page 26: Watch, Pause And Record Tv Buttons
WinTV-PVR Installation and Reference Manual Place the IR Receiver on your desktop so that the infrared light from the IR Remote transmitter can reach the IR Receiver. Turn on your computer. If you have previously installed the WinTV applications, the IR soft- ware should automatically run, and you will see the WinTV Remote icon in the Device Tray. -
Page 27: Setting Up An External Source
WinTV-PVR Installation and Reference Manual One Touch One Touch Record Pause Record mode TV Mode Pause mode button button button video (see Pause mode below). The One Touch Record button will start a record session. If you click OTR more than once, a record timer will be set and the recording will be done for 15 minutes for each additional time the OTR button is clicked. -
Page 28: The Channel Suite Manager
WinTV-PVR Installation and Reference Manual The Channel Suite Manager From the Channel Manager, you can Add, Edit or Delete channels. You can also create channel suites, which are subsets of the All Channels suite. For example, you can have a suite of just TV news channels, and name this suite “News”. -
Page 29: Still Frame Image Capture
Click on Pref button to get the adjustment menu. Still Frame Image Capture mode You can capture high quality images by clicking on the Snap button in the WinTV2000 applica- tion, you will see a thumbnail appear in the Capture tray. Adjusting your captured images You can capture images from 320x240 up to 1600x1200... -
Page 30: Single Click Titlemode/Notitlemode Makes Wintv Easy To Use
Then let it go! Move the TV window in TitleMode by clicking and holding your mouse button on the Title Bar (where it says Hauppauge WinTV2000), holding it down and dragging it to the new position. You can set a different size and a different place on your VGA screen for the WinTV window in TitleMode and NoTitleMode. -
Page 31: Setting Preferences In Title Mode
WinTV-PVR Installation and Reference Manual To select which bars and indicators are shown when in the TitleBar and NoTitleBar modes, click on Preferences. You can eliminate the status bar and the toolbar in the TitleMode or add the status bar in the NoTitleMode. -
Page 32: Setting Full Screen Tv Mode
WinTV-PVR Installation and Reference Manual channels, and display the volume when you adjust the volume. Allow Screen Saver : On, will allow your system to use your default screen saver when WinTV is open or to use the live TV as a screen saver. -
Page 33: Keyboard Shortcuts
Keyboard shortcuts Convenient keyboard control functions: Volume Up Volume Down Mute Channel Up Channel Down Print a Frame Copy to Clipboard Copy from Clipboard Freeze Frame Full screen TV mode WinTV-PVR Installation and Reference Manual Page Up Page Down Ctrl+M Plus (+) Minus (-) Ctrl+P... - Page 34 WinTV-PVR Installation and Reference Manual 3-12...
-
Page 35: Pause Mode
Pause Mode Pause Mode Clicking the Pause button or OTP button on the WinTV2000 applica- tion starts the Pause mode. The Pause Menu will drop down. (shown above) Note: It takes about 10 seconds to create a pause buffer. While the buffer is initializing, do not click any buttons on the WinTV application. -
Page 36: Pause Button
WinTV-PVR Installation and Reference Manual the Video Position bar. The Limit Pause Mode buffer size sets the maximum size of the Pause buffer. Here are some suggested sizes: if you are using MPEG-1 VCD format, 650 MBytes per hour are used. -
Page 37: Replay Button
Replay button: While in the Pause mode, hitting the Replay button acts like the Instant Replay you see on TV broadcast sporting events: the audio/video goes back in time and you repeat what you have previously seen. Each click of the Replay button causes audio/video to go back 10 sec- onds. -
Page 38: Fast Forward Button
WinTV-PVR Installation and Reference Manual Fast Forward Button: Clicking the Fast Forward button one time will fast forward your video at 2X speed. Clicking the Fast Forward button two times will fast for- ward your video at 8X speed. Slow Motion Button: Clicking the Slow Motion button, will play the video in Slow Motion. -
Page 39: Record Mode
Click on the Record button or the OTR button on the WinTV2000 appli- cation to open the Record and Playback control bar. Time counter Skip back 10 sec. Skip to beginning Video CD record Record Pause Rewind Time counter: The time is specified in a Hour:Minute:Second format. Record timer: A timed record is started by clicking the OTR button. -
Page 40: Vcd Record Button
WinTV-PVR Installation and Reference Manual The quality of the video recording and the directory where the files are stored are set in the MPEG Configuration Menu (see the section enti- tled “Configuring the format for MPEG compression”). Click the PREF button on the WinTV2000 application, then clicking Capture / MPEG. -
Page 41: Pause Button
Pause Button: Clicking the Pause button while Playing will pause your audio/video file. Clicking the Pause button again will continue the playing. Rewind Button: Clicking the Rewind button will play the video file in reverse at 1x speed. Clicking the Rewind button again will continue the playing. Fast Forward Button: Clicking the Fast Forward button one time will fast forward your video at 2X speed. - Page 42 WinTV-PVR Installation and Reference Manual Play a video file previously recorded: find the file you would like to play, highlight it with your mouse (one click of the mouse button) and click Open. Then click the Play button. Delete recorded video files which you no longer want (and which consume hard disk space).
- Page 43 Configuring MPEG compression formats and record directories To set the directory where your video recordings will be stored, click the PREF button (Preferences menu) on WinTV2000, then Capture and then on the MPEG tab. Set the DVCR File Path to your video directory. The default path is C:/My Documents\My Videos The WinTV-PVR supports several formats for MPEG video compres- sion, called Quality Levels.
-
Page 44: Mpeg-1
WinTV-PVR Installation and Reference Manual To configure the MPEG Quality Level, click on the PREF button (Preferences menu) on WinTV2000, then Capture and then on the MPEG tab. Here are the video formats: MPEG-1: VCD MPEG-2: 2.0MB/sec (Full D1) MPEG-2: 2.0MB/sec (Half D1) MPEG-2: 12.0 MB/sec (Full D1) MPEG-2: 12.0 MB/sec (CBR) DVD Standard Play: Datarate 8.0Mb/sec, 720x480, 48.0 kHz stereo... -
Page 45: Creating Video Cd's
CD-R media. A complete list of tested compatible DVD players can be found on our web site at: http://www.hauppauge.com/dvdplayers Step 1: Creating a Video CD compatible video file While in the record mode, click on the Video CD Record button. You can also have set the MPEG Quality Level to MPEG-1 VCD, and then click the Record button. - Page 46 Then click Next and you will be brought to the Burn menu. Note: Hauppauge recommends using CD-RW media to create Video CD’s for DVD playback. Most DVD players can use CD-RW media, while some can use either CD-RW or CD-R media.
-
Page 47: How To Use The Editor
MPEG Editor The Hauppauge MPEG Editor is an MPEG-1/MPEG-2 cut and join edi- tor. You can cut out segments from videos, or combine videos (of the same MPEG format) together. The MPEG editor makes its cuts on what are called "MPEG I-frames". These types of cuts do not require a re- encode, and therefore preserves the quality of the original video. - Page 48 WinTV-PVR Installation and Reference Manual To cut away advertisements from a movie, you must define all pieces BETWEEN the advertisement (everything which belongs to the movie) and add them to the cut list.
-
Page 49: Using Wintv-Scheduler
Using WinTV-Scheduler WinTV-Scheduler allows you to schedule the recording of TV shows. WinTV-Scheduler, once it is set, can be closed, and the WinTV applica- tion will “wake up” at the desired time and tuned to the desired chan- nel. After installation, WinTV-Scheduler can be found on your desktop. WinTV-Scheduler works by using the Windows Task Scheduler to launch WinTV at the chosen time. -
Page 50: Program Period
WinTV-PVR Installation and Reference Manual Program Period: one time, daily, weekly Date to Begin Program: today's date is the default. Change this if you want to schedule on another date. Source selection: leave set at WinTV2000 to bring up the WinTV at the requested time and on the requested channel. -
Page 51: Troubleshooting
Troubleshooting Installation tips and software updates can be found at: www.hauppauge.com/html/sw_pvr_pci.htm (WinTV-PVR pci only) Note: Our FAQ on the Hauppauge web site provides up to date Troubleshooting tips, which can be found at: www.hauppauge.com/html/faq.htm Problem: Poor image when running in 256-color mode Many VGA’s cannot run WinTV in 256-color mode. -
Page 52: How Do I Configure The Audio For The Wintv-Pvr
WinTV-PVR Installation and Reference Manual How do I configure the Audio for the WinTV-PVR? While watching live TV and while recording video, the WinTV-PVR board amplifies the audio signal. When you adjust the audio volume slide bar in the WinTV2000 application, the WinTV-PVR adjusts the audio volume accordingly. -
Page 53: Tips On System Optimization
Tips on System Optimization These are tips that will help you improve capture and playback perfor- mance of video files on you PC. 1.) Do not use DoubleSpace or any other disk compression scheme! This severely slows down your hard disk. 2.) Make sure DMA is checked for your Hard disk drives in Device Manager. - Page 54 WinTV-PVR Installation and Reference Manual 11-2...
-
Page 55: Technical Support
Hauppauge be liable for consequential damages, including any lost savings, lost profits, or any other damages, caused by the use of the WinTV board or inability to use it, even if the dealer or Hauppauge has been advised of such liability or other claims. - Page 56 WinTV-PVR Installation and Reference Manual...
-
Page 57: Warranty
The Hauppauge Limited Warranty Warranty Hauppauge Computer Works, Inc. warrants the WinTV board to be free from defects in material and workmanship for a period of 2 years from date of initial retail purchase. We will, at our option, repair or replace a defective product. - Page 58 WinTV-PVR Installation and Reference Manual...