
Related Manuals for natus ALGO 5


Summary of Contents for natus ALGO 5
- Page 1 ALGO® 5 Newborn Hearing Screener ____________________________________________________________________________________ Service Manual...
- Page 2 © Natus Medical Incorporated. April 2008 This manual may not be reprinted or copied in whole or in part without written consent from Natus Medical Incorporated. The content of this manual may change without notice. Natus Medical Incorporated Technical Service +1 888 496 2887...
-
Page 3: Table Of Contents
Index ..............................41 List of Figures and Tables FIGURE 1: ALGO 5 — front view ........................7 FIGURE 2: ALGO 5 — rear view (cover removed) ..................8 FIGURE 3: DSP Box............................9 FIGURE 4: Preamplifier 5 (Preamp 5)......................9 FIGURE 5: Acoustic Transducer Assembly (ATA 5) ..................10 FIGURE 6: Patient Cable Assembly (PCA 5)....................10... - Page 4 FIGURE 31: High Ambient ...........................37 TABLE 1: Ground Integrity ...........................14 TABLE 2: Earth leakage current........................14 TABLE 3: Enclosure leakage current ......................14 TABLE 4: Parts List for Natus ALGO 5 system ....................38 ALGO® 5 Newborn Hearing Screener Service Manual P/N 000976 Rev.A...
-
Page 5: Introduction
Precautionary Information Important! Incorrect use of the screener and its accessories, or the use of parts and accessories that are not manufactured or supplied by Natus Medical Incorporated, can ALGO® 5 Newborn Hearing Screener Service Manual P/N 000976 Rev.A... -
Page 6: Product Description
Warning! Please avoid practices that can compromise the safe and effective use of the ALGO 5: • Do not remove the Panel PC computer from the ALGO 5 unless your service representative specifically instructs you to do so. There are no user-serviceable parts inside aside from replacement of the RTC Battery. -
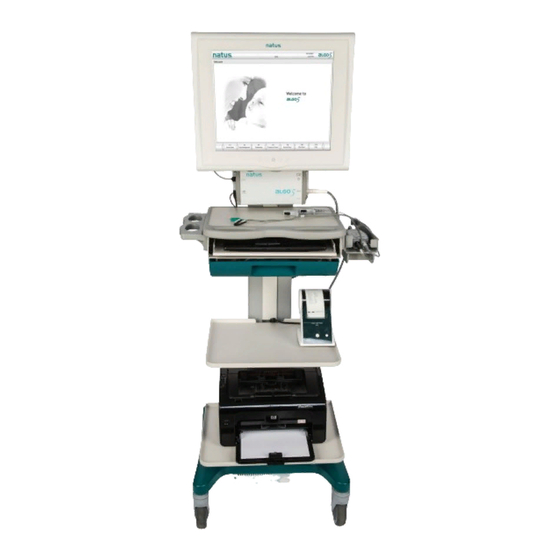
Page 7: Pictorial Introduction To The Algo 5
Pictorial introduction to the ALGO 5 This section is meant to acquaint you with various views of the ALGO 5 that you will see in the course of troubleshooting and repairing it. The item names used in the Parts List (see Chapter 5) are used throughout the manual whenever parts are discussed. - Page 8 Power Supply for Label Printer mounted in the column Optional Power Supply for Inkjet Page Printer Main Switch FIGURE 2: ALGO 5 — rear view (cover removed) ALGO® 5 Newborn Hearing Screener Service Manual P/N 000976 Rev.A...
- Page 9 DSP Serial Number Label on top Panel PC Status LED Communication cable Power Preamp Socket Socket FIGURE 3: DSP Box ATA Socket PCA Socket Preamp 5 Cable Connector Hook FIGURE 4: Preamplifier 5 (Preamp 5) ALGO® 5 Newborn Hearing Screener Service Manual P/N 000976 Rev.A...
- Page 10 Red Transducer: right ear Blue Transducer: left ear Connector FIGURE 5: Acoustic Transducer Assembly (ATA 5) Connector Nape - White Common - Green Vertex - Black FIGURE 6: Patient Cable Assembly (PCA 5) ALGO® 5 Newborn Hearing Screener Service Manual P/N 000976 Rev.A...
-
Page 11: Before You Start
Should you encounter situations that are not covered by this Service Manual, contact a Natus Technical Service representative. Please have your Natus device model and serial number available when calling Technical Service. United States customers: Contact a Natus Technical Service Representative at:... -
Page 12: Routine Maintenance Procedure
Routine Maintenance Procedure This chapter defines procedures for routine maintenance of the ALGO 5 screener. These procedures must be performed after any of the following events and/or as prescribed by the institution’s maintenance schedule: • Institution first receives the ALGO 5 screener. -
Page 13: Cleaning The Cart
Technicians must be familiar with the standards applicable to their institution and country. 2.3.1. Ground Integrity Unplug the ALGO 5 power cord from the wall outlet. Make sure it is a 3-prong power cord (with ground). ALGO® 5 Newborn Hearing Screener Service Manual... -
Page 14: Earth Leakage Current
Using an Ohm Meter, measure impedance between the positive and negative contacts to get a baseline impedance. Using the Ohm Meter, measure the impedance from the ground pin on the outlet plug to any screw on a cart column, such as the bracket that attaches the panel PC to the column. -
Page 15: Performance Verification
Section 2.4.1). If the equipment check option is not available from the main window, access the Service Menu from the Preferences panel to acquire rights via the Profile Manager. 2.4.1. Equipment Check for the ALGO 5 screener Access the Equipment Check from the main window: FIGURE 7: Main Window... - Page 16 The Equipment Check comprises the following routines: FIGURE 9: Equipment check o Initialize Baseboard Test DSP board runs a self-test and loads firmware o Cable connection Verifies connectivity of ATA 5 and Preamp 5 o Calibration dates Shows calibration date of ATA 5 (refer to 2.4.2.2 – ATA 5 Cable calibration due ) o Artifact Test Runs internal DSP test program o Acoustic Test...
- Page 17 If the DSP Box is not connected to the Panel PC or the DSP Box power cord is disconnected, the Initialize Baseboard Test will fail with the following Warning: FIGURE 10: DSP Box disconnected ALGO® 5 Newborn Hearing Screener Service Manual P/N 000976 Rev.A...
- Page 18 If the Preamp 5 is disconnected, the Cable Connection Test shows a red icon with error message below: FIGURE 11: Preamp 5 disconnected ALGO® 5 Newborn Hearing Screener Service Manual P/N 000976 Rev.A...
- Page 19 If the ATA 5 cable is disconnected, the Cable Connection Test shows a red icon with the error message below: FIGURE 12: ATA 5 disconnected If the ATA 5 cable is overdue for calibration, the Calibration Dates section in FIGURE 12 shows a red icon next to the <Next calibration>...
-
Page 20: Component Tests
The following figure gives an overview of the hardware components tested during the series of Equipment Check tests. DSP Box Equipment Check Kit ATA 5 Cable PCA 5 Cable Preamp 5 FIGURE 13: Equipment Check - Overview The following lists each step in the Equipment Check and identifies which device is involved in the testing: •... -
Page 21: Ata 5 Cable Calibration Due Warnings
2.4.2.2. ATA 5 Cable calibration due Warnings The ALGO 5 checks the Due for calibration date of the ATA 5 each time the screener is turned on. Different Warnings are issued related to the date the screener is turned on. The procedure is described in FIGURE 14. -
Page 22: Troubleshooting Guide
Troubleshooting Guide This chapter assumes that you are a qualified biomedical technician who is familiar with the ALGO 5 as described in Chapter 1. P a ge Printer Isolation T ransform er Label P rinter 120/ 240 V~ P a nel -PC... -
Page 23: Troubleshooting The Algo 5
3.1. Troubleshooting the ALGO 5 FIGURE 16: Troubleshooting the ALGO 5 Symptom Probable cause Corrective Action Reference Panel PC does not No power Verify that AC outlet boot after Main switch is functioning. is turned on Power switch not in... - Page 24 Printer defect Replace printer. Barcode Barcode Barcode scanner Replace Barcode scanner scanner defect scanner does not respond Cart Roller is worn out Contact Natus Technical Service. ALGO® 5 Newborn Hearing Screener Service Manual P/N 000976 Rev.A...
-
Page 25: Troubleshooting The Panel Pc
Remove the Panel PC from the cart and place it with the screen facing down on a table. • Remove the 11 M3 x 10mm Phillips screws (Natus P/N 800213) that hold the outer shell on and remove the outer shell. FIGURE 17: Location of Panel PC outer shell screws ALGO®... - Page 26 • Remove the 16 M3 x 5 mm Phillips screws (Natus P/N 800212) that hold the inner shell on (including the 2 screws that attach the plate with the connectors) and carefully pry it open to expose the motherboard. FIGURE 18: View outer shell Panel PC FIGURE 19: Location of Battery on Motherboard Panel PC ALGO®...
- Page 27 • Remove the RTC battery and replace it with the recommended battery (P/N 000972, 3V coin-cell Lithium battery CR2032). FIGURE 20: Detail View RTC Battery on Panel PC • Reassemble the Panel PC by following the above steps in reverse, and mount the Panel PC back on the cart.
-
Page 28: Troubleshooting The Isolation Transformer
3.3. Troubleshooting the Isolation Transformer Follow the steps below to change the Isolation Transformer’s fuse: • Unplug the power cable leading from the Isolation Transformer to the wall. • Locate the power inlet module on the Isolation Transformer. Note the orientation of the power inlet module so as to put it back in the same direction. - Page 29 (refer to FIGURE 23). FIGURE 23: Fuse holder If the fuses are faulty, replace them with the following type of fuses: 115V: 6.3A,Slo-blw,5x20mm,250V Natus Part number:000801 Suggested manufacturer: Schurter (P/N 0034.3125 ) 230V: 3.15A,Slo-blw,5x20mm,250V Natus Part number:000800 Suggested manufacturer: Schurter (P/N 0034.3122 ) Reverse the above steps to complete the fuse replacement, making sure that the voltage selection is the same as it was before the fuses were replaced.
-
Page 30: Troubleshooting The Ata 5
3.4. Troubleshooting the ATA 5 • Run the Acoustic Check as shown below. If Acoustic Check shows a failure condition, refer to Section 4.3 – High Refer Rate and Section 4.4 – High Ambient. FIGURE 24: Acoustic Check ALGO® 5 Newborn Hearing Screener Service Manual P/N 000976 Rev.A... -
Page 31: Troubleshooting The Preamp 5
3.5. Troubleshooting the Preamp 5 • Run the Impedance and Artifact Checks as shown below. If the Impedance Check shows a failure condition, refer to Section 4.1 – High Impedance. FIGURE 25: Impedance Check ALGO® 5 Newborn Hearing Screener Service Manual P/N 000976 Rev.A... - Page 32 • If the Artifact Check shows a failure condition, refer to Section 4.2 – High Myogenic. FIGURE 26: Artifact Check ALGO® 5 Newborn Hearing Screener Service Manual P/N 000976 Rev.A...
-
Page 33: Troubleshooting The Pca 5
3.6. Troubleshooting the PCA 5 • Run the Impedance Check as shown below. If the Impedance Check shows a failure condition, refer to Section 4.1 – High Impedance. FIGURE 27: Impedance Check ALGO® 5 Newborn Hearing Screener Service Manual P/N 000976 Rev.A... -
Page 34: Technical Troubleshooting Guide
Technical Troubleshooting Guide 4.1. High Impedance FIGURE 28: High Impedance ALGO® 5 Newborn Hearing Screener Service Manual P/N 000976 Rev.A... -
Page 35: High Myogenic
4.2. High Myogenic FIGURE 29: High Myogenic ALGO® 5 Newborn Hearing Screener Service Manual P/N 000976 Rev.A... -
Page 36: High Refer Rate
4.3. High Refer Rate FIGURE 30: High Refer Rate ALGO® 5 Newborn Hearing Screener Service Manual P/N 000976 Rev.A... -
Page 37: High Ambient
4.4. High Ambient FIGURE 31: High Ambient ALGO® 5 Newborn Hearing Screener Service Manual P/N 000976 Rev.A... -
Page 38: Parts And Specifications
Natus part number, for ordering the part Name Name of the part Reference Reference to illustration elsewhere in Service Manual See the ALGO 5 Assembly Instructions for additional details on part identification. TABLE 4: Parts List for Natus ALGO 5 system Part # Name Reference... - Page 39 Inkjet Printer Power Cord 000954 Label Printer, Seiko SLP 440 FIGURE 1 Includes spare hardware to 000962 Spare Hardware Kit match set originally shipped with ALGO 5 system Lithium battery CR2032, 3V coin- 000972 FIGURE 19 cell 030734 USB Cable 040527...
-
Page 40: Specifications
5.3. Specifications Note: Specifications are subject to change without notice Power Supply: Power Rating 120 V~, or 240 V~; 600VA, 50/60Hz Nominal Dimensions: Cart 64” (163 cm) x 20” (51 cm) x 20” (51 cm) (H x W x D) Nominal Weight: Cart 110 lbs (50 kg) Cart fully equipped: 140 lbs (63.5 kg) -
Page 41: Index
High Ambient Troubleshooting, 37 ALGO 5 High Impedance Troubleshooting, 34 Block diagram wiring, 22 High Myogenic Troubleshooting, 35 Cleaning the ALGO 5, 12 High Refer Rate Troubleshooting, 36 Due for calibration, 21 Equipment check, 15 Front view, 7 Major Parts, 6... - Page 42 ALGO® 5 Newborn Hearing Screener Service Manual P/N 000995 Rev.A...