Table of Contents
Advertisement
Available languages
Available languages
Quick Links
Model: DIR-260/DIR-261
Internet, DAB+/FM radio with CD player
USER MANUAL
and Bluetooth
Internet, DAB+/FM-radio met cd-speler
HANDLEIDING
en Bluetooth
Internet/DAB+/FM-Radio mit CD-Player
BEDIENUNGSANLEITUNG
und Bluetooth
Radio Internet DAB+/FM avec lecteur
MODE D'EMPLOI
CD et Bluetooth
Radio DAB+/FM con Internet y con
MANUAL DEL USUARIO
reproductor de CD y Bluetooth
Internet, radio DAB+/FM con lettore CD
MANUALE D'USO
e Bluetooth
1
Advertisement
Table of Contents

Related Manuals for LENCO DIR-261


Summary of Contents for LENCO DIR-261
- Page 1 Model: DIR-260/DIR-261 Internet, DAB+/FM radio with CD player USER MANUAL and Bluetooth Internet, DAB+/FM-radio met cd-speler HANDLEIDING en Bluetooth Internet/DAB+/FM-Radio mit CD-Player BEDIENUNGSANLEITUNG und Bluetooth Radio Internet DAB+/FM avec lecteur MODE D’EMPLOI CD et Bluetooth Radio DAB+/FM con Internet y con...
- Page 2 Index: English............................3 Nederlands ..........................36 Deutsch ............................ 80 Français ..........................128 Español ..........................173 Italiano ........................... 218 Version: 5.0...
-
Page 3: Precautions Before Use
English DIR-260/DIR-261 CAUTION: Usage of controls or adjustments or performance of procedures other than those specified herein may result in hazardous radiation exposure. PRECAUTIONS BEFORE USE KEEP THESE INSTRUCTIONS IN MIND: Do not cover or block any ventilation openings. When placing the device on a shelf, leave 5 cm (2”) free space around the whole device. - Page 4 21. Never remove the casing of this device. 22. Never place this device on other electrical equipment. 23. Do not allow children access to plastic bags. 24. Only use attachments/accessories specified by the manufacturer. 25. Refer all servicing to qualified service personnel. Servicing is required when the device has been damaged in any way, such as the power supply cord or the plug, when liquid has been spilled or objects have fallen into the device, when the device has been exposed to rain or moisture, does not operate normally, or has been dropped.
- Page 5 * Those instruction are related only to products using power cable or AC power adaptor. Accessories: User manual Power adaptor Remote control...
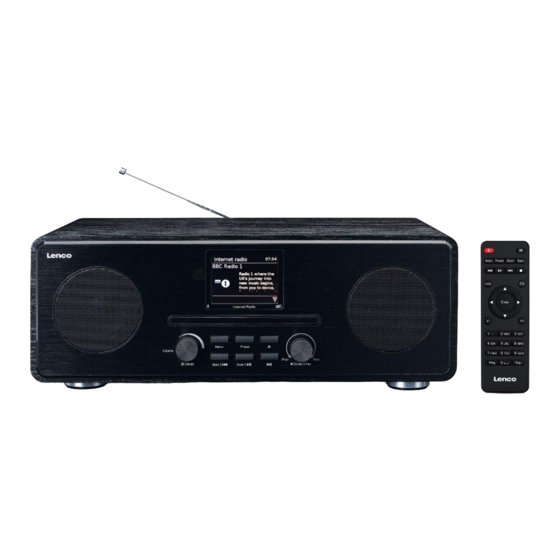
- Page 6 Driver Scan/Play/pause Button Remote Control Receiver CD Eject Button CD Passages 10. Next Button Volume/Standby/Mode knob 11. Stop/OK/pair/navigate knob Menu Button 12. LCD Display (TFT 2.8’’) Back/Prev Button 13. Driver Preset Button 14. Inverter tube 15. Telescopic antenna 16. Earphone jack 17.
- Page 7 Standby button 12. Equalizer settings Switch speaker ON/OFF Up cursor button 3. Menu-Main menu and Info Left cursor button 4. Preset-saved stations, Favorites, etc 15. OK Confirm selection 5. Scan-DAB/FM scan Right Cursor button 6. Eject button Down cursor button Go back one track 18.
- Page 8 Battery Precautions: Follow these precautions: Use only the type of battery specified in this manual. Be sure to follow the correct polarity when installing the battery as indicated in the battery compartment. A battery which is inserted in the wrong way may cause damage to the device.
- Page 9 The display will appear as below. Turn the NAVIGATE knob on the unit or press the navigation buttons on the remote control to highlight the desired hour format, then press the OK knob on the unit or press the OK button on remote control to continue. The date and time update page will appear as below.
- Page 10 If ‘No update’ is selected: Set the date and time manually. The day number will flash, Turn the NAVIGATE knob on the unit or use the navigate buttons on the remote control to set the desired day, then press the ‘OK’ button on the unit or the remote control to confirm.
- Page 11 If for example. the wireless network ABC123 is selected, the Key page will pop up. Turn the NAVIGATE knob on the unit or using the navigate button on remote control to highlight the character needed, press the ‘OK’ button on the unit or remote control to continue to the next character and repeat the above to complete your WIFI password.
- Page 12 If "Push Button" is selected, the below page will appear. Press the WPS connect button on your router and then press the OK knob on the unit or the remote control. If “Pin” is selected, the unit generates an 8-digit code number which you have to enter in your wireless router/accesspoint configuration menu.
-
Page 13: Internet Radio
Select internet radio from the main menu or press ‘mode’ on the remote control until internet radio is selected. The Lenco DIR-260/DIR-261 internet radio can play thousands of radio stations and podcasts from around the world through a broadband internet connection. When you select Internet radio mode, it contacts the solution provider Internet radio portal to get a list of stations, organized into different categories like Country and Popular. - Page 14 UK (this can be another country. Depends on the country you are using this device) Presents a sub-menu to search for stations using a variety of categories, for example, local stations, BBC stations, Genres or stations from a specific city. Choose the required category and either a further list of sub categories is shown, or (if there is no further sub-categories) the available stations for the chosen category are listed.
- Page 15 Location To select an Internet broadcast from a particular location, select Menu > Station list > Location. Select a continent from the menu and a list of countries available is presented, select a country and the available internet radio stations are presented. Choose a radio station from the list to tune to that station.
- Page 16 Presents a sub-menu to search for podcasts using a variety of categories, for example, comedy of the week, books and authors, popular, etc. Choose your favorite category and either a further list of sub categories is shown, or (if there is no further sub-categories) the available podcasts for the chosen category are listed.
- Page 17 The following page will appear: Press the buttons on remote control and select your desired location, press the ‘OK’ button on the unit/remote control to confirm storing the station on the selected preset. Repeat the above steps to store up to 10 preset stations. You will find them in My Added Stations list.
- Page 18 ⚫ Prune invalid ⚫ ⚫ Station order ⚫ System settings ⚫ Main Menu Station List The first time you select DAB radio mode, or if the station list is empty, radio automatically performs a full scan to see what stations are available. You may also need to start a scan manually to update the list of stations for one of the following reasons: ⚫...
- Page 19 Slideshow When slideshow is available (dependent on the broadcasted signal), the images are displayed on the left side of the screen. To cycle through the different display options (thumbnail, slide with DLS text and full screen slide) press the knob control. Settings Dynamic range compression (DRC) Some DAB broadcasts offer dynamic range compression (DRC).
- Page 20 DAB+ radio reception is different from FM radio reception. • In FM, you can often still receive a weak station, but probably with a rustling or crackling sound. • DAB + reception works digitally and if there is not enough signal you hear nothing. No hiss or crackle as with FM.
- Page 21 While a FM station is playing, the screen shows one of the two following sets data: ⚫ If RDS information is available, by default the service name (i.e. station name) is displayed. You can cycle through further RDS information by pressing Info. Each time you press Info, another set of information is displayed, cycling through RDS radio text, RDS programme type, frequency and today’s date.
- Page 22 NOTE: If the reception is weak, please unwind or extend the telescopic antenna, or relocate the unit to get better reception FM Mode: In Main menu, if FM is selected, the following page will appear. Symbol explanation: Automatic searching: Method 1: Press the scan button on the unit to search automatically; Method 2: Press the Scan button on the remote control to search automatically;...
- Page 23 FM menu.: If scan setting is selected, the following page will appear, turn the NAVIGATE knob on the unit or press the navigate button on remote control to set to YES or NO. If Audio setting is selected, the following page will appear, turn the NAVIGATE knob on the unit or press the navigate button on remote control to set to YES or NO.
-
Page 24: Track Programming
3. To enter Aux in mode, either press Mode to cycle through the listening modes until Aux in is displayed, or select Menu > Main menu > Aux in. 4. Adjust the volume of the DIR-260/DIR-261 radio (and, if necessary, the audio source device) as required. - Page 25 In Bluetooth mode, on your radio press Menu > Setup Bluetooth, this puts the radio into discoverable mode. The screen shows the Bluetooth name of the radio (Lenco DIR-260/DIR-261). On your Bluetooth smart device, make sure you Bluetooth is on and scan for device select the radio from the list of available Bluetooth devices.
- Page 26 While in Bluetooth mode you can pause, play, jump to next track and jump to previous track (in the playlist on the controlling Bluetooth device) using the buttons available on the radio. Bluetooth connection details For information on the current state of the Bluetooth connection and paired Bluetooth devices, in Bluetooth mode select Menu >...
- Page 27 Alarm Funtion: In Main menu, if Alarms is selected, the following page will appear. If Alarm 1 is selected, the following page will appear Select "Enable" to set it to off, Daily, Once, Weekends or Weekdays. Select "Time", the hour digit will blink, turn the NAVIGATE knob on unit or press the button on remote control to set the desired hour, press the NAVIGATE knob or the OK button to confirm;...
-
Page 28: System Settings
To cancel alarm completely, enter the alarm settings and set it OFF. The alarm icon will disappear. SYSTEM SETTINGS: After Main menu setup is completed, enter system settings, the following page will appear. In System settings menu, if Network is selected, the screen will appear as below. When Network wizard is selected, the unit will scan the available wireless network. - Page 29 In System settings menu, if Language is selected, select one to set the interface language. In System settings menu, if Factory Reset is selected, set it to "YES" to proceed, set it to "NO" to cancel factory reset. In System settings menu, if Setup wizard is selected, you can confirm if start setup now. In System settings menu, if Info is selected, you can check the "SW version", "Radio ID"...
- Page 30 Service not available No DAB reception (DAB) Update failed Software upgrade failed...
-
Page 31: Troubleshooting
Solutions Check that network is working between a Network down computer and the router Obtain the DIR-260/DIR-261 MAC address from Menu > System settings > Network > View settings and add to router list. Router restricts access Note: DIR-260/DIR-261 has separate MAC to listed MAC addresses for wired and wireless networks;... - Page 32 Scan the QR code below for direct download/install from Google Play/Apple Appstore Network connection setup. Before UNDOK can be used to control your Lenco DIR-260/DIR-261, you first must be sure that your smart device (smartphone, tablet) and the Lenco DIR-260/DIR-261 are connected to the same WIFI network.
- Page 33 UNDOK Example screen of the devices screen...
-
Page 34: Technical Specifications
Technical Specifications Connections DC, 3.5mm AUX-IN, 3.5mm Headphone-Out Input AC 100-240V ~ 50/60Hz Output 12V/2.5A Output power 2 x 10W RMS Batteries in remote control (not included) DAB Frequency 174.928 - 239.200 MHz FM Frequency 87.5 - 108 MHz Bluetooth Frequency: 2402 - 2480MHz Power consumption Max 30W... - Page 35 Guarantee Lenco offers service and warranty in accordance to European law, which means that in case of repairs (both during and after the warranty period) you should contact your local dealer. Important note: It is not possible to send products that need repairs to Lenco directly.
- Page 36 Nederlands DIR-260/DIR-261 LET OP: Het gebruik van afstandsbedieningen of aanpassingen of de uitvoering van procedures die niet in dit document zijn gespecificeerd, kan leiden tot gevaarlijke blootstelling aan straling. VOORZORGSMAATREGELEN VOOR GEBRUIK ONTHOUD DE VOLGENDE INSTRUCTIES: Bedek of blokkeer de ventilatieopeningen niet. Wanneer u het apparaat op een schap plaatst, dient u 5 cm (2”) vrije ruimte rondom het gehele apparaat te behouden.
- Page 37 19. Dit product is alleen voor niet-professioneel gebruik bedoeld en niet voor commercieel of industrieel gebruik. 20. Verzeker u ervan dat het apparaat in een stabiele positie staat opgesteld. Schade die wordt veroorzaakt door het gebruik van dit product in een onstabiele positie, trillingen of schokken of het niet opvolgen van de waarschuwingen of voorzorgsmaatregelen in deze gebruikershandleiding wordt niet gedekt door de garantie.
- Page 38 ⚫ Het weggooien van een batterij in het vuur of een hete oven, of het mechanisch verpletteren of insnijden van een batterij, kan leiden tot een explosie. ⚫ Het achterlaten van een batterij in een omgeving met extreem hoge temperaturen kan leiden tot een explosie of het lekken van brandbare vloeistof of gas.
- Page 39 Accessoires: Handleiding Voedingsadapter Afstandsbediening...
- Page 40 Driver Toets Scan/Start/Pauze Ontvanger van afstandsbediening Cd-uitwerptoets Cd-houder 10. Volgende-toets Knop Volume/Stand-by/Modus 11. Knop Stop/OK/Koppelen/Navigatie Menu-knop 12. LCD-display (TFT 2,8’’) Toets Terug/Vorige 13. Driver Voorkeuzetoets 14. Omvormerbuis 15. Uitschuifbare antenne 16. Hoofdtelefoonuitgang 17. Aux-ingang 18. DC-ingang (12V/2,5A) 19. Omvormerbuis...
- Page 41 Stand-by-toets 12. Equalizerinstellingen Luidspreker AAN/UIT schakelen Cursor omhoog-knop 3. Menu-Hoofdmenu en Info Cursor naar links-knop 4. Voorkeur-Opgeslagen stations, 15. OK Selectie bevestigen Favorieten, enz. 5. Scan-DAB-/FM-scan Cursor naar rechts-knop 6. Uitwerptoets Cursor omlaag-knop Eén track terug 18. V- Volume verlagen Afspelen/Pauze 19.
- Page 42 Batterijen installeren voor de afstandsbediening: Druk op de markering ‘open’ op de batterijklep en schuif omlaag Installeer twee (2) x type AAA batterijen in het batterijvak (let op de juiste polariteit) Schuif de klep terug op het batterijvak Voorzorgsmaatregelen m.b.t. batterijen: Neem deze voorzorgsmaatregelen in acht: Gebruik uitsluitend het type batterij gespecificeerd in deze handleiding.
- Page 43 Wacht ongeveer 20 seconden en de display zal er als volgt uitzien. Draai de NAVIGATIEKNOP op het apparaat linksom of druk op de navigatietoets op de afstandsbediening om “YES” (Ja) te markeren en druk op de knop OK op het apparaat of op de toets OK op de afstandsbediening om verder te gaan.
- Page 44 Auto update Automatisch bijwerken Update from DAB Update via DAB Update from FM Update via FM Update from Network Update via netwerk No update Geen update Uitleg van de opties: Update via DAB: De datum en tijd zullen worden gesynchroniseerd via een DAB-signaal Update via FM: De datum en tijd zullen worden gesynchroniseerd via een FM-signaal Update via netwerk: De tijd zal worden gesynchroniseerd via het internet-/netwerksignaal Geen update: De datum en tijd moeten handmatig worden ingesteld...
- Page 45 Als ‘No update’ (Geen update) is geselecteerd: Stel de datum en tijd handmatig in. Set Time/Date Tijd/datum instellen De dagaanduiding zal knipperen, draai de NAVIGATIEKNOP op het apparaat of gebruik de navigatietoetsen op de afstandsbediening om de gewenste dag in te stellen en druk vervolgens ter bevestiging op de toets ‘OK’...
- Page 46 De display zal er als volgt uitzien. Kies op de SSID-pagina een van de draadloze netwerken uit de lijst of selecteer een van de netwerken met het voorvoegsel [WPS]… Network settings Netwerkinstellingen Network wizard Scanning.- Netwerk-wizard scannen.- SSID SSID ABC123 ABC123 XYZ 123 XYZ 123...
- Page 47 Key: Wachtwoord: BKSP BKSP CANCEL ANNULEREN Selecteer ‘OK’ op de display na het correcte wachtwoord te hebben ingevoerd en druk op ‘OK’ op de afstandsbediening om verder te gaan. De volgende pagina’s zullen verschijnen, zoals hieronder afgebeeld. OPMERKING: U kunt ook de cijfertoetsen op de afstandsbediening gebruiken om het WiFi-wachtwoord in te voeren.
- Page 48 WPS Menu WPS-menu Push Button Drukknop Skip WPS WPS overslaan Als u “Push Button” (Drukknop) selecteert, dan zal de volgende pagina verschijnen. Druk op de WPS-verbindingstoets op uw router en druk vervolgens op de knop OK op het apparaat of op de afstandsbediening.
- Page 49 WPS Setup WPS-instelling Enter PIN XXXXXXXX at the other end Voer aan het andere einde pin XXXXXXXX in Press SELECT to continue Druk op SELECT om verder te gaan Als u “Skip WPS” (WPS overslaan) selecteert, dan zal de volgende pagina verschijnen. Voer het wachtwoord in van uw WiFi-netwerk Key: Wachtwoord:...
-
Page 50: Internet Radio
Selecteer Internetradio in het hoofdmenu of druk op ‘mode’ op de afstandsbediening totdat de internetradio is geselecteerd. De internetradio van de Lenco DIR-260/DIR-261 kan duizenden radiostations en podcasts uit de hele wereld afspelen via een breedband-internetverbinding. Wanneer u de modus Internetradio selecteert, dan neemt de radio contact op met het internetradioportaal van de provider om een lijst met stations te krijgen die in verschillende categorieën zijn ingedeeld,... - Page 51 De algemene bedieningen voor geluidsvolume, dempen, start/stop en voorkeuzes zijn beschikbaar. Opmerking: Het stationslijstmenu is beschikbaar via het internetradioportaal, waardoor deze alleen kan worden geopend wanneer de radio verbonden is met het internet. De stationslijsten en submenu’s zullen van tijd tot tijd veranderen. De stationslijst is in categorieën en zoekfuncties georganiseerd: Internet radio Internetradio...
- Page 52 Searching for: Zoeken naar: BKSP BKSP CANCEL ANNULEREN Selecteer een uitzending in de lijst. Stations Stations 0.11.FM 90s Country 0.11.FM 90’s Country 0.11.FM Classic Country 0.11.FM Klassiek Country 0.11.FM Today’s Country 0.11.FM Country van Vandaag ON Country on Radio ON Country op Radio 1.FM - Absolute Country…...
- Page 53 Discover U kunt met deze optie uit een lijst met stations kiezen die bepaald zijn op basis van hun oorsprong (land), genre (muziekstijl) of taal. Navigeer de de categorie-opties; nadat u uw selectie eenmaal hebt gemaakt, zal een scherm uw geselecteerde categorie en het aantal stations binnen die categorie bevestigen.
- Page 54 Zoeken U kunt ook via internetuitzendingen naar podcasts zoeken met bepaalde trefwoorden in hun titel. Om te zoeken, selecteert u Menu > Podcast list > Search (Menu > Podcastlijst > Zoeken). Voer een trefwoord in door achtereenvolgens de karakters en vervolgens OK te selecteren.
- Page 55 Een station opslaan als een favoriet Internetradiostation opslaan een voorkeuze: Houd tijdens het afspelen de toets ‘Preset’ op het apparaat of op de afstandsbediening ingedrukt om het huidige station als een favoriet op te slaan. De volgende pagina zal verschijnen: Save to Preset Opslaan als voorkeuze 1.
- Page 56 Uitleg van symbolen op de afspeelpagina: This symbol indicates one station stored. Dit symbool geeft één opgeslagen station aan. This symbol indicates wired connection. Dit symbool geeft een kabelverbinding aan. This symbol indicates wireless connection. Dit symbool geeft een draadloze verbinding aan.
- Page 57 Een vraagteken vóór een station in de lijst geeft aan dat dat stations momenteel onbeschikbaar is. Dit kan slechts tijdelijk zijn, al hangt dit af van de oorzaak van het signaalverlies. Stations die waarschijnlijk niet meer beschikbaar zullen raken (als u bijvoorbeeld uit het zendbereik van een station bent verhuisd), dan kunnen deze uit de lijst worden verwijderd.
- Page 58 Dit kan nuttig zijn als u naar muziek luistert met een breed dynamisch bereik in een lawaaierige omgeving (bijvoorbeeld klassieke muziek tijdens het koken). Selecteer Menu > DRC en vervolgens DRC high, DRC low of DRC off (DRC hoog, DRC laag of DRC uit) om de DRC-instelling voor de radio te veranderen.
- Page 59 BELANGRIJKE INFORMATIE OMTREND DAB+ ONTVANGST DAB+ radio ontvangst werkt anders dan FM radio ontvangst. • Bij FM kunt u een zwakke zender vaak nog wel enigszins ontvangen, dan wel waarschijnlijk met een ruisend of krakend geluid. • DAB+ ontvangst werkt digitaal en als er ter plaatse niet voldoende signaal is hoort u niets.
- Page 60 houden om in aflopende of oplopende frequentie te scannen of deze toetsen kort indrukken om handmatig af te stemmen. Opmerking: De scan kan worden ingesteld om alleen naar krachtige signalen te zoeken. Voorkeuzestations kunnen worden opgeslagen en herroepen zoals beschreven in Voorkeuzes.
- Page 61 Prune Invalid Opruimen This removes all invalid stations, continue? Dit verwijdert alle ongeldig stations, verdergaan? Selecteer “YES” (Ja) om alle ongeldige stations te verwijderen of selecteer “NO” (Nee) om te annuleren. Wanneer DRC wordt geselecteerd, dan kunt u deze functie instellen op DRC hoog, DRC laag of DRC uit.
- Page 62 [No Radio Text] Geen radiotekst Uitleg van symbolen: This symbol indicates one station stored. Dit symbool geeft één opgeslagen station aan. This symbol indicates the logo. Dit symbool toont het logo. This symbol indicates the audio type. Dit symbool geeft het audiotype aan. This symbol indicates the signal strength.
- Page 63 4. [Not set] 4. [Niet ingesteld] 5. [Not set] 5. [Niet ingesteld] Draai de NAVIGATIEKNOP op het apparaat of druk op de toets op de afstandsbediening om de voorkeur-/opslagpositie te selecteren, druk op de NAVIGATIEKNOP of druk op de toets OK om de voorkeur/opslag te bevestigen. Herhaal de bovengenoemde stappen om tot 10 stations op te slaan.
- Page 64 Als u Audio Setting (Audio-instelling) selecteert, dan zal de volgende pagina verschijnen. Draai de NAVIGATIETOETS op het apparaat of gebruik de navigatietoets op de afstandsbediening om op YES (Ja) of NO (Nee) in te stellen. FM weak reception Zwakke FM-ontvangst Listen in Mono only? Alleen in mono luisteren? OPMERKING: Als de ontvangst zwak is, trek dan de uitschuifbare antenne uit of verplaats het...
- Page 65 Today’s Date: Datum van vandaag: DD.MM.YYYY DD.MM.JJJJ 5. Pas het volume van de DIR-260/DIR-261 radio (en indien nodig het volume van de audiobron) naar wens aan. Gebruik tijdens het afspelen de bedieningen op uw externe apparaat. CD-modus: Als u CD selecteert in het hoofdmenu, dan zal de volgende pagina verschijnen.
-
Page 66: Tracks Programmeren
te starten. Druk op de Entertoets op het apparaat of op de toets op de afstandsbediening om te pauzeren. Druk op de toets op het apparaat of op de afstandsbediening om de vorige of volgende track te selecteren. Druk op de toets op het apparaat om de vorige of volgende track te selecteren. - Page 67 Een Bluetooth-apparaat koppelen met de radio Druk in de Bluetooth-modus op Menu > Setup Bluetooth (Menu > Bluetooth instellen) om de radio zichtbaar te maken. Het scherm toont de Bluetooth-naam van de radio (Lenco DIR-260/DIR-261). Schakel de Bluetooth-functie in op uw Bluetooth-smartapparaat, zoek naar apparatuur en selecteer de radio in de lijst met beschikbare Bluetooth-apparaten.
- Page 68 Houd de toets ingedrukt om vooruit/terug te spoelen. Een verbonden Bluetooth-apparaat loskoppelen: Houd de toets [OK] 3 seconden ingedrukt. De melding “Bluetooth Discoverable” (Bluetooth zichtbaar) zal op de display verschijnen. Slaapfunctie: Als u Sleep (Slaap) selecteert in het hoofdmenu, dan zal de volgende pagina verschijnen. Set sleep time Slaaptimer instellen Sleep OFF...
- Page 69 Als u Alarms (Alarmen) selecteert in het hoofdmenu, dan zal de volgende pagina verschijnen. Alarms Alarm Alarm 1: Off [00:00] Alarm 1: Uit [00:00] Alarm 2: Off [00:00] Alarm 2: Uit [00:00] Als u Alarm 1 selecteert, dan zal de volgende pagina verschijnen Alarm 1 Alarm 1 Enable: Off...
- Page 70 Selecteer “Volume” en draai de NAVIGATIEKNOP op het apparaat of druk op de toets op de afstandsbediening om het gewenste volume in te stellen. Selecteer "Save" (Opslaan) om alle instellingen op te slaan, het alarmicoontje zal in de onderste kolom van het scherm verschijnen,u kunt Alarm 2 op dezelfde wijze instellen. Wanneer het alarm klinkt, dan kunt u op de toets MODE op het apparaat drukken of op de toets...
- Page 71 Info Info Backlight Achtergrondverlichting Multi-room Multikamer Als u Network (Netwerk) selecteert in het Systeeminstellingsmenu, dan zal het volgende scherm verschijnen. Network settings Netwerkinstellingen Network wizard Netwerk-wizard PBC Wlan setup PBC WLAN-instelling View settings Weergave-instellingen Wlan region WLAN-gebied Manual settings Handmatige instellingen Network settings Netwerkinstellingen Wlan region...
- Page 72 Network wizard Netwerk-wizard Scanning/ Scannen/ Wanneer u PBC Wlan Setup (PBC Wlan-instelling) selecteert, dan zal het apparaat naar beschikbare draadloze netwerken zoeken. Zie pagina 6. Wanneer u View Settings (Zie instellingen) selecteert, dan kunt u "Actieve verbinding", "MAC-adres", "Wlan-regio", "DHCP", "SSID", "IP-adres", "Subnetmasker", "Gateway-adres", "Primaire DNS"...
- Page 73 Backlight Achtergrondverlichting Timeout Time-out On Level Niveau aan Dim Level Niveau dimming Als Timeout (Time-out) is geselecteerd, kunt u de achtergrondverlichting van het scherm Timeout (Time-out) instellen op 10 s, 20 s, 30 s, 45 s, 60 s, 90 s, 120 s of 180 s. Als On Level (Niveau aan) is geselecteerd, kunt u de achtergrondverlichting van het scherm Power On (Stroom inschakelen) instellen op High (Hoog), Medium (Gemiddeld) of Low (Laag).
- Page 74 Foutmeldingen Bericht Omschrijving Voorbeeld Correct wachtwoord ingevoerd, MAC-filter ingeschakeld op Verbinding mislukt maar de router weigert het verzoek router MP3 ontvangen, maar het Bestandsformaat niet herkenbaar - Formatfout blijkt dat de stream geen MP3 onafhankelijk van netwerk is tijdens het decoderen Probleem na router - incorrecte Verkregen gegevens van Netwerkfout...
- Page 75 Netwerk uit en de router werkzaam is Zoek naar het MAC-adres van de DIR-260/DIR-261 MAC via Menu > System settings > Network > View settings (Menu > Systeeminstellingen > Netwerk > Zie instellingen) en voeg toe aan de lijst met routers.
- Page 76 DAB+ Geen geluid Plaats de radio op een plaats met een betere ontvangst. UNDOK ™ is de bijbehorende app voor uw Lenco DIR-260/DIR-261 audiosysteem. Met UNDOK kunt u uw audioapparaat Lenco DIR-260/DIR-261 bedienen via een wifi-netwerkverbinding. Er is een versie beschikbaar voor ANDROID- en APPLE-smartphones/-tablets die u kunt downloaden via de Google Play App Store en Apple App Store.
- Page 77 Netwerkverbinding instellen. Voordat u UNDOK kunt gebruiken om uw Lenco DIR-260/DIR-261 te bedienen, dient u er eerst voor te zorgen dat uw smartapparaat (smartphone, tablet) en de Lenco DIR-260/DIR-261 met hetzelfde WiFi-netwerk zijn verbonden. Raadpleeg deze documentatie voor uw audioapparaat of raadpleeg de documentatie van uw smartphone/tablet om uw audioapparaten op het juiste netwerk aan te sluiten.
-
Page 79: Technische Specificaties
Technische specificaties Aansluitingen DC IN, 3,5mm AUX-IN, 3,5mm hoofdtelefoonuitgang Adapteringang AC 100-240V ~ 50/60Hz Adapteruitgang 12V/2,5A Totaal vermogen 2 x 10 W RMS Batterijen in afstandsbediening (niet inbegrepen) 2 x AAA DAB-frequentie 174,928 - 239,200 MHz FM-frequentie 87,5 - 108 MHz Bluetooth-frequentie: 2402 - 2480 MHz Energieverbruik... - Page 80 Aan de beschrijving in dit document kunnen geen rechten worden ontleend. Garantie Lenco biedt service en garantie aan overeenkomstig met de Europese wetgeving. Dit houdt in dat u, in het geval van reparaties (zowel tijdens als na de garantieperiode), uw lokale handelaar moet contacteren.
- Page 81 Deutsch DIR-260/DIR-261 ACHTUNG: Eine andere als die hier beschriebene Bedienung, Einstellung oder Verwendung der Funktionen kann zu gefährlicher Strahlenbelastung führen. VORSICHTSMASSNAHMEN VOR DER BENUTZUNG BEFOLGEN SIE IMMER FOLGENDE ANWEISUNGEN: Blockieren oder bedecken Sie keine Lüftungsöffnungen. Wenn Sie das Gerät auf ein Regal stellen, lassen Sie um das gesamte Gerät 5 cm (2”) freien Platz.
- Page 82 vorgesehen, es sei denn, sie werden durch eine verantwortliche Person beaufsichtigt oder wurden in die ordnungsgemäße Bedienung des Gerätes durch eine für ihre Sicherheit verantwortliche Person eingewiesen. 19. Dieses Produkt ist nur für den nicht-professionellen Gebrauch und nicht für gewerbliche oder industrielle Zwecke bestimmt.
- Page 83 ⚫ Die Batterie darf während der Benutzung, Aufbewahrung oder des Transports weder sehr hohen oder sehr niedrigen Temperaturen noch niedrigem Luftdruck in großen Höhenlagen ausgesetzt werden. ⚫ Die Ersetzung der Batterie mit einem falschen Batterietyp kann zum Explodieren der Batterie oder dem Auslaufen von entflammbarem Gas oder entflammbarer Flüssigkeit aus der Batterie führen.
- Page 84 Zubehör: Bedienungsanleitung Netzadapter Fernbedienung...
- Page 85 Lautsprechertreiber Scannen/Wiedergabe/Pause-Taste Empfänger Fernbedienung CD-auswerfen-Taste CD-Schlitz 10. Titel-vor-Taste Lautstärkeregler sowie 11. Stopp/OK/Koppeln-Taste sowie Standby/Modus-Taste Drehknopf für die Navigation Menü-Taste 12. LCD-Display (2,8"-TFT) Zurück/Titel-zurück-Taste 13. Lautsprechertreiber Speicherplatz-Taste 14. Inverteröffnung 15. Teleskopantenne 16. Kopfhörerbuchse 17. AUX-Eingangsbuchse 18. DC-Eingangsbuchse (12 V/2,5 A) 19. Inverteröffnung...
- Page 86 Standby-Taste 12. EQ-Einstellungen Lautsprecher ein/aus Cursor-aufwärts-Taste 3. Menü – Hauptmenü und Info Cursor-links-Taste 4. Speicherplatz – Gespeicherte 15. OK – Bestätigung einer Auswahl Radiosender, Favoriten usw. 5. Scannen – DAB-/FM-Senderscan Cursor-nach-rechts-Taste 6. Auswerfen-Taste Cursor-abwärts-Taste Einen Titel zurückspringen 18. V- – Lautstärke verringern Wiedergabe/Pause 19.
- Page 87 Vorsichtsmaßnahmen im Umgang mit Batterien: Befolgen Sie diese Sicherheitsmaßnahmen: Benutzen Sie nur den in dieser Bedienungsanleitung angegebenen Batterietyp. Achten Sie beim Einlegen der Batterie darauf, dass Sie sie entsprechend der im Batteriefach angegebenen Polarität polrichtig einlegen. Durch eine nicht ordnungsgemäß eingelegte Batterie kann das Gerät beschädigt werden.
- Page 88 Setup wizard? Einrichtungsassistent? Start now? Jetzt starten? NEIN Auf dem Display erscheint nachstehende Anzeige. Drehen Sie den Drehknopf für die Navigation am Gerät oder drücken Sie die Cursortasten für die Navigation auf der Fernbedienung, um das gewünschte Stundenformat zu markieren. Drücken Sie anschließend die OK-Taste am Gerät oder auf der Fernbedienung, um fortzufahren.
- Page 89 Auto update Automatische Aktualisierung Update from DAB Über DAB aktualisieren Update from FM Über FM aktualisieren Update from Network Über das Netzwerk aktualisieren No update Keine Aktualisierung Erklärung der Optionen: Über DAB aktualisieren: Datum und Uhrzeit werden mit dem DAB-Zeitsignal synchronisiert Über FM aktualisieren: Datum und Uhrzeit werden mit dem FM-Zeitsignal synchronisiert Über das Netzwerk aktualisieren: Die Uhrzeit wird mit dem Internet-/Netzwerk-Zeitsignal synchronisiert...
- Page 90 Wenn Sie „No update“ (Keine Aktualisierung) ausgewählt haben: Stellen Sie Datum und Uhrzeit per Hand ein. Set Time/Date Uhrzeit/Datum einstellen Die Tagesstelle blinkt. Drehen Sie den Drehknopf für die Navigation am Gerät oder benutzen Sie die Cursortasten für die Navigation auf der Fernbedienung, um den gewünschten Tag einzustellen.
- Page 91 Network settings Netzwerkeinstellungen Network wizard Scanning.- Netzwerkassistent Scan läuft.- SSID SSID ABC123 ABC123 XYZ 123 XYZ 123 [WPS] 123 [WPS] 123 [WPS] 456 [WPS] 456 [Rescan] [Erneut scannen] [Wired] [Kabelnetzwerk] [Manual config] [Manuelle Konfiguration] Wenn Sie beispielsweise das Drahtlosnetzwerk ABC123 auswählen, dann öffnet sich die Seite für die Eingabe des Netzwerkschlüssels.
- Page 92 Key: Schlüssel: BKSP BKSP CANCEL ABBRECHEN Wenn Sie das Passwort vollständig eingegeben haben, dann wählen Sie auf dem Display OK aus und drücken Sie anschließend auf der Fernbedienung die OK-Taste, um fortzufahren. Die nachstehend gezeigte Seite wird angezeigt. HINWEIS: Sie können das WLAN-Passwort auch mit Hilfe der Zifferntasten auf der Fernbedienung eingeben.
- Page 93 HINWEIS: Damit Sie die WPS-Funktion benutzen können, benötigen Sie einen Router, der die WPS-Funktion unterstützt! WPS Menu WPS-Menü Push Button Taste drücken Skip WPS WPS überspringen Wenn Sie „Push Button“ (Taste drücken) ausgewählt haben, dann erscheint nachstehende Seite. Drücken Sie die WPS-Taste Ihres Routers und anschließend die OK-Taste am Gerät oder auf Ihrer Fernbedienung.
- Page 94 WPS Setup Geschützte WLAN-Einrichtung über WPS Enter PIN XXXXXXXX at the other end Geben Sie am Gegengerät die PIN XXXXXXXX Press SELECT to continue Drücken Sie SELECT, um fortzufahren Wenn Sie „Skip WPS“ (WPS überspringen) ausgewählt haben, dann erscheint nachstehende Seite.
- Page 95 Wählen Sie im Hauptmenü „Internet radio“ (Internetradio) aus oder drücken Sie solange die Mode-Taste auf der Fernbedienung, bis „Internet radio“ (Internetradio) ausgewählt wurde. Das Lenco DIR-260/DIR-261-Internetradio kann über eine Breitband-Internetverbindung unzählige Radiosender und Podcasts aus der ganzen Welt wiedergeben. Wenn Sie den Internetradiomodus auswählen,...
- Page 96 Hier stehen Ihnen die üblichen lokalen Steuerungen für die Wiedergabelautstärke, die Stummschaltung, die Wiedergabe/das Pausieren der Wiedergabe und die Speicherplätze zur Verfügung. Hinweis: Auf das durch das Internetradioportal bereitgestellte Radiosender-Listenmenü können Sie nur zugreifen, wenn das Radio mit dem Internet verbunden ist. Die Radiosenderlisten und Untermenüs ändern sich von Zeit zu Zeit.
- Page 97 Suche Sie können aber auch über das Internet nach Sendungen von Radiosendern mit bestimmten Schlüsselwörtern in ihrem Titel suchen. Wählen Sie für diese Suche Menu (Menü) > Station list (Radiosenderliste) > Search (Suche) aus. Geben Sie dann ein Schlüsselwort ein, indem Sie dessen Zeichen nacheinander eingeben und anschließend mit OK bestätigen.
- Page 98 Standort Wählen Sie Menu (Menü) > Station list (Radiosenderliste) > Location (Standort) > aus, wenn Sie eine Internetsendung von einem bestimmten Standort auswählen möchten. Wenn Sie aus dem Menü einen Kontinent auswählen, dann erscheint eine Liste mit verfügbaren Ländern. Wenn Sie hier ein Land auswählen, dann werden die verfügbaren Internetradiosender angezeigt.
- Page 99 ⚫ Vereintes Königreich ⚫ Suche ⚫ Populär ⚫ Standort ⚫ Entdecken UK (Hier kann je nach dem Land, in dem Sie dieses Gerät benutzen, ein anderes Land angegeben sein) Hierüber erhalten Sie ein Untermenü, um mit Hilfe einer Vielzahl von Kategorien wie beispielsweise Comedy of the week (Comedy der Woche), Books and Authors (Bücher und Autoren), Popular (Populär) usw.
- Page 100 Menü einen Kontinent auswählen, dann erscheint eine Liste mit verfügbaren Ländern. Wenn Sie hier ein Land auswählen, dann werden die verfügbaren Podcasts angezeigt. Wenn Sie jetzt aus dieser Liste einen Podcast auswählen, dann stellt das Radio diesen Podcast ein. Populär Hierüber erhalten Sie eine Liste mit den populärsten Podcasts aus der ganzen Welt.
- Page 101 Drücken Sie die Taste oder auf der Fernbedienung und wählen Sie anschließend den gewünschten Speicherplatz aus. Drücken Sie die OK-Taste am Gerät oder auf der Fernbedienung, um die Speicherung auf dem ausgewählten Speicherplatz zu bestätigen. Wiederholen Sie die vorstehend beschriebenen Schritte, um bis zu 10 Speicherplätze zu belegen.
- Page 102 DAB-Radiomodus Im DAB-Radiomodus können Sie DAB/DAB+-Digitalradio empfangen und Informationen über den aktuellen Radiosender, den Stream und den wiedergegebenen Titel anzeigen lassen. Drücken Sie die Mode-Taste und navigieren Sie solange durch die Wiedergabemodi, bis DAB Radio (DAB-Radio) angezeigt wird oder wählen Sie Menu (Menü) > Main menu (Hauptmenü) > DAB aus.
- Page 103 Wählen Sie Menu (Menü) > Prune invalid (Bereinigung ungültiger Radiosender) aus, um Radiosender, die in der Radiosenderliste enthalten, jedoch unerreichbar sind, zu entfernen. Radiosender auswählen Wählen Sie Menu (Menü) > Station List (Radiosenderliste) aus und drücken Sie anschließend den OK-Knopf, um einen Radiosender wiedergeben zu lassen oder um einen Radiosender zu ändern.
- Page 104 Sie können die Reihenfolge in der DAB-Radiosenderliste entweder Alphanumeric (Alphanumerisch), nach Ensemble oder nach Valid (Gültigkeit) geordnet anzeigen lassen, wobei Ensemble Radiosendergruppen auflistet, die zusammen auf dem gleichen Ensemble wie beispielsweise BBC oder South Wales local gesendet werden. Valid (Gültigkeit) listet alphanumerisch geordnet zuerst gültige und danach nicht sendende Radiosender auf.
- Page 105 ⚫ Audioeinstellungen ⚫ Systemeinstellungen ⚫ Hauptmenü WICHTIGE INFORMATIONEN ZUM DAB+-EMPFANG Der DAB+-Radioempfang unterscheidet sich vom UKW-Radioempfang. • Bei UKW können Sie bei schwachem Senderempfang häufig immer noch ein knisterndes oder knackendes Geräusch hören. • DAB+-Empfang funktioniert digital. Daher hören Sie bei unzureichender Signalstärke nichts.
- Page 106 ⚫ Wenn RDS-Informationen verfügbar sind, dann wird standardmäßig der Dienstname (z. B. der Radiosendername) angezeigt. Durch Drücken von Info können Sie durch weitere RDS-Informationen navigieren. Jedes Mal, wenn Sie Info drücken, wird zyklisch eine andere Informationseinheit in der Reihenfolge RDS-Radiotext, RDS-Programmtyp, Frequenz und das aktuelle Datum angezeigt.
- Page 107 Prune Invalid Bereinigung ungültiger Radiosender This removes all invalid stations, continue? Alle ungültigen Radiosender entfernen? NEIN Wählen Sie ‘YES’ (JA) aus, um alle ungültigen Radiosender zu entfernen oder ‘NO’ (NEIN), um den Vorgang abzubrechen. Wenn Sie DRC (Komprimierung des Dynamikbereichs) auswählen, dann können Sie DRC auf DRC high, DRC low oder DRC off auswählen.
- Page 108 87.50MHz 87,50 MHz FM Radio FM-Radio [No Radio Text] [Kein Radiotext] Symbolerklärung: Dieses Symbol zeigt an, dass ein Radiosender This symbol indicates one station stored. gespeichert ist. This symbol indicates the logo. Dieses Symbol zeigt das Logo an. This symbol indicates the audio type. Dieses Symbol zeigt den Audiotyp an.
- Page 109 Save to Preset Auf Speicherplatz speichern 1. 92.00MHz 1. 92,00 MHz 2. [Not set] 2. [Nicht belegt] 3. [Not set] 3. [Nicht belegt] 4. [Not set] 4. [Nicht belegt] 5. [Not set] 5. [Nicht belegt] Drehen Sie den Drehknopf für die Navigation am Gerät oder drücken Sie die Taste oder auf der Fernbedienung, um den gewünschten Speicherplatz/Speicherort auszuwählen.
- Page 110 FM station scan FM-Senderscan Strong station only? Nur starke Radiosender? NEIN Wenn Sie Audio setting (Audioeinstellung) ausgewählt haben, dann wird die nachstehende Seite angezeigt. Drehen Sie den Drehknopf für die Navigation am Gerät oder drücken Sie die Cursortasten für die Navigation auf der Fernbedienung, um YES (JA) oder NO (NEIN) auszuwählen.
- Page 111 Today’s Date: Das heutige Datum: DD.MM.YYYY TT.MM.JJJJ 4. Stellen Sie je nach Wunsch die Lautstärke des DIR-260/DIR-261 und bei Bedarf an der externen Audioquelle ein. Benutzen Sie während der Wiedergabe die Bedienelemente Ihres externen Geräts. CD-Modus: Wenn Sie im Hauptmenü „CD“ ausgewählt haben, dann erscheint die nachstehende Seite.
-
Page 112: Bluetooth-Modus
Drücken Sie die Auswerfen-Taste am Gerät oder auf der Fernbedienung, um das CD-Fach zu öffnen. Legen Sie eine CD im CD-Fach ein. WIEDERGABE/PAUSE-Steuerung Drücken Sie die OK-Taste am Gerät oder die Taste auf der Fernbedienung, um die Wiedergabe zu starten. Drücken Sie die OK-Taste am Gerät oder die Taste auf der Fernbedienung, um die Wiedergabe zu pausieren. - Page 113 Wenn Sie im Bluetooth-Modus auf Ihrem Radio Menu (Menü) > Setup Bluetooth (Bluetooth einrichten) auswählen, dann wird Ihr Radio für andere Bluetooth-Geräte sichtbar. Auf dem Display wird der Bluetooth-Name des Radios (Lenco DIR-260/DIR-261) angezeigt. Vergewissern Sie sich, dass auf Ihrem Bluetooth-Mobilgerät Bluetooth aktiviert ist und scannen Sie dann nach verfügbaren Bluetooth-Geräten.
- Page 114 Einzelheiten zur Bluetooth-Verbindung Wählen Sie im Bluetooth-Modus Menu (Menü) > View details (Details anzeigen) aus, um Informationen zum aktuellen Status der Bluetooth-Verbindung und über das gekoppelte Bluetooth-Gerät anzeigen zu lassen. Das daraufhin angezeigte Menü bietet Ihnen folgende Optionen: Bluetooth Info (Bluetooth-Information) – Information über den aktuellen Status und die Version der Bluetooth-Verbindung des Radios Connected Device (Verbundene Geräte) –...
- Page 115 ~ Drehen Sie den Drehknopf für die Navigation am Gerät oder drücken Sie die Taste oder auf der Fernbedienung, um 15, 30, 45, 60 Minuten einzustellen. Nach Beendigung der Einstellung wird auf dem Display die verbleibende Restzeit angezeigt. ~ Die verbleibende Restzeit der Einschlafautomatik wird auf dem Display unten wie nachstehend gezeigt angezeigt.
- Page 116 Wenn Sie ‘Alarm 1’ (Weckruf 1) ausgewählt haben, dann erscheint nachstehende Seite. Alarm 1 Weckruf 1 Enable: Off Aktivieren: Aus Time: [00:00] Uhrzeit: [00:00] Mode: Internet radio Modus: Internetradio Preset: Last listened Senderspeicher: Zuletzt gehört Volume: 12 Lautstärke: 12 Save Speichern Wählen Sie ‘Enable’...
- Page 117 Alarm OFF Weckruf stummschalten Wenn Sie den Weckruf deaktivieren möchten, dann gehen Sie zu den Weckrufeinstellungen und setzen Sie ihn dort auf OFF (AUS). Daraufhin wird das Weckrufsymbol nicht mehr angezeigt. SYSTEMEINSTELLUNGEN: Wenn die Einstellungen des Hauptmenüs abgeschlossen sind, wechselt das Gerät zu den Systemeinstellungen, woraufhin die nachstehende Seite angezeigt wird.
- Page 118 Wenn Sie im Menü System settings (Systemeinstellungen) Network (Netzwerk) auswählen, dann erscheint auf dem Display nachstehende Anzeige. Network settings Netzwerkeinstellungen Network wizard Netzwerkassistent PBC Wlan setup PBC-WLAN-Einrichtung View settings Einstellungen anzeigen Wlan region WLAN-Region Manual settings Manuelle Einstellungen Network settings Netzwerkeinstellungen Wlan region WLAN-Region...
- Page 119 Wenn Sie PBC Wlan setup (WLAN-Einrichtung über PBC) auswählen, dann scannt das Gerät nach verfügbaren Drahtlosnetzwerken. Schlagen Sie hierfür auch auf Seite 6 nach. Wenn Sie View settings (Einstellungen anzeigen) auswählen, dann können Sie die ‘Active connection’(Aktive Verbindung), die ‘MAC address’ (MAC-Adresse), die ‘Wlan region ‘...
- Page 120 Backlight Hintergrundbeleuchtung Timeout Zeitüberschreitung On Level Eingeschaltet Dim Level Gedimmt Wenn Sie Timeout (Zeitüberschreitung) auswählen, dann können Sie einstellen, wie lange die Hintergrundbeleuchtung eingeschaltet bleiben soll. Für Timeout (Zeitüberschreitung) können Sie On (Immer eingeschaltet), 10 sec (10 s), 20 sec (20 s), 30 sec (30 s), 45 sec (45 s), 60 sec (60 s), 90 sec (90 s), 120 sec (120 s) oder 180 sec (180 s) auswählen.
- Page 121 Fehlernachrichten Meldung Beschreibung Beispiel Der richtige Schlüssel wurde Verbinden Aktivierte MAC-Filterung am eingegeben, jedoch verweigert der fehlgeschlagen Router Router die Anfrage MP3 wurde empfangen, Dateiformat kann nicht erkannt Formatfehler jedoch ist der Stream nicht als werden – Netzwerkunabhängig MP3 dekodierbar Problem nach dem Router –...
-
Page 122: Problembehebung
Überprüfen Sie, ob das Netzwerk zwischen PC und Netzwerk nicht aktiv Router arbeitet Beziehen Sie die MAC-Adresse des DIR-260/DIR-261 über Menu (Menü) > System settings (Systemeinstellungen) > Network (Netzwerk) > View settings (Einstellungen anzeigen) und fügen Sie diese dann der Ausnahmeliste auf dem Router hinzu. - Page 123 Bringen Sie das Radio an einen anderen Ort mit Empfang. UNDOK™ ist die App erster Wahl für Ihr Lenco DIR-260/DIR-261-Audiosystem. Mit Hilfe von UNDOK können Sie Ihr Audiogerät Lenco DIR-260/DIR-261 über ein Drahtlosnetzwerk bedienen. Es sind Versionen für ANDROID- und APPLE iOS-Smartphones/Tablet-PCs verfügbar, die Sie über Google Play bzw.
- Page 124 Tablet-PC in dessen Dokumentation nach, um zu erfahren, wie Sie Ihre Audiogeräte mit einem bestimmten Netzwerk verbinden. Wenn beide mit dem gleichen WLAN verbunden sind, dann finden Sie Ihr Lenco DIR-260/DIR-261 in der Liste gefundener Audiogeräte. Wählen Sie das Lenco DIR-260/DIR-261 aus. Jetzt können Sie mit der Bedienung über Ihre App UNDOK beginnen.
-
Page 126: Technische Daten
Technische Daten Anschlüsse DC-Eingang, 3,5-mm-AUX-Eingang, 3,5-mm-Kopfhörerausgang Netzadaptereingang 100 – 240 V~, 50/60 Hz Netzadapterausgang 12 V /2,5 A Ausgangsleistung 2 x 10 W RMS Batterien der Fernbedienung (nicht 2 x AAA im Lieferumfang enthalten) DAB-Frequenz 174,928 – 239,200 MHz FM-Frequenz 87,5 –... - Page 127 Beschreibung können keine Rechtsansprüche oder Leistungsanforderungen geltend gemacht werden. Garantie Lenco bietet Leistungen und Garantien im Einklang mit Europäischem Recht. Im Falle von Reparaturen (sowohl während als auch nach Ablauf der Garantiezeit) sollten Sie deshalb Ihren Einzelhändler kontaktieren. Wichtiger Hinweis: Es ist nicht möglich, Produkte für Reparaturen direkt an Lenco zu schicken.
- Page 128 Hiermit erklärt Commaxx B.V. Wiebachstraat 37, 6466 NG Kerkrade, The Netherlands, dass dieses Produkt den grundsätzlichen Anforderungen der EU-Richtlinie entspricht. Die Konformitätserklärung kann unter folgendem Link abgerufen werden: techdoc@commaxxgroup.com Service Besuchen Sie bitte für weitere Informationen und unseren Kundendienst unsere Homepage www.lenco.com Commaxx B.V. Wiebachstraat 37, 6466 NG Kerkrade, Die Niederlande.
-
Page 129: Précautions Avant Utilisation
Français DIR-260/DIR-261 ATTENTION : L’utilisation de commandes ou d’ajustements ou l’exécution de procédures autres que celles spécifiées dans le présent document peuvent entraîner une exposition dangereuse aux radiations. PRÉCAUTIONS AVANT UTILISATION GARDEZ CES INSTRUCTIONS À L’ESPRIT : Ne couvrez pas et n’obturez pas les ouvertures de ventilation. Lorsque vous placez l’appareil sur une étagère, laissez 5 cm (2”) d’espace libre tout autour de l’appareil. - Page 130 18. Cet appareil ne doit pas être utilisé par des personnes (y compris les enfants) souffrant de déficiences physiques, sensorielles ou mentales, ou d’un manque d’expérience et de connaissances, à moins qu’elles n’aient été supervisées ou qu’une personne responsable de leur sécurité...
-
Page 131: Installation
⚫ Pendant l’utilisation, le stockage ou le transport, la pile ne doit pas être soumise à des températures extrêmement élevées ou basses, à une faible pression d’air à haute altitude. ⚫ Le remplacement d’une pile par une autre de type incorrect peut entraîner une explosion ou une fuite de liquide ou de gaz inflammable. - Page 132 Accessoires : Mode d’emploi Adaptateur secteur Télécommande...
- Page 133 Conducteur Bouton Recherche/Lecture/Pause Récepteur de télécommande Bouton d’éjection de CD Passages CD 10. Bouton Suivant Molette Volume/Veille/Mode 11. Molette Arrêter/OK/Coupler/Naviguer Bouton menu 12. Écran LCD (TFT 2,8’’) Bouton Retour/Précédent 13. Conducteur Bouton Présélection 14. Tube d’inverseur 15. Antenne télescopique 16. Sortie casque 17.
- Page 134 Bouton veille 12. Paramètres de l’égaliseur COUPER/ACTIVER le son des Bouton curseur haut haut-parleurs 3. Menu - menu principal et infos Touche de navigation vers la gauche 4. Préréglage- stations enregistrées, favoris, 15. OK Confirmer la sélection. etc. 5. Recherche-recherche DAB/FM Touche de navigation vers la droite 6.
- Page 135 Remettez le couvercle du compartiment à piles Précautions relatives aux piles : Prenez les précautions suivantes : Utilisez les types de piles spécifiées dans ce manuel. Veillez à respecter la polarité correcte lors de l’insertion de la pile, tel qu’indiqué dans le compartiment à...
- Page 136 Setup wizard? Assistant de configuration ? Start now? Commencer maintenant ? Les éléments suivants s’affichent. Tournez le bouton NAVIGUER de l’appareil ou appuyez sur les touches de navigation de la télécommande pour mettre en surbrillance le format de l’heure souhaitée, puis appuyez sur le bouton OK de l’appareil ou de la télécommande pour continuer.
- Page 137 Auto update mise à jour automatique Update from DAB Mettre à jour à partir de DAB Update from FM Mettre à jour à partir de FM Update from Network Mettre à jour à partir du réseau No update Aucune mise à jour Explication des options : Mettre à...
- Page 138 Si vous avez sélectionné « No update » (Aucune mise à jour) : Réglez l’heure et la date manuellement. Set Time/Date Réglage de l’heure/date Le numéro correspond au jour clignote, tournez le bouton NAVIGUER de l’appareil ou utilisez les touches de navigation de la télécommande pour régler le jour souhaité, puis appuyez sur le bouton «...
- Page 139 Network settings Réglages du réseau Network wizard Scanning.- Recherche de l’assistant réseau.- SSID SSID ABC123 ABC123 XYZ 123 XYZ 123 [WPS] 123 [WPS] 123 [WPS] 456 [WPS] 456 [Rescan] [Nouvelle recherche] [Wired] [à fil] [Manual config] [config. manuelle] Si, par exemple, le réseau sans fil ABC123 est sélectionné, la page Clé s’affiche. Tournez le bouton NAVIGUER de l’appareil ou utilisez les touches de navigation de la télécommande pour mettre en surbrillance le caractère nécessaire, appuyez sur le bouton «...
- Page 140 Key: Touche : BKSP RETOUR CANCEL ANNULER Après avoir saisi le mot de passe correct, sélectionnez OK à l’écran et appuyez sur la touche « OK » de la télécommande pour continuer. Les pages suivantes s’affichent de la manière suivante. REMARQUE : Vous pouvez également utiliser les touches numériques de la télécommande pour entrer le mot de passe WI-FI.
- Page 141 WPS Menu Menu WPS Push Button Bouton-poussoir Code PIN Skip WPS Ignorer la fonction WPS Si « Push Button » (Bouton-poussoir ) est sélectionné, la page suivante apparaît. Appuyez sur le bouton de connexion WPS de votre routeur, puis appuyez sur le bouton OK de l’appareil ou de la télécommande.
- Page 142 WPS Setup Configuration WPS Enter PIN XXXXXXXX at the other end Saisissez le code PIN XXXXXXXX à l’autre extrémité Press SELECT to continue Appuyez sur SELECT pour continuer Si « Skip WPS » (Sauter WPS) est sélectionné, la page suivante apparaît. Saisissez le mot de passe de votre réseau WI-FI Key: Touche :...
-
Page 143: Radio Internet
Menu principal Une fois l’installation terminée, l’appareil passe au menu principal. La page suivante apparaît. Tournez le bouton NAVIGUER de l’appareil ou appuyez sur les touches de navigation de la télécommande pour parcourir les éléments de la liste du menu principal. Main menu Menu principal Internet radio... - Page 144 La radio Internet DIR-260/DIR-261 de Lenco peut retransmettre des milliers de stations de radio et de podcasts du monde entier grâce à une connexion Internet haut débit. Quand vous sélectionnez le mode radio Internet, la radio contacte le portail de la radio Internet de votre fournisseur de solution afin d’obtenir une liste des stations, organisées dans différentes...
- Page 145 Recherche Vous pouvez également rechercher des stations parmi les diffusions Internet avec des mots-clés particuliers dans leur titre. Pour effectuer la recherche, sélectionnez « Menu > Station list > Search » (Menu > Liste des stations > Recherche). Saisissez un mot-clé en sélectionnant les caractères les uns après les autres, puis appuyez sur «...
- Page 146 Lieu Pour sélectionner une station de diffusion Internet d’un emplacement particulier, sélectionnez « Menu > Station list > Location > » (Menu > Liste stations > Emplacement >). Sélectionnez un continent dans le menu et une liste des pays disponibles s’affiche.
- Page 147 ⚫ Populaire ⚫ Lieu ⚫ Découverte R-U (il peut s’agir d’un autre pays. Dépend du pays dans lequel vous utilisez cet appareil) Présente un sous-menu pour rechercher des podcasts en utilisant une variété de catégories, par exemple, comédie de la semaine, livres et auteurs, populaire, etc. Choisissez votre catégorie préférée et soit une autre liste de sous-catégories s’affiche, soit (s’il n’y a pas d’autres sous-catégories) les podcasts disponibles pour la catégorie choisie s’affichent.
- Page 148 Populaire Cette entrée offre une liste des podcasts les plus populaires dans le monde entier. Découverte Cette entrée vous permet de sélectionner une liste de podcasts définis par leur origine (pays), leur genre (style de musique) ou leur langue. Parcourez les options de catégorie : après sélection, un écran vous confirme la catégorie que vous avez choisie et le nombre de podcasts dans cette catégorie.
- Page 149 Retrouver un préréglage sauvegardé Appuyez sur le bouton « PRESET » de l’appareil ou de la télécommande pour rappeler une station stockée, tournez le bouton NAVIGUER de l’appareil ou utilisez les touches de navigation de la télécommande pour rappeler une station en mémoire. Appuyez sur « OK » et écoutez la station sélectionnée.
- Page 150 ⚫ Menu principal Liste des Stations La première fois que vous sélectionnez le mode radio DAB, ou si la liste des stations est vide, la radio effectue automatiquement un balayage complet des stations disponibles. Vous pourrez également avoir besoin d’effectuer une recherche manuelle pour mettre à jour la liste des stations pour l’une des raisons suivantes : ⚫...
- Page 151 Informations sur la station en cours Lors de l’écoute, l’écran affiche le nom de l’émission et les informations DLS (segment d’étiquette dynamique) diffusées par la station qui fournit ainsi des informations en temps réel, telles que le nom du programme, le titre de la musique et des informations de contact. Les émissions stéréo sont indiquées avec une icône en haut de l’écran.
- Page 152 Save to Preset Enregistrer dans les présélections 1. [Not set] 1. [Non défini] 2. [Not set] 2. [Non défini] 3. [Not set] 3. [Non défini] 4. [Not set] 4. [Non défini] 5. [Not set] 5. [Non défini] Tournez le bouton NAVIGUER de l’appareil ou appuyez sur les touches de navigation de la télécommande pour sélectionner la position de la présélection/de mise en mémoire, puis appuyez sur le bouton OK de l’appareil ou de la télécommande pour confirmer.
- Page 153 • Avec la réception DAB+, il peut y avoir une très grande différence de niveau de réception entre un emplacement donné et « quelques mètres » plus loin. En présence d’un signal local DAB+ faible, déplacez la radio pour trouver un signal plus fort.
- Page 154 Réglages Paramètres de recherche Par défaut, le balayage des stations radio FM s’arrête sur une station disponible. Il peut en résulter un rapport signal-sur-bruit pauvre (sifflement) pour les stations faibles. Pour modifier les paramètres de recherche afin d’interrompre le balayage sur une station avec un signal puissant, sélectionnez «...
- Page 155 Lorsque DRC est sélectionné, réglez-le sur DRC high (DRC élevé), DRC low (DRC faible) ou DRC off (DRC désactivé). Il existe 3 niveaux de compression : DRC désactivé - aucune compression. Ceci est le réglage par défaut. DRC faible - compression moyenne. DRC élevé...
- Page 156 This symbol indicates wireless connection. Ce symbole indique une connexion sans fil. Recherche automatique : Méthode 1 : Appuyez sur le bouton scan de l’appareil pour effectuer une recherche automatique ; Méthode 2 : Appuyez sur le bouton scan de la télécommande pour effectuer une recherche automatique ;...
- Page 157 Scan setting Réglage de la recherche Audio setting Réglage audio System settings Réglages système Main menu Menu principal Si le paramètre Scan (recherche) est sélectionné, la page suivante s’affiche, tournez le bouton NAVIGUER de l’appareil ou appuyez sur les touches de navigation de la télécommande pour régler YES (OUI) ou NO (NON).
- Page 158 FM weak reception Réception FM faible Listen in Mono only? Écouter en mono uniquement ? REMARQUE : Si la réception est faible, déployez l’antenne télescopique, ou déplacez l’appareil pour obtenir une meilleure réception. Mode Aux In : Le mode d’entrée auxiliaire permet de lire la musique à partir d’une source externe telle qu’un lecteur MP3.
- Page 159 Today’s Date: Date du jour : DD.MM.YYYY JJ MM AAAA 4. Réglez le volume du DIR-260/DIR-261 (et, si nécessaire, de la source audio externe) selon les besoins. Pendant la lecture, utilisez les commandes de votre appareil externe. Mode CD : Dans le menu principal, si CD est sélectionné, la page suivante apparaît.
- Page 160 En mode Bluetooth, appuyez sur « Menu > Setup Bluetooth » (Menu > Configuration Bluetooth) sur la radio et celle-ci devient visible. L’écran affiche le nom Bluetooth de la radio (Lenco DIR-260/DIR-261). Sur votre appareil intelligent Bluetooth, assurez-vous que Bluetooth est activé et recherchez l’appareil en sélectionnant la radio dans la liste des appareils Bluetooth disponibles.
- Page 161 Commande à partir de la radio En mode Bluetooth, vous pouvez suspendre, lire, passer à la piste suivante et retourner à la piste précédente (dans la liste de lecture sur le périphérique Bluetooth de contrôle) à l’aide des boutons de la radio. Détails sur la connexion Bluetooth En mode Bluetooth, pour obtenir des informations sur le statut actuel de la connexion Bluetooth et les périphériques Bluetooth couplés, sélectionnez «...
- Page 162 ~ Tournez le bouton NAVIGUER de l’appareil ou appuyez sur le bouton de la télécommande pour régler 15, 30, 45, 60 MIN. Une fois le réglage terminé, le temps restant s’affiche à l’écran. ~ L’icône de temps de mise en veille apparaît sur la colonne inférieure de l’écran tel qu’illustré ci-dessous.
- Page 163 Alarm 1 Alarme 1 Enable: Off Activer : Dés Time: [00:00] Heure : [00:00] Mode: Internet radio Mode : Radio Internet Preset: Last listened Présélection : Dernière station écoutée Volume: 12 Volume : 12 Save Enregistrer Sélectionnez « Enable » (Activer) pour le régler sur off, Daily, Once, Weekends or Weekdays (Activé, Quotidien, Une fois, Week-end ou Jours de la semaine).
-
Page 164: Réglages Du Système
Alarm OFF Alarme désactivée Pour annuler complètement l’alarme, entrez les paramètres de l’alarme et réglez-la sur OFF (Désactivé). L’icône d’alarme disparaît. RÉGLAGES DU SYSTÈME : Une fois la configuration du menu principal terminée, entrez les paramètres du système, la page suivante apparaît. System settings Réglages système Network... - Page 165 Network settings Réglages du réseau Network wizard Assistant réseau PBC Wlan setup Configuration PBC WLAN View settings Visualisation des réglages Wlan region Région du réseau local sans fil (WLAN) Manual settings Réglages manuels Network settings Réglages du réseau Wlan region Région du réseau local sans fil (WLAN) Manual settings Réglages manuels...
- Page 166 paramètres « Active connection »(Connexion active), « MAC address » (Adresse MAC), « Wlan region » (Région du réseau local sans fil (WLAN)), « DHCP », « SSID », « IP address » (Adresse IP), « Subnet mask » (Masque de sous-réseau), « Gateway address » (Adresse de passerelle), «...
- Page 167 Backlight Rétroéclairage Timeout délai d’attente On Level Niveau activé Dim Level Niveau de luminosité Si Timeout (délai d’attente) est sélectionné, vous pouvez régler le rétroéclairage de l’écran du rétroéclairage sur On (Activé), 10 sec, 20 sec, 30 sec, 45 sec, 60 sec. 90 sec, 120 sec ou 180 sec.
- Page 168 Messages d’erreur Message Description Exemple Impossible de se Le mot de passe saisi est correct, Le filtrage d’adresse MAC est connecter mais le routeur a rejeté la demande activé sur le routeur Un fichier MP3 a été reçu, Le format de fichier n’est pas mais il s’avère lors de la Erreur format reconnu –...
-
Page 169: Dépannage
Vérifier que le réseau fonctionne entre un Réseau inaccessible ordinateur et le routeur Vous pouvez obtenir l’adresse MAC DIR-260/DIR-261 via le chemin Menu > System settings > Network > View settings (Menu > Réglages système > Réseau > Visualisation des Le routeur limite réglages) et ajouter à... - Page 170 Déplacez la radio à un endroit où vous trouverez une réception. UNDOK™ est l’application d’accompagnement de votre système audio Lenco DIR-260/DIR-261. Avec UNDOK, vous pouvez contrôler votre appreil audio Lenco DIR-260/DIR-261 via une connexion réseau Wi-Fi. Une version existe pour les smartphones/tablettes Android ou Apple. Téléchargez l’application depuis le magasin d’application Google Play ou App Store d’Apple.
- Page 171 Pour connecter vos dispositifs audio au réseau approprié, consultez leur documentation ou consultez la documentation de votre smartphone/tablette. Lorsqu’il est connecté au même réseau WI-FI, le Lenco DIR-260/DIR-261 apparaît dans la liste des dispositifs audio découverts. Sélectionnez le Lenco DIR-260/DIR-261. Vous pouvez désormais commencer à...
-
Page 172: Caractéristiques Techniques
Caractéristiques techniques Connexions CC, AUX-IN 3,5 mm, sortie casque 3,5 mm Entrée d’adaptateur 100 à 240 Vca, 50/60 Hz Sortie d’adaptateur 12 V /2,5 A Sortie d’alimentation 2 x 10 W en valeur efficace Piles de la télécommande (non fournies) 2 x AAA Fréquence DAB 174,928 –... - Page 173 Garantie Lenco propose un service et une garantie conformément à la législation européenne, ce qui signifie qu’en cas de besoin de réparation (aussi bien pendant et après la période de garantie), vous pouvez contacter votre revendeur le plus proche.
- Page 174 Español DIR-260/DIR-261 PRECAUCIÓN: El uso de controles o ajustes o rendimiento de procedimientos excepto aquellos que los aquí especificados puede provocar una exposición peligrosa a la radiación. PRECAUCIONES PREVIAS AL USO TENGA ESTAS INSTRUCCIONES EN MENTE: No cubra o bloquee ninguna apertura de ventilación. Cuando coloque el dispositivo en una estantería, deje 5 cm (2”) de espacio libre alrededor de todo el dispositivo.
- Page 175 que se les haya dado supervisión o instrucciones acerca del uso correcto del dispositivo por parte de una persona responsable de su seguridad. 19. Este producto está diseñado para un uso no profesional únicamente y no para un uso comercial o industrial. 20.
-
Page 176: Instalación
⚫ Si arroja la pila al fuego o a un horno caliente, o aplasta o cortar mecánicamente una pila, podría provocar una explosión. ⚫ Si deja una pila en un lugar con temperaturas extremadamente altas, se puede producir una explosión o una fuga de líquido o gas inflamable. ⚫... - Page 177 Accesorios: Manual del usuario Adaptador de corriente Mando a distancia...
- Page 178 Driver Botón búsqueda / reproducción pausa Receptor de mando a distancia Botón expulsar CD Pasajes de CD 10. Botón Siguiente Dial de volumen / en espera / modo 11. Dial de parada / OK / emparejar / navegar Botón de menú 12.
- Page 179 Botón de modo de espera 12. Configuración del ecualizador Encendido / apagado del altavoz Botón de cursor hacia arriba 3. Menú-Menú principal e información Botón de cursor hacia la izquierda 4. Presintonía-Emisoras guardadas 15. OK Confirmar selección favoritos, etc. 5. Búsqueda-Búsqueda emisoras Botón del cursor derecho DAB/FM...
- Page 180 Instalación de la pila del mando a distancia: Empuje sobre la marca “open” de la cubierta de las pilas y deslícela hacia abajo Instale dos (2) pilas tamaño AAA en el compartimento de las pilas (compruebe la polaridad correcta) Vuelva a deslizar la cubierta de la batería Precauciones acerca de las pilas: Siga estas precauciones: Use únicamente el tipo de pila especificado en este manual.
- Page 181 Gire el dial NAVEGAR de la unidad en sentido antihorario o pulse el botón navegar del mando a distancia para resaltar "YES (SÍ)" y pulse el dial OK de la unidad o pulse el botón OK del mando a distancia para continuar. Setup wizard? ¿Asistente de instalación? Start now?
- Page 182 Auto update Actualización automática Update from DAB Actualizar desde DAB Update from FM Actualizar desde FM Update from Network Actualización desde la red No update No hay actualizaciones Explicación de las opciones: Actualización desde DAB: La actualización se sincronizará desde una señal DAB. Actualización desde FM: La hora y la fecha se sincronizarán desde una señal FM.
- Page 183 Configuración manual de la fecha y hora. Set Time/Date Fecha/Hora Parpadeará el número del día; gire el dial NAVEGAR de la unidad o use los botones de navegación del mando a distancia para configurar el día que desee; posteriormente, pulse el botón “OK”...
- Page 184 La pantalla será como la que aparece debajo. En la página SSID, elija una de las redes inalámbricas de la lista o elija la red con el prefijo [WPS]… Network settings Configuración de red Network wizard Scanning.- Búsqueda del asistente de red.- SSID SSID ABC123...
- Page 185 Key: Clave: BKSP BKSP ACEPTAR CANCEL CANC. Tras completar la contraseña correcta, selecciona el botón OK en la pantalla y pulse el botón “OK” en el mando a distancia para continuar. Aparecerán las siguientes páginas tal y como se muestra debajo. NOTA: Asimismo puede usar los botones numéricos del mando a distancia para introducir la contraseña WIFI.
- Page 186 WPS Menu Menú WPS Push Button Botón Skip WPS Salir de WPS Si se selecciona "Push Button (Pulsar botón)", aparecerá la página que aparece debajo. Pulse el botón de conexión WPS de su router y posteriormente pulse el botón OK de la unidad o del mando a distancia.
- Page 187 WPS Setup Ajustes WPS Enter PIN XXXXXXXX at the other end Introduzca el PIN XXXXXXXX en el otro extremo Press SELECT to continue Pulse SELECT para continuar Cuando se selecciona "Skip WPS (Saltar WPS)", aparecerá la página que aparece debajo. Introducción de la contraseña de red WIFI Key: Clave:...
-
Page 188: Radio Por Internet
Seleccione la radio por internet desde el menú principal o pulse “mode” en el mando a distancia hasta que se seleccione la radio por internet. La radio por internet Lenco DIR-260/DIR-261 puede reproducir miles de emisoras de radio y podcasts de todo el mundo mediante una conexión a internet de banda ancha. Cuando... - Page 189 Dispone de los controles locales comunes para el volumen de sonido, silenciar, reproducción/parada y Presintonías. Nota: El menú de la lista de emisoras lo proporciona en portal de radio por internet, así que solo es accesible cuando la radio se conecta a internet. Las listas de emisoras y submenús cambiarán de vez en cuando.
- Page 190 Searching for: Buscando: BKSP BKSP ACEPTAR CANCEL CANC. Selecciona una emisión de la lista. Stations Emisoras 0.11.FM 90s Country 0.11.FM 90s Country 0.11.FM Classic Country 0.11.FM Country clásico 0.11.FM Today’s Country 0.11.FM Country actual ON Country on Radio ON Country on Radio 1.FM - Absolute Country…...
- Page 191 realizado su selección una pantalla confirma la categoría seleccionada y el número de emisoras dentro de esa categoría. Para ver la lista, seleccione la opción que muestra el número de emisoras disponibles. Información sobre lo que se está reproduciendo ahora Cuando se está...
- Page 192 Búsqueda Asimismo puede buscar a través de podcasts con palabras clave particulares en su título. Para buscar, seleccione Menu (Menú) > Podcast list (Lista de podcasts) > Search (Buscar). Introduzca una palabra clave seleccionando caracteres uno a uno y después pulse OK.
- Page 193 Guardar una emisora como favorito Guardar to presintonizar una emisora de radio por internet: Durante la reproducción, mantenga pulsado el botón “Preset” de la unidad o del mando a distancia para guardar la emisora actual como favorito. Aparecerá la siguiente página: Save to Preset Guardar en Presintonía 1.
- Page 194 Pulse el botón MENU de la unidad o pulse el botón Menu del mando a distancia para volver al menú de radio por internet. Explicación de los símbolos en la página de reproducción: This symbol indicates one station stored. Este símbolo indica una emisora guardada. This symbol indicates wired connection.
- Page 195 ⚫ Si dispone de una mala recepción de algunas emisoras (balbuceos) puede que desee enumerar solo las emisoras con buena fuerza de señal. Un signo de interrogación delante de una emisora de la lista indica que la emisora no está disponible actualmente.
- Page 196 forma que el volumen de sonidos suaves aumenta y el volumen de sonidos altos disminuye. Esto puede ser útil si está escuchando música con una gama dinámica alta en un entorno ruidoso (por ejemplo, música clásica mientras cocina). Para cambiar la configuración DRC para la radio, seleccione Menu (Menú) >...
- Page 197 INFORMACIÓN IMPORTANTE ACERCA DE LA RECEPCIÓN DE DAB+ La recepción de radio DAB+ es diferente de la FM. • En FM, a veces se puede recibir una señal débil, pero, probablemente, con crujidos o chasquidos. • La recepción de DAB+ funciona de forma digital, así que, si no hay suficiente señal, no se escucha nada.
- Page 198 Nota: Se puede configurar la búsqueda para buscar únicamente señales fuertes. Se pueden guardar y recordar las emisoras presintonizadas tal y como se describe en Presintonías. Información sobre lo que se está reproduciendo ahora Mientras se reproduce una emisora FM, la pantalla muestra uno de los dos siguientes conjuntos de datos.
- Page 199 Prune Invalid Recorte no válido This removes all invalid stations, continue? Esto elimina todas las emisoras no válidas; ¿continuar? Seleccione "YES (SÍ)" para eliminar todas las emisoras no válidas; seleccione "NO" para cancelarlo. Cuando se selecciona DRC, fíjelo en DRC alto, DRC bajo o DRC desconectado. Existen 3 niveles de compresión: DRC desconectado - sin compresión.
- Page 200 [No Radio Text] [Sin texto de radio] Explicación de los símbolos: This symbol indicates one station stored. Este símbolo indica una emisora guardada. This symbol indicates the logo. Este símbolo indica el logotipo. This symbol indicates the audio type. Este símbolo indica el tipo de audio. This symbol indicates the signal strength.
- Page 201 4. [Not set] 4. [No configurado] 5. [Not set] 5. [No configurado] Gire el dial NAVEGAR en la unidad o pulse el botón o el botón del mando a distancia para seleccionar la posición de presintonía / guardado; pulse el dial NAVEGAR o pulse el botón OK para confirmar la presintonización / guardado.
- Page 202 YES (SÍ) o NO. FM weak reception Recepción débil de FM Listen in Mono only? ¿Escuchar solo en mono? NOTA: Si la recepción es débil, extienda la antena telescópica o vuelva a ubicar la unidad para conseguir una mejor recepción. Modo de entrada Auxiliar: El modo de entrada auxiliar reproduce sonido desde una fuente externa, como un reproductor MP3.
- Page 203 Today’s Date: Fecha de hoy: DD.MM.YYYY DD.MM.AAAA Ajuste el volumen de la radio DIR-260/DIR-261 (y, si es necesario, el dispositivo Fuente de audio) según se requiera. Durante la reproducción, use el control de su dispositivo externo. Modo CD: En el menú principal, si se selecciona CD, aparecerá la siguiente página.
-
Page 204: Programación De Pistas
Bluetooth); esto pone la radio en modo descubrible. La pantalla muestra el nombre del Bluetooth de la radio (Lenco DIR-260/DIR-261). En su dispositivo inteligente Bluetooth, asegúrese de que el Bluetooth está conectado y busca dispositivos; seleccione la radio de la... - Page 205 Para cambiar a otro dispositivo Bluetooth emparejado En modo Bluetooth de la radio, seleccione Menu (Menú) > View details (Ver detalles) > Paired Device List (Lista de dispositivos emparejados) y después seleccione el dispositivo que requiera de la lista. Control desde la radio Mientras está...
- Page 206 Set sleep time Ajuste del temporizador de suspensión Sleep OFF Retardo desconectado Gire el dial NAVEGAR en la unidad o pulse el botón en el mando a distancia para configurarlo a 15, 30, 45, 60 MINUTOS. Cuando haya finalizado la configuración, aparecerá en pantalla el tiempo restante.
- Page 207 Alarm 1 Alarma 1 Enable: Off Activar: Desactivado Time: [00:00] Hora: [00:00] Mode: Internet radio Modo: Radio por internet Preset: Last listened Presintonizada: Última emisora escuchada Volume: 12 Volumen: 12 Save Guardar Seleccione “Enable (Habilitar)” para configurarlo en desconectado, diariamente, una vez, fines de semana o días laborables.
-
Page 208: Ajustes Del Sistema
Alarm OFF Alarma apagada Para cancelar la alarma completamente, introduzca la configuración de la alarma y desconéctela. Desaparecerá el icono de la alarma. AJUSTES DEL SISTEMA: Una vez que se ha completado la configuración del menú principal, entre en la configuración del Sistema y aparecerá... - Page 209 Network wizard Asistente de red PBC Wlan setup Configuración PBC Wlan View settings Ver configuración Wlan region Región Wlan Manual settings Configuración manual Network settings Configuración de red Wlan region Región Wlan Manual settings Configuración manual NetRemote PIN Setup Configuración del PIN remoto de red Network profile Perfil de red Keep network connected...
- Page 210 Time/Date Hora/Fecha Set Time/Date Fecha/Hora Auto update Actualización automática Set format Configurar formato Set timezone Configurar zona horaria Daylight savings Ahorro de luz diurna En el menú de configuración del sistema, si se selecciona Language (Idioma), seleccione uno para configurar el idioma de la interfaz. En el menú...
- Page 211 Si se selecciona Timeout (Parada), puede fijar la retroiluminación de la pantalla desde Timeout (Parada) a conectada, 10 segundos, 20 segundos, 30 segundos, 45 segundos, 60 segundos. 90 segundos, 120 segundos o 180 segundos. Si se selecciona On level (A nivel), puede fijar la retroiluminación de la pantalla de Nivel de encendido a High, Medium o Low (Alto, Medio o Bajo).
- Page 212 Mensajes de error Mensaje Descripción Ejemplo Se ha introducido la clave correcta, Se ha habilitado el filtro MC en Error al conectar pero el router rechaza la solicitud. el router. MP3 recibido pero se ha No se puede reconocer el formato descubierto que la ¡Error forma! del archivo - independiente de la...
-
Page 213: Solución De Problemas
Método de Cambie el método de encriptación en el router. encriptación DIR-260/DIR-261 es compatible con WEP. WPA y desconocido WPA2 Configure la red de forma manual en Menu Configuración de red (Menú) >... - Page 214 Mueva la radio de sitio para encontrar recepción. UNDOK ™ es la aplicación complementaria para su sistema de audio Lenco DIR-260/DIR-261. Con UNDOK puede controlar su dispositivo de audio Lenco DIR-260/DIR-261 a través de una conexión de red WiFi. Existe una versión para smartphones / tablets ANDROID y APPLE Ios y puede descargarse desde Google Play app store y Apple appstore.
- Page 215 Para conectar sus dispositivos de audio a la red correcta, consulte esta documentación para su dispositivo de audio o consulte la documentación de su smartphone/tablet. Cuando se conecta a la misma red WIFI, el dispositivo Lenco DIR-260/DIR-261 aparece en la lista de dispositivos de audio que se han encontrado. Seleccione Lenco DIR-260/DIR-261. Ahora puede comenzar a controlar el dispositivo con su aplicación UNDOK.
-
Page 216: Especificaciones Técnicas
Especificaciones técnicas Conexiones DC IN, 3,5mm AUX-IN, salida del auricular de 3,5mm Entrada del adaptador CA 100-240V ~ 50/60Hz Salida del adaptador 12V/2.5A Potencia de salida 2 x 10 W RMS Pilas del mando a distancia (no incluidas) 2 x AAA Frecuencia DAB 174,928 –... - Page 217 Garantía Lenco ofrece servicio y garantía en cumplimiento con las leyes de la Unión Europea, lo cual implica que, en caso de que su producto precise ser reparado (tanto durante como después del periodo de garantía), deberá...
- Page 218 UE. Se puede consultar la declaración de conformidad a través de techdoc@commaxxgroup.com Servicio Para obtener más información y soporte del departamento técnico, por favor, visite la página web www.lenco.com Commaxx B.V. Wiebachstraat 37, 6466 NG Kerkrade, Países Bajos.
- Page 219 Italiano DIR-260/DIR-261 ATTENZIONE: L'utilizzo di controlli o regolazioni o l'esecuzione di procedure diverse da quelle specificate può causare l'esposizione a radiazioni pericolose. PRECAUZIONI PRIMA DELL'USO CONSERVARE QUESTE ISTRUZIONI: Non coprire o bloccare le aperture di ventilazione. Quando si posiziona il dispositivo su uno scaffale, lasciare uno spazio libero di 5 cm (2") attorno all'intero perimetro.
- Page 220 non siano sotto supervisione o abbiano ricevuto istruzioni circa l'uso corretto del dispositivo da parte di chi è responsabile per la loro sicurezza. 19. Questo prodotto è destinato esclusivamente all'uso non professionale e non commerciale o industriale. 20. Assicurarsi che l'unità sia collocata in una posizione stabile. I danni causati dall'uso di questo prodotto in una posizione instabile, vibrazioni o urti o la mancata osservanza di qualsiasi altro avvertimento o precauzione indicati in questo manuale utente non saranno coperti da garanzia.
-
Page 221: Installazione
⚫ Non sottoporre le batterie a temperature estreme alte o basse, bassa pressione dell'aria ad alta quota durante l'uso, lo stoccaggio o il trasporto. ⚫ La sostituzione con una batteria di tipo errato può provocare un'esplosione o la perdita di liquidi o gas infiammabili. ⚫... - Page 222 Driver Pulsante Scansione/Riproduzione/Pausa Ricevitore telecomando Pulsante Espelli CD Passaggi CD 10. Pulsante Avanti Manopola Volume/Standby/Modalità 11. Manopola Arresto/OK/Accoppiamento/Navigazione Pulsante Menu 12. Display LCD (TFT 2.8’’) Pulsante Indietro/Precedente 13. Driver Pulsanti preimpostazione...
- Page 223 14. Tubo inverter 15. Antenna telescopica 16. Jack cuffie 17. Jack Aux 18. CC in jack (12V/2,5A) 19. Tubo inverter Pulsante Standby 12. Impostazioni equalizzatore Accensione/spegnimento altoparlante Pulsante cursore Su 3. Menu-Menu principale e informazioni Pulsante cursore sinistra 4. Preset-Stazioni salvate, Preferiti ecc. 15.
- Page 224 Riproduzione/Pausa 19. V+ Alza volume Vai avanti di una traccia 20. 0..9 Richiama preferiti/Memoria; immissione lettere e numeri Pulsante Arresta riproduzione 21. Prog per CD 11. Pulsante Modalità 22. Rip. per CD Installazione della batteria nel telecomando: Premere l'indicazione ‘open’ del coperchio della batteria e far scorrere verso il basso Installare due (2) batterie di dimensioni AAA nel vano batteria (verificare la corretta polarità) far scorrere indietro il coperchio della batteria...
- Page 225 Primo utilizzo Collegare l'adattatore alla presa a muro, il display apparirà come di seguito. Attendere circa 20 secondi, il display apparirà come di seguito. Ruotare la manopola NAVIGAZIONE sull'unità in senso antiorario o premere il pulsante di navigazione sul telecomando per evidenziare "SÌ", quindi premere la manopola OK sull'unità o premere il pulsante OK sul telecomando per continuare.
- Page 226 La pagina di aggiornamento di data e ora apparirà come di seguito. Aggiornamento automatico Auto update Aggiornamento da DAB Update from DAB Aggiornamento da FM Update from FM Aggiornamento da Rete Update from Network Nessun aggiornamento No update Spiegazione delle opzioni: Aggiornamento da DAB: L'ora e la data verranno sincronizzate da un segnale DAB Aggiornamento da FM: L'ora e la data verranno sincronizzate da un segnale FM Aggiornamento da Rete: L'ora verrà...
- Page 227 Risparmio di luce diurna Daylight savings ON (Attivo) OFF (Disattivo) Se è selezionato ‘Nessun aggiornamento’: Impostare la data e l'ora manualmente. Set Time/Date Impostazione Ora/Data Il numero del giorno lampeggerà, ruotare la manopola NAVIGAZIONE sull'unità o utilizzare i pulsanti di navigazione sul telecomando per impostare il giorno desiderato, quindi premere il pulsante "OK"...
- Page 228 Impostazioni di rete Network settings Scansione guidata della rete.- Network wizard Scanning.- SSID SSID ABC123 ABC123 XYZ 123 XYZ 123 [WPS] 123 [WPS] 123 [WPS] 456 [WPS] 456 [Rescan] [Rescan] [Wired] [Wired] [Manual config] [Manual config] Se, ad esempio, è selezionata la rete wireless ABC123, verrà visualizzata la pagina Chiave. Ruotare la manopola NAVIGAZIONE sull'unità...
- Page 229 Dopo aver completato la password corretta, selezionare OK sul display e premere il pulsante "OK" sul telecomando per continuare. Le pagine successive appariranno come di seguito. NOTA: È inoltre possibile utilizzare i pulsanti numerici sul telecomando per inserire la password WIFI. Impostazioni di rete Network settings Attendere Connessione._...
- Page 230 Push Button Push Button Skip WPS Skip WPS Se si seleziona "Push Button" (Pulsante a pressione), verrà visualizzata la pagina seguente. Premere il pulsante di connessione WPS sul router, quindi premere la manopola OK sull'unità o sul telecomando. Impostazione WPS WPS Setup Premere il pulsante WPS all'altra estremità...
- Page 231 Tasto: Key: BKSP BKSP CANCEL CANCEL Ruotare la manopola NAVIGAZIONE sull'unità o utilizzare il pulsante di navigazione sul telecomando per evidenziare il carattere necessario, premere il pulsante "OK" sull'unità o sul telecomando per passare al carattere successivo e ripetere quanto sopra per completare la password WIFI.
- Page 232 Selezionare la radio Internet dal menu principale o premere "mode" sul telecomando fino a selezionare la radio Internet. La radio Internet Lenco DIR-260/DIR-261 può riprodurre migliaia di stazioni radio e podcast da tutto il mondo attraverso una connessione Internet a banda larga. Quando si seleziona la modalità...
- Page 233 Sono disponibili i controlli locali comuni per il volume del suono, disattivazione dell’audio, riproduzione/pausa e Impostazione predefinita. Nota: Il menu dell'elenco delle stazioni viene fornito dal portale della radio Internet, quindi è accessibile solo quando la radio è connessa a Internet. Gli elenchi delle stazioni e i sottomenu cambieranno di volta in volta.
- Page 234 Cercare: Searching for: BKSP BKSP CANCEL CANCEL Seleziona una trasmissione dall'elenco. Stazioni Stations 0.11.FM 90s Country 0.11.FM 90s Country 0.11.FM Classic Country 0.11.FM Classic Country 0.11.FM Today’s Country 0.11.FM Today’s Country ON Country on Radio ON Country on Radio 1.FM - Absolute Country… 1.FM - Absolute Country…...
- Page 235 Scopi Consente di selezionare da un elenco di stazioni definite dalla loro origine (Paese), Genere (stile di musica) o lingua. Naviga tra le opzioni di categoria; una volta effettuata la selezione, una schermata conferma la categoria selezionata e il numero di stazioni all'interno di quella categoria.
- Page 236 (se non sono presenti ulteriori sottocategorie) vengono elencati i podcast disponibili per la categoria scelta. Ricerca Puoi anche cercare tra i podcast con determinate parole chiave nel titolo. Per eseguire la ricerca, selezionare Menu > Podcast list (Elenco Podcast) > Search (Cerca).
- Page 237 Memorizzazione di una stazione come preferita Stazione radio Internet che memorizza una preselezione: Durante la riproduzione, tenere premuto il pulsante "Preset" sull'unità o sul telecomando per memorizzare la stazione corrente come preferita. Apparirà la pagina seguente: Salva in Preset Save to Preset 1.
- Page 238 Premere il pulsante MENU sull'unità o premere il pulsante Menu sul telecomando per tornare al menu della radio Internet. Spiegazione dei simboli nella pagina di riproduzione: Questo simbolo indica una stazione This symbol indicates one station stored. memorizzata. Questo simbolo indica la connessione cablata. This symbol indicates wired connection.
- Page 239 ⚫ Se la ricezione di alcune stazioni è scarsa (gorgogliante), potresti voler elencare solo le stazioni con una buona potenza del segnale. Un punto interrogativo prima di una stazione in un elenco indica che la stazione non è attualmente disponibile. A seconda della causa della perdita del segnale, questa può essere solo temporanea.
- Page 240 Impostazioni Compressione intervallo dinamica (DRC) Alcune emittenti DAB offrono compressione intervallo dinamica (DRC). Questa funzionalità consente alla radio di comprimere l'intervallo dinamico della trasmissione audio in uscita, in modo che il volume dei suoni tranquilli è aumentato e il volume dei suoni forti è ridotto. Ciò può...
- Page 241 Ruotare la manopola NAVIGAZIONE sull'unità o utilizzare i pulsanti di navigazione sul telecomando per selezionare la posizione di preselezione / memorizzazione, premere la manopola OK sull'unità o premere il pulsante OK sul telecomando per confermare la preselezione / memorizzazione. Ripetere i passaggi precedenti per memorizzare/preimpostare fino a 10 stazioni. INFORMAZIONI IMPORTANTI RELATIVE ALLA RICEZIONE DAB+ La ricezione radio DAB+ è...
- Page 242 Selezione delle stazioni Per trovare una stazione, premere OK. Il display della frequenza inizia ad aumentare mentre la radio esegue la scansione della banda FM. In alternativa, è possibile eseguire la scansione verso l'alto o verso il basso tenendo premuti i pulsanti sinistro o destro o sintonizzarsi manualmente con pressioni rapide.
- Page 243 Elimina non valido Prune Invalid Ciò rimuove tutte le stazioni non valide, This removes all invalid stations, continue? continuare? SÌ Selezionare "YES (SI)" per rimuovere tutte le stazioni non valide, selezionare "NO" per annullare. Quando è selezionato DRC, impostarlo su DRC alto, DRC basso o DRC spento. Ci sono 3 livelli di compressione: DRC Off - nessuna compressione.
- Page 244 [Nessun testo radio] [No Radio Text] Spiegazione simbolo: Questo simbolo indica una stazione This symbol indicates one station stored. memorizzata. Questo simbolo indica il logo. This symbol indicates the logo. Questo simbolo indica il tipo di audio. This symbol indicates the audio type. Questo simbolo indica la potenza di segnale.
- Page 245 Ruotare la manopola NAVIGAZIONE sull'unità o premere il pulsante telecomando per selezionare la posizione di preselezione / memorizzazione, premere la manopola NAVIGAZIONE o premere il pulsante OK per confermare la memorizzazione / preselezione. Ripetere i passaggi precedenti per memorizzare/preimpostare fino a 10 stazioni. Richiamo stazione: Dopo aver completato la preimpostazione, premere il pulsante Preset per richiamare la stazione memorizzata, premere la manopola OK o il pulsante OK per ascoltare la stazione...
- Page 246 Se è selezionata l'impostazione Audio, verrà visualizzata la pagina seguente, ruotare la manopola NAVIGAZIONE sull'unità o premere il pulsante di navigazione sul telecomando per impostare su YES (Sì) o NO. Ricezione FM debole FM weak reception Ascoltare solo mono? Listen in Mono only? SÌ...
- Page 247 Ingresso ausiliario Auxiliary Input Audio In Audio In Data di oggi: Today’s Date: GG.MM.AAAA DD.MM.YYYY 4. Regolare il volume del DIR-260/DIR-261 (e, se necessario, il dispositivo sorgente audio) come richiesto. Durante la riproduzione, usa il controllo sul tuo dispositivo esterno.
- Page 248 Modalità CD: Nel Menu principale, se è selezionato CD, verrà visualizzata la pagina seguente. Premere il pulsante di espulsione sull'unità o sul telecomando per aprire lo sportello del CD. Inserire un disco CD nello scomparto del CD. Funzione Riproduzione/pausa Premere il pulsante OK sul dispositivo o il pulsante sul telecomando per avviare la riproduzione.
- Page 249 In modalità Bluetooth, sulla radio premere Menu > Setup Bluetooth (Configurazione Bluetooth), questo mette la radio in modalità rilevabile. Lo schermo mostra il nome Bluetooth della radio (Lenco DIR-260/DIR-261). Sul tuo dispositivo smart Bluetooth, assicurati che il Bluetooth sia acceso e cerca il dispositivo seleziona la radio dall'elenco dei dispositivi Bluetooth disponibili.
- Page 250 Dettagli connessione Bluetooth Per informazioni sullo stato corrente della connessione Bluetooth e dei dispositivi Bluetooth accoppiati, in modalità Bluetooth selezionare Menu > View details (Visualizza dettagli), il menu offre le seguenti opzioni: Informazioni Bluetooth: informazioni sullo stato corrente e sulla versione della connessione Bluetooth sulla radio Dispositivo connesso: dettagli del dispositivo Bluetooth attualmente connesso Elenco dispositivi accoppiati: elenco di un massimo di dieci dispositivi che sono stati...
- Page 251 Impostare il tempo di spegnimento Set sleep time 8 MIN 8 MINIS Ingresso ausiliario Auxiliary lnput Audio ln Audio ln Data di oggi: Today’s Date: GG.MM.AAAA DD.MM.YYYY Funzione Sveglia: Nel Menu principale, se è selezionato Sveglie, verrà visualizzata la pagina seguente. Sveglie Alarms Sveglia 1: Off [00:00]...
-
Page 252: Impostazioni Di Sistema
Ora: [00:00] Time: [00:00] Modalità: Radio Internet Mode: Internet radio Preimpostazione: Ultimo ascoltato Preset: Last listened Volume: 12 Volume: 12 Salva Save Seleziona "Enable (Abilita)" per impostarlo su Disattivato, Giornaliero, Una volta, Fine settimana o Giorni feriali. Selezionare "Time (Orario)", la cifra dell'ora lampeggerà, ruotare la manopola NAVIGAZIONE sull'unità... - Page 253 Impostazioni sistema System settings Rete Network Ora/Data Time/Date Lingua Language Ripristino di fabbrica Factory Reset Aggiornamento software Software update Impostazioni sistema System settings Aggiornamento software Software Update Configurazione guidata Setup wizard Info Info Retroilluminazione Backlight Multisala Multi-room Nel menu Impostazioni di sistema, se è selezionato Rete, la schermata apparirà come di seguito.
- Page 254 Regione Wlan Wlan region Impostazioni manuali Manual settings Configurazione NetRemote PIN NetRemote PIN Setup Profilo di rete Network profile Mantenere la rete connessa Keep network connected Quando è selezionata la procedura guidata di rete, l'unità eseguirà la scansione della rete wireless disponibile.
- Page 255 Impostazione Ora/Data Set Time/Date Aggiornamento automatico Auto update Imposta formato Set format Impostazione fuso orario Set timezone Risparmio di luce diurna Daylight savings Nel menu Impostazioni di sistema, se viene selezionato Language (Lingua), selezionarne una per impostare la lingua dell'interfaccia. Nel menu Impostazioni di sistema, se viene selezionato Factory Reset (Ripristino alle impostazioni di fabbrica), impostarlo su "YES"...
- Page 256 Messaggi di errore Messaggio Descrizione Esempio È stata inserita la chiave corretta, ma Filtraggio MAC abilitato sul Connessione fallita il router rifiuta la richiesta router Ho ricevuto MP3, ma ho Impossibile riconoscere il formato Errore durante la scoperto che lo streaming non del file - indipendentemente dalla formattazione era MP3 durante il tentativo di...
-
Page 257: Risoluzione Dei Problemi
(Visualizza impostazioni) e aggiungi all'elenco dei router. Il router limita l'accesso agli indirizzi Nota: DIR-260/DIR-261 ha indirizzi MAC separati MAC elencati per reti cablate e wireless; viene visualizzato solo l'indirizzo del metodo dell'adattatore di rete corrente, ma l'altro indirizzo può essere ottenuto... - Page 258 Spostare la radio in una posizione per trovare la ricezione. UNDOK™ è l'app complementare per il tuo sistema audio Lenco DIR-260/DIR-261. Con UNDOK puoi controllare il tuo dispositivo audio Lenco DIR-260/DIR-261 tramite una connessione di rete WiFi. Esiste una versione per smartphone / tablet ANDROID e APPLE Ios e può essere scaricata dall'app store di Google Play e dall'appstore di Apple.
- Page 259 Configurazione connessione di rete. Prima che UNDOK possa essere utilizzato per controllare il tuo Lenco DIR-260/DIR-261, devi prima assicurarti che il tuo dispositivo smart (smartphone, tablet) e Lenco DIR-260/DIR-261 siano collegati alla stessa rete WIFI. Per connettere i tuoi dispositivi audio alla rete appropriata, consulta questa documentazione per il tuo dispositivo audio o consulta la documentazione del tuo smartphone / tablet.
-
Page 260: Specifiche Tecniche
Specifiche Tecniche Connessioni CC, ingresso AUX da 3,5 mm, uscita cuffie da 3,5 Ingresso CA 100-240V ~ 50/60Hz Uscita 12V/2,5A Potenza di uscita 2 x 10W RMS Batterie nel telecomando (non incluse) Frequenza DAB 174.928 - 239.200 MHz Frequenza FM 87,5 - 108 MHz Frequenza Bluetooth: 2402 - 2480MHz... - Page 261 Garanzia Lenco offre assistenza e garanzia in conformità con la legge europea, il che significa che in caso di riparazioni (sia durante che dopo il periodo di garanzia) è necessario contattare il rivenditore locale.