Table of Contents
Advertisement
Quick Links
Instructions
Discussion attachments
For 2, 5, 9, 10 and 13 persons
This instruction manual is for Olympus discussion attachments.
To ensure safety, obtain optimum performance and to familiarize yourself fully with the use
of this product, we recommend that you study this manual thoroughly before operating this
product, and always keep this manual at hand when operating this product.
Optical microscope accessory
Retain this instruction manual in an easily accessible place near the work desk for future
reference.
For details of products included in the configuration of this system, see page 7 and 10 of this
instruction manual.
Advertisement
Table of Contents

Related Manuals for Olympus U-MDOB3


Summary of Contents for Olympus U-MDOB3
- Page 1 Discussion attachments For 2, 5, 9, 10 and 13 persons This instruction manual is for Olympus discussion attachments. To ensure safety, obtain optimum performance and to familiarize yourself fully with the use of this product, we recommend that you study this manual thoroughly before operating this product, and always keep this manual at hand when operating this product.
- Page 2 Refer to your local Olympus distributor in EU for return and/or collection systems available in your country. NOTE: This product has been tested and found to comply with the limits for a Class A digital device, pursuant to Part 15 of the FCC Rules.
-
Page 3: Table Of Contents
Contents Introduction ............................... 1 Safety precautions ............................2 Configuration of the discussion system and orientation of observed images ..5 2 Nomenclature of units and functions ................... 7 3 Operation ..............................11 3-1 Using the stray light prevention cover ..................11 3-2 Diopter adjustment ............................11 Diopter adjustment of main observer ........................ - Page 4 5-3 System for 9 persons..........................22 Attaching U-MDOB3 ................................22 Attaching the stand ..................................22 Attaching U-MDOSV .................................22 Attaching BX3-MDOE ................................23 Attaching the stand ..................................23 Attaching U-MDOSV .................................24 Attaching the observation tube .............................24 Attaching the eyepiece .................................25 Adjusting the stand height ..............................25 5-4 System for 10 persons ..........................
-
Page 5: Introduction
Introduction This system is a discussion attachment used together with the BX series microscope. Eyepieces, objectives or condensers, etc. used together with this system should be applied to UIS2 (or UIS) optical system series. Instruction manual This document is an instruction manual for discussion attachment. Read the instruction manual for microscope together with this instruction manual. -
Page 6: Safety Precautions
Also, take proper measures to fix the desks to avoid them from moving. CAUTION - Electric safety - Always use the power cord provided by Olympus. If the proper AC adapter and the power cord are not used, the electric safety and the EMC (Electro-Magnetic Compatibility) performance of the product cannot be assured. - Page 7 CAUTION - Safety symbols - The following symbols are placed on this product. Study the meaning of the symbols and always use the product in the safest possible manner. Symbols Meaning Supply DC current (from the provided AC adapter). Indicates an input jack. Indicates a pointer.
- Page 8 (OFF), wait until the lamp housing is cooled down sufficiently, and keep it covered with a dust cover during storage. 4. When disposing of this product, follow the regulations and rules of your local government. Contact Olympus for any questions.
-
Page 9: Configuration Of The Discussion System And Orientation Of Observed Images
Configuration of the discussion system and orientation of observed images The following illustration shows the top view of the discussion system. expresses the orientation of the line of sight of the observer. expresses the orientation of the image observed through each eyepieces. If the observation tubes are not attached in the orientation as shown in the illustration, the orientation of the image rotates. - Page 10 System for 10 persons Assistant Assistant observer observer Assistant Assistant observer observer Main observer System for 13 persons Assistant Assistant Assistant Assistant observer observer observer observer Assistant Assistant Assistant Assistant observer observer observer observer Main observer...
-
Page 11: Nomenclature Of Units And Functions
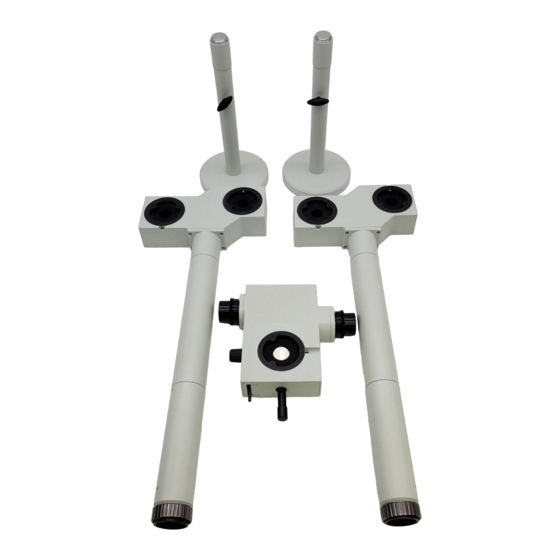
Nomenclature of units and functions Face to face observation system for 2 persons Pointer control lever for assistant observer (page 13) Pointer control lever (page 13) U-DO3 Tube mount AC adapter Pointer color switching lever (page 13) input connector Up: Red. Middle: Shielded. Down: Green. Pointer brightness control knob (page 13) OFF/Continuously variable Tube mount... - Page 12 OFF/Continuously variable System for 5 persons Tube mount AC adapter (common with the face to face observation system for 2 persons) Tube mount U-MDOSV U-MDOB3 Tube mount Stand height lock knob (page 19) AC adapter input connector input connector U-MDOSV...
- Page 13 U-MDOSV Tube mount BX3-MDOE Tube mount Tube mount Tube mount Tube mount Tube mount BX3-MDOE U-MDOB3 U-MDOSV U-MDOSV U-MDOSV Stand height lock knob (page 19) AC adapter Pointer control lever (page 13) input connector input connector Pointer color switching lever (page 13) Pointer brightness control knob (page 13) Up: Red.
- Page 14 Tube mount BX3-MDOE Tube mount Tube mount Tube mount Tube mount Tube mount U-MDOSV BX3-MDOE BX3-MDOE U-MDOB3 U-MDOB3 Tube mount Tube mount U-MDOSV U-MDOSV U-MDOSV Stand height lock knob (page 19) Tube mount AC adapter Pointer control lever (page 13)
-
Page 15: Operation
Operation 3-1 Using the stray light prevention cover Cover the eyepieces a which are not used by the assistant observers with the provided stray light prevention covers b . 3-2 Diopter adjustment Diopter adjustment of main observer When the eyepiece is equipped with the eyepiece micrometer While looking through the eyepiece equipped with the eyepiece micrometer, rotate the diopter adjustment ring b to adjust so that the scales or lines of the eyepiece micrometer in the field of view are... -
Page 16: Diopter Adjustment Of Assistant Observer
When the eyepiece is not equipped with the eyepiece micrometer Rotate the pointer brightness control knob c of the discussion attachment in the clockwise direction to turn ON the pointer ( ). Set the pointer color switching lever d to the Down position (G). At this time, if the pointer cannot be observed in the field of view, move the pointer to the center of the field of view using the pointer control lever e . -
Page 17: Pointer Operation
3-3 Pointer operation Adjusting the pointer brightness The brightness adjustment range for the pointer of this product is set to support a dark specimen (e.g. specimen for fluorescence observation). For this reason, when observing a bright specimen (e.g. specimen for brightfield observation), you may feel it difficult to identify the pointer unless rotating the brightness control knob to the maximum, but this is not a failure of this product. -
Page 18: Notes For Image Acquisition
3-4 Notes for image acquisition This section describes special considerations for image acquisition in combination with discussion attachments. · When combining the camera, attach the trinocular tube at the main observer position and attach the camera via camera adapter. · If the pointer is in the metering area, the exposure during image acquisition may be affected. -
Page 19: Specifications
Specifications Item Specification Maximum number of 2 persons (face to face observation), 2 persons (side by side observation), 5 persons, 9 persons , 10 observers persons and 13 persons. Magnification of observation tube Orientation of observed When using the same type of observation tube, orientations of images observed by all observers image are identical. -
Page 20: Assembly
Assembly In order to deliver our intended performance, we recommend you to request Olympus to assemble the system. Place each unit of the discussion system according to "1 Configuration of the discussion system and orientation of observed images" (page 5). -
Page 21: Side By Side Observation System For 2 Persons And System For 5 Persons
5-2 Side by side observation system for 2 persons and system for 5 persons Attaching the observation attachment body Loosen the clamping screw a of the standard arm (BX3-ARM) of the microscope until the clamping screw is not viewable from above (i.e. until there is no protrusion when touched with fingers). -
Page 22: Attaching The Stand
Attaching the stand Place the side viewer on the desk upside down and screw the b portion of the stand into the mount screw hole a of the side viewer. Loosen the stand height lock knob c . Rotate the portion shown in the picture and place one of three rubber legs attached to the back side of the base of the stand so that it is parallel to the tube of the side... -
Page 23: Attaching The Side Viewer
Attaching the side viewer Remove the cap on the observation attachment body a and the cap from the mount b on the side viewer. Return the vertical direction of the side viewer where the stand is attached to the original direction. Insert b of the side viewer into the observation attachment body a completely to the end. -
Page 24: Attaching The Eyepiece
Attach the observation tube g for the assistant observer to the tube mount f on the side viewer, and tighten the clamping screw h to secure the observation tube. Attach the observation tube so that the side surface i of the side viewer is parallel to the side surface j of the observation tube. -
Page 25: Adjusting The Stand Height
Adjusting the stand height Adjustment order Adjust the stand height in the following order. Assistant observer Assistant observer Main observer Look through the eyepieces at the main observer position display the pointer using the pointer color switching lever a . Use the pointer control lever b to move the pointer to the center of the field of view. -
Page 26: System For 9 Persons
BX3-MDOE U-MDOSV U-MDOSV U-MDOSV Attaching U-MDOB3 See "Attaching the observation attachment body" in "5-2 Side by side observation system for 2 persons and system for 5 persons" (page 17). Attaching the stand See "Attaching the stand" in "5-2 Side by side observation system for 2 persons and system for 5 persons"... -
Page 27: Attaching Bx3-Mdoe
Attaching BX3-MDOE Attach BX3-MDOE b to the tube mount a on U-MDOSV. Tighten the clamping screw c to secure BX3-MDOE to U-MDOSV. Attach BX3-MDOE so that the clamping screw c of U-MDOSV and the clamping screw d of BX3-MDOE are aligned in one line perpendicularly. -
Page 28: Attaching U-Mdosv
Move the portion shown in the picture up and down so that the d portion of the stand is 71 mm, and tighten the stand height lock knob e . If there is a difference in height between the desk top surface where the microscope frame is installed and the desk top surface where U-MDOSV is installed, adjust the length of the d portion of the stand. -
Page 29: Attaching The Eyepiece
Attaching the eyepiece See "Attaching the eyepiece" in "5-2 Side by side observation system for 2 persons and system for 5 persons" (page 20). Adjusting the stand height Adjustment order Adjust the stand height in the following order. For adjusting procedures, see "Adjusting the stand height" in "5-2 Side by side observation system for 2 persons and system for 5 persons"... -
Page 30: System For 10 Persons
5-4 System for 10 persons The large desk (1250 to 1400(W) x 1100 to 1250(D) mm) is required for assembling and operating this system. Prepare the sufficient installation space. Attaching the stand Height of the a portion of the stand The height of the a portion of the stand to be adjusted after screwing the stand into U-MDO10R3 is 21 mm. -
Page 31: Attaching The Light Path Split Unit
Attaching the light path split unit Attach the light path split unit a provided with U-MDO10R-3 to the top of U-MDO10R-3 (at assistant observer position), and tighten the clamping screw b to secure the light path split unit. Attach the light path split unit a so that the clamping screw b of U-MDO10R-3 and the clamping screw c of the light path split unit are aligned in one line perpendicularly. -
Page 32: Attaching The Observation Tube
Attaching the observation tube See "Attaching the observation tube" in "5-2 Side by side observation system for 2 persons and system for 5 persons" (page 19). Attaching the eyepiece See "Attaching the eyepiece" in "5-2 Side by side observation system for 2 persons and system for 5 persons" (page 20). Adjusting the stand height Adjustment order Adjust the stand height in the following order. -
Page 33: Extending To The System For 13 Persons
For assembling procedures, see "5-2 Side by side observation system for 2 persons and system for 5 persons" (page 17) and "5-3 System for 9 persons" (page 22). Concerning the stands assembled (gray) areas in the following diagram, adjust the stand height written below. U-MDOSV BX3-MDOE BX3-MDOE U-MDOB3 BX3-MDOE BX3-MDOE U-MDOSV U-MDOSV U-MDOSV U-MDOSV... -
Page 34: Attaching Other Units
Connecting the AC adapter · Always use the AC adapter and power cord provided by CAUTION Olympus. If the proper AC adapter and the power cord are not used, the electric safety and the EMC (Electro- Magnetic Compatibility) performance of the product cannot be assured. -
Page 35: Attaching The Cord Stopper
Connect the power cord’s plug e to the power outlet f on the wall. Attaching the cord stopper To prevent the AC adapter cord a from getting in the way of microscope operation and from contacting the lamp housing, peel off the backing paper from the stickers of the provided cord stopper b (2 pcs.) and attach them. -
Page 36: Proper Selection Of The Power Supply Cord
If no power supply cord is provided, please select the proper power supply cord for the equipment by referring to “Specifications” and “Certified Cord” below: Caution : In case you use a non-approved power supply cord for Olympus products, Olympus can no longer warrant the electrical safety of the equipment. - Page 37 Table 2 HAR flexible cord Approval organizations and cordage harmonization marking methods Alternative marking utilizing Printed or embossed black-red-yellow thread (Length harmonization marking (May be of color section in mm) Approval organization located on jacket or insulation of internal wiring) Black Yellow Comite Electrotechnique Belge...
- Page 38 MEMO...
- Page 40 Manufactured by Shinjuku Monolith, 2-3-1 Nishi-Shinjuku, Shinjuku-ku, Tokyo 163-0914, Japan Distributed by 48 Woerd Avenue Waltham, MA 02453, U.S.A. 8F Olympus Tower, 446 Bongeunsa-ro, Gangnam-gu, Seoul, 06153 Korea AX9884 13...