Table of Contents
Advertisement
Quick Links
Advertisement
Table of Contents

Related Manuals for KitchenAid 5KFP1335ECU0


Summary of Contents for KitchenAid 5KFP1335ECU0
- Page 1 5KFP1335 5KFP1325...
- Page 3 English ................5 Deutsch ................35 Français ................65 Italiano ................95 Nederlands ..............125 Español ................155 Português ............... 185 Ελληνικά ................. 215 Svenska ................245 Norsk ................275 Suomi ................305 Dansk ................335 Íslenska ................365 Русский ................395 Polski ................
-
Page 5: Table Of Contents
FOOD PROCESSOR INSTRUCTIONS TABLE OF CONTENTS FOOD PROCESSOR SAFETY Important safeguards ....................6 Electrical requirements ..................... 8 Electrical equipment waste disposal ................8 PARTS AND FEATURES Parts and accessories ....................9 Important food processor features ................. 10 ACCESSORIES Included accessories ....................11 Disc assembly overview .................. -
Page 6: Food Processor Safety
FOOD PROCESSOR SAFETY IMPORTANT SAFEGUARDS When using electrical appliances, basic safety precautions should always be followed, including the following: 1. Read all instructions. Misuse of appliance may result in personal injury. 2. To protect against risk of electrical shock, do not put Food Processor in water or other liquid. - Page 7 8. The use of attachments not recommended or sold by KitchenAid may cause fire, electric shock, or injury. 9. Do not use outdoors. 10. Do not let cord hang over edge of table or counter.
-
Page 8: Electrical Requirements
FOOD PROCESSOR SAFETY 17. This appliance is intended to be used in household and similar applications such as: - staff kitchen areas in shops, offices or other working environments. - farm houses. - by clients in hotels, motels and other residential type environments. -
Page 9: Parts And Features
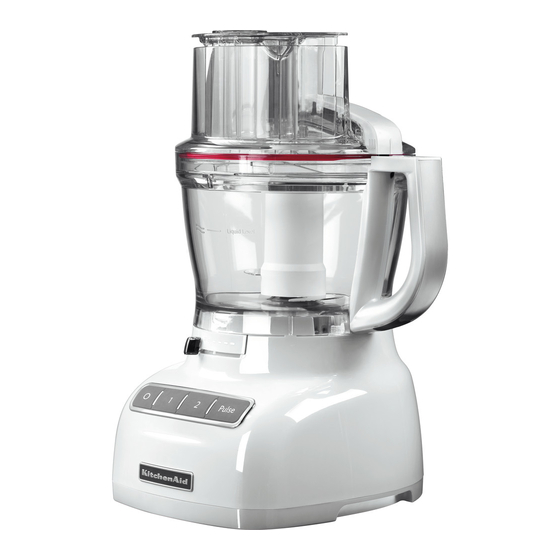
PARTS AND FEATURES Parts and accessories 3-Piece food Work bowl cover pusher with 3-in-1 feed tube Accessory case* 3.1 L (13-cup) work bowl Externally adjustable slicing control Base 950 mL (4-cup) Mini-bowl* and mini-blade* Egg whip* Externally adjustable slicing Reversible (2 mm and 4 mm) disc (thin to thick) shredding disc Dough blade*... -
Page 10: Important Food Processor Features
PARTS AND FEATURES Important Food Processor features Externally adjustable slicing control 3-Piece food pusher KitchenAid’s exclusive externally adjustable Three pushers are nested inside of each slicing disc allows you to adjust slicing other. Remove the medium pusher from thickness from thin to thick, without having the large pusher to reveal a medium-size to remove the blade assembly. -
Page 11: Accessories Included Accessories
ACCESSORIES Included accessories 3.1 L (13-Cup) Work bowl Disc adapter The durable, large work bowl provides Adapter fits over the drive adapter and capacity for large jobs. into the bottom of the shredding disc. 950 mL (4-Cup) Mini-bowl* Stainless steel multipurpose blade and mini-blade* Versatile blade chops, minces, blends, mixes, Mini-bowl and stainless steel mini-blade are and emulsifies in a matter of seconds. -
Page 12: Disc Assembly Overview
ACCESSORIES Disc assembly overview There are two different disc adapters included with the food processor. One is used exclusively with the adjustable slicing disc. The other is used with the Reversible Shredding Disc and all other optional discs. Adjustable Reversible slicing disc shredding disc Drive Slicing adapter adapter Disc Drive adapter adapter Properly assembled... -
Page 13: Accessories Selection Guide
ACCESSORIES Accessories selection guide Action Setting Food Accessory Cheese Multipurpose stainless steel blade Chocolate Fruit Fresh Herbs Nuts Mince Chop Puree Tofu Vegetables Mini-bowl* and mini multipurpose Meat Stainless steel blade* Pasta Sauce Pesto Salsa Sauces Cake Batter Pie Dough Fruit (soft) Adjustable slicing disc Potatoes Tomatoes... -
Page 14: Preparing The Food Processor For First Use
PREPARING THE FOOD PROCESSOR FOR FIRST USE Before first use Before using your Food Processor for the first time, wash the work bowl, work bowl cover, mini-bowl*, feed tube pushers, discs, and blades either by hand or in the dishwasher (see “Cleaning the Food Processor”). Removing the work bowl cover from the work bowl Your Food Processor is shipped with the work bowl cover installed on the work bowl, with the mini-bowl* inside the work bowl. To remove the work bowl cover from the work bowl for initial cleaning: Grasp the feed tube on the work bowl Lift out the mini-bowl*. -
Page 15: Setting Up Your Food Processor
SETTING UP YOUR FOOD PROCESSOR Attaching the work bowl NOTE: Select the accessory you would like to use and install it according to the instructions on the following pages. Power Shaft Place the Food Processor on a dry, level Place the work bowl on the base, countertop with the controls facing aligning the raised portion with the forward. Do not plug in the Food indentation on the base. The center Processor until it is completely assembled. -
Page 16: Attaching The Work Bowl Cover
SETTING UP YOUR FOOD PROCESSOR Attaching the work bowl cover NOTE: Your Food Processor will not operate unless the work bowl and work bowl cover are properly locked on the base, and the large pusher is inserted to the maximum fill line on the feed tube (approximately halfway down). Food pusher Place the work bowl cover on the Fit the food pusher into the 3-in-1 work bowl with the feed tube just to feed tube. See “Using the 3-in-1... -
Page 17: Installing The Adjustable Slicing Disc
SETTING UP YOUR FOOD PROCESSOR Installing the adjustable slicing disc IMPORTANT: The adjustable slicing disc can only be installed in one direction. With the work bowl installed, place Holding the adjustable slicing disc by the drive adapter on the power shaft the 2 finger grips, align the pins onto of the base. the adjustable slicing disc adapter into the L-slots on the disc. Slide the disc down onto the adapter and turn to... -
Page 18: Adjusting The Slicing Thickness
SETTING UP YOUR FOOD PROCESSOR Adjusting the slicing thickness NOTE: The lever only works with the adjustable slicing disc. Changing thickness settings with other discs or blades installed will have no effect on operation. Thinner Thicker Set the desired slicing thickness by moving the lever to the left for thinner slices or to the right for thicker slices. -
Page 19: Installing The Shredding Disc
SETTING UP YOUR FOOD PROCESSOR Installing the shredding disc IMPORTANT: When using the reversible shredding disc, have the desired side (medium/fine) facing UP . Holding the disc by the 2 finger grips, Slide the drive adapter into the disc insert the disc adapter into the hole in adapter as far as it will go, until it the bottom of the disc. clicks into place. With the work bowl installed, slide the Install the work bowl cover, being sure drive adapter onto the power shaft. it locks into place. TIP: You may need to turn the disc/drive adapter until it drops down into place. -
Page 20: Installing The Multipurpose Blade Or Dough Blade
SETTING UP YOUR FOOD PROCESSOR Installing the multipurpose blade or dough blade* Place the blade on the power shaft. Push to lock. Press down firmly on the Rotate the blade so it falls into place multipurpose blade until it is down as on the power shaft. far as it will go. The multipurpose blade features an internal seal that fits tightly over the center of the work bowl. -
Page 21: Installing The Mini-Bowl* And Mini-Blade
SETTING UP YOUR FOOD PROCESSOR Installing the mini-bowl* and mini-blade* Place the mini-bowl inside the work Insert the drive adapter into the bowl over the power shaft. Rotate the mini-blade, and place on the power mini-bowl until the tabs on the top shaft. It may be necessary to rotate the edge of the bowl drops into the indents blade until it falls into place. -
Page 22: Installing The Egg Whip
SETTING UP YOUR FOOD PROCESSOR Installing the egg whip* IMPORTANT: The egg whip can only be used with the work bowl. Be sure the egg whip is properly With the work bowl in place on the assembled. If the two pieces have been base, place the egg whip on the power disassembled for cleaning, align the pin shaft. -
Page 23: Using The 3-In-1 Feed Tube
SETTING UP YOUR FOOD PROCESSOR Using the 3-in-1 feed tube The 3-in-1 feed tube features a 3-piece food pusher. Use the entire food pusher to process large items, or use the inner portions to create medium-sized or small feed tubes to process smaller items. To slice or shred small items, insert the 3-piece food pusher into the feed tube, then lift out the small pusher to remove. Use the small feed tube and pusher to process small or slender items, like single carrots or celery stalks. When not using the small feed tube,... -
Page 24: Using Your Food Processor Before Use
USING YOUR FOOD PROCESSOR Before use Before operating the Food Processor, be sure the work bowl, blades, and work bowl cover are properly assembled on the Food Processor base (see “Setting Up Your Food Processor”). This line on the work bowl indicates the maximum level of liquid that can be processed by the Food Processor. -
Page 25: Using The Speed1/Speed 2 Control
USING YOUR FOOD PROCESSOR Using the speed 1/speed 2 control IMPORTANT: Wait until the blade or disc comes to a complete stop before removing the work bowl cover. Be sure to turn off the Food Processor before removing the work bowl cover, or before unplugging the Food Processor. -
Page 26: Removing Processed Foods
USING YOUR FOOD PROCESSOR Removing processed foods Press the O (OFF) button. Unplug the Turn the work bowl cover to the Food Processor before disassembling. left and remove. If using a disc, remove it before If using the mini-bowl*, grasp and removing the bowl. Holding the remove the bowl using the finger grips disc by the 2 finger grips, lift it located along the top edge of the bowl. straight up. -
Page 27: Care And Cleaning
USING YOUR FOOD PROCESSOR Turn the work bowl to the left to The multipurpose blade can be removed unlock it from the base. Lift to remove. from the work bowl before the contents are emptied. You may also leave the blade locked in place. -
Page 28: Tips For Great Results
TIPS FOR GREAT RESULTS Using the multipurpose blade To chop fresh fruits To chop nuts or make nut butters: or vegetables: Process up to 710 mL (3 cups) of nuts to Peel, core, and/or remove desired texture, using short pulses, 1 to 2 seeds. Cut food in 1 to seconds each time. For a coarser texture, 2.5-4 cm (1 -inch) pieces. -
Page 29: Using A Slicing Or Shredding Disc
TIPS FOR GREAT RESULTS Using a slicing or shredding disc To slice or shred fruits To slice uncooked meat or poultry, or vegetables that are such as stir-fry meats: long and relatively small Cut or roll food to fit feed tube. Wrap in diameter, such as celery, carrots, and and freeze food until hard to the touch, 30 bananas: minutes to 2 hours, depending on thickness... -
Page 30: Using The Dough Blade
TIPS FOR GREAT RESULTS Using the dough blade* The dough blade is specially quickly and thoroughly. For the best results, designed for mixing and do not knead recipes which use more than kneading yeast dough 350 g (3 cups) of flour. Helpful hints • To avoid damage to the blade or motor, do • To capitalize on the speed of the not process food that is so hard or firmly processor, drop ingredients to be chopped frozen that it cannot be pierced with the... - Page 31 TIPS FOR GREAT RESULTS • When preparing a cake or cookie batter, • Use a spatula to remove ingredients from use the multipurpose blade to cream the work bowl. fat and sugar first. Add dry ingredients last. Place nuts and fruit on top of flour mixture to prevent overchopping. Process nuts and fruits, using short pulses, until blended with other ingredients. Do not overprocess. • When shredded or sliced food piles up on one side of the bowl, stop the processor and redistribute the food using a spatula.
-
Page 32: Troubleshooting
TROUBLESHOOTING If your Food Processor should malfunction or fail to operate, check the following: Food Processor doesn’t run: Food Processor not shredding or slicing properly: • Make sure that the bowl and lid are • Make sure the raised-blade side of the properly aligned and locked in place and the large food pusher is inserted in the disc is positioned face up on the common... -
Page 33: Warranty And Service
Service Center. misuse, abuse, or installation/ Warranty from operation not in accordance date of purchase. with local electrical codes. KITCHENAID DOES NOT ASSUME ANY RESPONSIBILITY FOR INDIRECT DAMAGES. Customer service In U.K. and Ireland: For any questions, or to find the nearest KitchenAid Authorized Service Center, please find our contact details below. NOTE: All service should be handled locally by an Authorized KitchenAid Service Center. - Page 34 © 2014. All rights reserved. Specifications subject to change without notice. W10505785C...