
Related Manuals for Orbit 57865


Summary of Contents for Orbit 57865
- Page 1 Battery Operated SPRINKLER TIMER No external power source needed Ideal for remote locations and drip irrigation Full waterproof construction Easy-Set Logic™ Programming MODEL 57865 PN 57865-24 rA...
- Page 2 Orbit Irrigation Products, Inc. ® North Salt Lake, UT 84054 www.orbitonline.com 1-800-488-6156 Help: Before returning this sprinkler timer to the store, contact Orbit Technical ® Service at: 1-800-488-6156. Listings: The sprinkler timer complies with UL-1951. Appropriate international models are CE approved.
-
Page 3: Table Of Contents
TABLE OF CONTENTS Buttons, Dial and Display ....................2 Install Batteries .......................4 Programming your Timer ....................5 Additional Features ......................6 Connecting the Timer ......................8 Glossary of Terms ......................9 Troubleshooting ......................10... -
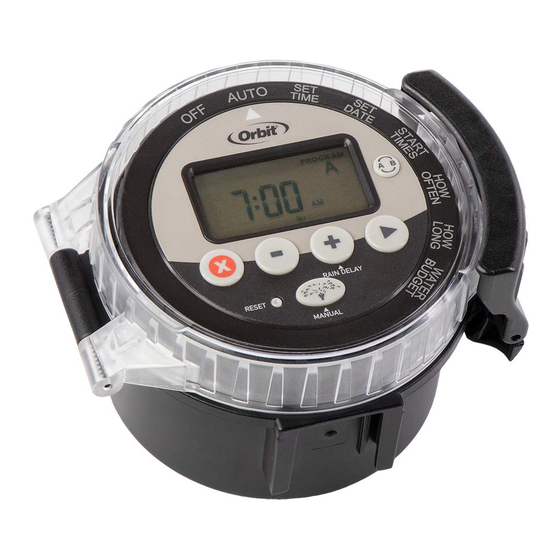
Page 4: Buttons, Dial And Display
BUTTONS, DIAL AND DISPLAY Buttons A Toggle between Programs A and B B Clear settings or cancel events C Decrease value D Increase value, select HOW OFTEN setting or access RAIN DELAY mode E Move cursor or toggle AM/PM F Access MANUAL WATERING mode G Reset all timer settings... - Page 5 Dial Display All timer functions are OFF AUTO Timer is set for automatic operation and will only water in this dial position 1 Shows current station while SET TIME programming or watering Set the time of day 2 Shows current start time while SET DATE programming Set the year, month and day...
-
Page 6: Install Batteries
INSTALL BATTERIES Step 1 Step 1 Step 2 Remove cap Step 2 Separate program pod from base Step 3 Step 3 Step 4 Insert 3 AA batteries as indicated in the battery compartment Step 4 Return program pod to base Note: During battery changes, programming will be preserved for 30 seconds. -
Page 7: Programming Your Timer
PROGRAMMING YOUR TIMER Step 1 Step 4–Start Times Turn the dial to START TIMES. Press reset button. Press to select the desired program. Step 2–Set Time NOTE: Use program B only if you want Turn the dial to SET TIME. to schedule watering independent of Program A. - Page 8 PROGRAMMING YOUR TIMER Step 7–Auto Press to select the desired days to Turn the dial to AUTO. water: select either days of the week, interval (every 1 to 32 days), or odd/even The set program(s) will run automatically. days. Manual Watering Press to highlight your option(s).
-
Page 9: Additional Features
ADDITIONAL FEATURES Press to reset the value to 100%. Turn dial to OFF. NOTE: The % symbol will show on the No watering may occur while in the OFF screen when the value for A or B is position. anything other than 100%. Water Budget Rain Delay Turn dial to WATER BUDGET. -
Page 10: Connecting The Timer
CONNECTING THE TIMER Connect the timer to the valve after you 4. Attach timer to timer clip. have programmed it. This timer will only 5. Rotate dial to OFF. Wait 60 seconds to operate with DC solenoids that have been allow the timer to close all valves. -
Page 11: Glossary Of Terms
GLOSSARY OF TERMS Timer- A device that is responsible for start time will be “stacked” or delayed, and turning an automatic watering system on will start upon completion of the previous and off. program. Cycle Start Time- The time the program Station (Watering Station)- An area where begins watering the first station. -
Page 12: Troubleshooting
TROUBLESHOOTING One or more stations do not turn on: in valve or solenoid. 4. Replace valve diaphragm. 1. Make sure programming is correct. 5. Replace solenoid. 2. Make sure programming is not in OFF or Rain Delay mode. All stations do not turn on: 3.