
Related Manuals for Viper ROS1300


Summary of Contents for Viper ROS1300
- Page 1 ROS1300 INSTRUCTION FOR USE Model No.: 50000605 55940533 / Rev. A / JUNE 2021 Original instructions...
- Page 3 CA11 9BQ UK Hereby declare under our sole responsibility that the Product: FC - Floor Scrubber/Sweeper - Battery Description: Charging mode: 220-240V 50-60Hz; Working mode: 24V DC, IP24 Type: ROS1300 Is in compliance with the following standards: EN 60335-1:2012+A11:2014+A13:2017 EN 60335-2-72:2012...
-
Page 4: Table Of Contents
INSTRUCTION FOR USE ENGLISH TABLE OF CONTENTS INTRODUCTION ............................2 GUIDE PURPOSE AND CONTENTS .............................2 HOW TO KEEP THIS INSTRUCTION FOR USE ..........................2 DECLARATION OF CONFORMITY .............................2 ACCESSORIES AND MAINTENANCE ............................2 CHANGE AND IMPROVEMENT..............................2 SCOPE OF APPLICATION ................................2 MACHINE IDENTIFICATION DATA ............................2 TRANSPORT AND UNPACKING ..............................3 SAFETY ................................ -
Page 5: Introduction
INSTRUCTION FOR USE ENGLISH INTRODUCTION NOTE The numbers in brackets refer to the components shown in Machine Description chapter. GUIDE PURPOSE AND CONTENTS The purpose of this instruction for use is to provide the operator with all basic information and technical characteristics, operation, machine inactivity, spare parts, and safety conditions etc. -
Page 6: Transport And Unpacking
INSTRUCTION FOR USE ENGLISH TRANSPORT AND UNPACKING When the carrier delivers the machine, make sure the packaging and machine are both whole and undamaged. If any damage is observed, inform the carrier of the damage before accepting the goods, to reserve the right to compensation for the damage. Follow the instructions on packing strictly when unpacking the machine. -
Page 7: General Safety Instruction
INSTRUCTION FOR USE ENGLISH GENERAL SAFETY INSTRUCTION Specific warnings and cautions to inform about potential damages to people and machine are shown below. DANGER! • This machine must be operated by trained and authorized personnel according to guidance of the manual. •... - Page 8 INSTRUCTION FOR USE ENGLISH • If spare parts need be replaced, order ORIGINAL spare parts from an Authorized Dealers or Retailers. • Return the machine to the Service Center if it doesn’t work as usual or is damaged. • To ensure machine proper and safe operation, the scheduled maintenance shown in the relevant chapter of this manual, must be performed by the authorized personnel or an authorized Dealer or Retailer.
-
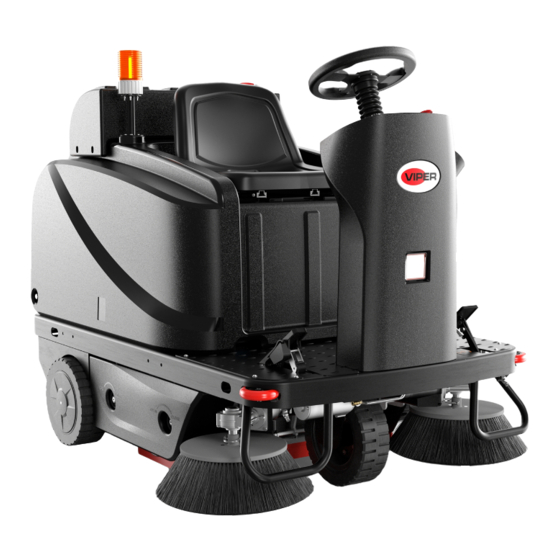
Page 9: Machine Description
INSTRUCTION FOR USE ENGLISH MACHINE DESCRIPTION MACHINE STRUCTURE Tank cover Solution tank (*) Turn indicator Air outlet bracket Filter compartment cover Knurled knob Hopper Latch Hopper rear wheel Steering wheel Solution tank USB charging port Phone bag Accelerator pedal Machine lift anchor Chassis Right cover Side blade... - Page 10 INSTRUCTION FOR USE ENGLISH On-board charger (*) Main broom adjuster Hood support cable Circuit breaker box Battery connector Battery (*) Battery tray Main broom Figure 3...
-
Page 11: Control Panel
INSTRUCTION FOR USE ENGLISH CONTROL PANEL Multifunction display Items displayed: A) Pump/Vacuum motor/Side-broom separate running mode 0000.H 0000.H stop B) One-button start mode OFF. C) Safety stop mode (seat safety switch off) D) Reverse mode E) Braking/parking mode 0000.H 0000.H F) Battery charging mode G) Pump working H) Vacuum motor working... -
Page 12: Working Mode Description
INSTRUCTION FOR USE ENGLISH WORKING MODE DESCRIPTION HOW TO OPERATE DISPLAY DESCRIPTION Standby mode 1. The point in the hour meter does – Key (56) on not flash. – Seat safety switch (23) on 2. LCD only displays battery type, –... -
Page 13: Accessories
INSTRUCTION FOR USE ENGLISH HOW TO OPERATE DISPLAY DESCRIPTION Braking/parking mode Machine stops moving. Other – Key (56) on functions remain in their original – Seat safety switch (23) on state. – Mechanical parking brake (35) pressed Safety stop mode 1. -
Page 14: Technical Data
INSTRUCTION FOR USE ENGLISH TECHNICAL DATA Parameter Value Machine length 1,680 mm /66.1 Inches Machine width (without side brooms) 1,055 mm /41.5 Inches Machine maximum height 1,300 mm /51.2 Inches Cleaning width (without side brooms) 700 mm /27.6 Inches Cleaning width (with two side brooms) 1,350 mm /53.1 Inches Minimum distance from the floor (blades not included) 60 mm/2.4 Inches... -
Page 15: Wiring Diagram
INSTRUCTION FOR USE ENGLISH WIRING DIAGRAM CAN-H CAN-L... -
Page 16: Operating Guide
INSTRUCTION FOR USE ENGLISH OPERATING GUIDE WARNING! On some points of the machine there are some labels indicating: – DANGER! – WARNING! – CAUTION! – CONSULTATION While reading this Manual, the operator must pay attention to the symbols shown on the labels. Do not cover these labels for any reason and immediately replace them if damaged. -
Page 17: Battery Installation And Battery Type Setting (Wet /Gel/ Agm/ Dis/Exi/Ful/Opt/Ene(Tppl))
INSTRUCTION FOR USE ENGLISH BATTERY INSTALLATION BATTERY TYPE SETTING (WET /GEL/ AGM/ DIS/EXI/FUL/OPT/ENE(TPPL)) Battery Installation Make sure that the machine is turned off with the ignition key and the parking brake is engaged. Tip back the cover (31, Figure 2) carefully. The machine is equipped with battery cables suitable for installing 4X6V batteries. -
Page 18: Before Machine Start-Up
INSTRUCTION FOR USE ENGLISH BEFORE MACHINE START-UP Checklist Have a full knowledge of the machine operating controls and their functions. Sit on the seat (A, Figure 9), insert the ignition key (C, Figure 0000.H 0000.H 9), and start the machine. (See the procedures in the following paragraph) Check the battery level. -
Page 19: Starting And Stopping The Machine
INSTRUCTION FOR USE ENGLISH STARTING AND STOPPING THE MACHINE Preliminary operations Sit on the driver’s seat (A, Figure 10) and adjust its position with the lever (C, Figure 10) to allow easy reach of all controls. NOTE The driver’s seat (A, Figure 10) is equipped with a safety sensor, which allows the machine to be driven only when the operator is on the driver’s seat. -
Page 20: Parking Brake
INSTRUCTION FOR USE ENGLISH PARKING BRAKE Engage the parking brake by pressing on the front of the pedal (A, Figure 11) and engaging the lever (B, Figure 11). Disengage the parking brake by pressing on the back of the pedal (C, Figure 11) and releasing it. -
Page 21: Hopper Dumping
INSTRUCTION FOR USE ENGLISH HOPPER DUMPING Stop the machine (see the procedures in the previous paragraph). Engage the parking brake. Disengage the latch (A, Figure 13) by pulling its lower end. Remove the hopper (D, Figure 13) by disengaging it from the inner guides with the handle (B, Figure 13). -
Page 22: Water Spray Flow Setting
INSTRUCTION FOR USE ENGLISH WATER SPRAY FLOW SETTING Set up the machine as follows: Press “vacuum button” (A, Figure 15) and “pump button” (B, Figure 15) at the same time. Access to select water spray flow mode Insert ignition key (C, Figure 15) and turn it to "I". Several seconds later the system enters user setting mode Panel Setting (Figure 15). -
Page 23: Machine Storage During Long Inactivity
INSTRUCTION FOR USE ENGLISH MACHINE STORAGE DURING LONG INACTIVITY If the machine is not going to be used for more than 30 days, proceed as follows: Perform the procedures shown in After Using the Machine chapter. Disconnect the battery connector. FIRST PERIOD OF USE After the first 8 hours of use, check the machine fasteners and connecting parts for proper tightness and check the visible parts for integrity and leakage. -
Page 24: Battery Charging
INSTRUCTION FOR USE ENGLISH BATTERY CHARGING NOTE Charge the batteries when battery level is low. 0000.H CAUTION! Keeping the batteries charged can extend their life. CAUTION! When the batteries are discharged, charge them as soon as possible, as that can shorten their life. Check WET battery electrolyte level at least once a week. -
Page 25: Main Broom Height Check And Adjustment
INSTRUCTION FOR USE ENGLISH MAIN BROOM HEIGHT CHECK AND ADJUSTMENT NOTE Brooms with harder or softer bristles are available. This procedure is applicable to all types of brooms. Check the main broom distance from the floor according to the following procedures: •... -
Page 26: Main Broom Replacement
INSTRUCTION FOR USE ENGLISH MAIN BROOM REPLACEMENT WARNING! It is advisable to wear protective gloves when replacing the main broom because there can be sharp debris between the bristles. Drive the machine onto a level ground and engage the parking brake. Turn the ignition key to “O”. -
Page 27: Side Broom Height Check And Adjustment
INSTRUCTION FOR USE ENGLISH SIDE BROOM HEIGHT CHECK AND ADJUSTMENT NOTE Brooms with harder or softer bristles are available. This procedure is applicable to all types of brooms. Check the side broom distance from the floor according to the following procedures: •... -
Page 28: Dust Filter Cleaning And Integrity Check
INSTRUCTION FOR USE ENGLISH DUST FILTER CLEANING AND INTEGRITY CHECK NOTE Besides standard polyester filter, paper filters are also available. The following procedure is applicable to both types. Drive the machine onto level ground and engage the parking brake. Turn the ignition key to “O”. Remove the cover (A, Figure 30) Disengage the latch (F, Figure 30) by pulling its lower end. -
Page 29: Blade Height And Operation Check
INSTRUCTION FOR USE ENGLISH BLADE HEIGHT AND OPERATION CHECK Drive the machine onto level ground. Engage the parking brake. Turn the ignition key to “O”. Side Blade Check Unscrew the knobs (A and D, Figure 34) and remove both left (B, Figure 34) and right (E, Figure 34) covers. -
Page 30: Wheel Chain Check And Adjustment
INSTRUCTION FOR USE ENGLISH WHEEL CHAIN CHECK AND ADJUSTMENT Drive the machine onto level ground. Engage the parking brake. Turn the ignition key to “O”. When the front wheel is loose, adjust the wheel chain adjusting screw (A, Figure 40) on the front of the machine to make sure the wheel chain is of proper tightness. -
Page 31: Error Code Of Display App: Detail
INSTRUCTION FOR USE ENGLISH ERROR CODE OF DISPLAY app: detail Error 01 Battery VOL low Battery voltage low Error 02 Tra overload Traction motor overload Error 03 Main brush overload Main broom motor overload Error 04 Side brush overload Side broom motor overload Error 05 Filter clean M overload Filter shaker motor overload... - Page 33 Company information: www.vipercleaning.eu www.nilfisk.us info-eu@vipercleaning.com...