Advertisement
Quick Links
EN
INTRODUCTION
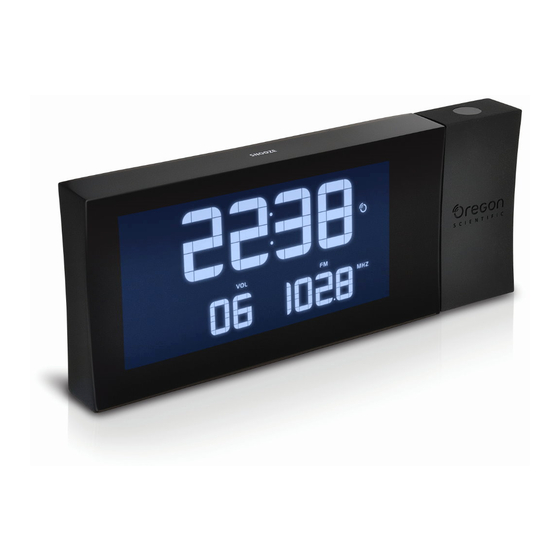
PRODUCT INTRODUCTION
LCD Display
Time Display
Outdoor Temperature
Indoor Temperature / Radio
/ Volume Display
Display
LCD Display
Symbol
Description
Function
Radio signal reception to
Indicates the strength of the
outdoor unit (RTHN129)
radio reception
Indicates low battery power of
Low battery
outdoor unit (RTHN129)
Alarm 1 on
Appears when an alarm is
Alarm 2 on
activated
Appears when RF clock data
RF antenna icon
received
Shows outdoor temperature of
OUT 12345
Outdoor sensor reading
selected sensor.
IN
Indoor sensor reading
Shows indoor temperature
ZONE
Time zone
Indicates selected time zone
Snoozing
Alarm is in snooze mode
Shows selected frequency
FM/AM
Radio
band
Projection
Time Display
Outdoor Temperature Display
(channel 1 only)
Focus length (1.5m – 2m)
NOTE
GETTING STARTED
Connecting the main unit to power supply
Inserting batteries into remote thermo sensor
RESET inside the sensor after each battery change.
Placement of the main unit
ace the de ice as far as ossib e fro
co
ters and
a oid interference ith rece tion.
Only use this device indoors in a dry location.
eave s ace around the device for ventilation ur oses so that the
ar
air can esca e freely.
o ensure for good sound uality do not cover the s ea er.
Placement of the remote thermo sensor (RTHN129)
Max 50m
deal lace ents for the sensor ould be in any location outside the
ho e at a height of not
ore than
ft
sunlight or et conditions.
NOTE
e ending on conditions the
KEY DESCRIPTIONS
Top
SNOOZE
ac light
ro ection button
Back
adio utton
Clock button
et lar
button
button
icro
ack
Reset button
°C / °F button
Light button
RADIO RECEPTION
his roduct is designed to auto atically synchroni e its calendar and
clock
hen brought
ithin the range of the radio signal.
is receiving the signal the radio rece tion sy bol
e ending on the strength of the signal the connection rocess takes
to
inutes. f the signal is
eak it could take u to
receive a valid signal.
Symbol
Description
The icon is turned off to indicate that the
RF antenna
main unit has not received RF clock data for
icon off
at least 1 hour and 15 minutes.
The icon is turned on when the main unit has
RF antenna
received RF clock data.The icon will turn off if
icon on
no data is received for 1 hour and 15 minutes,
or the clock time is adjusted manually.
he
ain unit is able to receive
clock data fro
and
for at
C
and
he ti e one settings ithin the range of
to
reference to ti e one
of the C
he ti e one settings
C
of the
broadcasting signal.
Clock signal reception indicator:
Symbol
Description
Strong signal
Weak signal
No signal
Receiving signal
Radio reception disabled
NOTE
ece tion can be affected by a nu ber of factors. or best
rece tion
lace the device a ay fro
appliances. Other causes of signal interference include electrical
trans ission to ers steel reinforced construction and
eception is ideal hen the unit is placed near a indo .
Enabling/disabling radio reception
SEARCH button located inside the outdoor receiver
ress SEARCH to enable the CC search function. he
t ice to indicate that search function is enabled.
ress and hold SEARCH to disable the CC search function. he
ash three ti es to indicate that search function is disabled.
SETTING TIME MANUALLY
ress and hold SEARCH button is located inside the outdoor
receiver to disable signal reception.
ress and hold . The screen displays ZONE and the nu ber ashes.
ress once or press and hold
and
the ti e one offset sets the clock up to
received clock signal ti e. or
the ti e one setting is 0
2 C 3
.
ress
to con r .
ress once or press and hold
and
hour for at hour
inute year calendar for at
onth
onth and date.
ress
again to con r .
DISPLAYING TIME AND DATE
ress
to toggle bet een ti e and date display.
ALARM FUNCTION
ou can set t o different alar
ti es ith this clock.
Setting/adjusting alarm time
icro a es to
ress and hold .
se
and
to ad ust the hour and press
se
and
to ad ust the
inute and press
The alar
ti e is displayed. The alar
Snooze function
To use the SNOOZE function press the SNOOZE light button on
top of the clock hen the alar
again after
inutes. ou can repeat this function three ti es.
ress to enable sleeping ti er function
ode. The radion ill turn off after the ti e has elapsed.
Displaying the alarm time
y default the clock ill sho the current ti e and date.
To display lar
To display lar
Max 1.5m
Activating/deactivating the alarm
ress
to activate deactivate alar
lar
lar
.
shielded fro
direct
RADIO
n radio
ode the sound level fre uency and
a i u
radio signal reach is
.
Current Ti e
Enter radio mode
ress
to turn on the radio.
ress
to toggle in se uence O
button
last radio channel selected ill be re e bered.
NOTE
.
Select frequency
ress and hold
ress
or
to increase or decrease frequency.
n setting
ode press
higher or lo er frequencies.
Adjusting volume
ress
to inrease volu e.
Flip 180° button
ress
to decrease volu e.
BACKLIGHT
To activate the backlight and pro ection function for
hen the unit
the SNOOZE light button.
CC starts to blink.
NOTE
This function only orks hen the backlight level is set to O.
To ad ust backlight level press ight to toggle bet een
hours to
PROJECTION
Function
re ote sensor in C
The pro ector displays the ti e on your ceiling for easy vie ing in a
broadcasting signal.
darkened roo .
reference to ti e ones
To activate the backlight and pro ection function for
the SNOOZE light button.
NOTE
This function only orks hen the pro ection function is turned O .
To turn pro ection O and O
bet een options. The default setting is O
To ip the pro ection content by
TEMPERATURE FUNCTION
The te perature is
ress C
to toggle bet een Centigrade C and ahrenheit
The current indoor te perature is al ays displayed in the lo er right
corner of the C display. To receive outdoor te perature infor ation you
can connect up to
ress
to toggle bet een channels
outdoor te perature of different sensors.
ress and hold
etal ob ects and electrical
ress and hold
etal siding.
function for the
auto atically be displayed in sequence.
RESETTING THE CLOCK
henever the clock is not behaving as e pected press eset
ill ash
point of a blunt ob ect such as a stylus or ball point pen.
NOTE
This ill return all settings to default values.
ill
REMOTE SENSOR
The
ain unit can collect te perature data fro
should be placed
ndicator on the front of the sensor
trans itting a signal.
to ad ust the setting. or
hours fro
the
1
to ad ust the setting for
h
onth day day
CH Channel
each one has a different channel nu ber.
EU/UK/US
elect your region for CC.
SEARCH ress to search for CC function.
RESET ress if the sensor is not
to con r .
have been replaced.
to con r .
NOTE
efore placing the re ote sensor outdoors check that the battery
sound ill stop after
inutes.
co part ent door is closed properly.
sounds. The alar
ill stop and start
ins in adio
for
sec press
and .
for
sec press
and .
in se uence
oth O
oth O .
ill display.
olu e evel
adion re uency
O
.The last
ill support
only.
ill support both
to enter radio setting
ode.
or
for
seconds to auto atically search
seconds press
and O.
seconds press
press and hold Light to toggle
press Flip 180 .
easured in C or
.
.
re ote sensors to the
ain unit
to
and display the
and
for seconds to start searching for re ote sensors.
and
for
seconds to enable auto scan
channels. nfor ation fro
Channel
ill
ith the
up to
sensors and
ithin
ft
of the
ain unit. The a ber
ill blink to indicate that the unit is
s
. f
ore than one sensor is being used
ake sure
orking correctly or if the batteries
Advertisement

Related Manuals for Oregon Scientific Prysma G RRM222PBK


Summary of Contents for Oregon Scientific Prysma G RRM222PBK
- Page 1 Placement of the remote thermo sensor (RTHN129) Snooze function To use the SNOOZE function press the SNOOZE light button on INTRODUCTION top of the clock hen the alar sounds. The alar ill stop and start again after inutes. ou can repeat this function three ti es. ress to enable sleeping ti er function ins in adio ode.
- Page 2 NOTE The technical speci cation of this product and contents of this user guide are sub ect to change ithout notice. ages not dra n to scale. ABOUT OREGON SCIENTIFIC isit our ebsite .oregonscienti c.co to learn ore about Oregon cienti c products.
- Page 3 12345 ZONE FM/AM 22 x 200 x 80 238 g -5,0 °C °C °F 122.0 °F) 0.1 °C (0,2 °F) °C/°F Max 50m 125 x 50 x 19.5 Max 1.5m 59 g °C °F 140 °F) 0,1 ºC (0,2 ºF)
- Page 4 Obsah je uzamčen Dokončete, prosím, proces objednávky. Následně budete mít přístup k celému dokumentu. Proč je dokument uzamčen? Nahněvat Vás rozhodně nechceme. Jsou k tomu dva hlavní důvody: 1) Vytvořit a udržovat obsáhlou databázi návodů stojí nejen spoustu úsilí a času, ale i finanční prostředky. Dělali byste to Vy zadarmo? Ne*.