Table of Contents
Advertisement
Quick Links
Advertisement
Table of Contents

Related Manuals for LG MG280d


Summary of Contents for LG MG280d
- Page 1 MG280d User Guide - English...
-
Page 2: Table Of Contents
Table of Contents How to Use Touch General functions Call register Button Making and answering calls Missed calls Introduction Entering text Received calls For Your Safety Changing the text input Dialled calls mode All calls Guidelines for safe and Contacts Delete recent calls efficient use Call charges... - Page 3 Organiser Messages Multimedia Contacts New message Camera Search contacts Write text message Video camera Add new Write multimedia message Voice recorder Inbox Caller groups Record Drafts Speed dial View list Outbox Own number Listen to voice mail My business card Photo album Info message Settings...
- Page 4 Table of Contents Browser Settings Call waiting Minute minder Home Date & time Auto redial Bookmarks Date Security Time Go to URL PIN code request Display Settings Handset lock Wallpaper Profiles Call barring Menu colour Cache Fixed dial number Standby text Cookie Change codes Backlight...
-
Page 5: How To Use Touch
How to Use Touch Button This product’s buttons on the slide are touch buttons. Be sure to read “Cautions for Touch Buttons” before using touch buttons. Cautions for Touch 2. You do not need to press hard on the touch buttons to make it work normally. Buttons Keep product from severe impact, as sensors of the touch buttons may be... -
Page 6: Button
How to Use Touch Button 6. Touch buttons may not work normally if a - To disable Touch Protection when slide is mobile phone case or plastic is covering closed,press volume button twice. the touch buttons. Also, touch buttons - After disabling Touch Protection, if there is may not work normally if you are using it no button action for a certain duration, wearing a glove. -
Page 7: Introduction
Introduction Congratulations on your purchase of the advanced and compact cellular phone, designed to operate with the latest digital mobile communication technology. This user’s guide contains important information on the use and operation of this phone. Please read all the information carefully for optimal performance and to prevent any damage to or misuse of the phone. -
Page 8: For Your Safety
For Your Safety Important Information Turn off your phone in a medical facility or at a gas station. Never place your phone in a microwave oven as this will This user guide contains important information on the use and cause the battery to explode. operation of this phone. - Page 9 Only use the batteries, antennas, and chargers provided by bathroom. LG. The warranty will not be applied to products provided by other suppliers. Never store your phone in temperatures less than- 4°F or greater than 122°F.
- Page 10 For Your Safety FCC RF Exposure Information Body-worn Operation WARNING! Read this information before operating the phone. This device was tested for typical body-worn operations with the back of the phone kept 0.6 inches (1.5cm) between the In August 1996, the Federal Communications (FCC) of he United user’s body and the back of the phone.
- Page 11 For Your Safety Vehicle Mounted External Antenna Battery Disposal (optional, if available) Please dispose of your battery properly or bring to your A minimum separation distance of 8 inches (20cm) must be local wireless carrier for recycling. maintained between the user/bystander and the vehicle Do not dispose in fire or with hazardous or flammable mounted external antenna to satisfy FCC RF exposure materials.
- Page 12 Part 15.21 statement " Change or Modifications that are not expressly approved by the manufacturer could void the user's authority to operate the equipment. " Part 15.105 statement This equipment has been tested and found to comply with the limits for a class B digital device, pursuant to Part 15 of the FCC Rules.
-
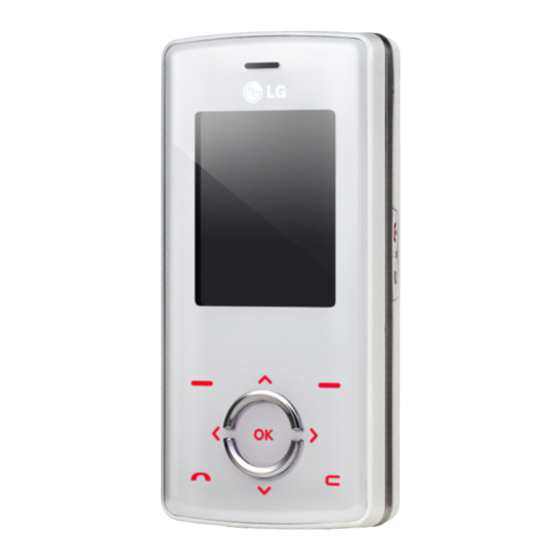
Page 13: Features
features Parts of the phone Open view Navigation keys In standby mode: i Briefly: List of Favourites j Briefly: List of Contacts k Briefly: List of Profiles (Hold down: Activate/ Deactivate Vibrate mode) l Briefly: List of Messages In menu: scroll up & down... - Page 14 Left soft key/ Right soft key These keys perform the function Indicated in the bottom of the display. Confirm key Selects menu options and confirms actions. Clear key Deletes a character with each press. Hold the key down to clear all input. Use this key to go back to a previous screen.
- Page 15 features Left side view Right side view Side keys In standby mode (opened) End key Volume of key tone Switch on/off In standby mode (closed): (hold down) Short press - The main LCD light End or reject a call. Long press - Only display a Camera/MP3 and Multimedia wallpaper.
- Page 16 Rear view...
-
Page 17: Display Information
features Display Information The screen displays several icons. These are described below. Icon area On-Screen Icons Text and graphic Icon/Indicator Description area Tells you the strength of the network signal. 1IRY 'SRXEGXW 'SRXEGXW 'SRXEGXW Soft key 1IRY 1IRY 'SRXEGXW 'SRXEGXW 1IRY 1IRY 'SRXEGXW... - Page 18 Icon/Indicator Description Note Vibrate only menu in profile. The quality of the conversation may change depending on network General menu in profile. coverage. When the signal strength is Loud menu in profile. below 2 bars, you may experience muting, call drop and poor audio. Silent menu in profile.
-
Page 19: Installation
Installation Installing the SIM card 2. Install the SIM card. Insert and slide the SIM card into the SIM and the handset battery card holder. Make sure that the SIM card is Make sure the power is off before you remove inserted properly and that the gold contact the battery. -
Page 20: Charging The Battery
3. Install the battery. Charging the Battery Slide the battery upwards until it snaps back Before connecting the travel adapter to the into place. phone you must first install the battery. 1. Ensure the battery is fully charged before using the phone for the first time. 2. -
Page 21: Disconnecting The Charger
Installation Disconnecting the CAUTION! • Do not force the connector as this may damage charger the phone and/or the travel adapter. • If you use the battery pack charger out of your Disconnect the travel adapter from the own country, use an attachment plug adaptor phone as shown in the diagram below. -
Page 22: General Functions
General Functions Making and answering Making an international call calls 1. Press and hold the key for the international prefix. The ‘+’ character automatically selects the international Making a call access code. 1. Make sure your phone is switched on. 2. - Page 23 General Functions Adjusting the volume Note If you want to adjust the earpiece volume If Press any key has been set as the during a call, use the side keys . Press the answer mode any key press will answer a up side key to increase and down side key to call except for the or the right soft...
-
Page 24: Entering Text
Signal strength ABC mode You can check the strength of your signal by This mode lets you enter letters by pressing the signal indicator ( ) on the LCD the key labelled with the required letter once, screen of your phone. Signal strength can twice, three or four times until the letter is vary, particularly inside buildings. - Page 25 General Functions 2. Change the text input mode by pressing If the word is still incorrect after typing You can check the current text completely, press the down navigation key input mode in the top right corner of the once or more to cycle through the other LCD screen.
- Page 26 Note Note To exit from the text input mode Refer to the table below for more without saving your input, press information on the characters available The phone goes back to standby mode. using the alphanumeric keys. Characters in the order display Using the ABC mode Upper Case Lower Case...
-
Page 27: Contacts
General Functions Using the 123 (Number) mode Contacts The 123 mode enables you to enter You can store phone numbers and their numbers in a text message (a telephone corresponding names in the memory of your number, for example). SIM card. Press the keys corresponding to the required In addition, you can store up to 1000 digits before manually switching back to the... -
Page 28: Selecting Functions And Options
Selecting Functions and Options Your phone offers a set of functions that allow you to customise the phone. These functions are arranged in the menus and sub- menus, accessed via the two soft keys marked . Each menu and sub-menu lets you view and alter the settings of a particular function. -
Page 29: In-Call Menu
In-call menu Your phone provides a number of control Answering an incoming call functions that you can use during a call. To To answer an incoming call when the handset access these functions during a call, initially is ringing, slide open the phone then press press the MP3 key to unlock the touch key. -
Page 30: Multiparty Or Conference Calls
Muting the microphone on hold, both calls having been answered. Once a multiparty call is set up, calls can be You can mute the microphone during a call added, disconnected or separated (that is, by pressing the [Options] key then selecting removed from the multiparty call but still Mute on. - Page 31 In-call menu Putting a conference call on hold Taking a private call during a conference call Press the left soft key, then select the Conference/Hold all. To have a private call with one caller from a conference call, display the number of the Activate the conference call on caller you wish to talk to on the screen, then press the left soft key.
-
Page 32: Menu Tree
Menu Tree The following illustration shows the available menu structure and indicates the: Number assigned to each menu option. 1. Profiles 3. Tools 5. Messages 3.1 Favourites 5.1 New message 1.X.1 Activate 3.2 Alarm clock 5.2 Inbox 1.X.2 Personalise 1.X.3 Rename 3.3Calculator 5.3 Drafts 3.4 Unit converter... - Page 33 Menu Tree 6. Multimedia 8. My stuff 9. Settings 6.1 Camera 8.1 Games & apps 9.1 Date & time 6.2 Video camera 8.2 Videos 9.2 Display 9.3 Power saving 6.3 Voice recorder 8.3 Photos 9.4 Language 6.4 MP3 8.4 Music 9.5 Connectivity 6.5 Photo album 8.5 Text...
-
Page 34: Profiles
Profiles In Profiles, you can adjust and customise the Ring tone: Select the desired ring tone phone tones for different events, from the list. environments, or caller groups. Ring volume: Set the volume of the ringing There are five preset profiles: General, tone. - Page 35 Profiles Note profiles Vibrate only Silent Headset cannot be renamed. 1. To change the name of a profile, scroll to the profile in the profile list and after pressing the left soft key or the OK key, select Rename. 2. Key in the desired name and press the OK key or the left soft key [OK].
-
Page 36: Call Register
Call register You can check the record of missed, received, Received calls Menu 2.2 and dialled calls only if the network supports This option lets you view the last 10 incoming the Calling Line Identification (CLI) within the calls. You can also: service area. -
Page 37: All Calls
Call register All calls Received calls: Length of the incoming Menu 2.4 calls. You can view all lists of outgoing or incoming Dialled calls: Length of the outgoing calls. calls. Reset all: Allows you to reset the timers of all calls by pressing the left soft key [Yes]. -
Page 38: Gprs Information
Auto display: This network service allows you to automatically see the cost of your last calls. If set to On, you can see the last cost when the call is released. GPRS information Menu 2.7 You can check the amount of data transferred over the network through the GPRS information option. -
Page 39: Tools
Tools Favourites 4. Edit the alarm name and press [OK]. Menu 3.1 This option allows you to add your own favourites to the list already provided. Once Calculator you create your own menu, you can access Menu 3.3 the desired function quickly in the idle screen This contains the standard functions such as by pressing the up navigation key. -
Page 40: Unit Converter
Unit converter 1. Select the city corresponding to your time Menu 3.4 zone by pressing the left/right navigation This converts any measurement into a unit keys one or more times. The local date and you want. There are 9 types that can be time are displayed. - Page 41 Organiser Contacts Send via Bluetooth: You can send the Menu 4.1 data of phone book to devices which is compatible with Bluetooth through Search contacts (Menu 4.1.1) Bluetooth. 1. Select Search by pressing the right soft Copy to handset: You can copy an entry [Contacts] or [OK].
- Page 42 entries. SIM card memory capacity depends Caller groups (Menu 4.1.3) on the mobile service provider. You can also You can add up to 20 members per group, save 40 characters of name in The Phone with up to a maximum of 7 groups in total. memory, and save characters in the SIM card.
- Page 43 Organiser Speed dial My business card (Menu 4.1.4) (Menu 4.1.6) Assign contacts to any of the keys This option allows you to create your own business card featuring Name and a mobile You can then call that contact by pressing phone number.
- Page 44 - Name only: Set the phonebook list by Memory in use: This feature allows you to displaying the name only. see how many entries are in use, or free in your phonebook. - Name & number: Set the phonebook list by displaying the name and number. Clear contacts - With pictures: Set the phonebook list You can delete all the entries in the SIM...
- Page 45 Organiser Calendar Add new (Menu 4.2.1) Menu 4.2 Allows you to add a new schedule and memo When you enter this menu a calendar will be for the chosen day. You can store up to 20 displayed. The month and year are shown at notes.
- Page 46 Go to date (Menu 4.2.5) You can go the chosen date directly. Set alarm tone (Menu 4.2 . 6) You can set the alarm tone of each chosen date. Memo Menu 4.3 1. Select the Memo by pressing the left soft key d [OK].
- Page 47 Messages New message Contacts: You can add phone numbers or Menu 5.1 e-mail addresses in the address book. This menu includes functions related to SMS Symbol: You can add special characters. (Short Message Service), MMS (Multimedia My business card: You can add your Message Service), voice mail, as well as the Business card to the message.
- Page 48 Colour: You can also set the Colour of the Write multimedia message text (foreground) and the background. (Menu 5.1.2) Add T9 dictionary: You can add your own A multimedia message can contain text, words. This menu will only be shown when images, and/or sound clips.
- Page 49 Messages Options Set slide format Send: You can send multimedia messages - Set timer: You can set a timer for slide, to multiple recipients, as well as save it to text, picture and sound. send at a later time. - Swap text and picture: You can switch the position of picture and text of the Note message.
- Page 50 If the phone shows ‘No space for SIM Note message’, you only have to delete the SIM messages from the Inbox. If the phone displays When creating a multimedia message, if ‘No space for message’, you will then need to you upload a picture (50K) you may find that whilst the picture is loading delete messages, media or applications to free...
- Page 51 Messages Information: You can view information Outbox Menu 5.4 about received messages; Sender’s This menu allows you to view the messages address, Subject (only for Multimedia which you have sent, those that are currently message), Message date & time, Message sending or messages that have failed sending type, Message size.
- Page 52 Listen to voice mail Info message Menu 5.5 Menu 5.6 (Dependent to network and Once this menu has been selected, simply subscription) press the left soft key [OK] to listen to voice mail. You can also hold down the Info service messages are text messages key in standby mode to listen to voice mail.
- Page 53 Messages Topics Templates (Menu 5.6.2) Menu 5.7 (Dependent to network and subscription) Text templates (Menu 5.7.1) Add new: You can add Info service You have 6 text templates as below; message numbers in the Phone memory • Please call me back. with its nickname.
- Page 54 Edit: You can edit multimedia templates. Reply charging: When a message is sent, it allows the recipients to reply and charge Delete all: Allows you to delete all the cost of the reply to your telephone bill. multimedia messages. SMS centre: If you want to send the text message, you can receive the address of SMS centre through this menu.
- Page 55 Messages Auto retrieve: If you select On, you Voice mailbox number (Menu 5.8.4) receive multimedia messages You can receive voicemail if your network automatically. If you select Off, you receive service provider supports this feature. When only notification message in the inbox and a new voicemail has arrived, the symbol will then you can check this notification.
- Page 56 Info message (Menu 5.8.5) Receive Yes: If you select this menu, your phone will receive Info service messages. No: If you select this menu, your phone will not receive Info service messages any more. Alert Yes: Your phone will beep when you have received Info service message numbers.
- Page 57 Multimedia Camera Flash: Determines the flash operation. Menu 6.1 Zoom: Determines the zoom rate. This application enables you to take a still picture. You can take a picture in your Note desired size, and use it for the contacts Frame shots are only available with the photo, home screen and other more general pixel resolution set to 176 x 220.
- Page 58 Quality: Determines the quality of a video Note clip. Use the k , l keys to scroll through White Balance : Allows you to change the the photos (please note that only settings according to the environment. pictures taken in 72 l 72 resolution Record Time: Determines the recording will be listed here).
- Page 59 Multimedia 1. Once recording has started, the message Note Recording and the remaining time is displayed. Because of the small dimension of the speaker, in some cases the audio could 2. If you want to finish recording, press the be distorted, especially at maximum left soft key [Save].
- Page 60 This menu allows you to view the whole play Note list. You can move through the tracks by pressing the navigation key. In addition, once doesn't support the variable you have selected the track, you can delete rate of MP3 and AAC file. Therefore, you can't change the file from VBR MP3 the file or view its information via the options format to AAC.
- Page 61 Multimedia - Playmode Photo album Menu 6.5 This menu allows to set the play mode. You can view and send a picture. In addition, - Set shuffle you can set the picture as a wallpaper. You can listen to your MP3 music Multi view: You can view the maximum of 9 randomly.
- Page 62 Video album Settings Menu 6.6 Menu 6.7 You can view videos which have been saved in Camera the memory. (Menu 6.7.1) Play: You can play the video file when Auto save: If you set this feature to On, pressing the OK key or selecting Play menu the images will be saved automatically of the Options menu.
-
Page 63: Browser
Browser You can access various WAP (Wireless Description Application Protocol) services such as Scrolls each line of the content banking, news, weather reports and flight area information. These services are specially designed for mobile phones and they are Returns to the previous page maintained by WAP service providers. -
Page 64: Bookmarks
Home Edit: You can edit the URL and/or the title Menu 7.1 of the selected bookmark. Connects to a homepage. The homepage will Delete: Deletes the selected bookmark. be the site which is defined in the activated Delete all: Deletes all the bookmarks. profile. - Page 65 Browser Each profile has submenus as follows: Linger time: You need to enter timeout period. After entering that, the WAP Activate: Activates the selected profile. navigation service will be unavailable if Settings: Use this to edit and change WAP any data is not input or transferred. settings for the selected profile.
-
Page 66: Cookie
Rename: You can change the profile name. Clear cookie (Menu 7.4.5) Add new: You can add a new profile. Removes all context saved in cookie. Delete: Deletes the selected profile from the list. Security (Menu 7.4.6) A list of the available certification is shown. Cache (Menu 7.4.2) Authority: You can see the list of... -
Page 67: My Stuff
My stuff Games & apps Menu 8.1 Java , is a technology developed by Sun Microsystems. Similar to the way you Games & apps (Menu 8.1.1) would download the Java Applet using the standard MS Internet Explorer • Default Games: In this menu, you can browsers, Java MIDlet can be manage the Java applications installed in downloaded using a WAP enabled... - Page 68 Note There is Mass Storage New Fantastic LG function in the . if you connect the The JAR file is a compressed format of USB cable, you can use the phone as a the Java program and the JAD file is a Removable Disk.
- Page 69 My stuff Music 4. Double click on « Removable disk » and open. A folder called My media will be You can store music files in this folder. displayed. Within that folder there are The supported formats are: a further 5 folders. Do not disconnect MP3,AAC,AAC+,AAC++, the phone whilst a file transfer is in WMA,MP4(audio),Wav.
- Page 70 Others Text Any type of file can be stored here. This folder supports .txt files. If you This folder is mainly used for place non .txt files here then the transporting files from one PC to handset will not display them. another.
-
Page 71: Videos
My stuff Videos Photos Menu 8.2 Menu 8.3 Show the list of 3GP and MP4 files . Shows the list of JPG files. Play: You can play the video file by View: You can see the JPG file by pressing pressing the OK key or selecting Play from the OK key or selecting View from the the Option menu. -
Page 72: Music
Rename: change the file name of selected Delete all: Deletes all files in the list file. The maximum length of characters is Information: Shows the file information. 200. And You can not change the extension of file. Delete: Delete a file. Text Menu 8.5 Delete all: Deletes all the files in the list... -
Page 73: Images
My stuff Images Sounds Menu 8.6 Menu 8.7 After selecting a image, press the left key After selecting a sound, press the left key [View] and then you can check the [Options]. options as follow: You can check the options as follow: Set as wallpaper: Currently selected Set as ringtone: Currently selected sound image can be set as a wallpaper. -
Page 74: Others
Others Menu 8.8 Any type of file can be stored here. This folder is mainly used for transporting files from one PC to another. View: You can view a file if it is one of the following types; JPG, GIF, WBMP, PNG and TXT. -
Page 75: Settings
Settings Date & time Display MENU 9.2 Menu 9.1 You can set functions relating to the date Wallpaper (Menu 9.2.1) and time. You can select the background pictures in Date standby mode. (Menu 9.1.1) Default: You can select a picture or an Set date animation of wallpaper by pressing You can enter the current date. -
Page 76: Backlight
Backlight Power saving (Menu 9.2.4) Menu 9.3 You can set the light-up duration of the This function saves battery power by keeping display. backlight brightness to max 40%. Brightness (Menu 9.2.5) The screen brightness can be adjusted from Language Menu 9.4 40% to 100%. - Page 77 Settings Set Bluetooth Note You can activate or cancel the Bluetooth If you use LG PC Sync via Bluetooth, function. you can exchange data only within the Paired devices/Handsfree devices phonebook. You can view all devices which your is When you receive data from another already paired to.
- Page 78 You can set the name of your Bluetooth Set as authorised/Set as unauthorised: device. The default name is LG Allows you to set an authorised connection between each Bluetooth device. For Supported services...
-
Page 79: Modem
You can access the network services through Then you can select the network which you the Modem. If you want to use the LG PC want to use if this network has a roaming Sync, Contents bank or Internet Cube, you... -
Page 80: Gprs Attach
GPRS attach Calling (Menu 9.5.4) Menu 9.6 You can set GPRS service depending on various situations. Call divert (Menu 9.6.1) Switch on The Call divert service allows you to divert If you select this menu, the phone is incoming voice calls, fax calls, and data calls automatically registered to a GPRS network to another number. -
Page 81: Answer Mode
Settings All fax calls • View status Diverts to a number with a fax connection View the status of the corresponding unconditionally. service. Cancel all Answer mode (Menu 9.6.2) Cancels all call divert service. Slide up The submenus If you select this menu, you can receive an Call divert menus have the submenus shown incoming call when you open the slide. - Page 82 Auto redial (Menu 9.6.6) You can send your phone number to another party. Your phone number will be When this function is activated, the phone shown on the receiver’s phone. will automatically try to redial in the case of failure to connect a call. Your phone number will not be shown.
- Page 83 Settings 3. If you want to change the setting, you calls. This function requires the call barring need to enter PIN code when you switch password. You can view the following on the phone. submenus. 4. If you enter wrong PIN code more than 3 All outgoing calls times, the phone will lock out.
- Page 84 The submenus: Number list • Activate You can view the number list saved as Fixed dial number. Allows to request the network to set call restriction on. Change codes (Menu 9.7.5) • Cancel PIN is an abbreviation of Personal Set the selected call restriction off. Identification Number to prevent use by •...
- Page 85 Settings Memory status Menu 9.8 You can check free space and memory usage of each repository, Internal memory, Multimedia memory. You can go to each repository menu. Reset settings Menu 9.9 You can initialise all factory defaults. You will need the Security code to activate this function.
- Page 86 Note Data cable/CD Always use genuine LG accessories. Failure to do so may invalidate your You can connect warranty. your phone to PC to...