Table of Contents
Advertisement
Quick Links
Advertisement
Table of Contents

Related Manuals for Draytek Vigor2865ac-B


Summary of Contents for Draytek Vigor2865ac-B
- Page 2 Vigor2865 Series 35b Security Firewall Quick Start Guide (for RF Model) Version: 1.4 Firmware Version: V4.3.2 (For future update, please visit DrayTek web site) Date: September 8, 2021...
- Page 3 Intellectual Property Rights (IPR) Information © All rights reserved. This publication contains information that is protected Copyrights by copyright. No part may be reproduced, transmitted, transcribed, stored in a retrieval system, or translated into any language without written permission from the copyright holders. The following trademarks are used in this document: Trademarks ...
- Page 4 Declaration of Conformity Hereby, DrayTek Corporation declares that the radio equipment type Vigor2865 is in compliance with Directive 2014/53/EU. The full text of the EU Declaration of Conformity is available at the following internet address: https://www.draytek.com.tw/ftp/Vigor2865/Document/CE/ Manufacturer: DrayTek Corp. Address: No.
- Page 5 Radiation Exposure Statement: This equipment complies with FCC radiation exposure limits set forth for an uncontrolled environment. This equipment should be installed and operated with minimum distance 20cm between the radiator & your body. The antenna/transmitter should be kept at least 20 cm away from human body. More update, please visit www.draytek.com.
-
Page 6: Table Of Contents
1. Package Content ....................1 2. Panel Explanation....................2 2.1 Vigor2865L ..........................2 2.2 Vigor2865ac / Vigor2865Lac / Vigor2865ax ..................4 2.3 Vigor2865Vac..........................8 3. Hardware Installation ..................10 3.1 Network Connection ......................... 10 3.2 Wall-Mounted Installation ......................11 3.3 Antenna Installation (for “L” model) ..................12 4. -
Page 7: Package Content
Take a look at the package content. If there is anything missed or damaged, please contact DrayTek or dealer immediately. Besides, the content is subject to the real package. Vigor router Antenna + Socket (L models) RJ-45 to RJ-45 Cable... -
Page 8: Panel Explanation
Status Explanation The router is powered off. Blinking The router is powered on and running normally. WAN2 Internet connection is ready. Internet connection is not ready. Blinking The data is transmitting. The QoS function is active. The QoS function is inactive. LTE device is connected and ready for use. - Page 9 Right The port is connected with 1000Mbps. The port is connected with 10/100Mbps. Left The port is connected. The port is disconnected. P1~P5 Blinking The data is transmitting. Right The port is connected with 1000Mbps. The port is connected with 10/100Mbps. The port “WAN2 / P6”...
-
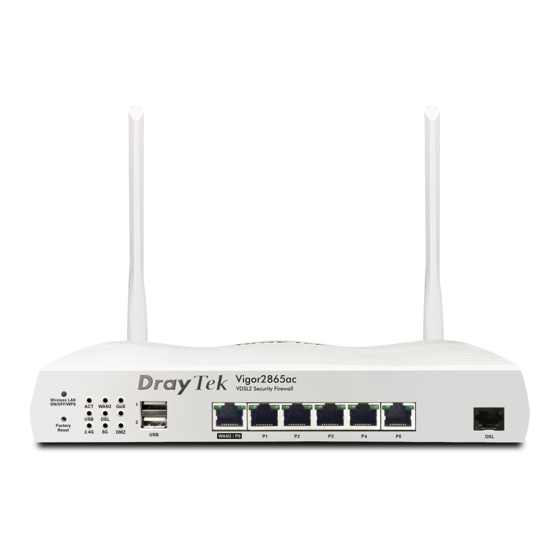
Page 10: Vigor2865Ac / Vigor2865Lac / Vigor2865Ax
Status Explanation The router is powered off. Blinking The router is powered on and running normally. WAN2 Internet connection is ready. Internet connection is not ready. Blinking The data is transmitting. The QoS function is active. The QoS function is inactive. USB device is connected and ready for use. - Page 11 WLAN: Wireless access point is ready. Wireless function is disabled. It will blink slowly while wireless traffic goes Blinking through. ACT and WLAN LEDs blink quickly and simultaneously when WPS is working, and will return to normal condition after two minutes. (You need to setup WPS within 2 minutes.) The DMZ function is enabled.
- Page 12 Interface Description Wireless LAN Wireless band will be switched /changed according to the ON/OFF/WPS button pressed and released. For example, 2.4G (On) and 5G (On) – in default. 2.4G (Off) and 5G (On) – pressed and released the button once.
- Page 13 LAN P1-P5 Connecters for local network devices. Connecter for accessing the Internet. Connecter for installing WLAN antennas. (For ac/ax model). Connecter for a power adapter. ON/OFF Power Switch. Connecter for installing LTE antennas. (For L model). SIM 2/ SIM 1 Slot for installing SIM card.
-
Page 14: Vigor2865Vac
Status Explanation The router is powered off. Blinking The router is powered on and running normally. WAN2 Internet connection is ready. Internet connection is not ready. Blinking The data is transmitting. The QoS function is active. The QoS function is inactive. USB device is connected and ready for use. - Page 15 Right The port is connected with 1000Mbps. The port is connected with 10/100Mbps The port “WAN2 / P6” is switchable. It can be used for LAN connection or WAN connection according to the settings configured in WUI. Interface Description Wireless LAN Wireless band will be switched /changed according to the ON/OFF/WPS button pressed and released.
-
Page 16: Hardware Installation
This section will guide you to install the router through hardware connection and configure the router’s settings through web browser. Before starting to configure the router, you have to connect your devices correctly. (For the hardware connection, we take “ac” model as an example.) Connect the DSL interface to the land line jack with a DSL line cable, or Connect the cable Modem/DSL Modem/Media Converter to the WAN port of router with Ethernet cable (RJ-45). -
Page 17: Wall-Mounted Installation
Vigor router has keyhole type mounting slots on the underside. Drill two holes on the wall. The distance between the holes shall be 168mm. Fit screws into the wall using the appropriate type of wall plug. Note The recommended drill diameter shall be 6.5mm (1/4”). When you finished about procedure, the router has been mounted on the wall firmly. -
Page 18: Antenna Installation (For "L" Model)
“ ” “ ” Magnetic antenna must be installed on the extension base before connecting to Vigor router. Extension Base There are two mounting holes for installing antennas with extension base on Vigor router. Please install them as shown below. Major Signal Transmitted Hole SIM Card... - Page 19 While installing the SIM card into the card slot, note that back plate of the SIM card slot must be removed first and the direction of card notch must be on the left side. There are two types of antennas provided for Vigor2865Lac, which must be installed in different locations carefully and correctly.
-
Page 20: Software Configuration
To access Internet, please finish basic configuration after completing the hardware installation. The Quick Start Wizard is designed for you to easily set up your router for Internet access. You can directly access the Quick Start Wizard via Web Configurator. Make sure your PC connects to the router correctly. Note You may either simply set up your computer to get IP dynamically from the router or set up the IP address of the computer to be the... - Page 21 Now, the Main Screen will pop up. Click Wizards>>Quick Start Wizard. Note The home page will change slightly in accordance with the router you have. Here we take Vigor2865ac as an example. If your router can be under an environment with high speed NAT, the configuration provide here can help you to deploy and use the router quickly.
- Page 22 please choose WAN2; if wireless 2.4G/5G connection is used, please choose WAN3 or WAN4; if 3G USB modem is used, please choose WAN5 or WAN6. Then click Next for next step. Each WAN interface will bring up specific configuration page. Here, we take WAN1 (ADSL/VDSL2) as an example. Click Next to go to the following page.
- Page 23 Choose WAN1 as WAN Interface and click the Next button; you will get the following page. After finished the above settings, simply click Next.
- Page 24 Please manually enter the Username/Password provided by your ISP. Then click Next for viewing summary of such connection. Click Finish. A page of Quick Start Wizard Setup OK!!! will appear. Then, the system status of this protocol will be shown. Now, you can enjoy surfing on the Internet.
- Page 25 Choose WAN1 as WAN Interface and click the Next button; you will get the following page. Please type in the IP address/mask/gateway information originally provided by your ISP. Then click Next for viewing summary of such connection. Click Finish. A page of Quick Start Wizard Setup OK!!! will appear. Then, the system status of this protocol will be shown.
-
Page 26: Customer Service
Web registration is preferred. You can register your Vigor router via https://myvigor.draytek.com. & & Due to the continuous evolution of DrayTek technology, all routers will be regularly upgraded. Please consult the DrayTek web site for more information on newest firmware, tools and documents. https://www.draytek.com...