RocketFish Advanced RF-WFD301 Series Quick Setup Manual
Miracast video receiver
Hide thumbs
Also See for Advanced RF-WFD301 Series:
- User manual (19 pages) ,
- Quick setup manual (2 pages) ,
- Manual d'installation rapide (2 pages)
Advertisement
Quick Links
RF-WFD301_12-1246_QSG_V1_EN.ai
RF-WFD301_12-1246_QSG_V1_EN.ai
1
1
1/11/2013
1/11/2013
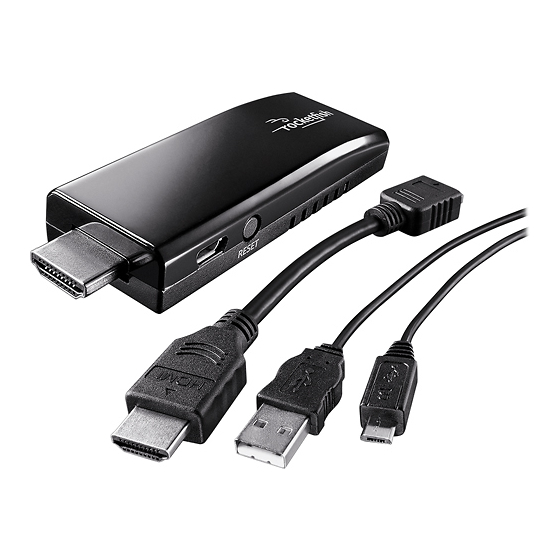
Package contents
• Rocketfish Miracast Video Receiver
• 6" HDMI adapter
• 30" Micro USB charger cable
• Quick Setup Guide
System requirements
• Digital TV with an HDMI jack and a USB port
Features
Receiver
6" HDMI adapter
• Requires Android™ Jellybean 4.2.1 or newer
• Works with compatible devices such as your phone or tablet to deliver signals to
your TV, projector or other audio/video devices.
Need additional help?
See your User Guide! This comprehensive guide includes
everything from basic how-to steps to more advanced features.
Go to www.rocketfishproducts.com, then click Support &
Service. Enter your model number in the Manual, Firmware,
Drivers & Product Information, then click Search.
Before using your new product, please read these instructions to prevent any damage.
Legal notices
2:34:57 PM
2:34:57 PM
30" Micro USB
cable charger
V1
FINAL
FOR PRINT
QUICK SETUP GUIDE
Rocketfish Advanced Miracast Video Receiver
Installing your receiver
1 Turn off the TV.
2 Insert the Rocketfish Miracast Video Receiver into the HDMI port on your TV. If the
video receiver will not fit into the HDMI port on your TV (too large or too wide), use
the 6" HDMI adapter for a better fit.
3 Insert one end of the 30" cable into the micro USB port on the receiver. Insert the
other end into the USB port on your TV.
4 Turn on your TV, then press the TV's Input or Source button to select the input HDMI
input of the Rocketfish Wireless Video Receiver.
5 The LED on the Rocketfish Miracast Video Receiver starts to blink and boot up. The
splash screen on your TV is displayed within 30 seconds. If the LED doesn't blink or
the boot up splash screen is not seen, check to make sure that the TV input you have
selected is correct and the Rocketfish Wireless Video Receiver has power and is fully
inserted.
Setting up your receiver connection
For the first time use, the Rocketfish Miracast Video Receiver will boot up and go into
the Auto mode and is ready to accept a Wi-Fi Direct connection.
1 Verify the TV screen shows Rocketfish Wireless Video Receiver screen as shown below.
2 On your Miracast mobile device, such as a mobile phone or tablet, turn on the Wi-Fi
network.
3 Press the WPS button on the Rocketfish Miracast Video Receiver for first-time
connection.
4 Go to Settings > Display > Wireless Display and select the SSID noted in Step 1.
5 When the connection is successful, your Miracast device's (such as your phone)
screen is displayed on your TV, indicating that video streaming has started.
Device ID: 0A:FB:1C
Wireless Video Receiver
Choose network, press Enter to connect.
SSID:
Discovery Channel:
Operating Channel:
Settings
Status:
One-year limited warranty
RF-WFD301
BBY-41-a048
11
149
Searching for peers
Advertisement

Related Manuals for RocketFish Advanced RF-WFD301 Series


Summary of Contents for RocketFish Advanced RF-WFD301 Series
- Page 1 1 Turn off the TV. • 6" HDMI adapter 2 Insert the Rocketfish Miracast Video Receiver into the HDMI port on your TV. If the video receiver will not fit into the HDMI port on your TV (too large or too wide), use •...
- Page 2 ROCKETFISH is a registered trademark of BBY Solutions, Inc. Registered in some countries. Distributed by Best Buy Purchasing, LLC, 7601 Penn Ave South, Richfield, MN 55423 U.S.A.