
Related Manuals for Honeywell FocusPRO TH6320R01


Summary of Contents for Honeywell FocusPRO TH6320R01
- Page 1 Operating Manual FocusPRO ® TH6320R Wireless Thermostat Termóstato inalámbrico Thermostat Sans Fil...
- Page 2 50°F (10°C). Need Help? For assistance with this product please visit http://yourhome.honeywell.com or call Honeywell Customer Care toll-free at 1-800-468-1502 Read and save these instructions ® U.S. Registered Trademark. Patents pending. Copyright © 2008 Honeywell International Inc. All rights reserved.
-
Page 3: Table Of Contents
Contents Español: vea la página 20 • Français : voir la page 40 About your new thermostat Auto-changeover (heat/cool) ..12 Programming at a glance....2 Remote control ......13 Quick reference to controls ..3 Display outdoor climate ....14 Quick reference to display ..4 Find lost remote control....14 Special features ......15 Programming &... -
Page 4: About Your New Thermostat
About your new thermostat Your new thermostat is pre-programmed and ready to go. All you have to do is set the time and day. Then check the settings below and change if needed: 1 Set time and day (required for proper operation) ....See page 5 2 Select fan setting (Auto/On)............See page 6 3 Select system setting (Heat/Cool) .........See page 7 4 Program schedules: Preset to energy-saving levels... -
Page 5: Quick Reference To Controls
Quick reference to controls Digital display (see page 4) Battery holder (see page 16) Temperature buttons Press to adjust temperature settings (see page 10-11) Hold button Press to override programmed temperature control (see page 11) Function buttons Press to select the function displayed just above each button. (Functions change depending on the task.) -
Page 6: Quick Reference To Display
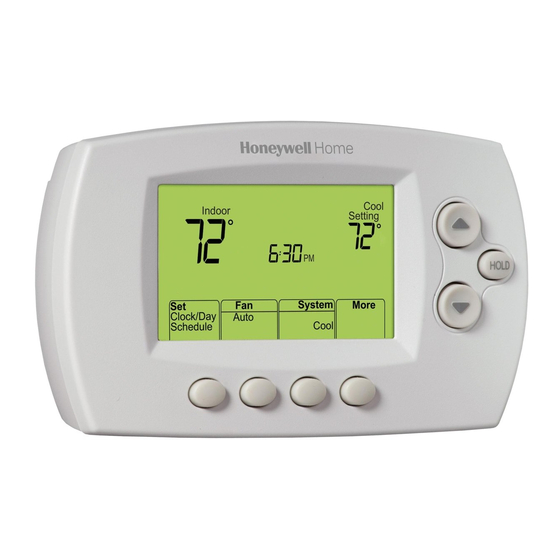
Quick reference to display screen Current inside temperature Low battery warnings Current time/day (see pages 16-17) (see page 5) Temperature setting Recovery Replace Battery Heat Indoor (see pages 9-11) Setting Recovery ° ° (see page 15) Auxiliary heat 6:30 (Only for heat pumps Current program period with auxiliary heat) Heat On... -
Page 7: Set Time And Day
Set the time and day Press , then adjust time 1 Press , then SET CLOCK SCHEDULE SET CLOCK SCHEDULE press to set clock. 2 Press , then press SET DAY to select the day of week. System More 3 Press to save. -
Page 8: Fan Settings (Auto/On)
Select the fan setting Press to select Auto or On. System More Auto Heat Clock/Day Schedule In “Auto” mode (the most commonly used setting), the fan runs only when the heating or cooling system is on. System More If set to “On,” the fan runs continuously. Heat Clock/Day Schedule... -
Page 9: System Settings (Heat/Cool)
Select the system setting Press to select: SYSTEM System More Auto Heat Clock/Day Schedule • Heat: Thermostat controls only the heating system. • Cool: Thermostat controls only the cooling system. System More Auto Clock/Day • Off: All systems are off. Cool Schedule •... - Page 10 EnergyStar ® settings for maximum cost savings This thermostat is pre-set to use EnergyStar ® program settings. We recom- mend these settings, since they can reduce your heating/cooling expenses by as much as 33%. (See next page to adjust times and temperatures of each time period.) Heat (Mon-Fri) Cool (Mon-Fri)
-
Page 11: Program Schedules
To adjust program schedules 1 Press , then SET CLOCK SCHEDULE System More Auto Heat Clock/Day SCHEDULE Schedule 2 Press to set your weekday Wake time (Mon-Fri), then press NEXT Schedule 3 Press to set the temperature Done for this time period, then press NEXT 4 Set time and temperature for the next Heat... -
Page 12: Program Schedule Overrides
Program schedule override (temporary) Press to temporarily adjust temperature Press to immediately adjust the temperature. This will Heat Indoor Setting temporarily override the temper- ° ° Hold Until ature setting for the current time 6:00 period. The new temperature will be Cancel System More... - Page 13 Program schedule override (permanent) Press to permanently adjust temperature Press to permanently adjust HOLD the temperature. This will over- Heat Indoor ride the temperature settings for Setting ° Hold ° all time periods. 6:00 The “Hold” feature turns off the program schedule and allows you Cancel System...
-
Page 14: Auto-Changeover (Heat/Cool)
Auto Changeover (heat/cool) Auto Changeover is a feature used in System More Auto Clock/Day climates where both air conditioning and Auto Schedule heating are often used on the same day. When the system is set to Auto, the ther- mostat automatically selects heating or cooling depending on the indoor Press until screen temperature. -
Page 15: Remote Control
Remote control Temperature is measured at The optional remote control can act as a location of remote control mobile thermostat, to maintain a comfortable temperature as you move ° from room to room. ° Remote has Control When the system is responding to Reading temperatures measured at the Remote, at Thermostat... -
Page 16: Display Outdoor Climate
Additional features To display outdoor climate System More Auto Heat Clock/Day Schedule If you have an outdoor air sensor, press Press to display to display the current outdoor tem- MORE more options perature and humidity. Press to exit. DONE Outdoor Outdoor To find a lost remote control temperature... -
Page 17: Special Features
Special features Built-in compressor protection: This feature helps prevent damage to the compressor in your air conditioning or heat pump system. Damage can occur if the compressor is re-started too soon after shutdown. This feature forces the compressor to wait for a few minutes before restarting. During the wait time, the display will flash the message Cool On (or Heat On if you have a heat pump). -
Page 18: Battery Replacement
Battery replacement (thermostat) Press and pull to remove Install fresh batteries when the REPLACE warning begins flashing. The warn- BATTERY ing flashes about two months before the batteries are depleted. Remove the battery holder and install 2 fresh AA alkaline batteries. After batteries are installed, the thermo- stat will automatically restore communi- cation with the wireless network within a... - Page 19 Battery replacement (outdoor air sensor) Remove sensor Replace outdoor sensor batteries when from bracket warning begins REPLACE BATTERY OUTDOOR flashing on the thermostat. The warning flashes about two months before the bat- teries are depleted. Remove the sensor from the bracket, remove the cover and install 2 fresh AA lithium batteries.
-
Page 20: In Case Of Difficulty
In case of difficulty Heating or • Check circuit breaker and reset if necessary. cooling system • Make sure power switch at heating & cooling system is on. does not respond • Make sure furnace door is closed securely. • Wait 5 minutes for the system to respond. Screen displays Thermostat has lost radio contact with the wireless network (usually “No Signal”... -
Page 21: Limited Warranty
This warranty does not cover removal or reinstallation costs. write Honeywell Customer Relations, 1985 Douglas Dr, This warranty shall not apply if it is shown by Honeywell that Golden Valley, MN 55422 or call 1-800-468-1502. In Canada, the defect or malfunction was caused by damage which... - Page 22 50 °F (10 °C). ¿Necesita ayuda? Consulte sobre este producto en http://yourhome.honeywell.com o llamando sin cargo a atención al cliente de Honeywell 1-800-468-1502 Lea y guarde estas instrucciones ® Marca registrada de los EE. UU. Patentes en trámite.
- Page 23 Índice Español: vea la página 20 • Français : voir la page 40 Acerca de su termostato nuevo Control remoto ......33 Programación rápida ....22 Visualización de la Referencia de los controles ..23 temperatura exterior....34 Referencia de la pantalla ..24 Búsqueda del control remoto extraviado ........34 Programación y funcionamiento Funciones especiales....35...
-
Page 24: Acerca De Su Termostato Nuevo
Acerca de su termostato nuevo Su termostato nuevo está preprogramado y listo para funcionar. Todo lo que tiene que hacer es configurar la hora y el día. Luego, revise las sigu- ientes configuraciones y, si es necesario, cámbielas: 1 Configuración de la hora/día (necesaria)......Vea la pág. 25 2 Selección de la configuración del ventilador (Auto/On) ..Vea la pág. -
Page 25: Referencia De Los Controles
Referencia rápida de los controles Pantalla digital (vea la pág. 24) Soporte de las baterías (vea la pág. 36) Botones de la temperatura Presione para ajustar las configuraciones de temperatura (vea las págs. 30 a 31) Botón Hold Presione para anular el control de temperatura programada (vea la pág. -
Page 26: Referencia De La Pantalla
Referencia rápida de la pantalla Temperatura interior actual Avisos de batería baja Hora y día actuales (vea págs. 36-37) (vea pág. 25) Config. de la temp. Recovery Replace Battery Heat Indoor (vea p. 29-31) Setting Recovery ° ° (vea pág. 35) Calefacción auxiliar 6:30 (solo para bombas de... -
Page 27: Configuración De La Hora/Día
Configuración de la hora y el día Presione y luego ajuste la hora 1 Presione SET CLOCK SCHEDULE SET CLOCK SCHEDULE luego presione para configurar la hora. 2 Presione y luego pre- SET DAY System More sione para seleccionar Auto Heat Clock/Day Schedule... -
Page 28: Configuración Del Ventilador
Selección de la configuración del ventilador Presione para seleccionar Auto u On. System More Auto Heat Clock/Day En el modo “Auto”, la configuración más Schedule comúnmente utilizada, el ventilador fun- ciona solamente cuando está encendido el sistema de calefacción o refrigeración. System More Heat... -
Page 29: Configuración Del Sistema
Selección de la configuración del sistema Presione para seleccionar: SYSTEM System More Auto Heat Clock/Day • Heat: el termostato controla sola- Schedule mente el sistema de calefacción. • Cool: el termostato controla sola- mente el sistema de refrigeración. System More •... -
Page 30: Cronogramas Del Programa
Configuraciones de EnergyStar ® para mayores ahorros en los costos Este termostato está configurado previamente para utilizar las configura- ciones del programa EnergyStar ® . Recomendamos estas configuraciones debido a que reducen los gastos de calefacción y refrigeración hasta en un 33%. - Page 31 Para ajustar los cronogramas del programa 1 Presione y luego SET CLOCK SCHEDULE System More Auto Heat Clock/Day SCHEDULE Schedule 2 Presione para configurar la hora Wake (de lunes a viernes) y luego presione Schedule NEXT Done 3 Presione para configurar la temperatura para este período y Heat luego presione...
-
Page 32: Anulación Del Cronograma Del Programa
Anulación del cronograma del programa (temporal) Presione para ajustar temporalmente la temp. Presione para ajustar la temperatura inmediatamente. Heat Indoor Setting Esto anulará temporalmente la ° ° Hold Until configuración de la temperatura 6:00 para el período actual. La nueva temperatura se Cancel System More... - Page 33 Anulación del cronograma del programa (permanente) Presione para ajustar permanentemente la temp. Presione para ajustar perma- HOLD nentemente la temperatura. Esto Heat Indoor anulará las configuraciones de Setting ° Hold ° temperatura para todos los 6:00 períodos. La función “Hold” apaga el crono- Cancel System More...
-
Page 34: Función Auto Changeover (Heat/Cool)
Función Auto Changeover (Heat/Cool) Auto Changeover es una función utiliza- System More Auto Clock/Day da en climas donde, a menudo, se usan Auto Schedule el acondicionador de aire y la calefac- ción en el mismo día. Cuando el sistema está configurado en Auto, el termostato elige automáticamente cuándo calentar Presione hasta que la o refrigerar, según la temperatura interior. -
Page 35: Control Remoto
Control remoto La temperatura se mide en la El control remoto opcional puede ubicación del control remoto funcionar como termostato móvil para mantener una temperatura agradable ° mientras pasa de una habitación a otra. ° Remote has Control Cuando el sistema responda a las tem- Reading peraturas medidas en el control remoto, at Thermostat... -
Page 36: Temperatura Exterior
Funciones adicionales Visualizar la temperatura exterior System More Auto Heat Clock/Day Schedule Si tiene un sensor de aire exterior, pre- sione para visualizar la temperatura Presione para mostrar MORE más opciones y la humedad exteriores actuales. Presione para salir. DONE Temperatura Humedad exterior... -
Page 37: Funciones Especiales
Características especiales Protección del compresor incorporada: esta función ayuda a evitar daños al compresor en su acondicionador de aire o en su sistema de bomba de calor. El compresor puede dañarse si se vuelve a iniciar inmediatamente después de ser apagado. Esta característica hace que el compresor demore unos minutos antes de volver a iniciarse. -
Page 38: Reemplazo De Las Baterías
Reemplazo de las baterías (termostato) Presione y jale para retirar Instale las baterías nuevas cuando el aviso comience a destellar. REPLACE BATTERY El aviso destellará durante, aproximada- mente, dos meses antes de que se agoten las baterías. Retire el soporte de las baterías e instale 2 baterías alcalinas AA nuevas. - Page 39 Reemplazo de las baterías (sensor de aire exterior) Retire el sensor Reemplace las baterías del sensor exteri- del soporte or cuando el aviso REPLACE BATTERY OUTDOOR comience a destellar en el termostato. El aviso destellará durante, aproximada- mente, dos meses antes de que se agoten las baterías.
-
Page 40: En Caso De Inconvenientes
En caso de inconvenientes El sistema de • Controle el interruptor de circuito y, si es necesario, reinícielo. calefacción o • Asegúrese de que el interruptor de energía del sistema de calefacción y refrigeración no efrigeración esté encendido. responde • Asegúrese de que la puerta del sistema de calefacción esté bien cerrada. •... -
Page 41: Garantía Limitada
Garantía limitada por hasta 5 años Honeywell garantiza, por el término de tres (3) años a partir INCUMPLIMIENTO DE CUALQUIER GARANTÍA, EXPRESA O de la fecha de compra por parte del consumidor, que este IMPLÍCITA, O DE CUALQUIER OTRA FALLA DE ESTE PRO- producto, sin incluir las baterías, no presentará... -
Page 42: Español: Vea La Página 20 • Français : Voir La
Pour obtenir de l’assistance concernant ce produit, visitez http://yourhome.honeywell.com ou appelez gratuitement l’assistance client d’Honeywell au 1-800-468-1502 Lisez et sauvez ces instructions ® Marque de commence enregistrée aux États-Unis. Brevets en instance. Copyright © 2008 Honeywell International Inc. Tous droits réservés. - Page 43 Table des matières Español: vea la página 20 • Français : voir la page 40 Un mot sur votre nouvel appareil Télécommande ......53 Programmation en un coup d’œil..42 Affichage de la temp. extérieure ..54 Coup d’œil sur les commandes 43 Retrouver une télécommande Coup d’œil sur l’affichage ..44 égarée ........54...
-
Page 44: Un Mot Sur Votre Nouvel Appareil
Un mot sur votre nouvel appareil Votre nouveau thermostat est préprogrammé et prêt à l’emploi. Il suffit de régler l’heure et la date. Il faudra ensuite vérifier si les réglages prévus conviennent et les modifier au besoin : 1 Régler l’heure et le jour ............Voir page 45 2 Sélectionner le réglage du ventilateur ........Voir page 46 3 Sélectionner le réglage du système ........Voir page 47 4 Horaire programmé... -
Page 45: Coup D'œil Sur Les Commandes
Coup d’œil sur les commandes Affichage numérique (voir p. 44) Porte-piles (voir p. 56) Boutons de réglage de la température Appuyer sur le bouton pour régler la température (voir p. 50-51) Bouton de Hold Appuyer pour déroger au programme (voir la page 51) Boutons de fonction Appuyer pour sélectionner la fonction affichée sous chaque bouton. -
Page 46: Coup D'œil Sur L'affichage
Coup d’œil sur l’affichage Température ambiante Avertissement de piles Heure/jour en cours (voir p. 56-57) (voir p. 45) Point consigne de Recovery Replace Battery Heat Indoor temp. (voir p. 49-51) Setting Recovery ° ° (voir p. 55) Chauffage auxiliaire 6:30 (Pour thermopompes Période du programme avec chauffage auxil-... - Page 47 Régler l’heure et le jour Appuyer sur et régler l’heure. 1 Appuyer SET CLOCK SCHEDULE SET CLOCK SCHEDULE puis pour régler l’heure. 2 Appuyer , puis SET DAY System More pour sélectionner le jour de la Auto Heat Clock/Day Schedule semaine.
- Page 48 Sélectionner le réglage du ventilateur Appuyer sur la touche du ventilateur ( System More Auto Heat Clock/Day pour sélectionner son mode de fonction- Schedule nement (Auto ou On). En mode de fonctionnement automa- tique (AUTO), qui est le réglage le plus System More Heat...
- Page 49 Sélectionner le réglage du système Appuyer pour sélectionner : SYSTEM System More Auto Heat Clock/Day • Heat : Thermostat commande le fonc- Schedule tionnement du système de chauffage. • Cool : Thermostat commande le fonctionnement du système de System More refroidissement.
-
Page 50: Horaires Programmés
Réglage EnergyStar ® pour une économie d’énergie maximale Le thermostat est préréglé aux points de consigne EnergyStar ® . Nous recom- mandons de conserver ces points de consigne, puisqu’ils pourraient faire réduire de jusqu’à 33 % les frais de chauffage-refroidissement. (Voir à la page suivante comment régler l’heure et la température de consigne pour chacune des périodes.) Heat (Lun-Ven) Cool (Lun-Ven) Heat (Sam-Dim) Cool (Sam-Dim) - Page 51 Réglage de l’horaire 1 Appuyer , puis SET CLOCK SCHEDULE System More Auto Heat Clock/Day SCHEDULE Schedule 2 Appuyer pour régler l’heure du réveil des jours de semaine Schedule (Lun-Ven), puis appuyer ensuite NEXT Done 3 Appuyer pour régler la température de consigne pour cette Heat Set Schedule...
-
Page 52: Dérogations À L'horaire
Dérogation (temporaire) au programme Appuyer pour ajuster temporairement la temp. Appuyer pour ajuster immédiatement la température. Heat Indoor Setting Cette fonction permet de déroger ° ° Hold Until à la température de consigne de 6:00 la période en cours. La nouvelle température de Cancel System More... - Page 53 Dérogation (permanente) au programme Appuyer pour modifier la temp. en permanence. Appuyer pour ajuster la tem- HOLD pérature en permanence. Cette Heat Indoor fonction permet de déroger à la Setting ° Hold température de consigne pour ° 6:00 toutes les périodes. La fonction de maintien «Hold»...
-
Page 54: Commutation Chaud-Froid Automatique
Commutation chaud-froid automatique Cette caractéristique est employée dans System More Auto Clock/Day les endroits où le chauffage et le Auto Schedule refroidissement sont parfois en service le même jour. Lorsque le système fonc- tionne en mode Auto, le thermostat sélectionne automatiquement le Appuyer jusqu’à... -
Page 55: Télécommande
Télécommande La température est mesurée à La télécommande optionnelle peut servir l’emplacement de la télécommande de thermostat mobile afin de maintenir une température agréable à mesure ° qu’on se déplace de pièce en pièce. ° Remote has Control Lorsque le système réagit aux tempéra- Reading tures mesurées à... -
Page 56: Retrouver Une Télécommande Égarée
Caractéristiques additionnelles Pour afficher la température extérieure System More Auto Heat Clock/Day Schedule S’il y a un capteur d’air extérieur, appuy- pour afficher la température et MORE Appuyer pour afficher l’humidité extérieures. Appuyer pour d’autres options DONE quitter. Température Humidité extérieure extérieure Outdoor... -
Page 57: Caractéristiques Spéciales
Caractéristiques spéciales Protection intégrée du compresseur : Cette fonction sert à éviter d’endommager le compresseur qui fait partie du système de refroidisse- ment ou de la thermopompe. Le compresseur pourrait en effet être endom- magé s’il redémarre trop rapidement après avoir été mis à l’arrêt. Cette fonction oblige le compresseur à... -
Page 58: Remplacement Des Piles
Remplacement des piles (thermostat) Appuyer et tirer pour retirer les piles Installer des piles neuves lorsque l’avertissement de remplacement des piles commence à clignoter REPLACE BATTERY à l’écran. Ce message clignote pendant environ deux mois avant que les piles ne soient complètement épuisées. - Page 59 Remplacement des piles (capteur d’air extérieur) Retirer le capteur Remplacer les piles du capteur extérieur de son support lorsque l’avertissement REPLACE BATTERY OUT commence à clignoter au thermostat. DOOR Ce message clignote pendant environ deux mois avant que les piles ne soient complètement épuisées.
-
Page 60: En Cas De Difficulté
En cas de difficulté Le système de • S’assurer que le coupe-circuit n’est pas déclenché et le remettre en chauffage ou de position de marche au besoin. refroidissement • S’assurer que le bouton de marche-arrêt du système de chauffage ou ne répond pas de refroidissement est à... -
Page 61: Garantie Limitée
Produits de détail, consommateur l’avait en sa possession. Honeywell Limited/Honeywell Limitée, 35, Dynamic Drive, La responsabilité de Honeywell se limite à réparer ou à rem- Scarborough (Ontario) M1V 4Z9. placer le produit conformément aux modalités susmention- Lorsque le produit est inscrit en ligne à... -
Page 62: Regulatory Information
Regulatory information FCC Compliance Statement (Part 15.19) (USA only) used for this transmitter must be installed to provide a sepa- This device complies with Part 15 of FCC Rules. Operation is ration distance of at least 20 cm from all persons and must subject to the following two conditions: not be co-located or operating in conjunction with any other 1 This device may not cause harmful interference, and... -
Page 63: Información Reguladora
Información reguladora Declaración de conformidad con las regulaciones FCC • Vuelva a orientar y ubicar la antena receptora. (Sección 15.19) (solo en los EE. UU.) • Aumente la distancia entre el equipo y el receptor. Este dispositivo cumple con la Sección 15 de las regulaciones •... - Page 64 Honeywell Customer Care toll-free at 1-800-468-1502 ¿Necesita ayuda? Consulte sobre este producto en http://yourhome.honeywell.com o llamando sin cargo a atención al cliente de Honeywell 1-800-468-1502 Vous faut-il de l’aide ? Pour obtenir de l’assistance concernant ce produit, visitez http://yourhome.honeywell.com ou appelez gratuitement l’assistance client d’Honeywell au...