Table of Contents

Related Manuals for Brother S-7300A


Summary of Contents for Brother S-7300A
- Page 1 S-7300A INSTRUCTION MANUAL Please read this manual before using the machine. Please keep this manual within easy reach for quick reference. SINGLE NEEDLE DIRECT DRIVE LOCK STITCHER WITH ELECTRONIC FEEDING SYSTEM AND THREAD TRIMMER...
- Page 2 Thank you very much for buying a BROTHER sewing machine. Before using your new machine, please read the safety instructions and the explanations given in the instruction manual. With industrial sewing machines, it is normal to carry out work while positioned directly in front of moving parts such as the needle and thread take-up, and consequently there is always a danger of injury that can be caused by these parts.
- Page 3 ) indicates something that you must do. The picture inside the circle indicates the · · · · · nature of the thing that must be done. (For example, the symbol at left means “you must make the ground connection”.) S-7300A...
- Page 4 Contact your Brother dealer or a qualified electrician for any electrical work that may need to Secure the table so that it will not move when tilting be done.
- Page 5 When not using the machine and when leaving the machine unattended If the machine develops a problem, contact your nearest Brother dealer or a qualified technician. If using a work table which has casters, the casters should be secured in such a way so that they Do not hold the machine head by the panel when cannot move.
- Page 6 If only one hand is used, the weight of the machine Ask your Brother dealer or a qualified electrician to head may cause your hand to slip, and your hand carry out any maintenance and inspection of the may get caught.
- Page 7 The following warning labels appear on the sewing machine. Please follow the instructions on the labels at all times when using the machine. If the labels have been removed or are difficult to read, please contact your nearest Brother dealer. Touching areas where high voltages are present can Be careful not to get your hands result in severe injury.
- Page 8 Transformer box (100 V/400 V system only) Oil tank Control box 0874D S-7300A...
- Page 9 S-7300A...
-
Page 10: Table Of Contents
12-2. Arm thread guide R ........74 5-7. Using the lower thread counter ...... 37 12-3. Presser foot height ........75 5-8. Home screen mode setting ......39 12-4. X-over seam sensor correction ..... 75 5-9. Illumination LED brightness setting ....40 S-7300A... - Page 11 12-8. Adjusting the needle and feed mechanism timing ........79 12-9. Needle and rotary hook timing ..... 80 12-10. Adjusting the presser foot floating amount (minute lifting amount) (option)....81 12-11. Thread trimming ......... 82 13.LIST OF ERROR CODES ..... 14.TROUBLESHOOTING ......S-7300A...
-
Page 12: Machine Specifications
0.8mm 1.2mm Needle (DB×1, DP×5) #11 - #18 #19 - #22 Motor AC servo motor Control circuit Microprocessor Rotary hook New lubrication-type rotary hook Lubricating oil -[]0[]P -[]3[]P Rotary hook High-speed spindle High-speed spindle Needle bar Special Brother grease S-7300A... -
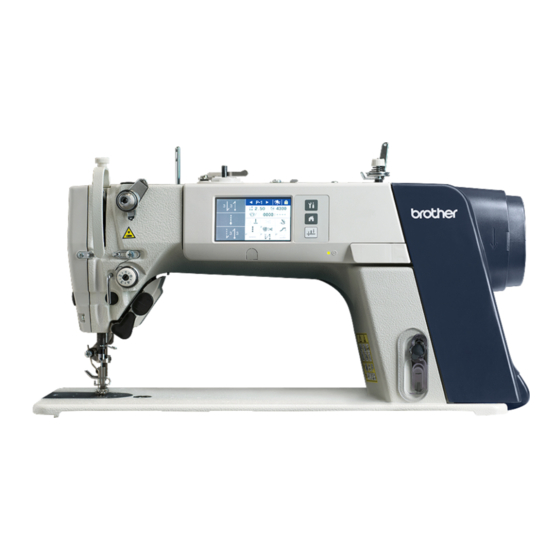
Page 13: Names Of Major Parts
(8) Power switch (9) Oil gauge window (10) Oil feeding pocket (11) Machine pulley (12) Operation panel (13) Cotton stand (14) Control box (15) Power indicator (16) USB port Safety devices: (17) Pulley cover (18) Thread take-up cover (19) Finger guard S-7300A... -
Page 14: Installation
If the table moves, it may crush your feet or cause other injuries. Contact your Brother dealer or a qualified electrician Use both hands to hold the machine head when for any electrical work that may need to be done. -
Page 15: Installation
(5) Spring washers [2 pcs] (6) Washers [2 pcs] (7) Bolts (large) [2 pcs] (8) Nuts (large) [2 pcs] (9) Spring washers (large) [2 pcs] (10) Washers (large) [2 pcs] 2. Connecting rod (11) Connecting rod (12) Nut 0881D S-7300A... - Page 16 0883D 0938D 5. Machine head seal 1. Tilt back the machine head, and then peel off the sticker (1). 2. Peel off the protective sheet (3) from the operation panel (2). S-7300A...
- Page 17 (7) is at the desired position within a distance of 16 mm of the needle plate when the knee liter plate is fully pressed. 8. After adjustment is completed, securely tighten the nut (6). Within 16 mm 0885D S-7300A...
-
Page 18: Lubrication
(5). Close the oil feeding pocket cover (3). <Lubrication oil replenishment interval> Be sure to add more oil if the oil gauge (6) is below the lower reference line. Upper reference line Lower reference line 0886D S-7300A... -
Page 19: Connecting The Cords
3. INSTALLATION 3-4. Connecting the cords CAUTION Contact your Brother dealer or a qualified electrician When securing the cords, do not bend the cords for any electrical work that may need to be done. excessively or fasten them too hard with staples,... - Page 20 ・ Make sure that ground connections are secure in order to ensure safety. ・ For Europe specifications, Americas 220 V specifications and Green and yellow wire (ground wire) 100 V/400 V system specifications, 0890D refer to “3-4-2. Other cords”. S-7300A...
-
Page 21: Other Cords
<Seen from underneath table> ・ Take care when tapping in the staples (8) to make sure that they do not pierce the cords. ・ Do extension cords, otherwise machine operation problems may result. Control box Green and yellow wire (ground wire) 0943D S-7300A... - Page 22 3. INSTALLATION <For 100V/400V system specifications> (1) Power switch (2) Screws [2 pcs] 4145M S-7300A...
- Page 23 NOTE: ・ Take care when tapping in the staples (7) to make sure that they do not pierce the cords. ・ Do extension cords, otherwise machine operation problems may result. Green and yellow wire (ground wire) 0945D S-7300A...
- Page 24 NOTE: ・ Take care when tapping in the staples (5) to make sure that they do not pierce the cords. ・ Do extension cords, otherwise machine operation problems may result. Green and yellow wire (ground wire) 0892D S-7300A...
-
Page 25: Test Operation (Operating The Treadle)
Press the ON power switch (1). The power indicator (2) will illuminate. 0893D The display (3) of the operation panel will change in the order shown in the illustration. (During this time, the feed mechanism will return to the home position.) S-7300A... -
Page 26: Adjusting The Treadle
(6) from the position in figure A to the position in figure B. The treadle stroke will then be increased by approximately 27 %. At this time, the treadle forward and backward depression sensitivity will change, so readjust if necessary. 0940D S-7300A... -
Page 27: Preparation Before Sewing
* There is an anti-spin spring (3) inside the bobbin case. The anti-spin spring (3) prevents the bobbin from racing at times such as during thread trimming. * Use bobbins (2) made of light alloy as specified by BROTHER. 2120M For thick materials 0798M 2121M S-7300A... -
Page 28: Winding The Lower Thread
(2), and then pull it out from the thread guide (3). 4. Check that the bobbin turns clockwise when the thread is pulled. 5. Hold the latch (4) on the bobbin case and insert the bobbin case into the rotary hook. 2126M S-7300A... -
Page 29: Threading The Upper Thread
Turn the machine pulley and raise the thread take-up (1) before threading the upper thread. This will make threading easier and it will prevent the thread from coming out at the sewing start. 25 - 30mm (Reference value: #60 spun thread) 0897D S-7300A... -
Page 30: Using The Knee Lifter
4. PREPARATION BEFORE SEWING 4-6. Using the knee lifter The presser foot (2) can be raised by pressing the knee lifter plate (1). 0899D S-7300A... -
Page 31: Using The Operation Panel (Basic Operations)
Furthermore, you can return to the home screen from any other screen by pressing the key. Detailed home screen Simple home screen S-7300A... -
Page 32: Description Of Detailed Home Screen
If you keep pressing this key, the display switches to the main sewing setting screen. (18) End backtack key Press this key to switch the end backtack sewing operation (off/on). If you keep pressing this key, the display switches to the end backtack setting screen. S-7300A... -
Page 33: Description Of Simple Home Screen
This key is set to operate as a "Thread trimming lock key" at the time of shipment from the factory. * The assignments for shortcut keys 1 to 4 can be changed. (Refer to "6-5. Assigning functions to shortcut keys".) S-7300A... -
Page 34: Types Of Icons
Type C: Touch keys which change their setting status (symbol) each time they are touched <Example> Unlocked Locked Lock key Thread wiping enabled Thread wiping disabled Thread wiper key Start backtack enabled Start backtack disabled Start backtack key S-7300A... -
Page 35: Menu Screen
・ The menu screen consists of the following five screens. ・ Press the key at a menu screen to change the screen. 1st page 2nd page 3rd page 4th page 5th page S-7300A... -
Page 36: Program Setting Method
Programs P1 to P9 Start backtack Start backtack sewing parameters Main sewing Main sewing parameters (step 1) Main sewing parameters (step 2) Main sewing parameters (step 3) …… Main sewing parameters (step 20) End backtack End backtack sewing parameters Program individual functions S-7300A... - Page 37 End backtack sewing pattern Sewing speed 220 - 3000 sti/min No. of stitches C 1 - 19 stitches No. of stitches D 1 - 19 stitches -3 specifications: 0.05 - 5.00 mm Stitch pitch -5 specifications: 0.05 - 5.00 mm S-7300A...
- Page 38 Best PFM mode Best PFM mode enabled (T/T short) Best PFM mode enabled (Prev. thread away + T/T short) X-over seam assist mode disabled X-over seam assist mode X-over seam assist mode enabled PFM : Performance : Thread Trimming X-over: Cross-over S-7300A...
-
Page 39: Start Backtack Settings
100 sti/min 1800 No. of stitches A 1 - 19 stitches 1 stitch No. of stitches B 1 - 19 stitches 1 stitch Stitch pitch 0.05 mm 2.00 -3 specifications: 0.05 - 5.00 mm -5 specifications: 0.05 - 5.00 mm S-7300A... -
Page 40: Main Sewing Settings
-5 specifications: 0.05 - 5.00 mm, DS1 - DS5 (*1) For China: 4300 (sti/min) For Japan and General Export: 4000 sti/min For -3 specifications for Europe and America: 4700 sti/min For -5 specifications for Europe and America: 4500 sti/min S-7300A... -
Page 41: End Backtack Settings
100 sti/min 1800 No. of stitches C 1 - 19 stitches 1 stitch No. of stitches D 1 - 19 stitches 1 stitch Stitch pitch 0.05 mm 2.00 -3 specifications: 0.05 - 5.00 mm -5 specifications: 0.05 - 5.00 mm S-7300A... -
Page 42: Using Program Individual Functions And Program Common Functions
× ○ Needle up/down × ○ Thread trimming lock × ○ Thread wiper × ○ Correction sewing ○ × AUTO × ○ Slow start ○ × Special locus ○ × Best PFM mode ○ × X-over seam assist mode S-7300A... -
Page 43: Needle Up/Down
5-5-3. Thread wiper Thread wiping operation can be set. Setting details Thread wiping operation is disabled after thread trimming. Thread wiping operation is enabled after thread trimming. * If thread trimming operation is disabled, thread wiping operation will also be disabled. S-7300A... -
Page 44: Correction Sewing
Sewing is carried out automatically for the number of stitches which have been set (start and end backtacking, fixed stitch sewing, thread trimming) simply by depressing the treadle once. After sewing is complete, thread trimming is carried out automatically. S-7300A... -
Page 45: Slow Start
The feed dog locus can be set. (Refer to "8-3. Using the feed dog locus".) Setting details The feed dog moves along the standard locus. The feed dog moves along special locus 1. The feed dog moves along special locus 2. The feed dog moves along special locus 3. S-7300A... -
Page 46: Best Pfm Mode
X-over seam assist is disabled (normal sewing is carried out). X-over seam assist is enabled. When the X-over seam sensor detects an X-over seam, the sewing speed, feed locus, feed timing and stitch pitch are changed to the special settings for X-over seam sewing. S-7300A... -
Page 47: Using The Production Counter
When the value is changed, the production counter (1) will flash. ・ If you would like to return the setting to "0000", press the Clear key. ・ If you press the OK key, the value will be confirmed and the display will return to the home screen. S-7300A... -
Page 48: Using The Lower Thread Counter
・ You can press the Reset key to provisionally reset the value to the one which was set previously (only if the counter function was turned on). ・ If you press the OK key, the value will be confirmed and the display will return to the home screen. S-7300A... - Page 49 * The lower thread counter value will return to the value which was previously set. 4. The display will return to the screen which was being displayed before the lower thread counter out warning appeared, and sewing will be possible. S-7300A...
-
Page 50: Home Screen Mode Setting
Use the + and - keys to set the value (1) for the mode. ・ Press the return key to return to the menu screen. ・ Press the home key to return to the home screen which has been set. S-7300A... -
Page 51: Illumination Led Brightness Setting
・ Press the return key to return to the menu screen (or the home screen). * Once the value for the brightness level is changed, the status will be displayed when you return to the home screen, even if the status was being displayed previously. S-7300A... -
Page 52: Using The Operation Panel (Advanced Operations)
Press the home key to return to the home screen. * When more than one step had been added for sewing, the number of stitches in the step which is currently being sewn will be completed, and then sewing will continue on to the next step. S-7300A... -
Page 53: Editing Steps
-5 specifications: 0.05 - 5.00 mm, DS1 - DS5 Linking - (*1) For China: 4300 (sti/min) For Japan and General Export: 4000 sti/min For -3 specifications for Europe and America: 4700 sti/min For -5 specifications for Europe and America: 4500 sti/min S-7300A... -
Page 54: Sewing Start Step Setting
(1) is cleared and the display returns to the normal detailed home screen. * If the program number is changed or the power is turned off and back on, the sewing start step number (1) will be cleared even if sewing is not carried out. S-7300A... -
Page 55: Program Copy
* At this time, the copy destination program number will be the program number which is currently selected. Press the return key to return to the program setting screen. Press the menu key to return to the menu screen. S-7300A... -
Page 56: Shortcut Key Assignment Method
The currently-selected icon will be enclosed in a blue box. After a shortcut key has been assigned, press the home key to return to the simple home screen. The icon for the function which has been assigned to the shortcut key will be displayed in this screen. S-7300A... -
Page 57: Design Stitch Registration Method
2mm×2 stitch Switching to add/delete step mode 1. At the menu screen, select "Design stitch registration" to switch to the design stitch registration (number selection) screen. 2. Next, select the design stitch number to be registered from DS-1 to DS-5. S-7300A... - Page 58 3. Select the stitch pitch, and then press the + or - key to set the desired design stitch. * For DS1 to DS5, the maximum stitch pitch is displayed as follows. 4. Press the home key to return to the home screen. S-7300A...
-
Page 59: Working Pace Setting Method
・ To confirm the setting and exit, press the OK key. The working pace will be confirmed and the mode will return to production counter setting mode. ・ To exit without confirming the setting, press the return key. The mode will return to production counter editing mode. S-7300A... -
Page 60: Memory Switch Setting Method (Standard)
Press the OK key to store the memory switch setting. The setting display will change from flashing to illuminated. <Memory switch setting mode exiting method> Press the return key to return to the menu screen. S-7300A... -
Page 61: List Of Memory Switch Settings
(Refer to the Service Manual for details on MSW-051.) OFF: No operation (only possible using presser foot lifter pedal) (*1) Other than Europe and America: ON Europe and America: OFF S-7300A... - Page 62 Needle down stop position correction value (Degrees) (Degrees) Feed motor settings (200 to 299) Setting Setting range Initial value Setting details units 50 - 150% Forward direction pitch correction ratio 50 - 150% Reverse direction pitch length correction ratio S-7300A...
- Page 63 30 - 300: Panel open time before panel lock turns on (sec) * The standby time is only counted at the home screen. If any other screen is displayed, the panel lock does not operate. OFF, ON Panel auto lock when turn on power - OFF: Disabled ON : Enabled S-7300A...
- Page 64 * Puller operation is enabled when MSW-960 is set to "1" (it does not operate when set to other than "2" or "3"). (Refer to the Service Manual for details on MSW-960.) * If set to puller switch, the presser foot lifting function using the switch is disabled. S-7300A...
-
Page 65: Hand Switches
Fully pressed: If the switch is kept pressed, sewing continues. 9: <Reverse continuous correction sewing> If the switch is kept pressed, sewing continues. 10: <Single correction sewing> Stops after half stitch sewing * These settings are enabled when the correction sewing icon is illuminated ( S-7300A... - Page 66 10: <Presser foot lifter (switching)> While tread trimming is stopped, the presser foot is raised and lowered each time the switch is pressed. * These settings are enabled when the correction sewing icon is turned off ( S-7300A...
-
Page 67: Hand Switch Function Setting
1. Select "Hand switch A function setting". 2. Next, select "Correction sewing function". Press the key to select the desired setting. ・ Press the return key to return to the previous screen. ・ Press the menu key to return to the menu screen. S-7300A... -
Page 68: 2Nd Correction Pitch Setting
Use the + or + key to set the ratio (1) with respect to the current pitch. The setting range is from 10% to 250%. ・ Press the return key to return to the previous screen. ・ Press the menu key to return to the menu screen. (1) (1) S-7300A... -
Page 69: Reading And Writing Data Using Usb Media
Same as above Cycle programs ISMCYC.SEW Same as above Program common functions ISMCOM.SEW Same as above Design stitches ISMDST.SEW Same as above Hand switch ISMHSW.SEW Same as above E*******.LDT ¥BROTHER¥ISM¥ISMLDT¥ Error log M*******.LDT Production data P*******.LDT Same as above S-7300A... -
Page 70: Resetting All Settings To Their Defaults
When initialization is complete, the display will return to the initialization menu screen. To exit from the initialization menu screen At the initialization menu screen, press the home key to close the initialization menu and switch to the home screen. S-7300A... -
Page 71: Sewing
(Refer to “Using the operation panel”.) 3. Depress the treadle to start sewing. 7-2. Using the thread wiper 1. Press the thread wiper key (1) so that it illuminates. 2. The thread wiper (2) will operate after the thread is trimmed. 0898D S-7300A... -
Page 72: Backtacking
When hand switch B (1) is pressed during sewing, the feed direction will be reversed. When it is released, the feed direction will return to normal. * Hand switch B (1) can be set to carry out various different operations. (Refer to "6-10. Hand switches".) 0901D S-7300A... -
Page 73: Sewing Condensed Stitches
* Hand switch A (1) can be set to carry out various different operations. (Refer to "6-10. Hand switches".) Sewing direction Condensed stitches 0902D S-7300A... -
Page 74: New Functions
25 to 30 mm (spun thread) or 28 to 33 mm (polyester thread). * Reference values for upper thread trailing length 25 - 30mm(For spun thread) 28 - 33mm(For polyester thread) Becomes shorter Becomes longer 0905D S-7300A... -
Page 75: Using X-Over Seam Assist Mode
Set to negative value → Detection timing is retarded If a loud noise is generated, the presser foot may be bouncing. In such cases, increase the presser foot pressure, or adjust the X-over seam detection sensitivity to a negative value. Material thickness X-over seam area S-7300A... -
Page 76: Using The Feed Dog Locus
No. 2 Feed direction Responsiveness to heavy-weight materials is improved compared to previous -3 specifications. [-[][]3 specifications only] 1. Use a genuine Brother rotary hook (SB6568001). 2. Replace gauge parts as necessary. Recommended needle plate (SB5244001) Recommended feed dog (SB5226001) 3. -
Page 77: Example Of Using Hand Switch Settings
If you would like to use a hand switch to operate the presser foot 10: Presser foot lifter lifter 1: Reverse (switching) (The optional solenoid presser foot lifter set is required.) * Refer to “6-10. Hand switches” for other settings. S-7300A... -
Page 78: Thread Tension
After the lower thread tension has been adjusted, adjust the upper thread tension so that a good, even stitch is obtained. 1. Lower the presser foot. 2. Adjust by turning the tension nut (2). Becomes weaker Becomes stronger 0903D S-7300A... -
Page 79: Adjusting The Presser Foot Pressure
・ If the tension of the pretension (1) is increased, the lengths of the threads trailing from the needle tips will be reduced; if the tension is reduced, the lengths will be increased. Adjust by turning the pretension (1). 25 - 30mm Becomes shorter Becomes longer 0905D S-7300A... -
Page 80: Adjusting The Thread Take-Up Amount (-[][]3 Specifications)
(1) until it touches the screw stop on the thread take-up support shaft (3). 5. After this, tighten the set screw (2). 6. Install the face plate. Screw stop 0906D S-7300A... -
Page 81: Cleaning
8. Remove the bobbin from the bobbin case (4) and clean the bobbin case (4) with a cloth. 9. Insert the bobbin into the bobbin case (4), and then place the bobbin case (4) back into the machine. 2184M S-7300A... - Page 82 3. Checking 1. Replace the needle if it is bent or if the tip is broken. 2. Check that the upper threads have been threaded correctly. (Refer to "4-5. Threading the upper thread".) 3. Carry out a test sewing. 0908D S-7300A...
-
Page 83: Adjusting The Rotary Hook Lubrication Amount
* Turn the rotary hook adjusting screw (3) and check the 0911D lubrication amount repeatedly until the lubrication amount is correct. 4. Check the lubrication amount again after the sewing machine has been used for approximately two hours. S-7300A... -
Page 84: Standard Adjustments
If only one hand is used, the weight of the machine Ask your Brother dealer or a qualified electrician to head may cause your hand to slip, and your hand carry out any maintenance and inspection of the may get caught. -
Page 85: Arm Thread Guide R
・ When sewing heavy-weight material, move arm thread guide R (1) to the left. (The thread take-up amount will become greater.) ・ When sewing light-weight material, move arm thread guide R (1) to the right. (The thread take-up amount will become less.) 0914D S-7300A... -
Page 86: Presser Foot Height
2. Press the menu key (1). 3. Select the "X-over seam sensor correction" key (2). 4. Turn the machine pulley to set the upper shaft position to between 110 and 290 degrees. 5. Lower the presser foot. 6. Press the OK key (3). S-7300A... -
Page 87: Adjusting The Feed Dog Height
(B)) Becomes (Refer to "12-6. Adjusting the feed dog angle" on the lower nextpage for details of this operation.) 0916D Becomes Becomes Becomes higher higher higher Needle plate Standard Standard Standard Becomes Becomes Becomes lower lower lower 0930D 0931D S-7300A... -
Page 88: Adjusting The Feed Dog Angle
* The height of the feed dog (2) will change after the angle has been adjusted, so it will be necessary to re-adjust the height of the feed dog (2). Back is lowered Front is raised Standard Standard Back is raised Front is lowered 0933D S-7300A... -
Page 89: Adjusting The Needle Bar Height
2. Remove the rubber cap (3) from the face plate. 3. Loosen the screw (4) and move the thread wiper (1) up or down to adjust its position. 4. Securely tighten the screw (4). 5. Install the rubber cap (3). 0918D S-7300A... -
Page 90: Adjusting The Needle And Feed Mechanism Timing
NOTE: If the feed lifting eccentric cam (4) is turned too far in the direction of <A>, it may cause the needle to break. 7. After adjusting, securely tighten the set screw (5). 8. Press the home key (6). Needle timing is (Standard) Needle timing is advanced retarded 0920D S-7300A... -
Page 91: Needle And Rotary Hook Timing
(7) is enough to allow the thread being used to pass through smoothly. The clearance should be 0.4 to 0.7 mm (for -[][]3 specifications) and 0.6 to 1.1 mm (for -[][]5 specifications). <-[][]3> 0.4 - 0.7mm <-[][]5> 0.6 - 1.1mm 2293M 0921D S-7300A... -
Page 92: Adjusting The Presser Foot Floating Amount (Minute Lifting Amount) (Option)
(6) clockwise. ・ To lower the presser foot (1) ... Turn the adjusting screw (6) counterclockwise. 5. Tighten the nut (7). * After making the adjustment, sew a piece of material to check the floating amount. Raise Lower 0922D S-7300A... -
Page 93: Thread Trimming
(11) is slightly visible. (The head of the screw (9) is pan-shaped, and so the upper knife (10) can pivot on this screw when it is tilted.) 0952D S-7300A... - Page 94 (12) moves the thread trimmer cam roller (13) to its maximum displacement position. * Make sure that the thread trimmer solenoid does not turn off and does not return during this step. 0955D S-7300A...
- Page 95 11. Tighten the screw (2) of the thread trimmer lever (1). * Make sure that there is no play in the thrust direction in the forked shaft (15) of the thread trimmer lever (1) (see illustration on page 8). 0957D S-7300A...
- Page 96 3. Check that the clearance between the edge of the thread trimmer cam (2) and the roller shaft (4) is 0.5 mm when the roller shaft (4) returns to the right. (Fig. (B)) * Tighten the two set screws (5) to approximately 4 N.m. 0959D S-7300A...
-
Page 97: List Of Error Codes
・ For items with "**" appearing in the "Page" column, ask the place of purchase for advice. <Connector layout diagram> Connector P2 Connector P4 Connector P1 Connector P3 Connector P5 Sewing machine motor connector Power supply connector Feed motor connector 0926D Main P.C. board Connector P13 Connector P6 0927D S-7300A... - Page 98 E150 motor. Motor overheating sensor connection was not Turn off the power and check the connection of E151 detected. connector P5. Sewing machine motor overload was detected Turn off the power and check the sewing conditions. E161 during sewing. S-7300A...
- Page 99 Model settings could not be read from machine Turn the power off and then back on again. E450 head memory (internal panel). Data backup cannot be written to machine head Turn the power off and then back on again. E451 memory (internal panel). S-7300A...
- Page 100 Turn off the power, and then repeat the version E890 update procedure. If an error code that is not listed above appears or if carrying out the specified remedy does not solve the problem, contact the place of purchase. S-7300A...
-
Page 101: Troubleshooting
・ Is the thread take-up spring too weak? Adjust the tension of the thread take-up spring. ・ Is the needle and rotary hook timing correct? Adjust the height of the needle bar. Adjust the clearance between the needle and the tip of the rotary hook. S-7300A... - Page 102 ・ Is the presser foot being raised before the sewing machine has stopped sewing? Raise the presser foot after the sewing machine has stopped sewing. ・ Is the upper thread trailing length too long after thread trimming? Large bird's nests forming sewing Increase the tension of the pre-tension. start. S-7300A...
- Page 103 0751M ・ Is the bobbin turning smoothly? If the bobbin is not turning smoothly, replace the bobbin. ・ Is a bobbin other that the light-alloy bobbins specified by Brother being used? Use only bobbins which are specified by Brother. S-7300A...
- Page 104 3. Keep pressing the best PFM mode key, and then select "T/T short parameter". (1) Delete the stitch pitch for the previous stitch. (2) Decrease the sewing speed for the final stitch and the stitch before it. Stitch pitch for 1st stitch Stitch pitch for 2nd stitch S-7300A...
- Page 105 Replace the fixed knife or the movable knife. both being ・ Is there not enough of a meshing amount between the upper knife trimmed) and the lower knife? Adjust the tip of the upper knife to the lower knife index position so that the knives mesh. S-7300A...
- Page 106 Is the knee lifter being used before the sewing machine has stopped? Adjust the tension release switching plate upward to retard the tension release timing. Thread take-up spring ・ Adjust the tension release switching plate upward to retard the stopper thread tension release timing. take-up spring are twisted together. S-7300A...
- Page 107 Insert connectors securely. 0925D ・ This display is to notify you that it is time to apply grease. "Grease up" flashes in the panel display when the Apply grease. power switch is turned on. S-7300A...
- Page 108 INSTRUCTION MANUAL * Please note that the contents of this manual may differ slightly from the actual product purchased as a result of product improvements. S-7300A © 2015 Brother Industries, Ltd. All Rights Reserved. This is the original instructions. I5031041D...