Table of Contents
Advertisement
Quick Links
Advertisement
Table of Contents

Related Manuals for Belkin F6D4050


Summary of Contents for Belkin F6D4050
- Page 1 Enhanced Wireless USB Adapter User Manual 8820-00050 F6D4050...
- Page 2 1 Introduction . . . . . . . . . . . . . . . . . . . . . . . . . . . . . . . . . . . . . . . . . . . 1 4 Using the Belkin Wireless networking Utility . . . . . . . . . . . . . . 19 Benefits of a Home Network .
-
Page 3: Benefits Of A Home Network
Thank you for purchasing the Belkin Enhanced Wireless USB Adapter . Now you can take advantage of this great new technology and gain the freedom to network your home and office computers wirelessly . This Adapter allows you to connect a notebook computer to your network . -
Page 4: Placement Of Your Wireless Networking Hardware For Optimal Performance
Placement of your Wireless networking Hardware for To achieve the best wireless network coverage for your “wireless clients,” (i .e ., computers enabled by Belkin Adapters or Cards): optimal Performance • Ensure that your wireless router’s (or access point’s) antennas... - Page 5 • Try moving cordless phones away from the wireless router (or capabilities of your Belkin Wireless Networking Utility to locate any other access point) and your wireless-enabled computers . wireless networks, and move your wireless router (or access point) and computers to a channel as far away from other networks as possible .
- Page 6 . Should you need to cover an even wider area, we suggest the Belkin Wireless Range Extender/Access Point . For more information regarding our networking products, visit our website at www .belkin .com/networking or call Belkin Technical Support . Enhanced Wireless USB Adapter...
-
Page 7: Product Features
• 2 .4GHz ISM (Industrial, Science, and Medical) band operation Provides immediate high-speed wireless connectivity at home, work, • Integrated easy-to-use Belkin Wireless Networking Utility and hotspot locations without compromising the use of existing 802 . 1 1b/g products •... -
Page 8: Product Specifications
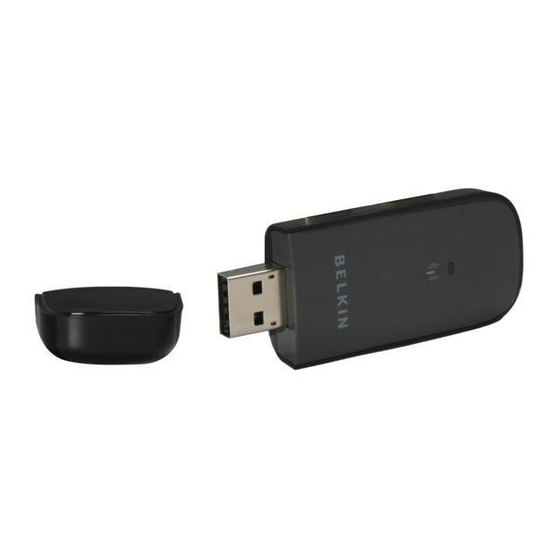
oVErVIEW sections table of contents Product Specifications (a) Protective Cap The cap is provided to protect the USB connector during transportation . Remove the cap before inserting the Adapter to your Host Interface: USB 2 .0 computer’s USB port . Operating Temperature: 32–140 degrees F (0–60 degrees C) Storage Temperature: -4–176 degrees F (-20–80 degrees C) (b) Power/Activity LED... -
Page 9: Installing And Setting Up The Adapter
A . 1 Insert the Installation Software CD into your CD-ROM drive . A .2 Click “Next” to begin the installation process . note: If the Belkin Wireless Card Installer screen does not appear within 20 seconds, access your CD-ROM by double-clicking on the “My Computer”... - Page 10 InSTAllIng And SETTIng UP THE AdAPTEr sections table of contents A .3 The InstallShield Wizard will start the installation process . A .4 A window may appear showing the message, “Windows can’t verify the publisher of this driver software” . This DOES NOT indicate a problem .
- Page 11 InSTAllIng And SETTIng UP THE AdAPTEr sections table of contents A .5 When prompted, plug in your Adapter . A .7 Click “Finish” to restart your computer . A .6 When the installation completes, you will see the following pop-up message on your Windows taskbar .
- Page 12 InSTAllIng And SETTIng UP THE AdAPTEr sections table of contents A.8 To connect to the Internet, open the Network and Sharing Center A .9 In the Control Panel, click on “View network status and tasks” . by first opening the Control Panel from the “Start” menu . Enhanced Wireless USB Adapter...
- Page 13 InSTAllIng And SETTIng UP THE AdAPTEr sections table of contents A.10 In the Network and Sharing Center, click on “Connect to A . 1 1 In the next screen, select an available wireless network and a network” . click “Connect” . Enhanced Wireless USB Adapter...
- Page 14 InSTAllIng And SETTIng UP THE AdAPTEr sections table of contents A . 1 2 Your Adapter will attempt to connect to the selected network . A . 1 3 Depending on the security settings of your wireless network, you may be prompted to enter a network security key or a passphrase . Click “Connect”...
- Page 15 InSTAllIng And SETTIng UP THE AdAPTEr sections table of contents A . 1 4 After connecting to the network, you can choose to save this A . 1 5 The Network and Sharing Center now indicates the network network and connect automatically when your Adapter is in range . connection that you have just established .
- Page 16 THE ADAPTER . B . 1 Insert the Installation Software CD into your CD-ROM drive . B .2 The Belkin Wireless Card Installer screen will automatically appear within up to 20 seconds . Click “Install Software” or “Next” to start the installation .
- Page 17 InSTAllIng And SETTIng UP THE AdAPTEr sections table of contents B .3 Select a destination folder for the software installation by clicking B .4 A Setup Status screen lets you know where you are in the “Browse”; or, simply click “Next” to install to the default location . setup process .
- Page 18 InSTAllIng And SETTIng UP THE AdAPTEr sections table of contents B .5 A window may appear showing the message, “The software you B .6 When prompted, plug in your Adapter . are installing…” This DOES NOT indicate a problem . Our software has been fully tested and is compatible with this operating system .
- Page 19 InSTAllIng And SETTIng UP THE AdAPTEr sections table of contents B .7 The Found New Hardware Wizard might appear in 3–15 seconds . If B.8 Click “Finish” to restart your computer . it does, select “Install the software automatically” and click “Next” to install the software .
- Page 20 C . Configuration C .2 The Belkin Wireless Networking Utility screen will appear . Using the Belkin Wireless networking Utility C . 1 After restarting your computer, double-click the Belkin Wireless Networking Utility icon on the desktop screen .