
Related Manuals for Ricoh FAX1130L


Summary of Contents for Ricoh FAX1130L
- Page 1 Operating Instructions Laser Facsimile For safe and correct use of this machine, please be sure to read the Safety Information in this manual before you use it.
- Page 2 About the Operating Instructions Your machine comes with the References: This Operating Instructions provides information you need for setting up your machine and installing the supplied software. It also provides all of the detailed instructions for using your machine as a printer, a scanner and a copier and information for maintaining and troubleshooting the machine.
- Page 3 Safety Information When using this machine, the following safety precautions should always be followed. Safety During Operation In this manual, the following important symbols are used: WARNING: Indicates a potentially hazardous situation which, if instructions are not followed, could result in death or serious injury. CAUTION: Indicates a potentially hazardous situation which, if instructions are not followed, may result in minor or moderate injury or damage to property.
- Page 4 CAUTION: • Protect the machine from dampness or wet weather, such as rain and snow. • Unplug the power cord from the wall outlet before you move the machine. While moving the machine, you should take care that the power cord will not be damaged under the machine.
- Page 5 Please contact your service representative if relocating this product to another country. In the event of problems, please contact your service representative in the first instance. FAX1130L/FAX1170L/F230/F250/LF120/LF125m : The CE declaration of Comformity is available on the Internet at URL : http://www.ricoh.co.jp/fax/ce_doc IF3030/IF3035 : The CE Declaration of Conformity is available by accessing the URL: http://jboard.danka.de/jboard/produkte/index.htmlo and selecting the product applicable.
- Page 6 Positions of Labels and Hallmarks for WARNING and CAUTION Labels This machine has labels for WARNING and CAUTION at the positions shown below. For safety, please follow the instructions and handle the machine as indicated. *This label is stuck to hot surfaces. Be careful not to touch these areas. In accordance with IEC 60417, this machine uses the following symbols for the main power switch: means POWER ON.
- Page 7 NOTICE Note to users in the United States of America Notice: This equipment has been tested and found to comply with the limits for a Class B digital device, pursuant to Part 15 of the FCC Rules. These limits are designed to provide reasonable protection against harmful interference in a residential installation.
- Page 8 7. If trouble is experienced with this equipment, for repair or warranty information, please contact RICOH CORP. CUSTOMER SUPPORT DEPT. at 1-800-FASTFIX. If the equipment is causing harm to the telephone network, the telephone company may request that you disconnect the equipment until the problem is resolved.
- Page 9 Differences Between British and American English British English American English (Re)dialling (Re)dialing Color Colour Emphasise Emphasize Recognise Recognize Organise Organize Authorise Authorize Cancelling Canceling Customise Customize Socket Jack Labelling Labeling WARNING • Do not disassemble the machine as it may give you an electric shock. •...
-
Page 10: Table Of Contents
ONTENTS ETTING TARTED Chapter 1: Setting Up Your Machine Unpacking ............1.2 Selecting a Location ........1.5 Understanding the Component Location ....1.6 Front View ............. 1.6 Rear View ............1.6 Control Panel Functions ........1.7 Attaching Accessories ........... 1.9 Document Output Support ....... - Page 11 Speaker, Ringer, Key Sound and Alarm Sound ... 1.34 Speaker Volume ..........1.35 Using the Save Mode .......... 1.36 Power Save Mode .......... 1.36 APER ANDLING Chapter 2: Selecting Print Materials ........2.2 Type, Input Sources and Capacities ....2.2 Guidelines for Paper and Special Materials ..
- Page 12 Receiving a Fax About Receiving Modes ........4.10 Loading Paper for Receiving Faxes ......4.11 Receiving Automatically in Fax Mode ..... 4.11 Receiving Automatically in Ans/Fax Mode ....4.12 Receiving Manually in Tel Mode ......4.12 Receiving Manually Using Remote Receive Start Code 4.13 Receiving Faxes Using the DRPD Mode ....
- Page 13 RINTING Chapter 5: MODEL ONLY Printing a Document in Windows ......5.2 Canceling a Print Job ........5.5 Using a Favorite Setting ........5.6 Using Help ............. 5.6 Setting Paper Properties ........5.7 Setting Graphic Properties ........5.9 Printing Multiple Pages on One Sheet of the Paper ... 5.11 Printing a Reduced or Enlarged Document ....
- Page 14 Setting the Notify Toner Option ....... 7.10 Cleaning the Drum ......... 7.11 Ignoring the Toner Empty Message ....7.11 ROUBLESHOOTING Chapter 8: Clearing Document Jams ........8.2 Input Misfeed ..........8.2 Exit Misfeed ........... 8.2 Clearing Paper Jams ..........8.3 In the Paper Tray ...........
-
Page 15: Chapter 1: Getting Started
ETTING TARTED Thank you for purchasing this multifunctional product. Your machine provides you with printing, copying, scanning, and faxing functions! This chapter gives you step-by-step instructions for setting up your machine. This chapter includes: • Setting Up Your Machine • Installing Software •... -
Page 16: Setting Up Your Machine
Setting Up Your Machine Unpacking Remove the machine and all accessories from the packing carton. Make sure that the machine has been packed with the following items. If there is a missing item, contact the retailer where you bought the machine: Starter Toner Cartridge AC Power Cord Telephone Line Cord... - Page 17 USB Cable Document Output Support (for America only) Key layout sheet Brand plaque (May already be affixed to the machine (for Europe only /May already be in some regions) affixed to the machine in some regions) * The appearance of the power cord and the telephone line cord may differ according to your country’s specifications.
- Page 18 Remove the packing tape from the front, back and sides of the machine. Tape ETTING TARTED...
-
Page 19: Selecting A Location
Selecting a Location Select a level, stable place with adequate space for air circulation. Allow extra space for opening covers and trays. The area should be well-ventilated and away from direct sunlight or sources of heat, cold and humidity. Do not set the machine close to the edge of your desk or table. -
Page 20: Understanding The Component Location
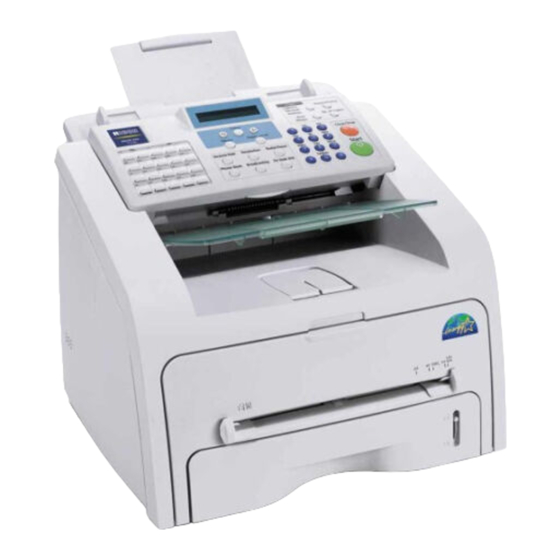
Understanding the Component Location These are the main components of your machine: Front View Automatic Document Document Input Feeder Support Control Panel (See page 1.7) Document Output Tray Front Output Tray (Face down) Document Guides Paper Output Extension Front Cover Toner Cartridge Paper Level Indicator... -
Page 21: Control Panel Functions
Control Panel Functions Use to store frequently-dialed fax number and dial them with a touch of the buttons. Scrolls through the options available for the selected menu item. Confirms the selection on the display. Enters Menu mode and scrolls through the menus available. - Page 22 Allows you to select the fax receiving mode. • Allows you to store frequently-dialed fax numbers using a one or two-digit speed dial or group number for automatic dialing and edit the stored numbers. • Allows you to print a Phone book list. Adjusts the resolution of the documents for the current fax job.
-
Page 23: Attaching Accessories
Attaching Accessories Document Output Support Insert the two tabs on the supplied document output support into the slots on both sides of the paper output tray. Fold out the extender, if necessary. :When detaching the document output tray, detach it by pressing the front portion of document output tray as seen from the picture. -
Page 24: Handset And Handset Cradle( For America Only)
Handset and Handset Cradle ( for America only) Plug the end of the coiled cord of the handset into the jack on the left side of your machine. Holding the cradle as shown, attach the handset cradle to the machine. ➀... -
Page 25: Installing The Toner Cartridge
Installing the Toner Cartridge Open the front cover. Remove the starter toner cartridge from its bag. Gently roll the cartridge 5 or 6 times to distribute the toner evenly inside the cartridge. Thoroughly rolling the cartridge will assure the maximum copies per cartridge. - Page 26 Slide the toner cartridge into the machine until it locks into place completely. Close the front cover. Make sure that the cover is securely closed. 1.12 ETTING TARTED...
-
Page 27: Loading Paper
Loading Paper You can load approximately 250 sheets. To load a stack of Letter-sized paper: Pull open the paper tray and remove it from the machine. Push down on the pressure plate until it locks into place. Fan the edges of the paper stack to separate the pages. Then tap the stack on a flat surface to even it up. - Page 28 Insert the paper stack into the paper tray with the side you want to print facing up. : If you want to load a different size of paper, you need to adjust the paper guides. For details, see page 1.15. Pay attention to the paper limit mark on the left inside wall of the tray.
- Page 29 Changing the Paper Size in the Paper Tray To load longer sizes of paper, such as Legal-sized paper, you need to adjust the paper guides to extend the paper tray. After pressing and unlatching the guide lock, slide the paper length guide out completely to extend the paper tray to its full length.
-
Page 30: Making Connections
Pinching the paper width guide as shown, move it toward the stack of paper until it lightly touches the side of the stack. OTES • Do not push the paper width guide far enough to cause the materials to warp. •... - Page 31 : In the United Kingdom, if a three-wire type (SHUNT-wire, older equipment) telephone or answering machine is connected to the EXT jack on the machine, the external equipment will fail to ring when receiving an incoming call as the machine is designed to operate with the latest technology.
-
Page 32: Connecting To Your Computer (For Mfp Model Only)
Connecting to your computer (for MFP model only) Plug the USB printer cable into the connector on the back of the printer. You must use a USB 1.1 compliant cable that is no more than 3 m in length. If you want to use a parallel printer cable, purchase only IEEE 1284 compliant parallel cable and connect it to the parallel connector on your machine. -
Page 33: Turning The Machine On
Turning the Machine On Plug one end of the supplied three-pronged electrical type cord into the AC socket on the machine and the other end into a properly grounded AC outlet. Press the power switch to turn the machine on. ➜... -
Page 34: Installing Software
Installing Software About Software (for MFP model only) You must install software using the supplied CD-ROM after you have set up your machine and connected it to your computer. The CD-ROM includes: • Software • Operating Instructions • Adobe Acrobat Reader The CD-ROM provides you with the following software: Type 1200 Driver To use your machine as a printer and scanner in Windows, you... -
Page 35: Printer Driver Features
Printer Driver Features Your printer drivers support the following standard features: • Paper source selection • Paper size, orientation and media type • number of copies The following table lists a general overview of features supported by your printer drivers. Printer Driver Feature Win9x/Me... -
Page 36: (For Mfp Model Only)
Installing Software in Windows (for MFP model only) System Requirements Before you begin, ensure that your system meets the minimum requirements. Supported Operating System • Windows 95 OSR2 • Windows 98/Windows 98 SE • Windows Me • Windows NT 4 Workstation or Server with Service Pack 3 •... - Page 37 Installing Software in windows OTES • Cancel the “New Hardware Found” window when your computer boots up. • Make sure that your machine is turned on and connected to your computer’s parallel port or USB port before installing software. Windows 95 and Windows NT 4.0 do not support the USB connection.
- Page 38 Choose the installation type. •Typical: Installs the common software for your printer, such as printer driver, Twain driver, Remote Control Panel. This is recommeded for most users. •Custom: Allows you to choose the language of software and the components you want to install. After selecting the language and the component(s), click Next.
-
Page 39: Repairing Software(For Mfp Model Only)
Click Finish. OTES • When you want to use your machine with the parallel cable, remove the USB cable and connect the parallel cable. Then reinstall the printer driver; select Start ¡ Programs ¡ Type 1200 ¡ Maintenance ¡ Repair ¡ Printer. If you have replaced the parallel cable with the USB cable, do the same to reinstall the driver. - Page 40 : If your machine is not connected to the computer, the OTES following window will appear. • After connecting the machine, click Next. • If you want to skip the connection status, click Next, and No to the following screen. Then the installation will start and the test page will not be printed at the end of the installation.
-
Page 41: Removing Software(For Mfp Model Only)
Removing Software (for MFP model only) Uninstall is required if you are upgrading software or if your installation fails. You can select Start ¡ Programs ¡ Type 1200 ¡ Maintenance. Otherwise, insert the supplied CD-ROM into your CD-ROM drive. The CD-ROM should automatically run and an maintenance window appears. -
Page 42: Setting Up The Machine System
Setting Up the Machine System Changing the Display Language To change the language that displays on the display of the control panel, follow these steps: Press Menu until “Machine Setup” appears on the top line of the display. Press the scroll button ( ) until “Language”... -
Page 43: Setting The Machine Id
Setting the Machine ID In some countries, you are required by law to indicate your fax number on any fax you send. The Machine ID, containing your telephone number and name or company name, will be printed at the top of each page sent from your machine. Press Menu until “Machine Setup”... -
Page 44: Entering Characters Using The Number Keypad
Entering Characters Using the Number Keypad As you perform various tasks, you need to enter names and numbers. For example, when you set up your machine, you enter your name or your company’s name and telephone number. When you store one or two digit speed dial or group dial numbers, you may also enter the corresponding names. - Page 45 Keypad Letters and Numbers Assigned numbers, letters or characters Space ’ & Changing Numbers or Names If you make a mistake while entering a number or name, press button to delete the last digit or character. Then enter the correct numbers or characters. Inserting a Pause With some telephone systems, you must dial an access code (9, for example) and listen for a second dial tone.
-
Page 46: Setting The Date And Time
Setting the Date and Time The current date and time are shown on the display when your machine is on and ready to work. All of your faxes will have the date and time printed on them. : If power to the machine is cut off, you need to reset the correct time and date once the power is restored. -
Page 47: Changing The Clock Mode
Changing the Clock Mode You can set your machine to display the current time using either 12-hour or 24-hour format. Press Menu until “Machine Setup” appears on the top line of the display. Press the scroll button ( ) until you see “Clock Mode” on the bottom line and press Enter. -
Page 48: Setting Sounds
Setting Sounds You can control the following sounds: • Ringer: You can adjust the ringer volume. • Key Sound: With this option set to “On,” a key tone sounds each time any key is pressed. • Alarm Sound: You can turn the alarm sound on or off. With this option set to “On,”... -
Page 49: Speaker Volume
Speaker Volume To adjust the volume using the On Hook Dial button: Press On Hook Dial. A dial tone sounds from the speaker. Press the scroll button ( ) until you hear the loudness you want. The display shows the current volume level. -
Page 50: Using The Save Mode
Using the Save Mode Power Save Mode Power Save mode allows your machine to reduce power consumption when it is not in actual use. You can turn this mode on by selecting the length of time for which the machine waits after a job is printed before it switches to a reduced power state. -
Page 51: Paper Handling
APER ANDLING This chapter introduces you to the basics of selecting print materials and loading them into your machine. This chapter includes: • Selecting Print Materials • Selecting an Output Location • Loading Paper in the Paper Tray • Using the Manual Feeder... -
Page 52: Selecting Print Materials
Selecting Print Materials You can print on a variety of print materials, such as plain paper, envelopes, labels, *transparencies* and so on. Always use print materials that meet the guidelines for use with this machine. See “Paper Specification” on page A.5. To get the best possible print quality, use only high-quality copier-grade paper. -
Page 53: Guidelines For Paper And Special Materials
Guidelines for Paper and Special Materials When selecting or loading paper, envelopes, or other special material, keep these guidelines in mind: • Always use paper and other materials that conform with the specifications listed under “Paper Specification” on page A.5. •... -
Page 54: Selecting An Output Location
- To avoid smudging caused by fingerprints, handle them and coated paper carefully. - To avoid fading, do not expose the printed transparencies to prolonged sunlight. • For labels(for MFP model only): - Verify that their adhesive material can tolerate fusing temperature of 200 C (392 F) for 0.1 second. -
Page 55: Printing To The Front Output Tray (Face Down)
Printing to the Front Output Tray (Face down) The front output tray collects printed paper face-down in correct order. The tray should be used for most print jobs. Printing to the Rear Output Slot (Face up) Using the rear output slot, paper comes out of the machine face up. Printing from the manual feeder to the rear output slot provides the straight paper path. - Page 56 To use the rear output slot: Open the rear cover by pulling it upward. : The fusing area inside the rear part of your machine ARNING becomes hot once the machine is turned on. Be careful when you access this area. If you do not want to use the rear output slot, close the rear cover.
-
Page 57: Loading Paper In The Paper Tray
Loading Paper in the Paper Tray The paper tray can hold a maximum of 250 sheets of 20 lb plain paper. For faxing and copying, you can use A4-, Letter- or Legal- sized paper only. For PC-printing, you can use many different sizes of paper;... -
Page 58: Using The Manual Feeder
Using the Manual Feeder Use the manual feeder to print transparencies, labels, envelopes or postcards in addition to making quick runs of paper types or sizes that are not currently loaded in the paper tray. Postcards, 3.5 by 5.83 in.(index) cards and other custom-sized materials can be printed with this printer. - Page 59 Adjust the paper guide to the width of the print material. : When printing on previously printed paper from the manual feeder, the printed side should be facing down with an uncurled edge to the machine. If you experience problems with paper feed, turn the paper around.
-
Page 60: Setting The Paper Type And Size For The Manual Feeder
Setting the Paper Type and Size for the Manual Feeder After loading paper in the manual feeder, you need to set the correct paper type and size using the control panel buttons. These settings will apply to Copy mode. For PC-printing, you need to select the paper size in the application program you use. -
Page 61: Copying
OPYING This chapter gives you step-by-step instructions for copying documents. This chapter includes: • Loading Paper for Copying • Preparing a Document • Making a Copy • Setting Copy Options • Changing the Default Settings • Setting the Time Out Option •... -
Page 62: Loading Paper For Copying
Loading Paper for Copying The instructions for loading print materials are the same whether you are printing, faxing or copying. For coping, you can use Letter-, A4-, Legal-sized print materials. For further details, see page 1.13 for loading in the paper tray and page 2.8 for loading in the manual feeder. -
Page 63: Making A Copy
Making a Copy Pull the document support all the way out. Fold out the extender, if necessary. Load the documents up to 20 pages face down into the ADF. Adjust the document guides to the document size. Customize the copy settings including number of copies, copy size, darkness and image by using the control panel buttons. -
Page 64: Setting Copy Options
Setting Copy Options The buttons on the control panel let you make all the basic copy options; darkness, document type, copy size and number of copies. Set the following options for the current copy job before pressing Start to make copies. Clear/Stop while you set the copy options, : If you press all of the options you have set for the current copy job will be... -
Page 65: Original Type
Original Type The image setting is used to improve the copy quality by selecting the document for the current copy job. To select the document type, press Original Type . Each time you press the button, the LED labeled with the selected mode turns on. -
Page 66: Reduced/Enlarged Copying
Reduced/Enlarged Copying Using the Reduce/Enlarge button, you can reduce or enlarge the size of a copied image from 50% to 150%. To select from the predefined copy sizes: Press Reduce/Enlarge. The default setting appears on the bottom line of the display. -
Page 67: Changing The Default Settings
Changing the Default Settings Copy options, including darkness, image, copy size and number of copies, can be set to the most frequently used modes. When you copy a document, the default settings are used unless they are changed by using the corresponding buttons on the control panel. -
Page 68: Setting The Time Out Option
Setting the Time Out Option You can set the time the machine waits before it restores the default copy settings, if you do not start copying after changing them on the control panel. Press Menu on the control panel until “Copy Setup” appears on the top line of the display. -
Page 69: Chapter 4: Faxing
AXING This chapter gives you information about using your machine as a fax machine. This chapter includes: • Sending a Fax • Receiving a Fax • Automatic Dialing • Advanced Fax Functions • Additional Features... -
Page 70: Sending A Fax
Sending a Fax Changing the Fax Setup options Press Menu until “Fax Setup” appears on the top line of the display. The first available menu item, “Ring To Answer,” displays on the bottom line. Press the scroll button ( ) until the menu item you want on the bottom line and press Enter. -
Page 71: Available Fax Setup Options
Available Fax Setup Options You can use the following setup options for configuring the fax system: Option Description Ring To Answer You can specify the number of times the machine rings, 1 to 7, before answering an incoming call. Darkness You can select the default darkness mode to fax your documents lighter or darker. - Page 72 Option Description Discard Size When receiving a document as long as longer than the paper installed in your machine, you can set the machine to discard any excess at the bottom of the page. If the received page is outside the margin you set, it will print on two sheets of paper at the actual size.
- Page 73 Pull the document input support all the way out. Fold out the extender, if necessary. Load the documents up to 20 pages face down into the ADF and adjust the document guides to the document size. For detailed guidelines for preparing an original document, see page 3.2.
-
Page 74: Adjusting The Document Resolution
Adjusting the Document Resolution The default document settings produce good results when setting typical text based documents. However, if you send documents that are of a poor quality, or contain photographs, you can adjust the resolution to produce a higher quality fax. Press Resolution on the control panel. -
Page 75: Sending A Fax Automatically
Sending a Fax Automatically Load the document(s) face down into the ADF. For details about loading a document, see page 4.5. Adjust the document resolution to suit your fax needs. See page 4.6. If you need to change the darkness, see page 4.3. Enter the remote fax phone number using the number keypad. -
Page 76: Sending A Fax Manually
Sending a Fax Manually Load the document(s) face down into the ADF. For details about loading a document, see page 4.5. Adjust the document resolution to suit your fax needs. See page 4.6. If you need to change the darkness, see page 4.3. Press On Hook Dial or lift the handset(for America only). -
Page 77: Confirming Transmission
Confirming Transmission When the last page of your document has been sent successfully, the machine beeps and returns to Standby Mode. When something goes wrong while sending your fax, an error message appears on the display. For a listing of error messages and their meanings, see page 8.8. -
Page 78: Receiving A Fax
Receiving a Fax About Receiving Modes • In Fax mode, the machine answers an incoming fax call and immediately goes into the fax reception mode. • In Tel mode, you can receive a fax by picking up the handset(for America only) or pressing On Hook Dial (you can hear voice or fax tone from the remote machine) and then pressing Start on the control panel of your machine. -
Page 79: Loading Paper For Receiving Faxes
Loading Paper for Receiving Faxes The instructions for loading paper in the paper tray are the same whether you are printing, faxing, or copying, except that faxes can only be printed on Letter-, A4- or Legal-sized plain paper. For details about loading paper and setting the paper size in the tray, see page 1.13 and page 1.33. -
Page 80: Receiving Automatically In Ans/Fax Mode
Receiving Automatically in Ans/Fax Mode For using this mode, you must attach an answering machine to the EXT jack on the back of your machine. See page 1.16. Press Receive Mode. Press and hold Receive Mode until “Ans/Fax” displays on the bottom line. -
Page 81: Receiving Manually Using Remote Receive Start Code
Receiving Manually Using Remote Receive Start Code You can receive a fax from someone you are talking to on the extension telephone without going to the fax machine. When you receive a call on the extension phone and hear fax tones, press the keys on the extension telephone. -
Page 82: Receiving Faxes In The Memory
To set up the DRPD mode: Press Menu until “Fax Setup” appears on the top line of the display. The first available menu item, “Receive Mode,” displays on the bottom line. Press the scroll button ( ➛ or ❿ ) until you see “DRPD Mode” on the bottom line and press Enter. -
Page 83: Automatic Dialing
Automatic Dialing One-touch Dialing The 20 one-touch buttons on the control panel lets you store frequently-used fax numbers and dial a number automatically with a touch of a button. Storing a Number for One-touch Dialing Press and hold one of the one-touch dial buttons for about 2 seconds. -
Page 84: Sending A Fax Using A One-Touch Number
Sending a Fax using a One-touch Number Load the document(s) face down into the ADF. For details about loading a document, see page 4.5. Adjust the document resolution to suit your fax needs. See page 4.6. If you need to change the darkness, see page 4.3. Press the one-touch button where you stored a number. -
Page 85: Sending A Fax Using A Speed Number
Enter the number you want to store using the number keypad and press Enter. To insert a pause between numbers, press Redial/Pause. A symbol “-” appears on the display. To assign a name to the number, enter the name you want. For details about entering characters, see page 1.30. -
Page 86: Group Dialing
Group Dialing If you frequently send the same document to several destinations, you can create a group of these destinations and set them under a one or two-digit group dial location. This enables you to use a group dial number setting to send the same document to all the destinations in the group. -
Page 87: Editing Group Dial Numbers
To assign a name to the group, enter the name. If you do not want to assign a name, skip this step. Press Enter when the name appears correctly or without entering a name. If you want to assign another group, press Enter and repeat from step 5. -
Page 88: Sending A Fax Using Group Dialing (Multi-Address Transmission)
Press Enter to add or delete the number. To change the group name, press Upper Level. Enter a new group name and press Enter. If you want to edit another group, press Enter and repeat from step 5. To return to Standby mode, press Clear/Stop. Sending a Fax Using Group Dialing (Multi-address Transmission) You can use group dialing for Broadcasting or Delayed... -
Page 89: Searching Sequentially Through The Memory
Searching Sequentially through the Memory Press Phone Book. Press Enter when “Search&Dial” appears on the display. Press the scroll button ( ) to scroll through the memory until the name and number you want to dial display. You can search upwards or downwards through the entire memory in alphabetical order, from A to Z. -
Page 90: Advanced Fax Functions
Advanced Fax Functions Sending Broadcasting Faxes Using the Broadcasting button on the control panel, you can use the broadcasting fax feature, which allows you to send a document to multiple locations. Documents are automatically stored in the memory and sent to a remote station. After transmission, the documents are automatically erased from the memory. -
Page 91: Sending A Delayed Fax
When you finish entering fax numbers, press 2 to select “No” at a Another No. prompt. The document is scanned into the memory before transmission. The display shows the memory capacity and the number of pages being stored in the memory. The machine begins sending the document in order of the numbers you entered. - Page 92 To enter more fax numbers, press 1 to select “Yes” and repeat steps 4 and 5. You can add up to 10 destinations. Note that you cannot use group dial numbers for another fax number. When you finish entering fax numbers, press 2 to select “No at a Another No.
-
Page 93: Sending A Priority Fax
Sending a Priority Fax Using the Priority Fax feature, a high priority document can be sent ahead of reserved operations. The document is scanned into the memory and transmitted when the current operation is finished. In addition, the priority transmission interrupts a broadcast operation between stations (i.e., when the transmission to station A ends, before transmission to station B begins) or between redial attempts. -
Page 94: Polling A Remote Machine
Polling a Remote Machine Polling is used when one fax machine requests another to send a document. This is useful when the person with the original document to be sent is not in the office. The person who wants to receive the document calls the machine holding it and requests that the document be sent. -
Page 95: Adding Documents To A Scheduled Fax
To select “AM” or “PM” for 12-hour format, press the button or any number button. If you set a time earlier than the current time, your machine will poll at that time on the following day. When the remote machine is secured with a 4-digit poll code, enter the correct code and press Enter. -
Page 96: Canceling A Scheduled Fax
The machine automatically stores the documents in the memory, and the display shows the memory capacity and the number of pages. After storing, the machine displays the numbers of total pages and added pages and then returns to Standby mode. Canceling a Scheduled Fax Press Menu until “Fax Feature”... -
Page 97: Additional Features
Additional Features Using Secure Receiving Mode You may need to prevent your received faxes from being accessed by unauthorized people. You can turn on Secure Receiving mode to restrict printing out all of the received faxes when the machine is unattended. In Secure Receiving mode, all of the incoming faxes go into the memory. - Page 98 To print received documents: Access the Secure Receive menu by following steps 1 and 2 on page 4.29. Press the scroll button ( ) to display “Print” on the bottom line and press Enter. Enter the four-digit passcode and press Enter. The machine prints all of the faxes stored in the memory.
-
Page 99: Printing Reports
Printing Reports Your machine can print reports containing useful information. The following reports are available: Phone Book List This list shows all of the numbers currently stored in the machine’s memory as speed dial and group dial numbers. You can print this Phone Book list using the Phone Book button;... - Page 100 When the Junk Fax Barrier feature is turned on, incoming faxes from those numbers are blocked. This feature recognize the last 6 digits of the fax number set as a remote fax machine’s ID. Multi-communication Report This report is printed automatically after sending documents from more than one location.
-
Page 101: Using Advanced Fax Settings
Using Advanced Fax Settings Your machine has various user-selectable setting options for sending or receiving faxes. These options are preset at the factory, but you may need to change them. To find out how the options are currently set, print the System Data list. For details about printing the list, see page 4.31 Changing Setting Options Press Menu until “Advanced Fax”... -
Page 102: Advanced Fax Setting Options
Advanced Fax Setting Options Option Description Send Forward You can set the machine to always forward all of the outgoing faxes to a specified destination, in addition to the fax numbers you entered. Select Off to turn this feature off. Select On to turn this feature on. - Page 103 Option Description Stamp RCV Name This option allows the machine to automatically print the page number, and the date and time of the reception at the bottom of each page of a received document. Select Off to turn this feature off. Select On to turn this feature on.
-
Page 104: Using The Remote Control Panel (For Mfp Model Only)
Using the Remote Control Panel (for MFP model only) Using the Remote Control Panel, you can create and edit Phone Book entries or update the firmware program of your machine on the desktop of your computer. When you install software, the Remote Control Panel program is automatically installed. - Page 105 The Phone Book Tab Click the Phone Book tab to create and edit Phone Book entries. Reads the Phone Book entries from the machine to the Remote Control Panel. Downloads the Phone Book entries from the Remote Control Panel to the machine.
- Page 106 The Firmware Update Tab Click the Firmware Update tab to update the firmware of your machine. This feature should be used by an authorized technician. Please consult with the purchase point. 4.38 AXING...
-
Page 107: Printing ( For Mfp Model Only )
RINTING (for MFP model only) This chapter explains how to print your documents in Windows and how to use the print settings. This chapter includes: • Printing a Document in Windows • Setting Paper Properties • Setting Graphic Properties • Printing Multiple Pages on One Sheet of the Paper •... -
Page 108: Printing A Document In Windows
Printing a Document in Windows The following procedure describes the general steps required for printing from various Windows applications. The exact steps for printing a document may vary depending on the application program you are using. Refer to your software application’s user’s guide for the exact printing procedure. - Page 109 The Layout tab first displays. The preview image shows the sample page with the settings you specified. If necessary, select the Orientation option. The Orientation option allows you to select the direction in which information is printed on a page. •...
- Page 110 • Normal: Your machine prints from the first page to the last page. • Reverse All Pages: Your machine prints from the last page to the first page. • Print Odd Pages: Your machine prints only the odd pages of the document. •...
-
Page 111: Canceling A Print Job
Canceling a Print Job There are two ways to cancel a print job: To stop a print job from the control panel: Press the button. Clear/Stop Your machine finishes printing the page that is moving through the machine and deletes the rest of the print job. -
Page 112: Using A Favorite Setting
Using a Favorite Setting The Favorites option, which is visible on each tab, allows you to save the current properties settings for future use. To save a Favorites item: Change the settings on each tab, as needed. Enter a name for the item in the Favorites input box. Click Save. -
Page 113: Setting Paper Properties
Setting Paper Properties Use the following options for paper handling. See page 5.2 for more information about accessing printer’s Properties. Click the Paper tab to access many paper properties. Property Description Copies allows you to choose the number of Copies copies to be printed. - Page 114 Property Description Make sure that Source is set to the Source corresponding paper tray. Use the Manual Feed source when printing to special material. You need to load one sheet at a time into the manual feeder. See page 2.8. If the paper source is set to Auto Select, the machine automatically picks up print material in the following order: the manual feeder and the...
-
Page 115: Setting Graphic Properties
Setting Graphic Properties Use the following graphic options to adjust the print quality for your specific printing needs. See page 5.2 for more information about accessing printer properties. Click the Graphics tab to display the properties shown below. Property Description You can select the printing resolution by Resolution choosing from 600 dpi (Normal) or 300... - Page 116 Property Description You can make advanced settings by clicking Advanced the Advanced Options button. Options Darkness Use this option to lighten or darken the image appearance in your print. • Normal: This setting is for normal documents. Lighten : This setting is for bolder line •...
-
Page 117: Printing Multiple Pages On One Sheet Of The Paper
Property Description Advanced True Type Options (for Win9x/Me only) Options (continued) This option determines what the driver tells the machine about how to image the text in your document. Select the appropriate setting according to the status of your document. •... - Page 118 Select the number of pages you want to print per sheet (1, 2, 4, 9 or 16) on the Pages per Side drop-down list. Select the page order on the Page Order drop-down list, if necessary. Left, Then Down, Then Down, Then Right, Then Down...
-
Page 119: Printing A Reduced Or Enlarged Document
Printing a Reduced or Enlarged Document You can scale your print job on a page. When you change the print settings from your software application, access the printer’s Properties. See page 5.2. From the Layout tab, select Reduce/Enlarge on the Type drop-down list. -
Page 120: Fitting Your Document To A Selected Paper Size
Fitting Your Document to a Selected Paper Size You can scale your print job to any paper size regardless of the digital document size. This can be useful when you want to check the fine details on a small document. When you change the print settings from your software application, access the printer’s Properties. -
Page 121: Printing Posters
Printing Posters You can print a single-page document onto 4, 9 or 16 sheets of paper, for the purpose of pasting the sheets together to form one poster-sized document. When you change the print settings from your software application, access the printer’s Properties. See page 5.2. From the Layout tab, select Poster on the Type drop- down list. -
Page 122: Using Watermarks
Click the Paper tab and select the paper source, size and type. Click OK and print the document. You can complete the poster by posting the sheets together. Using Watermarks The Watermark option allows you to print text over an existing document. -
Page 123: Creating A Watermark
Creating a Watermark When you change the print settings from your software application, access the printer’s Properties. See page 5.2. Click the Extras tab and click Edit in the Watermark section. The Edit Watermarks window appears. Enter text message you want to print in the Watermark Message box. -
Page 124: Editing A Watermark
Editing a Watermark When you change the print settings from your software application, access the printer properties. See page 5.2. Click the Extras tab and click Edit in the Watermark section. The Edit Watermarks window appears. Select the watermark you want to edit on the Current Watermarks list, to change the watermark message and the options. -
Page 125: Using Overlays
Using Overlays What is an Overlay? An overlay is text and/or images stored on the computer hard disk drive (HDD) as a special file format that can be printed on any document. Overlays are often used to take the place of Dear ABC preprinted forms and letterhead paper. - Page 126 In the Edit Overlays window, click Create Overlay. In the Create Overlay window, type a name of up to eight characters in the File name box. Select the destination path, if necessary. (The default is C:\Formover). Click Save. The name appears on the Overlay List. Click Ok or Yes to finish creating.
- Page 127 Using a Page Overlay After an overlay has been created, it is ready to be printed with your document. To print an overlay with a document: Create or open the document you want to print. When you change the print settings from your software application, access the printer’s Properties.
- Page 128 After you select the file, click Open. The file appears on the Overlay List and is available for printing. Select the overlay from the Overlay List box. If necessary, click Confirm Page Overlay When Printing. When this box is checked, a message window appears each time you submit a document for printing, asking you to confirm your wish to print an overlay on your document.
- Page 129 Deleting a Page Overlay You can delete page overlays that you no longer use. In the printer’s properties window, click the Extras tab. Click Edit in the Overlay section. Select the overlay you want to delete from the Overlay List box.
-
Page 130: Setting Up The Locally Shared Printer
Setting Up the Locally Shared Printer You can connect the machine directly to a selected computer, which is called “host computer,” on the network. Your machine can be shared by other users on the network through a Windows 9x, Me, 2000, XP or NT 4.0 network printer connection. Whether the printer is locally connected or network- connected, you need to install the printer software on each computer that will print documents to the printer. -
Page 131: In Windows Nt 4.0/2000/Xp
From the Start menu, select Settings and then Printers. Double-click your printer icon. From the Printer menu, select Properties. From the Details tab, select the printer port and click OK. In Windows NT 4.0/2000/XP Setting Up the Host Computer Start Windows. For Windows NT 4.0/2000, from the Start menu, select Settings and then Printers. - Page 132 Setting Up the Client Computer Right-click Start and select Explorer. Open your network folder in the left column. Click the shared name. For Windows NT 4.0/2000, from the Start menu, select Settings and Printers. For Windows XP, from the Start menu, select Printers and Faxes.
-
Page 133: Scanning ( For Mfp Model Only )
CANNING (for MFP model only) Scanning with your machine lets you turn pictures and text into digital files on your computer. Then you can fax or e-mail the files, display them on your web site or use them to create projects that you can print software. This chapter includes: •... -
Page 134: Scanning Basics
Scanning Basics Your machine offers a following way to begin scanning: • From TWAIN-compliant software: You can use other software including Adobe PhotoDeluxe and Adobe Photoshop. OTES • To scan with your machine, you must install the Type 1200 Driver. •... -
Page 135: Maintenance
AINTENANCE This chapter provides information for maintaining your machine and the toner cartridge. This chapter includes: • Clearing the Memory • Adjusting Shading • Cleaning Your Machine • Maintaining the Toner Cartridge... -
Page 136: Clearing The Memory
Clearing the Memory You can selectively clear information stored in your machine’s memory. Press Menu on the control panel until “Maintenance” appears on the top line of the display. Press the scroll button ( ) until you see “Clear Memory” on the bottom line and press Enter The first available menu item, “Clear All Mem.”... -
Page 137: Adjusting Shading
Adjusting Shading When the scan unit becomes dirty, it can alter the shading value. If your copy has black lines or is blurred, adjust the shading setting. Load a sheet of white paper into the ADF. Press Menu on the control panel until “Maintenance” appears on the top line of the display. -
Page 138: Cleaning The Inside
Cleaning the Inside During the printing process, paper, toner and dust particles can accumulate inside the machine. This buildup can cause print quality problems, such as toner specks or smearing. Cleaning the inside of the machine clears or reduces these problems. Turn the machine off and unplug the power cord. -
Page 139: Cleaning The Scan Unit
Cleaning the Scan Unit Keeping the scan unit clean helps ensure the best possible copies. We suggest that you clean the scan unit at the start of each day and during the day, as needed. Slightly dampen a soft lint-free cloth or paper towel with water. Open the control panel by gripping its bottom and pulling it upward. - Page 140 Wipe the roller surface with a soft cloth dampened with water. Carefully wipe the scanning glass with a soft dry cloth. If the glass is very dirty, first wipe it with a slightly dampened cloth, and then with a dry cloth. Be very careful not to scratch the glass surface.
-
Page 141: Maintaining The Toner Cartridge
Maintaining the Toner Cartridge Toner Cartridge Storage To get the most from the toner cartridge, keep the following guidelines in mind: • Do not remove the toner cartridge from its package until ready for use. • Do not refill the toner cartridge. The machine warranty does not cover damage caused by using a refilled cartridge. -
Page 142: Redistributing Toner
Redistributing Toner When the toner cartridge is near the end of its life, white streaks or light print occurs. The LCD displays the warning message, “[Toner Low].” You can temporarily reestablish the print quality by redistributing the remaining toner in the cartridge. Open the front cover. -
Page 143: Replacing The Toner Cartridge
Replacing the Toner Cartridge When the toner eventually runs out, only blank pages print when a print job is sent or when a fax is received. At this stage, the toner cartridge needs to be replaced. The display on the control panel shows the warning message, “[Toner Empty]”... -
Page 144: Setting The Notify Toner Option
Slide the new toner cartridge in until it locks into place. Close the front cover. Setting the Notify Toner Option If you have set the Notify Toner menu option to “On”, your machine automatically sends a fax to your service company or the dealer to notify them that your machine requires a new toner cartridge when the toner cartridge needs to be replaced. -
Page 145: Cleaning The Drum
Cleaning the Drum If there are streaks or spots on your print, the OPC drum of the cartridge may require cleaning. Before setting the cleaning procedure, make sure that paper is loaded in the machine. Press Menu on the control panel until “Maintenance” appears on the top line of the display. - Page 146 7.12 AINTENANCE...
-
Page 147: Troubleshooting
ROUBLESHOOTING This chapter gives helpful information for what to do if you encounter an error. This chapter includes: • Clearing Document Jams • Clearing Paper Jams • Clearing LCD Error Messages • Solving Problems... -
Page 148: Clearing Document Jams
Clearing Document Jams When a document jams while it passes through the ADF (Automatic Document Feeder), “[Document Jam]” appears on the display. Input Misfeed Remove the remaining documents from the ADF. Pull the jammed document gently out of the ADF. Load the documents back into the ADF. -
Page 149: Clearing Paper Jams
Pull the document gently out of the ADF. Close the control panel. Then load the documents back into the ADF. Clearing Paper Jams When a paper jam occurs, “Paper Jam” appears on the display. Refer to the table below to locate and clear the paper jam. Message Location of Jam Go to... -
Page 150: In The Paper Tray
In the Paper Tray Open and close the front cover. The jammed paper automatically exits the machine. If the paper does not exit, continue to step 2. Pull the paper tray open. Remove the jammed paper by gently pulling it straight out. If there is any resistance and the paper does not move when you pull or if you cannot see the paper in this area, skip to the fuser area around the toner cartridge. -
Page 151: In The Paper Exit Area
In the Paper Exit Area Open and close the front cover. The jammed paper automatically exits the machine. If the paper does not exit, continue to step 2. Gently pull the paper out of the front output tray. Skip to step 6. -
Page 152: In The Fuser Area Or Around The Toner Cartridge
In the Fuser Area or Around the Toner Cartridge : The fuser area is hot. Take care when removing paper ARNING from the machine. Open the front cover and pull the toner cartridge out, lightly pushing it down. Remove the jammed paper by gently pulling it straight out. Replace the toner cartridge and close the front cover. -
Page 153: Tips For Avoiding Paper Jams
Tips for Avoiding Paper Jams By selecting the correct paper types, most paper jams can be avoided. When a paper jam occurs, follow the steps outlined in page 8.3. • Follow the procedures on page 1.13 when you load paper. Ensure that the adjustable guides are positioned correctly. -
Page 154: Clearing Lcd Error Messages
Clearing LCD Error Messages Messages appears on the display to indicate the control panel to indicate the machine’s status or errors. Refer to the following table to understand the message’s meaning and correct the problem, if necessary. Messages and their meanings are listed in alphabetical order. - Page 155 Display Meaning Suggested solutions The toner cartridge is not Install the toner cartridge. See [Jam 1] or [No Cartridge] installed. page 1.11. The remote person did Try again after a few minutes. not answer or the line is [Line Busy] already engaged.
- Page 156 Display Meaning Suggested solutions You are doing in the Add/ Check the display to see if there Cancel operation, but is any scheduled job. The display Operation Not Assigned there is no jobs waiting. should indicate them in Standby mode, for example, Delay Fax. Paper has jammed in the Clear the jam.
-
Page 157: Solving Problems
Solving Problems The following chart lists some conditions that may occur and the recommended solutions. Follow the suggested solutions until the problem is corrected. If the problem persists, please call for service. Paper Feeding Problems Condition Suggested solutions Paper is jammed during Clear the paper jam. -
Page 158: Faxing Problems
Faxing Problems Condition Suggested solutions The machine is not • Unplug the power cord and plug it in again. working, there is no • Ensure that there is power to the electrical receptacle. display and the buttons are not working. No dial tone sounds. -
Page 159: Copying Problems
Condition Suggested solutions Documents are not There may not be enough memory to store the stored in the memory. document. If the display shows a “Memory Full” message, delete any documents you no longer need from the memory and then restore the document. Blank areas appear at You may have chosen the wrong paper settings in the the bottom of each page... -
Page 160: Printing Quality Problems
Printing Quality Problems The dirty inside of the machine or improper paper loading may reduce the print quality. See the table below to clear the problem. Condition Suggested solutions Light or faded If a vertical white streak or faded area appears on the page: print •... - Page 161 Condition Suggested solutions Vertical lines If black vertical streaks appear on the page: • The drum inside the toner cartridge has probably been AaBbCc scratched. Remove the toner cartridge and install a new one. AaBbCc See “Replacing the Toner Cartridge” on page 7.9. AaBbCc AaBbCc AaBbCc...
- Page 162 Condition Suggested solutions Background Background scatter results from bits of toner distributed on scatter the printed page. • The paper may be too damp. Try printing with a different batch of paper. Do not open packages of paper until necessary so that the paper does not absorb too much moisture.
- Page 163 Condition Suggested solutions Wrinkles or • Ensure that the paper is loaded properly. creases • Check the paper type and quality. See “Paper Specification” on page A.5. • Turn the stack of paper over in the paper tray. Also try rotating the paper 180°...
- Page 164 Condition Suggested solutions Character Voids Character voids are white areas within the parts of characters that should be solid black: • If you are using transparencies, try another type of transparency. Due to the composition of the transparency, some character voids are normal. •...
-
Page 165: Printing Problems(For Mfp Model Only)
Printing Problems (for MFP model only) Condition Possible cause Suggested solutions The machine The machine is not Check the power cord connections. Check does not print. receiving power. the power switch and the power source. The machine is not Select Printer Driver Type 1200 as selected as the default your default printer in your Windows. - Page 166 Condition Possible cause Suggested solutions A print job is The job may be very Reduce the complexity of the page or try extremely complex. adjusting the print quality settings. slow. The maximum print speed of your machine is 17 PPM for Letter-sized paper 16 PPM for A4-sized paper.
- Page 167 Condition Possible cause Suggested solutions Pages print, The toner cartridge is Redistribute the toner. if necessary. See but are blank. defective or out of page 7.8. toner. If necessary, replace the toner cartridge. The file may have Check the file to ensure that it does not blank pages.
-
Page 168: Scanning Problems(For Mfp Model Only)
Scanning Problems (for MFP model only) Condition Suggested solutions The scanner does not work. • Make sure that you place the document to be scanned face down in the ADF. • There may not be enough available memory to hold the document you want to scan. -
Page 169: Appendix A: Specifications
PECIFICATIONS This chapter includes: • General Specifications • Facsimile Specifications • Scanner and Copier Specifications • Printer Specifications(for MFP model only) • Paper Specification... -
Page 170: General Specifications
General Specifications Item Description Automatic document Up to 20 sheets (weight: 75 g/m , 20 lb) feeder (ADF) Width: 142 to 216 mm (5.6 to 8.5 inches) ADF Document size Length: 148 to 356 mm (5.8 to 14 inches) Paper tray: 250 sheets (weight: 75 g/m , 20 lb) Paper input capacity Manual feeder: 1 sheet (weight: 60~163 g/m... -
Page 171: Facsimile Specifications
Item Description Paper: 2.7 Kg Package Weight Plastic: 0.7 Kg Facsimile Specifications Item Description Compatibility ITU-T Group 3 Applicable line Public Switched Telephone Network (PSTN) or behind PABX Data coding MH/MR/MMR (ECM Mode) Modem speed 33600/31200/28800/26400/24000/21600/19200/16800/ 14400/12000/9600/7200/4800/2400 bps with fall back Transmission speed Approx. -
Page 172: Scanner And Copier Specifications
Scanner and Copier Specifications Item Description Compatibility(for MFP model only) TWAIN standard Scan method CIS, Mono Scan resolution 200 X 200 dpi (optical) Scan length Maximum: 15.7 inches (400 mm) Scan width Maximum: 8.5 inches (216 mm) Effective: 8.2 inches (208 mm) Mono bit depth 1 bit for Text mode 8 bit for Gray mode... -
Page 173: Paper Specification
Paper Specification Overview Your machine accepts a variety of print materials, such as cut-sheet paper, including up to 100% recycled fiber content paper, envelopes, *labels*, transparencies and custom-size paper. Properties, such as weight, composition, grain and moisture content, are important factors affecting the machine’s performance and the output quality. -
Page 174: Guidelines For Using Paper
Size (mm/in.) Weight Capacity Envelopes No.9 (98.4 x 225.4/3.88 x 8.88) No.10 (104.8 x 241.3/4.13 x 9.5) DL (110 x 220/4.33 x 8.66) 1 sheet of paper for the 75 to 90 g/m C5 (162 x 229/6.38 x 9.02) manual feeder C6 (114 x 162/4.49 x 6.38) B5 (176 x 250/6.93 x 9.84) No.7 3/4 (98.4 x 190.5/3.88 x 7.5) - Page 175 The following problems may cause print quality deviations, jamming or even damage to the machine: Symptom Problem with Paper Solution Poor print quality or toner Too moist, too rough, too Try another kind of paper, adhesion, problems with smooth or embossed; faulty between 100 ~ 400 Sheffield, 4 feeding paper lot...
-
Page 176: Paper Specifications
Paper Specifications Category Specifications Acid Content 5.5 pH or lower Caliper 0.094 ~ 0.18 mm (3.0 ~ 7.0 mils) Curl in Ream Flat within 5 mm (0.02 in.) Cut Edge Conditions Cut with sharp blades with no visible fray. Fusing Compatibility Must not scorch, melt, offset or release hazardous emissions when heated to 200 °C (392 °F) for 0.1 second. -
Page 177: Envelopes
extremes, which can cause damage. Planning is important to prevent damage to large supplies of paper. Unopened paper in sealed reams can remain stable for several months before use. Opened packages of paper have more potential for environment damage, especially if they are not wrapped with a moisture-proof barrier. - Page 178 Envelopes with Double Side Seams Double side-seams construction has vertical seams at both ends of the envelope rather than diagonal seams. This style may be more likely to wrinkle. Be sure the seam extends all the way to the corner of the envelope as illustrated below. Correct Incorrect Envelopes with Adhesive Strips or Flaps...
-
Page 179: Labels(For Mfp Model Only)
Labels (for MFP model only) AUTIONS • To avoid damaging the machine, use only labels recommended for laser printers. • To prevent serious jams, always use the manual feeder to print labels and always use the rear output tray. • Never print on the same sheet of labels more than once and never print on a partial sheet of labels. - Page 180 NDEX loading 1.13 preparing 3.2 adding documents 4.27 drum, clean 7.11 ADF (Automatic Document Feeder), load 3.3 automatic dialing group 4.18 error messages 8.8 one-touch 4.15 speed 4.16 automatic redialing 4.9 Favorite setting, use 5.6 fax system, set advanced settings 4.33 broadcasting faxes 4.22 basic settings 4.2 fitting to page, print 5.14...
- Page 181 memory, clear 7.2 printer properties windows 5.2 printing fitting to a selected paper size 5.14 network printer, set 5.24 from Windows 5.2 notifying toner low 7.10 multiple pages on one sheet 5.11 Phone Book list 4.21 posters 5.15 reduced or enlarged document one-touch dial 5.13 dialing 4.16...
- Page 182 Safety information i.ii scanning Windows 6.2 searching Phone Book 4.20 Secure Receiving mode 4.29 sending a fax automatically 4.7 manually 4.8 sharing printer, set 5.24 sounds, set 1.34 specifications facsimile A.5 general A.2 paper A.5 printer A.4 scanner and copier A.4 speed dial dialing 4.17 storing 4.16...
- Page 183 H914-8650...