Table of Contents
Advertisement
Advertisement
Table of Contents

Related Manuals for Toshiba TLP S70


Summary of Contents for Toshiba TLP S70
- Page 1 OWNER’S MANUAL 3LCD DATA PROJECTOR TLP-T70M TLP-T71M TLP-T60M TLP-T61M TLP-S70 TLP-S71 TLP-S40 TLP-S41 TLP-T70M / T60M / TLP-S70/TLP-S40 (XGA) (XGA / With Document Camera) (XGA) (XGA / With Document Camera) (SVGA) (SVGA / With Document Camera) (SVGA) (SVGA / With Document Camera)
-
Page 2: Before Using
WARNING: Changes or modifications made to this equipment, not expressly approved by Toshiba, or parties authorized by Toshiba, could void the user’s authority to operate USA only the equipment. - Page 3 IMPORTANT SAFETY INSTRUCTIONS (Continued) 5. Heat 8. Power-Cord Protection The product should be situated Power-supply cords should be away from heat sources such as routed so that they are not likely to radiators, heat registers, stoves, or be walked on or pinched by items other products (including placed upon or against them, amplifiers) that produce heat.
- Page 4 IMPORTANT SAFETY INSTRUCTIONS (Continued) 16. Damage Requiring Service 18. Servicing Unplug this product from the wall Do not attempt to service this outlet and refer servicing to product yourself as opening or qualified service personnel under removing covers may expose you the following conditions: to dangerous voltage or other a) When the power-supply cord or...
-
Page 5: Label Locations
LABEL LOCATIONS MODEL NO. / RATING Label WARNING Label CAUTION Label WARNING Label CAUTION Label CAUTION Label (LASER) Remote Control LASER WARNING CAUTION Label (LASER) POWER SUPPLY CORD SELECTION If your line voltage is 220 to 240V, use one of the following types of cable. Plug configuration Plug type SERIAL NO. -
Page 6: Exemption Clauses
Retain this information for future reference. EXEMPTION CLAUSES Toshiba Corporation bears no responsibility in the case of damages arising from natural disaster such as earthquakes, lightning, etc., fire not liable to Toshiba Corporation, operating by third parties, other accidents, or use under abnormal conditions including erroneous or improper operation and other problems. -
Page 7: Table Of Contents
CONTENTS Before Using SAFETY PRECAUTIONS ... 2 IMPORTANT SAFETY INSTRUCTIONS ... 3 LABEL LOCATIONS ... 8 POWER SUPPLY CORD SELECTION ... 9 IMPORTANT PRECAUTIONS ... 9 EXEMPTION CLAUSES ... 11 OTHER CAUTIONS AND INFORMATIONS ... 11 CONTENTS ... 12 Preparations Checking the package contents ... -
Page 8: Preparations
Preparations Checking the package contents Please make sure that the following items are included in the box, along with the main unit. If any item is missing, please contact the store immediately where you purchased the product. (11) (*1) (12) ( 3) (13) (10) -
Page 9: Names Of Each Part On The Control Panel And Remote Control
Names of each part on the control panel and remote control Control panel Remote Control CLASS 1 LED PRODUCT (15) (7) (8) (9) (10) (11) FAN TEMP LAMP (13) INPUT ON / STANDBY ZOOM + (14) MENU VOL. VOL. AUTO KEYSTONE AUTO SET ZOOM... -
Page 10: Preparing And Using The Remote Control
Preparing and using the remote control Loading dry-cell batteries Operating the remote into the remote control control q Remove the battery cover. Point the remote control toward the projector’s infrared remote sensor, and press a button on the remote control. •... -
Page 11: Connection
Placement (Continued) Projection Distance and Screen Size (with optical zooming) Use the figures, tables, and formulas below to determine the screen size and projection distance. (Screen sizes are approximate values for full-size picture with no keystone adjust- ment) Screen As seen from above As seen from the side 90°... -
Page 12: Operations
Operations Turning the power on and off Connecting the power cord Insert the power cord connector into the AC IN socket of the projector. Insert the power cord plug into a wall or other power outlet. When the power cord is plugged in, the following three green indicators will come on for several seconds: ON, TEMP, and LAMP. -
Page 13: Basic Operations
Basic operations Turn on the power. Turn on the power by following the instructions in “Turning on the power” Select the language and the lamp power (When using the first time). When the projector is used for the first time after purchase, menu for language and lamp power selection and configuration is displayed in English. -
Page 14: Using Handy Features
Using handy features Using auto setting (Auto setting) This function sets up the projector to the optimum state for each type of the input signal by using simple operations. Press the AUTO SET button. The Auto setting menu appears. Press the AUTO SET button again. The menu item is automatically adjusted/set. -
Page 15: Cutting Off The Picture And Sound Temporarily (Mute)
Using handy features (Continued) Press the ZOOM + button to bring it back to the original size. Each time the ZOOM + button is pressed, the image size increases. (You cannot make it larger than the original size.) Notes • Pressing either the ZOOM- or ZOOM+ button would display the •... -
Page 16: Displaying Information [Status Display]
Using handy features (Continued) Displaying Information [Status display] This displays information about the input signal, lamp use time, etc. Press the button twice (or press the CALL button on the remote control once). When the button is pressed once, the Setting display menu appears. -
Page 17: The Image Adjustment Menu
Using the menu (Continued) The image adjustment menu Use this menu to adjust image-related items. Items that can be adjusted are marked with “Yes”, and those that cannot are marked with “No”. Item Description Computer Y/P Contrast Lower Higher Brightness Darker Brighter Color... -
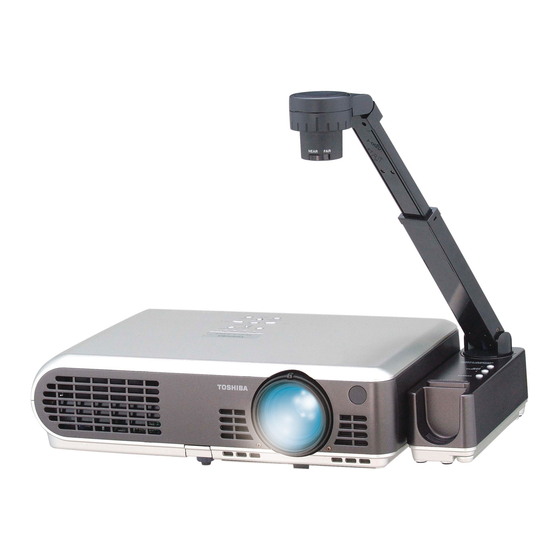
Page 18: Using The Document Camera
Using the document camera Please read this chapter if the model you purchased includes a document camera. Uninstalling the camera 1) Place the folded document 2) Slide the connect lever in camera with the bottom the direction of an arrow. side up. -
Page 19: Image Projection With The Document Camera
Using the document camera (Continued) Image projection with the document camera Place the document. Set the document at the top of or the side of the projector. Press the CAMERA button, and select camera input. • The input returns to the previous input when the CAMERA button is pressed again. -
Page 20: Locking The White Balance
Using the document camera (Continued) Locking the white balance Although the projector’s camera is constantly adjusting the color balance of the images it photographs, the color balance may be disrupted, depending on the color layout of the document, etc. If this happens, the white balance can be locked using the proce- dures below. -
Page 21: Lens And Main Unit Cleaning
Lens and main unit cleaning WARNING • Request cleaning and maintenance of a ceiling-mounted unit from your projector dealership. Lens cleaning • Clean the lens with a commercially available blower and/or lens cleaner. • The lens is easily scratched, so do not rub it with hard objects, or strike it. -
Page 22: Others
Others Trouble indications The indicator lights inform you of internal abnormalities. TEMP LAMP No power Problem with projector (Off) • Unplug the power cord, and contact your dealer. Lamp went out during use, or won’t come on TEMP LAMP Lamp temperature is high so that it is difficult to turn on, the lifetime of (Red lit) (Red lit) the lamp has ended or the projector is malfunctioning. -
Page 23: Specifications
Before calling service personnel (Continued) If This Happens Check • Is the document imaging camera’s lens dirty? The images from the document camera • Is the document imaging camera out of focus? • Is the location of the object being focused too dark? are blurry •... -
Page 24: List Of Supported Signals
Specifications (Continued) List of supported signals (RGB signals) This projector supports the following RGB signals. Note, however, that depending on the computer model, the screen may show flicker or streaking. Please adjust the projector if this happens. (Press the AUTO SET button, and adjust automatically or manually. Refresh rate Resolution Mode... -
Page 25: Control Terminal
Specifications (Continued) CONTROL terminal Pin assignment Pin No. Signal Name Mini DIN 8 pin connector Interface format 1 Communication method RS-232C, 9600bps, No Parity, Data Length: 8 bits; Stop Bit Length: 2 Communication format STX (02h) Command (3Byte) ETX (03h) Only 1 command valid per communication.