Table of Contents
Advertisement
Quick Links
Advertisement
Table of Contents

Related Manuals for Remington i-Light Pro+ Face & Body IPL6500BAU


Summary of Contents for Remington i-Light Pro+ Face & Body IPL6500BAU
- Page 1 IPL6500BAU 2 YEAR WARRANTY...
- Page 3 SKIN CHART SKIN CHART THE SKIN CHART THE SKIN CHART THE SKIN CHART HAIR COLOUR SKIN COLOUR HAIR COLOUR SKIN COLOUR ® WARNING: i-LIGHT is not suitable for very dark or black skin, white/grey or very light blonde/red hair. For facial use: Only suitable for female facial use below the cheekbone.
-
Page 4: Important Safety Instructions
THANK YOU FOR BUYING YOUR NEW REMINGTON® PRODUCT. PLEASE READ THESE INSTRUCTIONS CAREFULLY AND KEEP THEM SAFE. REMOVE ALL PACKAGING BEFORE USE. IMPORTANT SAFETY INSTRUCTIONS WARNING – TO REDUCE THE RISK OF BURNS, ELECTROCUTION, FIRE, OR INJURY TO PERSONS: Use this appliance only for its intended use described in this manual. -
Page 5: Warnings And Safety Information
WARNINGS AND SAFETY INFORMATION IMPORTANT SAFETY CAUTIONS Before you start using i-LIGHT ® Be sure to read all Warnings and Safety Information. Before you begin, check to see if i-LIGHT is suitable for you. ® Use the skin and hair chart at the front of this manual (page 2) and the integrated skin sensor to determine if this device is right for you. - Page 6 When Not To Use/When To Avoid Using i-Light ® • DO NOT use if you have tanned skin in the intended treatment area, as your skin may be too dark and treatment in tanned areas could temporarily cause skin swelling, blisters, or could change the colour of your skin.
- Page 7 CAUTION: Avoid treating areas that contain only vellus hairs (very thin, fine hair known as “peach fuzz”) as this may result in undesired hair re-growth. • If you’ve had professional or clinical or self-administered laser or IPL or electrolysis hair removal treatments, wait at least 6 months before using i-LIGHT .
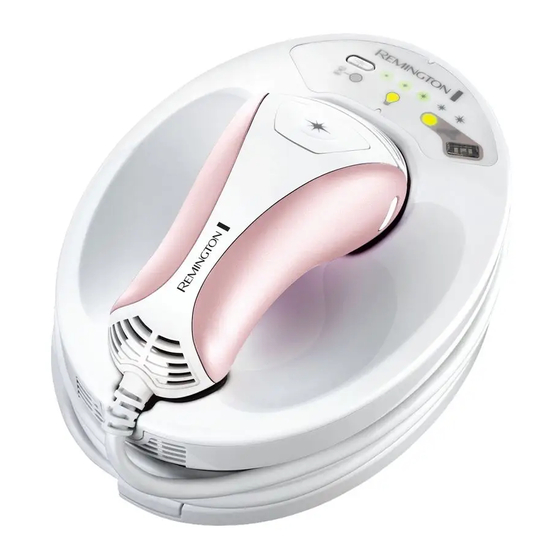
- Page 8 i-LIGHT PRO+ FACE & BODY KEY FEATURES ® i-LIGHT® KEY FEATURES Figure1...
-
Page 9: Getting Started
SUB HEADING SUB HEADING KEY FEATURES Power Switch Power Inlet Base Unit Hand Piece Flash Button Energy Level Selection Button Cool Down Mode Indicator Bulb Status Indicator Display Energy Level Indicator 10. Skin Tone Sensor 11. Hand Piece Cord 12. Flash Window 13. - Page 10 GETTING ACQUAINTED WITH i-LIGHT® , What is i- LIGHT ? ® The i- LIGHT ® system is a revolutionary light-based device designed for the removal GETTING ACQUAINTED WITH i-LIGHT PRO + FACE & BODY ® and female facial hair at home. GETTING ACQUAINTED WITH i-LIGHT®...
-
Page 11: Warnings And Safety Precautions
Hair grows in a cycle of 3 different phrases which lasts 18-24 months (Fig 3). Only hairs in the active growth phase are susceptible to treatment, which is why multiple treatments phase are susceptible to treatment, which is why multiple treatments are required for optimal results. are required for optimal results (Fig 3). -
Page 12: Preparing For Use
• DO NOT use directly over or near Active Implantable Medical Devices such as implantable pacemaker, • DO NOT use directly over or near Active Implantable Medical Devices such as implantable pacemaker, have been reported during clinical studies, it is recommended to observe all active implantable medical device warnings regarding the use of electronic devices to prevent any failure or interruption have been reported during clinical studies, it is recommended to observe all active implantable of an active implantable device. -
Page 13: Flash Button
Flash Button , Flash Button • The Flash Button is located on the hand piece. This is used to activate a flash (fig 6). • The Flash Button is located on the hand piece. This is used to activate a ash. , Flash Button •... - Page 14 , Attachment Release Buttons • Press both buttons and gently pull to remove the attachment. , Attachment Release Buttons • Press both buttons and gently pull to remove the attachment. Attachment Release Buttons • Press both buttons and gently pull to remove the attachment (Fig 10).
- Page 15 • Unwrap the hand piece cord from the i-LIGHT® base and rest the hand piece b • Ensure the power switch on the base unit is OFF. • Connect the power cord to the i-LIGHT® base unit at the power inlet. , PREPARE THE i-LIGHT®...
-
Page 16: Changing Attachments
Fig. 7 Fig. 7 Press the Flash Button to deliver a flash. • Mild to moderate discomfort is normal. If a flash delivered at Energy Level 1 feels tolerable, increase to Energy Level 3 Press the Flash Button to deliver a ash. 2. -
Page 17: How To Treat
Hold the attachment with one hand while pressing Fig. 9 both Attachment Release Buttons with the other hand and pull gently (Fig 16). Gently push the other attachment back into the Hand Piece making sure both side tabs click into place. -
Page 18: Treatment Tips
, How to treat: , NOTE: When the Skin Contact Sensors are fully engaged you will hear a ‘chirp’ and the Bulb Status Indicator Display will illuminate green. 3 Move to the next area and treat in a grid like pattern to ensure full coverage of the treatment area. •... -
Page 19: Facial Treatment
• You may notice that bony areas, such as elbows, shins and ankles, are more sensitive during treatment. • This is normal and should not be cause for alarm. To avoid this sensitivity, try stretching the skin away from the bony area during treatment. Facial Treatment •... -
Page 20: Troubleshooting
Refer to this troubleshooting guide if you experience any problems with i-LIGHT®, as this section addresses the most common problems you could encounter with i-LIGHT®. If you have followed the instructions in this section and continue to experience problems, please contact the Remington®... - Page 21 Face & Body, as this section addresses the most common problems you could encounter with the i-LIGHT PRO+ Face & Body. If you have followed the instructions in this section ® and continue to experience problems, please contact the Remington Service Centre for ® further assistance.
- Page 22 • Try resetting the unit by turning it off and waiting several seconds before turning it back on. Do not use if the unit is damaged. If you have concerns about using the unit, discontinue use and contact the Remington® Service Centre for further assistance. •...
-
Page 23: Frequently Asked Questions
Flash button was pressed while Not full contact. the skin contact sensor was not fully engaged. Bulb is missing or needs to be Replace bulb. SOUNDS replaced. Flash button was pressed after the skin contact sensor had been Skin contact sensors stuck. engaged since unit start up. -
Page 24: Environmental Protection
• If you call the Service Centre, please have the Model No. to hand, as we won’t be able to help you without it. The Model No. can be found on the rating plate of the appliance. • Replacement parts and accessories are available to buy through your Remington ®... -
Page 26: Warranty Against Defects
Spectrum Brands Australia Pty Ltd and Spectrum Brands New Zealand Limited WARRANTY AGAINST DEFECTS In this warranty: Australian Consumer Law means the Australian consumer law set out in Schedule 2 to the Competition and Consumer Act 2010; CGA means the New Zealand Consumer Guarantees Act 1993; Goods means the product or equipment which was accompanied by this warranty and purchased in Australia or New Zealand, as the case may be;... - Page 27 Warranty Conditions 4. The Goods must be used in accordance with the manufacturer’s instructions. This Warranty does not apply should the defect in or failure of the Goods be attributable to misuse, abuse, accident or non-observance of manufacturer’s instructions on the part of the user.
- Page 28 REMINGTON SERVICE HOTLINE Australia 1800 623 118 (toll free) New Zealand 0800 736 776 (toll free) AUTHORISED REPAIR CENTRES Visit www.remington-products.com.au for Authorised repair centre details. Remington and i-LIGHT are registered trademarks of Spectrum Brands, Inc., or one of its subsidiaries.