Table of Contents
Advertisement
Quick Links
Advertisement
Table of Contents

Related Manuals for Bernina Kaffe 770 QE PLUS


Summary of Contents for Bernina Kaffe 770 QE PLUS
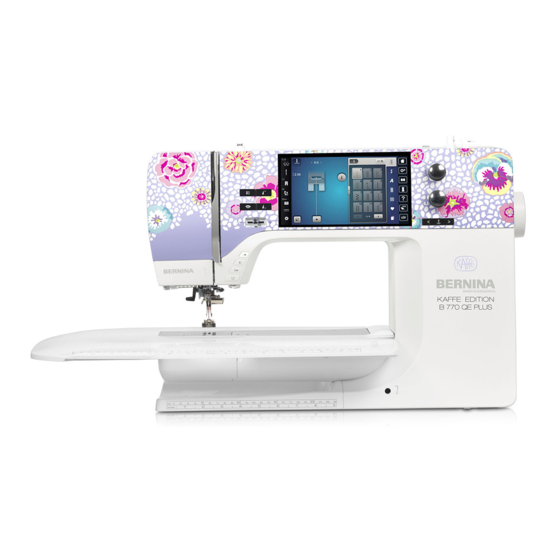
- Page 1 BERNINA 770 QE PLUS KAFFE EDITION...
- Page 3 Welcome Dear BERNINA customer, Congratulations! You have decided on BERNINA and therefore on a product which will delight you for years. For more than 100 years our family company has attached greatest importance to satisfied customers. As for me, it is a matter of personal concern to offer you Swiss development and precision at the height of perfection, future-orientated sewing technology and a comprehensive customer service.
-
Page 4: Table Of Contents
Introduction ............12 Adjusting the feed dog ..........35 BERNINA Quality control ........12 Slide-on table ............36 Welcome to the world of BERNINA ......12 Using the slide-on table ..........36 Overview Machine ..........14 Presser foot ............. 36 Overview front controls .......... - Page 5 Deleting stitch patterns from the personal memory ..79 Calling up the Creative Consultant ......65 Saving stitch patterns on the BERNINA USB stick ..79 Calling up the Help ..........65 Uploading a stitch pattern from the BERNINA USB stick ..................
- Page 6 10.3 Sewing handlook quilt stitches ........ 122 Altering the stitch density ........101 10.4 Guiding the quilt work freely ........123 Sewing cross stitches ..........101 BERNINA Stitch Regulator (BSR) ......124 Pintucks ..............102 11.1 BSR mode 1 ............124 Pintucks ..............102 Overview Pintuck Feet ..........
- Page 7 Table of Contents Overview Embroidery functions ........144 My BERNINA Embroidery ........128 Center the needle to the embroidery hoop ....144 12.1 Overview Embroidery module ......... 128 Moving the hoop to the back ........144 12.2 Supplied accessories Embroidery module ....128 Moving the module for the sewing mode .....
- Page 8 Administering embroidery motifs ........ 165 Quilt stitches ..............191 Saving embroidery motifs in the personal memory ..165 21.2 Overview Embroidery motifs ........191 Saving the embroidery motif on the BERNINA USB stick Editing embroidery motifs ..........191 ................... 166 Quilt motifs ..............192 Overwriting the embroidery motif in the personal Quilting in the hoop .............
-
Page 9: Important Safety Instructions
Do not look directly into the LED lamp with optical instruments (e. g. magnifying glass). • If the LED lamp is damaged or defective, have the LED lamp checked or repaired at your local authorized BERNINA dealer. • Switch off the machine before working in the needle area. •... - Page 10 Use only identical replacement parts. See instructions for servicing of double- insulated products. • To lubricate the machine, only use oil recommended by BERNINA. Safety instructions • While operating the machine, all protective inserts must be in place and all covers must be closed.
- Page 11 Important safety instructions • Do not place any objects on the foot control. • While sewing, guide the fabric gently. Pulling and pushing the fabric can cause needle breakage. • Keep fingers away from all moving parts. • Special care is required in the needle area. •...
-
Page 12: Important Information
• The latest version of the instruction manual can be downloaded at www.bernina.com Proper use Your BERNINA machine is conceived and designed for private household use. It is intended for sewing fabrics and other materials as described in this instruction manual. Any other use is not considered proper. BERNINA assumes no liability for consequences resulting from improper use. - Page 13 Designates a low-risk hazard which can lead to minor or moderate injuries if not avoided. Designates a hazard which can lead to material damage if not avoided. NOTICE Tips from BERNINA quilt experts can be found next to this symbol.
-
Page 14: My Bernina
1.3 Welcome to the world of BERNINA Made to create, this is the slogan of BERNINA. Not only with our machines do we support you in the implementation of your ideas. In addition to the offers listed below, we offer you lots of suggestions and instructions for your future projects as well as the opportunity to exchange ideas with other sewing, quilting and embroidery enthusiasts. - Page 15 Subtle instructions, free cutting patterns and embroidery motifs as well as many new ideas: All this you can find in the weekly blog of BERNINA. Our experts give useful tips and explain step by step how you can achieve the desired result. In the community you can upload your own projects and exchange experiences and ideas with other sewing and embroidering enthusiasts.
-
Page 16: Overview Machine
My BERNINA 1.4 Overview Machine Overview front controls «Quick Reverse» «Pattern Begin» «Thread Cutter» «Needle position Up/Down» «Presser Foot Up/Down» «Upper Multi-function knob» «Start/Stop» «Lower Multi-function knob» «Pattern End» «Needle Position Right/Left» «Securing»... -
Page 17: Overview Front
My BERNINA Overview front Connection for embroidery module Slide speed control Bobbin cover Thread take-up lever cover Connection for accessory (optional accessory) Thread take-up lever Presser foot Fixing screw Needle threader Connection for slide-on table Sewing light Connection for Free Hand System... -
Page 18: Overview Sideways
My BERNINA Overview sideways Connection for foot control Power switch PC-connection Connection for power cable Spool holder Magnet holder for touchscreen pen Bobbin winding unit with thread cutter Air vents Swiveling spool holder USB port Handwheel Feed dog up/down... -
Page 19: Overview - Back Panel
Overview - Back panel Connection for Slide-on Table Carry Handle Connection for Darning Hoop Bobbin Winder Pretension BSR connection Thread Guide Connection for accessory BDF BERNINA Dual Feed Air Vents Thread Cutter Thread Guide Feed Dog Bobbin Winding Unit Stitch Plate... -
Page 20: Supplied Accessories
Overview accessories machine Illustration Name Purpose Dust Cover To protect the machine from dust and contamination. BERNINA Accessory Box To store the supplied accessories as well as optional accessories. Free Hand System (FHS) To raise and lower the presser foot. Slide-On Table To increase the sewing surface. - Page 21 My BERNINA Illustration Name Purpose Touchscreen Pen For precise operation of the touch screen. Seam Ripper To undo seams and to cut buttonholes open. Height Compensating Tool To level an angled position of the presser foot sole when sliding over thick seams.
-
Page 22: Overview Presser Feet
My BERNINA Illustration Name Purpose Power Cable To connect the machine with the power supply system. Foot Control To start and stop the machine. To control the sewing speed. Overview presser feet Supplied standard presser feet Illustration Number Name Purpose... - Page 23 My BERNINA Illustration Number Name Purpose Example BERNINA Stitch Free-motion quilting Regulator (BSR) with regular stitch length. #97D Patchwork Foot For patchwork and other exact work, if working with BERNINA Dual Feed.
-
Page 24: Accessory Box
My BERNINA Accessory box In the accessory box, accessories can be neatly stored in compartments and matching holders. Big drawer Spool Pin Small drawer Presser Feet Buttonhole foot with slide Presser Foot Holders for 5.5 mm and 9.0 mm feet Selection of needles... -
Page 25: Overview User Interface
My BERNINA 1.6 Overview User Interface Overview functions/visual information «Upper Thread Tension» «Stitch Plate Selection» «Needle Selection» «Feed Dog Indicator» «Presser foot indicator / presser foot selection» 7 «Bobbin Thread» «Presser Foot Pressure» Overview System settings «Home» «Help» «Setup Program»... -
Page 26: Overview Selection Menu Sewing
My BERNINA Overview selection menu sewing «Practical Stitches» «Quilt Stitches» «Decorative Stitches» «Personal Memory» «Alphabets» «History» «Buttonholes» Software operation The touch-sensitive screen can be operated with the finger or stylus. Tap: Short tap of an element. Swipe: Tap an element and swipe quickly on the screen. - Page 27 My BERNINA Activate/deactivate functions Figure Element Status Switch Function is activated. Function is deactivated. Icon Function ist deactivated. Function ist activated. Adjust values Illustration Name Purpose Slider control Set the value with the slider control. Reset the value to the default value by tapping the small bullet.
-
Page 28: Needle, Thread, Fabric
My BERNINA Illustration Name Purpose «Delete» Delete the last character. «Lower Case Show the available letters in lower case letters. Characters» «Upper Case Show the available letters in upper case letters. Characters» «Numbers and Show the available numbers and mathematical Mathematical characters. - Page 29 My BERNINA Illustration Needle name Needle description Purpose Leather needle With cutting point For all types of leather, (LR = special point to synthetic leather, 130/705 H LR 90, 100 sew leather) plastic, sheeting. Especially sharp, narrow For micro fiber fabrics Microtex needle point and silk.
-
Page 30: Example For Needle Description
My BERNINA Illustration Needle name Needle description Purpose Hemstitch double Needle distance: 2.5 For special effects with hemstitch embroidery. needle 130/705 H ZWIHO 100 Needle distance: 3.0 For visible hems in Universal triple needle stretch fabrics, decorative sewing. 130/705 H DRI 80... -
Page 31: Needle/Thread Combination
My BERNINA Needle/thread combination The needle/thread combination is correct, when the thread fits perfectly into the long groove and goes easily through the needle eye. The thread can be optimally secured. The thread can break and skipped stitches can occur when there is too much clearance in the long groove and the needle eye. -
Page 32: Sewing Preparation
Sewing preparation 2.1 Before using the machine for the first time BERNINA recommends lubricating the hook before using the machine for the first time or after a longer period of non-use. (see page 171) By oiling the hook, the occurrence of unwanted noises in the hook area can be avoided. -
Page 33: Connection And Switching On
Authorized BERNINA dealer. The power cable for USA and Canada has a polarized plug (one blade wider than the other). To reduce the risk of electrical shock, this plug is intended to fit in a polarized outlet only one way. -
Page 34: Attaching The Knee Lifter Of The Free Hand System
Attaching the knee lifter of the Free Hand System The lateral position of the knee lifter can be adjusted by your local BERNINA Dealer if required. > Insert the knee lifter into the opening at the front side of the machine. -
Page 35: Switching The Machine On
Sewing preparation Switching the machine on > Set the Power Switch to «I». 2.4 Foot control Regulating the speed via the foot control Via the foot control the speed can be adjusted infinitely variable. > Press the foot control down carefully to start the machine. >... -
Page 36: Spool Pin
Sewing preparation 2.5 Spool pin Swiveling spool pin Installing the spool holder With metallic or other special threads, it is recommend to use the swiveling spool pin. The swiveling spool holder is necessary when several threads are sewn and it can also be used for bobbin winding while sewing. -
Page 37: Free Arm
> Pull the spool net over the thread spool. 2.6 Free arm The BERNINA 770 QE PLUS provides a solidly designed free arm which offers a lot of space for large project on the right of the needle. 2.7 Feed dog Adjusting the feed dog >... -
Page 38: Slide-On Table
Sewing preparation 2.8 Slide-on table Using the slide-on table The Slide-on Freearm Extension Table, attached to the freearm, enables the available sewing area to be extended. > Raise the needle. > Raise the presser foot. > Switch off the machine and disconnect it from the power supply. >... -
Page 39: Selecting The Presser Foot In The User Interface
Sewing preparation > Push the clamping lever up. > Remove the presser foot. > Guide the new presser foot upwards over the cone. > Press the clamping lever down. Selecting the presser foot in the User Interface After changing the presser foot, a check can be performed to determine whether it is suitable for the selected stitch pattern. -
Page 40: Adjusting The Presser Foot Pressure
Sewing preparation > Select the attached presser foot. – When the selected presser foot is suitable, sewing can start. – If the selected presser foot is not suitable for the selected stitch pattern, it can still be selected but the machine is automatically prevented from starting. -
Page 41: Selecting The Needle In The User Interface
Sewing preparation Selecting the needle in the User Interface After changing the needle, you can check whether this can be used with the selected stitch plate. > Tap «Needle Selection». > Select the fitted needle. – When the selected needle matches the selected presser foot, sewing can be started. If the selected needle does not match the selected presser foot, there will be an error message when starting the machine and the machine will not sew. -
Page 42: Adjusting The Needle Position Left/Right
Sewing preparation Adjusting the needle position left/right There is a total of 11 needle positions. The needle position is indicated by the needle position number in the display. > To position the needle position to the left, push the button «Needle position Left» (1). >... -
Page 43: Selecting The Stitch Plate In The User Interface
Sewing preparation > At the marking on the rear of the stitch plate, push the stitch plate downwards until it tips. > Remove the stitch plate. > Place the openings of the new stitch plate above the corresponding guide pins and press down until it clicks into place. - Page 44 Sewing preparation > Guide the thread in direction of the arrow through the thread tension (2). > Guide the thread downwards (3) around the thread take-up lever cover (4). > Guide the thread upwards and insert into the thread take-up lever (5). >...
- Page 45 Sewing preparation > Press the semi-automatic threader lever (9) slightly down, keep pressed and pull the thread to the left beneath the gray threader hook (10). > Guide the thread around the gray threader hook from the left to the right (12). >...
-
Page 46: Threading The Double Needle
Sewing preparation > Pull the thread beneath the presser foot from back to front over the thread cutter (15) and cut. Threading the double needle Prerequisite: • The double needle is inserted. > Guide the first thread in direction of the arrow on the right side of the tension disc (1). >... -
Page 47: Threading The Triple Needle
Sewing preparation Threading the triple needle Prerequisite: • The triple needle is inserted. > Place the foam pad, the thread spool and the appropriate spool disc on the spool holder. > Place the filled bobbin on the swiveling spool holder. >... -
Page 48: Threading The Bobbin Thread
Sewing preparation > Pull the excess thread over the thread cutter at the engaging lever (5) and cut. > Push the engaging lever (6) towards the bobbin. – The machine winds and the display to wind the bobbin appears. > Set winding speed. >... - Page 49 Sewing preparation > Insert the new bobbin so that the silvery sensor surface is facing the back of the bobbin case. > Pull the thread into the slot (2) from the left. > Pull the thread to the right under the spring (3), then pass it below the two thread guides (4) and pull it upwards.
-
Page 50: Indicating Fill Level Of Bobbin Thread
Sewing preparation > To insert the bobbin case into the machine, hold it so that the thread guide (5) points upwards. > Insert the bobbin case. > Press onto the center of the bobbin case until it engages. > Pull the thread through the thread cutter (6) and cut. >... -
Page 51: Setup Program
Setup Program Setup Program 3.1 Sewing settings Adjusting the upper thread tension Alterations of the upper thread tension in the Setup Program affect all stitch patterns. Individual alteration of the upper thread tension can also be made for currently selected stitches. >... -
Page 52: Programming The Button "Pattern End
Setup Program > Tap «Setup Program». > Tap «Sewing settings». > Tap «Programming buttons and icons». > Tap «Programming the Hovering Height of the presser foot». > To adjust the distance between the fabric and the presser foot. Programming the button «Pattern end» The presser foot can be positioned, the thread cut and the automatic securing can be programmed. -
Page 53: Programming The Button "Thread Cutter
Setup Program Programming the button «Thread cutter» The automatic securing can be programed before the thread cut takes place. > Tap «Setup Program». > Tap «Sewing settings». > Tap «Programming buttons and icons». > Tap «Programming the button Thread cutter». >... -
Page 54: Programming The Button "Quick Reverse
Setup Program Programming the button «Quick reverse» You can choose between «Reverse sewing» and «Stitch-specific reverse sewing». > Tap «Setup Program». > Tap «Sewing settings». > Tap «Programming buttons and icons». > Tap «Programming the button Quick reverse». > To set the stitch-precise reverse sewing, tap «Backstepping». >... -
Page 55: Embroidery Settings
Setup Program > Tap «Setup Program». > Tap «Sewing settings». > Tap «Programming the foot control». – «Needle up/down» is activated in the default setting. – The Back-kick on the foot control raises or lowers the needle. > To program the Back-kick, tap «Programming the Back-kick». >... -
Page 56: Adjusting The Maximum Embroidering Speed
When opening the embroidery motifs on the machine, they are always centered in the Embroidery Hoop. If it is desired to open embroidery motifs in the original position (determined by the BERNINA Embroidery Software), the function «Centering the embroidery motif» must be activated. -
Page 57: Entering The Fabric Thickness
Setup Program > Tap «Calibrating the embroidery hoop». > Select the desired embroidery hoop and follow the instructions in the display. > To delete the current calibration, tap «Delete» (1). > Center the needle via the arrow icons on the display. Entering the fabric thickness If the fabric thickness is more than 4 mm as for e.g. -
Page 58: Programming The Securing Stitches
If the embroidery motif is programmed with securing stitches, the securing stitches can be removed in the BERNINA Embroidery Software. The machine recognizes when no securing stitches are programmed and adds them. If no securing stitches are wanted, they can be deactivated. -
Page 59: Changing The Measuring Unit
Setup Program > To activate the automatic thread cut before changing a thread, tap the switch in the upper section of the display (1) again. > Tap the switch in the middle section of the display (2) so that the machine will stop after about 7 stitches and the remaining thread can be cut manually. -
Page 60: Monitoring Functions
Setup Program > To delete single syllables of the entered text, tap «Delete». > Tap «Confirm». 3.4 Monitoring functions Activating the upper thread indicator > Tap «Setup Program». > Tap «Monitoring Functions». > Tap the switch in the upper section of the display to deactivate the upper thread indicator. >... -
Page 61: Machine Settings
Selecting a language The User Interface can be programmed in different languages according to the customer's wish because BERNINA provides a wide range of international languages for the customers. Via firmware updates additional languages for the User Interface can be provided. -
Page 62: Calibrating The Display
Setup Program Calibrating the display Please find further information on this topic in the chapter attachment below troubleshooting at the end of the instruction manual. > Tap «Setup Program». > Tap «Machine Settings». > Tap «Calibrate Screen». > Touch the crosses in sequence using the touchscreen pen. Back to default setting ATTENTION: Using this function will delete all individually made settings. -
Page 63: Deleting Motifs On The Bernina Usb Stick
Deleting motifs on the BERNINA USB Stick When motifs which won't be needed anymore are saved on the BERNINA USB Stick, the stick can be connected to the machine and the data can be deleted. > Insert the BERNINA USB stick into the USB Port of the machine. -
Page 64: Packing The Embroidery Module
> Tap «Setup Program». > Tap «Machine Settings». > Tap «Information». > Tap «Machine Data». Registering details of the dealer The contact details for your specialized BERNINA dealer can be entered. > Tap «Setup Program». > Tap «Machine Settings». > Tap «Information». -
Page 65: Saving Service Data
> To enter the address of the specialized BERNINA dealer, tap «Address». > To enter the telephone number of the specialized BERNINA dealer, tap «Phone Number». > To enter the website or e-mail address of the specialized BERNINA dealer, tap «E-mail Address». Saving Service data The service data regarding the current status of the machine can be saved on a USB stick and consequently provided to the specialized BERNINA dealer. - Page 66 Setup Program > Tap «Information». > Tap «Machine ID». – The machine ID is displayed. – If the «Machine ID» is not displayed, the most up-to-date version of the firmware must first be installed on the machine.
-
Page 67: System Settings
System settings System settings 4.1 Calling up the Tutorial The Tutorial gives information and explanations, covering various aspects of sewing, embroidering and the different stitches. > Tap «Tutorial». > Select the desired topic in order to view information. 4.2 Calling up the Creative Consultant The Creative Consultant provides decision support for sewing projects. -
Page 68: Creative Sewing
It is recommended to match the presser foot pressure with the fabric. The thicker the fabric, the lower the presser foot pressure. The BERNINA Dual Feed feeds the fabric from above and from beneath simultaneously. This provides an even and careful feed forward even for smooth and thin materials. Striped and checkered patterns can be matched perfectly by even feeding. -
Page 69: Application Of The Bernina Dual Feed
• Imitation leather, coated fabrics (optimally with optional accessory Zigzag Foot with Non-Stick Sole #52D). Application of the BERNINA Dual Feed Only use presser feet with a cut-out at the center back and the labeling «D». Additional presser feet with the labeling «D» are listed in the enclosed accessory catalog. -
Page 70: Regulating The Speed
The default setting of the upper thread tension is set automatically as soon as a stitch pattern or an embroidery motif is selected. The upper thread tension is set optimally at the BERNINA factory and the machine has been tested. Metrosene-/Seralon thread size 100/2 (Company Mettler, Switzerland) is used for upper and bobbin thread. -
Page 71: Editing Stitch Patterns
Creative sewing > Adjust the upper thread tension. > Tap the yellow-outlined icon on the right side to reset the alterations to the default setting. > Tap the yellow-outlined icon on the left side to reset the alteration to default setting in the Setup Program. -
Page 72: Correcting The Balance
Creative sewing Correcting the balance Different fabrics, threads and stabilizers can affect the programmed stitch patterns so that they cannot be sewn out correctly. The electronic balance can correct these deviation and the stitch pattern can be adjusted optimally to the selected fabric. >... -
Page 73: Mirror Image Of Stitch Patterns
Creative sewing > Tap «Long stitch». Mirror image of stitch patterns > Select a stitch pattern or alphabet. > Tap «i-Dialog». > To mirror the stitch pattern from left to right, tap «Mirror Image Left/Right». > To mirror the stitch pattern in sewing direction, tap «Mirror Image Up/Down». Editing stitch pattern length The stitch patterns can be lengthwise extended or shortened. -
Page 74: Quick Reverse
Creative sewing > Tap «Triple Stitch». Quick reverse > Select a stitch pattern or alphabet. > To switch immediately to sewing in reverse when pushing the button «Quick Reverse», select Needle Stop Down (permanent). > Program needle stop up (permanent) to sew another stitch forward before the machine switches to reverse sewing. -
Page 75: Creating Stitch Pattern Combinations
Creating Stitch pattern combinations In the Combi-mode stitch patterns and alphabets can be combined according to your wish. By combining any alphabet letters, the logo BERNINA can be created. > Tap «Combination Mode/Single Mode». > Select the desired stitch patterns. -
Page 76: Deleting A Stitch Pattern Combination
Creative sewing Deleting a stitch pattern combination > Create a stitch pattern combination. > Tap «i-Dialog». > Tap «Edit Entire Combination». > Tap «Delete». > Tap «Confirm». Editing a single stitch pattern > Create a stitch pattern combination. > To select a single stitch pattern, tap the desired position (1) within the stitch pattern combination. >... -
Page 77: Adding A Single Stitch Pattern
Creative sewing > Tap «i-Dialog». > Tap «Delete». Adding a single stitch pattern The new stitch pattern is always inserted after the selected stitch pattern. > Create a stitch pattern combination. > To select a single stitch pattern, tap the desired position (1) within the stitch pattern combination. >... -
Page 78: Mirroring A Stitch Pattern Combination
Creative sewing > Tap «Stitch Width» (3). > Tap «Adjust Width within Combination» (4). – The widths of all of the stitch patterns are adapted to the width of the widest stitch pattern in the combination Furthermore, the length and width of the stitch pattern combination are increased or decreased proportionally. -
Page 79: Stitch Pattern Combination Subdivider 2
Creative sewing > Tap «Edit Combination at Cursor Position». > Tap «Combination Subdivider (1)». Stitch pattern combination Subdivider 2 A stitch pattern combination can be interrupted at various sections. The interruption is placed beneath the cursor. > Create a stitch pattern combination. >... -
Page 80: Administering Stitch Patterns
Creative sewing > To repeat the stitch pattern combination, tap «Pattern Repeat» 1x. > To repeat the stitch pattern combination up to 9x, tap «Pattern Repeat» again. > To deactivate the pattern repeat, tap and hold «Pattern Repeat» or tap «Clear Settings». 5.7 Administering stitch patterns Saving settings of stitch patterns >... -
Page 81: Loading Stitch Patterns From The Personal Memory
> To delete the stitch pattern, tap «Confirm». Saving stitch patterns on the BERNINA USB stick On the BERNINA USB stick stitch patterns, also those which have been individually edited, can be saved. > Select a stitch pattern or alphabet. -
Page 82: Deleting Stitch Patterns From The Bernina Usb Stick
Creative sewing > Tap «Increasing/Decreasing the display size» (1). > Insert the BERNINA USB stick into the USB port of the machine. > Tap «USB Stick». > Select the desired stitch pattern. Deleting stitch patterns from the BERNINA USB stick > Tap «Personal Memory». -
Page 83: Height Compensation Of Uneven Layers
Creative sewing 5.9 Height Compensation of uneven layers If the presser foot is at an angle when sewing over a thick seam, the feed dog cannot grip the fabric and the sewing project cannot be sewn out properly. > Place 1 – 3 compensating plates as required from the back of the presser foot close to the needle to level the fabric layer. -
Page 84: Sewing Corners
Creative sewing 5.10 Sewing Corners When sewing corners, only a small section of the fabric is actually on the feed dog. Therefore it cannot grip the fabric well. By means of the height compensation tool the fabric can be fed evenly. >... -
Page 85: Practical Stitches
Practical stitches Practical stitches 6.1 Overview Practical Stitches Stitch Stitch Name Description patterns number Straight stitch To join seams, for topstitching and basting. Zigzag To finish edges, to sew elastic seams, to sew on lace inserts and elastics. Vari-overlock For finishing edges, sewing together and simultaneously finishing elastic fabrics. - Page 86 Practical stitches Super stretch stitch For highly stretch open seams. Gathering stitch For gathering with rubber threads and for flat joining seams on medium- weight fabrics. Stretch overlock For simultaneously sewing together and finishing elastic fabrics, as well as for flat joining seams.
- Page 87 Practical stitches Bartack program For reinforcing pocket openings, sewing belt loops and securing seam ends. Large fly stitch For reinforcing pocket openings, zippers and slits in medium-weight to thick fabrics. Small fly stitch For reinforcing pocket openings, zippers and slits in fine to medium-weight fabrics.
-
Page 88: Sewing Straight Stitch
Practical stitches 6.2 Sewing straight stitch Match the stitch length with the sewing project, such as for denim fabrics use long stitches (ca. 3 – 4 mm), for delicate fabrics use short stitches (ca. 2 – 2.5 mm). Match the stitch length with the thread size, e. -
Page 89: Sewing In The Zipper
Practical stitches > Sew the required length of seam. > Push the button «Quick Reverse». – The machine secures automatically and stops at the end of the securing program. 6.4 Sewing in the zipper As the fabric feed can be difficult when starting to sew, it is recommended to hold the threads firmly or to pull the fabric slightly to the back for a few stitches or to sew 1 –... -
Page 90: Sewing Both Sides Of The Zipper From Bottom To Top
Practical stitches > Sew the second side from bottom to top. 6.5 Sewing both sides of the zipper from bottom to top For fabrics with pile, such as velvet, it is recommended to sew in the zipper on both sides from bottom to top. -
Page 91: Sewing Triple Straight Stitch
Practical stitches 6.6 Sewing Triple straight stitch The triple straight stitch is especially suitable for durable seams and for firm, densely woven fabrics such as denim and corduroy. For firm or densely woven materials, it is recommended to fit the Jeans Foot #8. This will help to sew denim or canvas. -
Page 92: Manual Darning
Practical stitches 6.8 Manual darning Used for darning holes or worn areas in all fabric types. If the thread is lying on top and a poor stitch formation results, slow down the movement of the sewing project. If there are knots on the wrong side of the fabric, move the sewing project faster. When the thread breaks, guide the sewing project more consistently. - Page 93 Practical stitches > Sew the rows in irregular lengths. > Turn the sewing project by 90°. > Sew the first rows not too close. > Turn the sewing project by 180°. > Sew another loose row.
-
Page 94: Automatic Darning
Practical stitches 6.9 Automatic darning The Simple Darning Program No. 22 is particularly suitable for quick darning of worn areas or tears. It is recommended to use fine material as a backing for the worn and damaged areas or to stick an adhesive interlining. -
Page 95: Finishing Edges
Practical stitches The Reinforced Darming Program No. 23 is particularly suitable for quick darning of worn areas or tears. The Reinforced Darming Program No. 23 replaces the longitudinal threads in all fabrics. If the Darning Program does not cover the whole worn or damaged area, it is recommended to reposition the work and the sew the Darning Program again. -
Page 96: Sewing Double Overlock
Practical stitches 6.12 Sewing Double overlock A double overlook seam is suitable for loose knits and cross seams in knits. When working with jersey, a jersey needle should be used to prevent damaging the knit fabric. When sewing stretch materials, use a stretch needle. -
Page 97: Edgestitching Using The Seam Guide
Practical stitches > Select the needle position at the desired distance to the edge. 6.15 Edgestitching using the seam guide When sewing parallel wider lines, it is recommended to guide the seam guide along the sewn of lines. > Fit the Reverse Pattern Foot #1C. >... -
Page 98: Sewing Blind Hems
Practical stitches > Select the needle position to the far right in order to sew along the upper edge. 6.17 Sewing blind hems For invisible hems in medium to heavy weight cotton, wool and blended materials. Prerequisite: • The fabric edges are finished. >... -
Page 99: Sewing Visible Hems
Practical stitches > After sewing about 10 cm, check both sides of the fabric and adjust the width again if necessary. 6.18 Sewing visible hems The visible hem is particularly suitable for elastic seams in tricot made of cotton, wool, synthetic and mixed fibers. -
Page 100: Sewing Flat Joining Seams
Practical stitches 6.19 Sewing flat joining seams The flat joining seam is especially suitable for long-pile or thick materials such as terry cloth, felt or leather. > Fit the Reverse Pattern Foot #1C. > Tap «Practical Stitches». > Select Stretch overlock No. 13. >... -
Page 101: Decorative Stitches
Decorative stitches Decorative stitches 7.1 Overview Decorative Stitches Easier or more difficult decorative stitches come into their own depending on the type of fabric. • Decorative stitches which are programmed with simple straight stitches are particularly appropriate for lightweight materials, e. g. Decorative stitch No. 101 •... -
Page 102: Bobbin-Play
Decorative stitches Decorative stitch Category Name Category 7100 Kaffe Fassett stitches 7.2 Bobbin-Play The bobbin can be filled with different thread material. For free-motion stitching to add texture. This method is similar to «normal» free-motion sewing, but is done on the wrong side of the fabric. Reinforce the area to be sewn with embroidery stabilizer. -
Page 103: Altering The Stitch Density
Decorative stitches > To adjust the upper thread tension, tap «Upper Thread Tension». 7.3 Altering the stitch density With certain decorative stitches (e. g. No. 401) the stitch density can be altered. If the stitch density is increased, the stitch distance is enlarged. If the stitch density is decreased, the stitch distance is shortened. The programmed length of the stitch pattern is not affected. -
Page 104: Pintucks
Decorative stitches 7.5 Pintucks Pintucks Pintucks are narrow stitched folds which are normally sewn on the fabric before cutting out the pieces for garments or other sewing projects. They are suitable for embellishing or in combination with other heirloom embroidery techniques. The use of Pintuck Feet can simplify this technique considerably. This technique reduces the size of the fabric. -
Page 105: Working With Cord
Decorative stitches Pintuck foot Number Description # 32 (optional accessory) 7 grooves For light to medium-weight fabrics. In combination with the 2 mm double needle # 33 (optional accessory) 9 grooves For very light fabrics (without extra cord). In combination with the 1 or 1.6 mm twin needle # 46C (optional accessory) 5 grooves... -
Page 106: Sewing Pintucks
Decorative stitches > Make sure that the cord slides through the thread slot of the bobbin cover. > Place the spool on the spool holder. > Check that the cord runs smoothly. > If the thread doesn't glide smoothly at the hook cover, leave the hook cover open. >... -
Page 107: Alphabets
Alphabets Alphabets 8.1 Overview Alphabet Block- outline, script, quilt and comic writing, as well as Cyrillic and Cyrillic script can be sewn in two different sizes. Block- outline, script, quilt and comic writing, as well as Cyrillic and Cyrillic script can also be sewn in small letters. -
Page 108: Creating Lettering
Alphabets 8.2 Creating lettering It is recommend to sew a test sample using the desired thread, the original fabric and the original stabilizer. Please make sure that the fabric is fed evenly and lightly without colloding and being caught. Do not pull, push or hold the fabric while sewing. >... -
Page 109: Altering Font Size
Alphabets 8.3 Altering font size Block, Double block, Script and Comic alphabets as well as Cyrillic can also be downsized. > Tap «Alphabets». > Select the font. > Select the letter. > Tap «i-Dialog». > To reduce the font size, tap «Alter Font Size». >... -
Page 110: Buttonholes
Buttonholes 9.1 Overview Buttonholes To create the correct buttonhole for every button, every purpose and for every garment, your BERNINA 770 QE PLUS provides a considerable collection of buttonholes. The corresponding button can be sewn on automatically. Eyelets can also be sewn. - Page 111 Buttonholes Straight stitch buttonhole For staystitching and reinforcing buttonholes and as button hole edging, especially for buttonholes in leather and imitation leather. Button sew-on program Sews buttons with 2 or 4 holes. Eyelet with small zigzag Openings for cords or narrow ribbons and for decorative work.
-
Page 112: Making Use Of The Height Compensation Tool
Buttonholes 9.2 Making use of the height compensation tool When a buttonhole is to be sewn at right angles to the project edge, it is recommend to use the height compensation plates (optional accessory). > Place the plates from the back between the sewing project and the bottom of the slide to the thick part of the sewing project. -
Page 113: Marking Buttonholes
Buttonholes 9.4 Marking buttonholes > For the buttonholes to be sewn manually, mark the position and the length on the fabric using chalk or a water-soluble pen. > For the buttonholes to be sewn automatically, mark the complete length of 1 buttonhole on the fabric using chalk or a water-soluble pen. -
Page 114: Cord
Buttonholes 9.5 Cord Using cord with the Buttonhole Foot with Slide #3A The additional cord reinforces and embellishes the buttonhole and is particularly suitable for the Buttonhole No. 51. Ideal cords are Perle cotton No. 8, strong hand-sewing thread and fine crochet yarn. It is recommended to not hold the cord while sewing. -
Page 115: Using Cord With The Buttonhole Foot #3
Buttonholes > Pull the ends of the cord through to the wrong side of the fabric (using a hand sewing needle) and knot or secure them with stitches. Using cord with the Buttonhole Foot #3 Prerequisite: • The Buttonhole Foot #3C is fitted and raised. >... -
Page 116: Sewing A Test Sample
Buttonholes > Pull the cord ends with the hand sewing needle to the back and knot or secure them. 9.6 Sewing a test sample A test buttonhole should always be sewn on a piece of the original fabric: It is recommended to choose the same interlining and the same buttonhole. -
Page 117: Determining The Buttonhole Length With The Buttonhole Foot With Slide #3A
Buttonholes 9.8 Determining the buttonhole length with the Buttonhole Foot with Slide #3A The button can be placed in the yellow circle in the left section of the display. The yellow circle can be enlarged or downsized by turning the «Upper/Lower Mulitfunction knobs» and the diameter of the button can be determined in this way. -
Page 118: Sewing A Buttonhole Automatically
Buttonholes 9.10 Sewing a buttonhole automatically When the Buttonhole Foot with Slide #3A is used, the length of the buttonhole is measured automatically by the lens on the presser foot. The buttonhole will be exactly duplicated and the machine switches to the next step automatically when the maximum length is reached. -
Page 119: Programming The Heirloom Buttonhole
Buttonholes 9.11 Programming the Heirloom buttonhole Prerequisite: • The Buttonhole Foot with Slide #3A is fitted. > Tap «Buttonholes». > Select Heirloom buttonhole No. 63. > Sew the required length of the buttonhole. > To program the length, push the button «Quick Reverse». –... -
Page 120: Sewing The Manual 5-Step Buttonhole With The Buttonhole Foot #3C
Buttonholes > Step 6 appears by tapping «Scroll down». – The machine sews the lower bartack and stops automatically. > Step 7 appears by tapping «Scroll down». – The machine secures and stops automatically. 9.13 Sewing the manual 5-step buttonhole with the Buttonhole Foot #3C The length of the beads is manually determined when sewing. -
Page 121: Cutting The Buttonhole Open With The Seam Ripper
Buttonholes 9.14 Cutting the buttonhole open with the seam ripper > Place a pin in each end of the buttonhole to avoid accidental cutting into ends of buttonhole. > Cut the buttonhole from both ends to the middle. 9.15 Cutting open buttonholes with the buttonhole cutter (optional accessory) >... -
Page 122: Sewing Eyelets
Buttonholes Adjusting the thread shank For buttons on thicker fabrics, increase the thread shank = the distance between the button and the fabric. Buttons sewn on thin fabrics or buttons for decorative purposes only are stitched without a «thread shank». NOTICE! The adjustment of the thread shank is only possible when using the Button Sew-on Foot #18. -
Page 123: Quilting
Quilting 10 Quilting 10.1 Overview Quilt Stitches Stitch Stitch Name Description pattern number No. 1301 Quilting, securing To secure at the sewing start and sewing end program with short forward stitches. No. 1302 Quilting, straight stitch For machine quilting using a straight stitch with a 3 mm stitch length. -
Page 124: Quilting, Securing Program
Quilting Stitch Stitch Name Description pattern number No. 1331 Stippling stitch/stippling For imitations of stippling stitch. quilt stitch No. 1332 – Feather stitch For quilting, crazy patchwork, embellishing No. 1338 and finishing. 10.2 Quilting, Securing Program Prerequisite: • The Reverse Pattern Foot #1C is fitted. >... -
Page 125: Guiding The Quilt Work Freely
Quilting 10.4 Guiding the quilt work freely Free-motion quilting and darning are based on the same free-motion principles. With stipple quilting, entire areas of the fabric are filled with quilt stitches. The single lines of stitching are rounded and must not cross each other. -
Page 126: Bernina Stitch Regulator (Bsr)
BERNINA Stitch Regulator (BSR) 11 BERNINA Stitch Regulator (BSR) The BERNINA Stitch regulator equalizes the stitch length which results of the free movement of the fabric while free-motion sewing - a sewing technique which grows more and more popular. When free-motion sewing with the BSR presser foot, every stitch is equally long and the stitch formation is perfectly regular. -
Page 127: Changing The Presser Foot Sole
BERNINA Stitch Regulator (BSR) The lens of the BSR presser foot is dirty NOTICE The machine doesn't recognize the BSR presser foot. > Clean the lens with a soft, slightly damp cloth. > Change the presser foot. > Insert the cable of the BSR Foot into the connection (1). -
Page 128: Using The Bsr Mode
BERNINA Stitch Regulator (BSR) 11.7 Using the BSR mode The BSR function can either be operated via the foot control or via the button «Start/Stop». Starting via the foot control: The foot control needs to be pressed while quilting. The machine keeps running in the BSR1 Mode until the foot control is released, even if the fabric isn't moved. -
Page 129: Securing In Bsr2 Mode
BERNINA Stitch Regulator (BSR) Securing in BSR2 Mode Prerequisite: • The BSR Presser Foot is fitted and connected to the machine. • The BSR display opens and a BSR2 Mode is active. > Lower the presser foot. > Tap «i-Dialog». -
Page 130: My Bernina Embroidery
My BERNINA Embroidery 12 My BERNINA Embroidery 12.1 Overview Embroidery module Embroidery arm Guide rails for the machine Coupling for securing the hoop Connection to the machine 12.2 Supplied accessories Embroidery module Overview accessory Embroidery module Illustration Name Purpose Drop-Shaped Embroidery Foot For embroidering, darning and free-motion quilting. - Page 131 My BERNINA Embroidery Illustration Name Purpose Medium Embroidery Hoop To embroider medium-sized embroidery motifs up to 100 x 130 mm (3.94 × 5.12 in). Including the template for precise fabric positioning. Small Embroidery Hoop To embroider small embroidery motifs up to 72 × 50 mm (2.83 ×...
-
Page 132: Overview User Interface
My BERNINA Embroidery 12.3 Overview User Interface Overview functions/visual information «Upper Thread Tension» «Stitch Plate Selection» «Needle Selection» «Feed Dog Indicator» «Presser foot indicator / presser foot selection» 7 «Bobbin Thread» «Hoop Indicator/Select Hoop» Overview System settings «Home» «Help» «Setup Program»... -
Page 133: Overview Selection Menu Embroidery
My BERNINA Embroidery Overview Selection menu embroidery «Selection» «Color Information» «Edit» «Embroidery» 12.4 Important Embroidery information Upper thread A good quality thread (brand manufacturer) is essential for embroidery so that the embroidery is not affected negatively because of poor thread or thread breakage. -
Page 134: Bobbin Thread
Selecting the embroidery file format In order that embroidery motifs can be read by the BERNINA Embroidery machine, they have to be created by the BERNINA Embroidery Software and exported as .EXP file. Besides the actual embroidery file, a .BMP file and an .INF file are generated additionally. -
Page 135: Underlay Stitches
My BERNINA Embroidery Underlay stitches Underlay stitches are the foundation of a motif and are used to stabilize the base material and hold it in shape. They also prevent the covering stitches of the motif from sinking into the knit or the nap of the material. -
Page 136: Connecting Stitches
My BERNINA Embroidery Connecting stitches Long stitches which are used to get from one part of the motif to the next. Before and after the connecting stitch securing stitches are sewn. Connecting stitches are trimmed. -
Page 137: Embroidering Preparation
Embroidering preparation 13 Embroidering preparation 13.1 Attaching the Module Transporting the embroidery module NOTICE Damage to the embroidery module connection and machine. > Remove the embroidery module before transporting the machine. Prerequisite: • The slide-on table must not be attached. >... -
Page 138: Preparing The Machine
All embroidery motifs can either be embroidered as-is or they can be changed by using the various functions. You can find all embroidery motifs at the end of the instruction manual. Furthermore, embroidery motifs from the Personal Memory or from the BERNINA USB stick can be loaded. > Tap «Home». -
Page 139: Selecting The Presser Foot In The User Interface
Embroidering preparation > Push the clamping lever up. > Remove the presser foot. > Insert the embroidery foot from below into the bracket. > Press the clamping lever down. Selecting the presser foot in the User Interface After having fitted the appropriate embroidery foot (Embroidery Foot #26, supplied accessory) it can be selected and saved on the machine. -
Page 140: Selecting The Embroidery Needle In The User Interface
Embroidering preparation > Loosen the fixing screw of the needle using the screwdriver gray Torx. > Pull the needle down. > Hold the new needle with the flat side to the back. > Insert the needle as far as it will go. >... -
Page 141: Attaching The Stitch Plate
Embroidering preparation > Tap «Needle Information». > Select the needle type (1) of the fitted needle. > Select the needle type (2) of the fitted needle. Attaching the stitch plate The stitch plate (CutWork/Straight, supplied accessory) has a small needle hole in the needle insertion area. The thread is pulled in and knotted optimally which results in an optimized stitching result. -
Page 142: Selecting The Stitch Plate In The User Interface
Embroidering preparation Selecting the stitch plate in the User Interface After changing the stitch plate, you can check whether this can be used with the selected needle. > Tap «Stitch Plate Selection». > Select the previously fitted stitch plate. – If the selected stitch plate is suitable to be used in combination with the needle, sewing can begin. -
Page 143: Tear-Away Stabilizers
Embroidering preparation Prerequisite: • The embroidery motif is selected. > Tap «Hoop Indicator/Select Hoop». – The machine selects the optimal embroidery hoop according to the size of the embroidery motif automatically. If the pre-set embroidery hoop would not be available, another desired embroidery hoop can be selected. -
Page 144: Using Paper-Backed Adhesive Stabilizer
> Make sure that the arrows marks of both hoops match. > Attach the template holder. > Place the template in the inner hoop, so the BERNINA logo is at the front edge at the arrow mark until it clicks into place. -
Page 145: Attaching The Hoop
Embroidering preparation > Place the material under the inner hoop. > Line up the marked center point on the center of the template. > Place the material and the inner hoop on the outer hoop so that the arrows of both hoops match. >... -
Page 146: Overview Embroidery Functions
Embroidering preparation Overview Embroidery functions «Center Embroidery Hoop to Needle» «Grid On/Off» «Move Hoop to the Back» «Center Motif» «Move Hoop to the Left» «Virtual Positioning» (becomes visible by scrolling) Center the needle to the embroidery hoop Relocating the embroidery hoop facilitates threading when the needle is close to the embroidery hoop. >... -
Page 147: Grid On/Off
Embroidering preparation > Tap «Move Hoop to the Left». > Tap «Home». > Tap «Sewing Mode». Grid on/off When the center of the hoop and the grid are displayed, the embroidery motif can be positioned more exactly. > Tap «Hoop Indicator/Select Hoop». >... -
Page 148: Setup Program
Setup Program 14 Setup Program 14.1 Adjusting the embroidery settings in the Setup Program Further information about this topic (see page 53). -
Page 149: Creative Embroidering
Creative embroidering 15 Creative embroidering 15.1 Overview embroidering Embroidery time/Embroidery Motif Size «i-Dialog» Scaling up, downsizing and moving the Embroidery motif layers embroidery motif view Area to be embroidered 15.2 Selecting and changing the embroidery motif > Tap «Selection». > Tap «Load Embroidery Motif». >... -
Page 150: Editing The Embroidery Motif
Creative embroidering 15.5 Editing the embroidery motif Overview Editing embroidery motif «Move View» «Mirror Image Up/Down» «Move Embroidery Motif» «Duplicating» «Zoom Out» «Delete Embroidery Motif» «Zoom In» «Check Embroidery Motif Size» «Move Embroidery Motif» «WordArt» (activated after text entry) «Rotate Embroidery Motif» «Group Embroidery Motifs»... -
Page 151: Moving The Embroidery Motif View
Creative embroidering Moving the embroidery motif view The view of the embroidery motif can be moved. In addition to that, the view can be adjusted with or without changing the embroidery position. > Select an embroidery motif. > To activate «Move View», tap «Zoom In». –... -
Page 152: Rotating Motif
Creative embroidering Rotating motif > Select an embroidery motif. > Tap «i-Dialog». > Tap «Rotate Embroidery Motif». > Turn the «Upper Multi-function knob» or the «Lower Multi-function knob» to the right to rotate the embroidery motif clockwise. > Turn the «Upper Multi-function knob» or the «Lower Multi-function knob» to the left to rotate the embroidery motif counter-clockwise. -
Page 153: Altering The Embroidery Motif Size Disproportionally
Creative embroidering Altering the embroidery motif size disproportionally Enlargements or reductions of the motif size up to maximum 20% achieve the best results. If the motif size is to be altered by more than 20%, the motif should be adapted in a separate embroidery software and then reloaded onto the machine. -
Page 154: Changing The Stitch Type
Creative embroidering > Tap «i-Dialog». > Tap «WordArt». > To change the distance between the characters in increments of one millimeter, turn the «Upper multifunction knob». > Turn the «Lower multifunction knob» to the left or right to curve the writing upwards or downwards. Changing the stitch type If the satin stitches are too long, they can be changed to step stitches. -
Page 155: Checking The Size And The Position Of The Embroidery Motif
Creative embroidering Checking the size and the position of the embroidery motif It can be checked whether or not the embroidery motif matches the designated position/location on the fabric. Points which are beyond the embroidery hoop are not traveled to. >... -
Page 156: Grouping Embroidery Motifs
Creative embroidering > Tap «Change Embroidery Motif Sequence». > Select the required embroidery motif and move it to the corresponding position. Grouping embroidery motifs Embroidery motifs can be added to or removed from a group. The grouped embroidery motifs can be processed in the same way as for one embroidery motif. -
Page 157: Pinpoint Placement
Creative embroidering > Select all embroidery motifs (2). > Tap «i-Dialog». > Tap «Group». – All embroidery motifs are added to the embroidery motif group. > Select the embroidery motif group. > Tap «Ungroup». – The grouping is canceled. 15.6 Pinpoint placement Positioning of grid points This function allows the exact positioning of the embroidery motif on the fabric in an easy way. -
Page 158: Free Point Positioning
Creative embroidering > To confirm the changed position, tap «Save Position». – The point changes color and is set. > Select the second positioning point of the embroidery motif. > Turn the «Upper Multifunctional knob» or the «Lower Multifunctional knob» to the left or to the right to position the needle above the respective mark on the fabric. -
Page 159: Combining Embroidery Motifs
Creative embroidering > Turn the «Upper Multifunctional knob» or the «Lower Multifunctional knob» to the left or to the right to position the needle above the respective mark on the fabric. > To confirm the changed position, tap «Save Position». –... -
Page 160: Deleting A Single Embroidery Motif
Creative embroidering Deleting a single embroidery motif Prerequisite: • A combination of embroidery motifs has been created. > Tap the desired embroidery motif in the area of the embroidery motif level (1), keep it touched and drag it outwards. – A new window opens. >... -
Page 161: Creating Lettering
Creative embroidering > Select the combination (1). > Tap «i-Dialog». > Tap «Duplicating». – The combination is duplicated (2). 15.8 Creating lettering Overview embroidery alphabets Embroidery motif Name Swiss Block Anniversary Alphabet Guinevere Drifter Childs Play Russian Textbook Curly Rounded Sans Creating words/sentences A lettering is always embroidered in one color. -
Page 162: Editing Words/Sentences
Creative embroidering Lettering can be positioned within the hoop as you like. When the embroidery motif is positioned outside the area to be embroidered, the hoop is outlined in red on the display. With the Hoop Selection, it can be checked whether or not the embroidery motif can be embroidered in another hoop. -
Page 163: Changing The Colors Of The Embroidery Motif
Creative embroidering > Turn the «Lower Multi-function knob» to move the embroidery motif vertically. > Tap «Add Embroidery Motif». > Enter the text and rotate it if necessary. > Tap «Hoop Indicator/Select Hoop». > To position the text lines more precisely, tap «Grid On/Off». 15.9 Changing the colors of the embroidery motif Overview changing the color «Color indication»... -
Page 164: Changing The Colors
Creative embroidering Changing the colors > Select an embroidery motif. > Tap «Color Information». > To change a color, tap «Altering color/brand» next to the color to be changed. > To display additional colors, swipe up or down on the display. >... -
Page 165: Moving The Hoop
Creative embroidering > Select an embroidery motif. > Tap «Embroidery». > To embroider the basting stitches along an embroidery motif, tap «Basting». > To deactivate the basting stitches, tap «Basting» again. Moving the hoop If the embroidery motif is so big that repeated rehooping is necessary, the embroidered motif can be moved again. -
Page 166: Reducing Color Changes
Creative embroidering > Tap «Embroidery». > To deactivate the function, tap the yellow-outlined icon «Cut Connecting Stitches». > To activate the function, tap the yellow-outlined icon «Cut Connecting Stitches» again. Reducing color changes When the embroidery motifs overlap, the color changes cannot be reduced. >... -
Page 167: Administering Embroidery Motifs
Creative embroidering The mobility of the embroidery arm can be restricted or impeded with very narrow fabric tubes. Therefore make sure that the embroidery hoop can move forwards and backwards sufficiently. An impediment of the embroidery arm caused by a fabric tube which is too tight can result in embroidery motif offset or damage to the fabric. -
Page 168: Saving The Embroidery Motif On The Bernina Usb Stick
> Tap «Selection». > Tap «Save Embroidery Motif». – The embroidery motif to be saved is outlined in yellow. > Insert the BERNINA USB stick into the USB port of the machine. > Tap «USB Stick». > Tap «Confirm». Overwriting the embroidery motif in the personal memory >... -
Page 169: Loading An Embroidery Motif From The Personal Memory
> Select an embroidery motif. Loading an embroidery motif from the BERNINA USB stick > Tap «Selection». > Insert the BERNINA USB stick into the USB port of the machine. > Tap «USB Stick». > Select a personal embroidery motif. -
Page 170: Deleting An Embroidery Motif From The Bernina Usb Stick
Deleting an embroidery motif from the BERNINA USB stick > Tap «Selection». > Tap «Delete». > Insert the BERNINA USB stick into the USB port of the machine. > Tap «USB Stick». > Select the embroidery motif which is to be deleted. -
Page 171: Embroidery
Embroidery 16 Embroidery 16.1 Embroidering via the button «Start/Stop» In case of a power cut the embroidery process is interrupted. After the restart the machine goes to the position which was embroidered last. > Push the button «Start/Stop» until the embroidery machine starts. –... -
Page 172: Embroidering Via The Foot Control
Embroidery > Adjust the upper thread tension. > Tap the yellow-outlined icon on the right side to reset the alterations to the default setting. > Tap the yellow-outlined icon on the left side to reset the alteration to default setting in the Setup Program. -
Page 173: Care And Maintenance
For reasons of safety, it is also recommended to save data and settings on a BERNINA USB stick before the firmware update is started. If personal data and settings should get lost during a firmware update, they can be transferred to the machine again afterwards. -
Page 174: Recovering Saved Data
If personal data and settings after a software update are not available anymore, they can be transferred to the machine again afterwards. > Insert the BERNINA USB stick providing the saved data and settings into the USB port of the machine. > Tap «Setup Program». -
Page 175: Cleaning The Hook
Care and maintenance > Lower feed dog. > Remove the stitch plate. Dust and thread residues inside the machine NOTICE Damage to mechanical and electronic components. > Use a brush or a soft cloth. > Do not use compressed air spray. >... -
Page 176: Lubricating The Hook
> Insert the bobbin case. Lubricating the hook Lubricating the hook can prevent the occurrence of unwanted noises in the hook area. BERNINA recommends lubricating the hook in the following cases: • Before using the machine for the first time •... - Page 177 > Clean the hook race with a brush and a soft cloth. Do not use any sharp objects. > Add one drop of BERNINA oil down into the hook race. > Add one drop of oil into each of the two oil depots so that the felts are damp, and make sure that the red-marked surface of the hook sleeve remains free of oil.
-
Page 178: Cleaning The Thread Catcher
Care and maintenance Cleaning the thread catcher > Tap «Setup Program». > Tap «Machine Settings». > Tap «Maintenance/Updates». > Tap «Cleaning the thread catcher». > Clean the thread catcher according to the instructions on the display. -
Page 179: Errors And Faults
Errors and faults 18 Errors and faults 18.1 Error messages Message on the display Cause Solution Stitch number unknown. > Check the entry and enter the new number. The stitch pattern cannot be > Combine other stitches. selected in the Combi-mode. The feed dog is not lowered. - Page 180 The needle position doesn't > Calibrate the hoop. correspond with the center of the hoop. The embroidery module is not > Connect the embroidery module to the machine. attached. > Contact the specialized BERNINA dealer to have the machine checked.
- Page 181 > Reduce the size of the embroidery motif. large. > Attach a larger hoop. Insufficient free space on the There is not enough free capacity > Make sure that the BERNINA USB stick (optional BERNINA USB stick (optional on the BERNINA USB stick accessory) is used. accessory).
- Page 182 Message on the display Cause Solution No BERNINA USB stick is inserted. The BERNINA USB stick (optional > Use a BERNINA USB stick (optional accessory) providing Make sure that during the accessory) is not inserted. enough free capacity. complete automatic update always the same BERNINA USB stick remains inserted.
-
Page 183: Troubleshooting
> Adjust the upper thread tension. loose. > Check the thread feed from the thread spool. Needle blunt or bent. > Replace the needle, make sure that a new BERNINA quality needle is used. Poor quality needle. > Use a new BERNINA quality needle. - Page 184 > Rethread. Poor quality thread. > Use quality thread. The stitch plate or the hook tip is > Contact the nearest specialized BERNINA dealer to have damaged. the damages repaired. > Replace the stitch plate. The thread is caught in the area >...
- Page 185 > Place the machine in a warm room one hour before use. The machine doesn't start > Connect the machine and switch it on. The machine is damaged. > Contact a specialized BERNINA dealer. The light of the button Light is defect. > Contact a specialized BERNINA dealer.
- Page 186 Settings in the Setup Program. > Activate it in the Setup Program. doesn't react The bobbin thread indicator is > Contact a specialized BERNINA dealer. defect. Error during firmware update USB stick is not recognized. > Using the BERNINA USB stick.
-
Page 187: Storage And Disposal
Storage and disposal 19 Storage and disposal 19.1 Storing the machine It is recommended to store the machine in the original packaging. If the machine is stored in a cold room, place it in a warm room one hour before use. >... -
Page 188: Technical Data
Technical data 20 Technical data Designation Value Unit Maximum fabric thickness 12.5 (0.49) (in) Sewing light Maximum speed 1000 Stitches per minute Measurements without the spool pin (W × H × D) 522 × 358 × 214 (20.55 × 14.09 × 8.43) (in) Weight (30.86) -
Page 189: Overview Stitch Patterns
Overview stitch patterns 21 Overview stitch patterns 21.1 Overview Stitch patterns Practical stitches Buttonholes Decorative stitches Natural stitches... - Page 190 Overview stitch patterns Cross stitches Satin stitches Geometric stitches...
- Page 191 Overview stitch patterns White embroidery Novelty stitches...
- Page 192 Overview stitch patterns International 1701 1702 1703 1704 1705 1706 1707 1708 1709 1710 1711 1715 1716 1717 1718 1719 1720 1721 1722 1723 1729 1730 1731 1732 1733 1735 1736 Seasons 2001 2002 2003 2004 2005 2006 2007 2008 2009 2015 2016...
-
Page 193: Quilt Stitches
Let your inspiration run free. A vast selection of embroidery motifs is at your disposal. If you see one of the following pictograms below a number of the embroidery motif, you can find additional information at https://www.bernina.com/specialeffects. Freestanding lace Punchwork Design (motif) -
Page 194: Quilt Motifs
Overview stitch patterns Quilt motifs 103 x 103 mm 64 x 64 mm Bd380 2.976 Bd378 4 x 4.1 inch 2.5 x 2.5 inch 1. Isacord 40 5822 1. Isacord 40 5822 96 x 96 mm 62 x 64 mm Bd379 1.639 Bd381 3.8 x 3.8 inch 2.4 x 2.5 inch 1. Isacord 40 5822 1. Isacord 40 5822 80 x 69 mm 80 x 80 mm Bd382 Bd383 1.690 3.2 x 2.7 inch 3.1 x 3.1 inch 1. - Page 195 Overview stitch patterns 101 x 33 mm 101 x 36 mm Bd388 Bd389 4 x 1.3 inch 4 x 1.4 inch 1. Isacord 40 5822 1. Isacord 40 5822 101 x 32 mm 43 x 55 mm Bd390 Bd391 4 x 1.2 inch 1.7 x 2.2 inch 1. Isacord 40 5822 1. Isacord 40 5822 52 x 68 mm 96 x 96 mm Bd392 Bd395_48 5.672 2.1 x 2.7 inch 3.8 x 3.8 inch 1. Isacord 40 5822 1.
- Page 196 Overview stitch patterns 55 x 74 mm 75 x 75 mm Bd409_48 Bd410_48 1.838 2.555 2.2 x 2.9 inch 2.9 x 2.9 inch 1. Isacord 40 1335 1. Isacord 40 1335 97 x 97 mm 97 x 97 mm Bd414_48 Bd415_48 2.738 3.212 3.8 x 3.8 inch 3.8 x 3.8 inch 1. Isacord 40 5822 1. Isacord 40 5822 97 x 97 mm 89 x 89 mm Bd416_48 Bd364 2.168 1.373 3.8 x 3.8 inch 3.5 x 3.5 inch...
- Page 197 Overview stitch patterns 99 x 99 mm 104 x 104 mm Bd565_48 Bd558_48 4.424 4.472 3.9 x 3.9 inch 4.1 x 4.1 inch 1. Isacord 40 5531 1. Isacord 40 4620 102 x 102 mm 123 x 123 mm 12499-06 12499-04 3.838 7.229 4 x 4 inch 4.9 x 4.8 inch 1. Isacord 40 5115 1. Isacord 40 5610 123 x 123 mm 133 x 215 mm 12499-05 12499-24 6.317 11.445 4.9 x 4.9 inch 5.2 x 8.4 inch...
- Page 198 Overview stitch patterns 124 x 124 mm 44 x 174 mm 12416-03 12416-26 5.909 2.816 4.9 x 4.9 inch 1.7 x 6.9 inch 1. Isacord 40 0721 1. Isacord 40 3830 171 x 178 mm 76 x 76 mm 12416-48 Nb346_48 9.050 3.366 6.7 x 7 inch 3 x 3 inch 1. Isacord 40 5610 1. Isacord 40 5513 76 x 76 mm 127 x 127 mm Nb347_48 Nb334_48 2.337 6.838 3 x 3 inch 5 x 5 inch...
- Page 199 Overview stitch patterns 57 x 58 mm 122 x 105 mm 82013-31 82013-32 1.884 4.506 2.3 x 2.3 inch 4.8 x 4.1 inch 1. Isacord 40 2920 1. Isacord 40 2920 89 x 73 mm 123 x 122 mm 12416-24 12607-16 2.330 1.222 3.5 x 2.9 inch 4.8 x 4.8 inch 1. Isacord 40 3830 1. Isacord 40 0020 123 x 123 mm 110 x 61 mm 12616-16 12380-22 1.198 2.487 4.8 x 4.8 inch 4.4 x 2.4 inch...
-
Page 200: Quilting In The Hoop
Overview stitch patterns Quilting in the hoop 140 x 140 mm 140 x 139 mm 12736-01 1.657 12736-02 1.473 5.5 x 5.5 inch 5.5 x 5.5 inch 1. Isacord 40 0020 1. Isacord 40 0020 2. Isacord 40 0020 2. Isacord 40 0020 3. Isacord 40 0020 3. Isacord 40 0020 4. Isacord 40 0020 4. - Page 201 Overview stitch patterns 140 x 140 mm 137 x 137 mm 12736-09 12736-10 1.624 1.240 5.5 x 5.5 inch 5.4 x 5.4 inch 1. Isacord 40 0020 1. Isacord 40 0020 2. Isacord 40 0020 3. Isacord 40 0020 4. Isacord 40 0020 5. Isacord 40 0020 6. Isacord 40 0020 7. Isacord 40 0020 8.
-
Page 202: Projects
Overview stitch patterns Projects You can find the detailed embroidery instructions at https://www.bernina.com/770PLUSdesigns. 150 x 229 mm 100 x 135 mm 32152-01 32152-02 7.265 1.356 5.9 x 9 inch 3.9 x 5.3 inch 1. Isacord 40 0108 1. Isacord 40 0108 188 x 220 mm 179 x 196 mm 32152-03a 32152-03b 1.803 1.847 7.4 x 8.7 inch 7.1 x 7.7 inch 1. Isacord 40 0108 1. -
Page 203: Children
Overview stitch patterns 135 x 155 mm 190 x 279 mm 32152-09 32152-10 7.220 3.894 5.3 x 6.1 inch 7.5 x 11 inch 1. Isacord 40 0108 1. Isacord 40 0108 125 x 122 mm 32152-11 4.614 4.9 x 4.8 inch 1. Isacord 40 0108 Children 118 x 145 mm 135 x 147 mm Be790305 13.118 12590-03 22.117 4.6 x 5.7 inch 5.3 x 5.8 inch 1. Isacord 40 0015 1. - Page 204 Overview stitch patterns 99 x 55 mm 119 x 142 mm 12401-17 Ck859 1.345 30.121 3.9 x 2.2 inch 4.7 x 5.6 inch 1. Isacord 40 0731 1. Isacord 40 3815 2. Isacord 40 0630 2. Isacord 40 0101 3. Isacord 40 5934 3. Isacord 40 6141 4. Isacord 40 0111 4. Isacord 40 0630 5.
- Page 205 Overview stitch patterns 142 x 127 mm 114 x 152 mm Be790307 Be790311 19.667 12.320 5.6 x 5 inch 4.5 x 6 inch 1. Applique 1 1. Applique 1 2. Applique 3 2. Applique 3 3. Isacord 40 3130 3. Isacord 40 0933 4. Applique 1 4. Applique 1 5. Applique 3 5.
-
Page 206: Animals
Overview stitch patterns Animals 81 x 148 mm 116 x 192 mm 12676-01 15.344 Cm263_48 14.402 3.2 x 5.8 inch 4.6 x 7.6 inch 1. Isacord 40 2171 1. Isacord 40 3151 2. Isacord 40 2530 2. Isacord 40 0532 3. Isacord 40 2155 3. Isacord 40 1755 4. Isacord 40 2520 4. -
Page 207: Borders
Overview stitch patterns 106 x 81 mm Lj598 15.746 4.2 x 3.2 inch 1. Isacord 40 0101 2. Isacord 40 0131 3. Isacord 40 0132 4. Isacord 40 4174 5. Isacord 40 0108 6. Isacord 40 0020 7. Isacord 40 5933 8. Isacord 40 0453 Borders 113 x 77 mm 155 x 104 mm 12383-09... - Page 208 Overview stitch patterns 140 x 140 mm 91 x 88 mm 12611-28 12649-05 3.649 9.087 5.5 x 5.5 inch 3.6 x 3.5 inch 1. Applique 1 1. Applique 1 2. Applique 2 2. Applique 2 3. Isacord 40 0703 3. Isacord 40 1840 4. Isacord 40 1860 5. Isacord 40 0015 139 x 139 mm 43 x 70 mm 12606-26 12606-33...
-
Page 209: Sport And Hobbies
Overview stitch patterns 87 x 72 mm Nx763 14.953 3.4 x 2.8 inch 1. Isacord 40 2155 2. Isacord 40 0520 3. Isacord 40 1921 4. Isacord 40 5912 5. Isacord 40 5510 6. Isacord 40 3040 7. Isacord 40 0310 8. Isacord 40 3910 9. Isacord 40 0442 10. -
Page 210: Embellishment
Overview stitch patterns 138 x 142 mm 100 x 86 mm 12472-01 Be790606 23.233 7.445 5.4 x 5.6 inch 3.9 x 3.4 inch 1. Isacord 40 2504 1. Isacord 40 0020 2. Isacord 40 3901 2. Isacord 40 1306 3. Isacord 40 5610 4. Isacord 40 4240 5. Isacord 40 0015 6. Isacord 40 0015 7. - Page 211 Overview stitch patterns 120 x 120 mm 94 x 184 mm 12633-06 12473-04 18.023 11.531 4.7 x 4.7 inch 3.7 x 7.3 inch 1. Isacord 40 0015 1. Isacord 40 5552 2. Isacord 40 5374 140 x 130 mm 133 x 120 mm Be790403 12473-06 13.281 11.358 5.5 x 5.1 inch 5.3 x 4.7 inch 1. Isacord 40 0020 1. Isacord 40 4610 2. Isacord 40 0731 2.
- Page 212 Overview stitch patterns 123 x 150 mm 116 x 109 mm 21021-04 21021-06 16.176 12.204 4.8 x 5.9 inch 4.6 x 4.3 inch 1. Isacord 40 1161 1. Isacord 40 1161 2. Isacord 40 1252 2. Isacord 40 1252 3. Isacord 40 1565 3. Isacord 40 1565 118 x 113 mm 146 x 122 mm 12490-03 12490-04 6.669 8.724 4.6 x 4.5 inch 5.8 x 4.8 inch...
-
Page 213: Borders And Lace
Overview stitch patterns 114 x 115 mm 100 x 174 mm 82007-44 82006-30 9.467 21.584 4.5 x 4.5 inch 3.9 x 6.9 inch 1. Isacord 40 2152 1. Isacord 40 0020 2. Isacord 40 2520 2. Isacord 40 4174 3. Isacord 40 0020 4. Isacord 40 4174 5. Isacord 40 0771 6. Isacord 40 0832 7. - Page 214 Overview stitch patterns 34 x 71 mm 101 x 110 mm 21021-25 Oc00303 4.748 35.018 1.3 x 2.8 inch 4 x 4.4 inch 1. Isacord 40 1252 1. Isacord 40 0015 34 x 170 mm 40 x 151 mm 12633-20 12508-08 12.897 7.102 1.4 x 6.7 inch 1.6 x 5.9 inch 1. Isacord 40 0015 1. Isacord 40 0352 2. Isacord 40 4752 3. Isacord 40 0124 42 x 152 mm 24 x 177 mm 12508-17...
- Page 215 Overview stitch patterns 44 x 172 mm 35 x 142 mm Be110415 Fa981 6.436 3.709 1.7 x 6.8 inch 1.4 x 5.6 inch 1. Isacord 40 6051 1. Isacord 40 1055 2. Isacord 40 0811 3. Isacord 40 1921 151 x 21 mm 32 x 152 mm 21002-21 21009-29 3.176 4.649 5.9 x 0.8 inch 1.3 x 6 inch 1. Isacord 40 1252 1. Isacord 40 5210 26 x 240 mm 73 x 190 mm 82005-40...
-
Page 216: Seasons
Overview stitch patterns Seasons 119 x 123 mm 124 x 152 mm 82023-14 14.989 82023-15 9.577 4.7 x 4.8 inch 4.9 x 6 inch 1. Isacord 40 1753 1. Isacord 40 5210 2. Isacord 40 1753 2. Isacord 40 5220 3. Isacord 40 1753 3. Isacord 40 5100 4. Isacord 40 0010 4. - Page 217 Overview stitch patterns 88 x 145 mm 112 x 138 mm He252 Hg746_48 12.251 17.815 3.5 x 5.7 inch 4.4 x 5.4 inch 1. Isacord 40 1902 1. Isacord 40 3040 2. Isacord 40 1701 2. Applique 1 3. Isacord 40 1902 3. Applique 2 4. Isacord 40 0532 4. Isacord 40 0221 5.
- Page 218 Overview stitch patterns 80 x 191 mm 108 x 172 mm 12415-32 12415-29 10.937 4.814 3.1 x 7.5 inch 4.3 x 6.8 inch 1. YLI variations 8019 1. YLI variations 8019 164 x 110 mm 83 x 124 mm 12655-14 12433-05 16.122 15.348 6.4 x 4.4 inch 3.3 x 4.9 inch 1. Isacord 40 1115 1. Isacord 40 1725 2. Isacord 40 1055 2. Isacord 40 5934 3.
-
Page 219: Flowers
Overview stitch patterns Flowers 119 x 160 mm 108 x 162 mm Fq987_48 32.494 12505-03 8.606 4.7 x 6.3 inch 4.3 x 6.4 inch 1. Isacord 40 5650 1. Isacord 40 0442 2. Isacord 40 5833 2. Isacord 40 5822 3. Isacord 40 0352 3. Isacord 40 5822 4. Isacord 40 5934 4. - Page 220 Overview stitch patterns 121 x 121 mm 57 x 152 mm 21027-14 21027-16 7.316 4.222 4.8 x 4.8 inch 2.3 x 6 inch 1. Isacord 40 5115 1. Isacord 40 1805 2. Isacord 40 2721 2. Isacord 40 2520 3. Isacord 40 4114 3. Isacord 40 2721 4. Isacord 40 2520 4. Isacord 40 5100 5.
-
Page 221: Designworks
Overview stitch patterns 124 x 166 mm 114 x 135 mm 82006-07 21006-02 22.673 9.132 4.9 x 6.5 inch 4.5 x 5.3 inch 1. Isacord 40 4174 1. Isacord 40 3910 2. Isacord 40 0108 2. Isacord 40 3900 3. Isacord 40 0643 3. Isacord 40 0015 4. Isacord 40 0660 4. Isacord 40 3962 5. - Page 222 Overview stitch patterns 69 x 194 mm 104 x 127 mm 21026-02_dw 21026-02_cr 7.815 2.7 x 7.6 inch 4.1 x 5 inch 1. Edding 69 1. Swarovski 0280 2. Applique 1 2. Swarovski 0280 3. Applique 2 4. Isacord 40 0015 5. Isacord 40 0020 6. Isacord 40 0015 121 x 161 mm 118 x 202 mm 12448-09_pw 21026-05_dw 8.265 9.309...
- Page 223 Overview stitch patterns 141 x 134 mm 192 x 196 mm Be700124 Be790906 6.184 21.054 5.6 x 5.3 inch 7.6 x 7.7 inch 1. Isacord 40 2300 1. Edding 8 2. Isacord 40 3901 2. Edding 3 3. Edding 5 4. Edding 34 5. Edding 69 6. Edding 10 7. Edding 5 8.
-
Page 224: Kaffe Fassett Stitches
Overview stitch patterns Kaffe Fassett stitches 57 x 52 mm 51 x 47 mm 90025-01 6.598 90025-02 4.345 2.2 x 2 inch 2 x 1.8 inch 1. Isacord 40 2530 1. Isacord 40 2363 2. Isacord 40 0101 2. Isacord 40 2530 3. Isacord 40 2530 3. Isacord 40 2508 4. Isacord 40 2508 4. - Page 225 Overview stitch patterns 52 x 48 mm 51 x 46 mm 90025-11 90025-12 5.172 3.768 2 x 1.9 inch 2 x 1.8 inch 1. Isacord 40 0310 1. Isacord 40 4240 2. Isacord 40 3150 2. Isacord 40 0520 3. Isacord 40 5912 3. Isacord 40 1200 4. Isacord 40 2508 4. Isacord 40 0101 5.
- Page 226 Overview stitch patterns 115 x 83 mm 101 x 82 mm 90025-21 90025-22 18.912 15.704 4.5 x 3.3 inch 4 x 3.2 inch 1. Isacord 40 0010 1. Isacord 40 0010 2. Isacord 40 6011 2. Isacord 40 2732 3. Isacord 40 4116 3. Isacord 40 4430 4. Isacord 40 4111 4. Isacord 40 4116 5.
- Page 227 Overview stitch patterns 100 x 102 mm 102 x 94 mm 90025-31 90025-32 23.747 16.769 3.9 x 4 inch 4 x 3.7 inch 1. Isacord 40 3962 1. Isacord 40 3962 2. Isacord 40 6031 2. Isacord 40 5411 3. Isacord 40 4111 3. Isacord 40 5324 4. Isacord 40 4116 4. Isacord 40 3335 5.
- Page 228 Overview stitch patterns 190 x 190 mm 190 x 155 mm 90025-41 90025-42 4.903 3.165 7.5 x 7.5 inch 7.5 x 6.1 inch 1. Isacord 40 0020 1. Isacord 40 0020 140 x 113 mm 101 x 203 mm 90025-43 90025-44 1.631 5.5 x 4.4 inch 4 x 8 inch 1. Isacord 40 0020 1. Isacord 40 0020 140 x 121 mm 72 x 80 mm 90025-45 90025-46 2.132 5.5 x 4.8 inch 2.8 x 3.1 inch 1.
- Page 229 Overview stitch patterns 140 x 140 mm 139 x 200 mm 90025-51 90025-52 2.697 1.116 5.5 x 5.5 inch 5.5 x 7.9 inch 1. Isacord 40 0020 1. Isacord 40 0020 140 x 140 mm 190 x 190 mm 90025-53 90025-54 3.705 8.323 5.5 x 5.5 inch 7.5 x 7.5 inch 1. Isacord 40 0020 1. Isacord 40 0020 100 x 371 mm 190 x 190 mm 90025-55 90025-56 11.412 3.950 3.9 x 14.6 inch 7.5 x 7.5 inch...
- Page 230 Overview stitch patterns 190 x 190 mm 187 x 191 mm 90025-61 Kaffe Cat In A Ruff_1 8.401 112.067 7.5 x 7.5 inch 7.4 x 7.5 inch 1. Isacord 40 0020 1. Isacord 40 1346 2. Isacord 40 1115 3. Isacord 40 1342 4. Isacord 40 0931 5. Isacord 40 0811 6. Isacord 40 5552 7.
- Page 231 Overview stitch patterns 149 x 149 mm 192 x 192 mm Kaffe Peonies_4 Kaffe White Dahlia_1 69.123 115.565 5.9 x 5.9 inch 7.6 x 7.6 inch 1. Isacord 40 2520 1. Isacord 40 0003 2. Isacord 40 2530 2. Isacord 40 2900 3. Isacord 40 6133 3. Isacord 40 3045 4. Isacord 40 2160 4.
-
Page 232: Index
Setting values.............. 25 Attaching the knee lifter ............ 32 Fitting the stitch plate ............ 139 Foot Control ................. 33 BERNINA Dual Feed............... 66 Connecting .............. 31 Buttonholes ................ 108 Free point positioning ............ 156 Calibrating the Buttonhole foot No. 3A......... 61 Inserting the embroidery needle.......... - Page 233 Index Pintucks ................ 102 Updating firmware.............. 171 Placing the spool disc............ 34 Using a spool net .............. 35 Positioning of grid points ............ 155 Using eco Mode.............. 65 Power cable ................ 31 USA/Canada .............. 31 Virtual positioning of the Embroidery Hoop...... 145 Practical Stitches ..............
- Page 236 BERNINA recommends threads from 1068025.00A.04 2022-01 EN...