Table of Contents
Advertisement
Advertisement
Table of Contents

Related Manuals for Roland J-6


Summary of Contents for Roland J-6
- Page 1 J-6 (Version 1.02) Owner’s Manual...
-
Page 2: Table Of Contents
Table of contents Table of contents Connecting to a Computer or Mobile Device ....20 Panel Descriptions ..............3 Top Panel.................. 3 Factory Reset and Backup/Restore ........21 Rear Panel ................5 Main Specifications ..............22 Selecting Patterns ..............6 Signal Flow ................ -
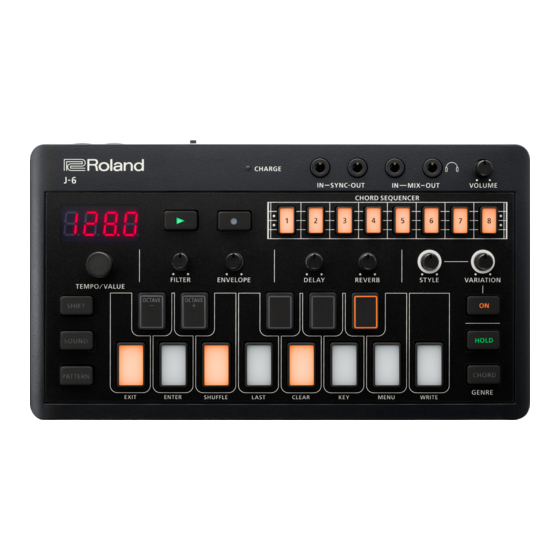
Page 3: Panel Descriptions
Orange (lit): Charging. Green (lit): Charging is completed. Green orange (blinking): A charging error occurred. Please contact your dealer or a Roland customer service center. CHARGE https://roland.cm/service indicator When not charging via USB port: (lit): The remaining battery power is low. Charge the battery. - Page 4 Panel Descriptions 2. Common Controller Explanation Display This is a four-digit, seven-segment LED display. [TEMPO/VALUE] knob Changes the values shown in the display. [SHIFT] button Use this in combination with other controllers. [SOUND] button Switches the unit to sound selection mode. [PATTERN] button Switches the unit to pattern selection mode.
-
Page 5: Rear Panel
Panel Descriptions Rear Panel A. [POWER] switch Turns the power on/off. B. USB port (USB Type-C ® Use a commercially available USB 2.0 cable (Type-A to C, or Type-C to C) to connect this port to your computer. This is used to transfer USB MIDI and USB audio data. * Do not use a USB cable that is designed only for charging. -
Page 6: Selecting Patterns
Selecting Patterns Selecting Patterns Switching between patterns Press the [PATTERN] button. Pattern mode is activated for the step buttons. Press the step [1]–[8] buttons to switch between patterns. Switching between banks Hold down the [PATTERN] button and press a step [1]–[8] button. The bank switches to the bank in the display. - Page 7 Selecting Patterns Saving a pattern Hold down the [SHIFT] button and press the [C (WRITE)] button on the right side of the keyboard. Up to 64 patterns (8 patterns × 8 banks) can be saved. Use the [TEMPO/VALUE] knob to select what to save. Ptn: Saves the currently selected pattern.
-
Page 8: Selecting Sounds
Selecting Sounds Selecting Sounds Switching between sounds Press the [SOUND] button. The unit enters sound select mode. Press the step [1]–[8] buttons to switch between sounds. You can also use the [TEMPO/VALUE] knob to switch between sounds. Press the [SOUND] button once again. The unit returns to the previous screen. -
Page 9: Using The Sequencer
Using the Sequencer Using the Sequencer Basic operations (basic steps for inputting notes) Press the step [1]–[8] buttons. The [SHIFT] button blinks, and the note you pressed on the keyboard is displayed. Press the keyboard buttons. This adds note data to the step. If the [CHORD] button is on, the notes in the chord are inputted (this overwrites any existing data). - Page 10 Using the Sequencer Hold down the [SHIFT] button and press the [C# (OCTAVE-)] or [D# (OCTAVE+)] buttons on the keyboard to switch octaves, and when the keyboard button turns lit, you can delete it. * Press the [G (CLEAR)] button on the keyboard while holding down the [SHIFT] button to delete all note and phrase data at once.
- Page 11 Using the Sequencer Setting the playback range (last step) Hold down the [SHIFT] button and press the [F (LAST)] keyboard button. Turn the [TEMPO/VALUE] knob to set the value. When you are finished, press the [C (EXIT)] button. Inputting consecutive ties (long notes) Select a step that contains notes and press the [HOLD] button.
- Page 12 Using the Sequencer Useful sequencer functions Copying steps (COPY) While a step is selected, hold down the [SHIFT] button and press the [B (MENU)] keyboard button. Use the [TEMPO/VALUE] knob to select “COPY”. Press the [D (ENTER)] button. Pasting a copied step (PSTE) While a step is selected, hold down the [SHIFT] button and press the [B (MENU)] keyboard button.
- Page 13 Using the Sequencer Starting playback from a specific step Hold down the [SHIFT] button and press the [ø] (play) button. Inputting notes in real time Press the [ó] (record) button. The [ó] (record) button lights up, and the [ø] (play) button blinks. Press the [ø] (play) button.
-
Page 14: Using Chord Mode
Using Chord Mode Using Chord Mode Basic operations Press the [CHORD] button. Chords sound when you play the keyboard. * If you just want to check how a chord sounds, press the STYLE [ON] button to turn it off. Selecting the chord set Hold down the [SHIFT] button and press the [CHORD] button. - Page 15 Using Chord Mode Changing the keyboard transposition Hold down the [SHIFT] button and press the [A (KEY)] keyboard button. This returns you to the transpose setting screen. Turn the [TEMPO/VALUE] knob to edit the value. When you are finished, press the [C (EXIT)] keyboard button on the left side.
-
Page 16: Using The Phrase Function
Using the Phrase Function Using the Phrase Function Basic operations Press the STYLE [ON] button to make it light up (ON). Play the keyboard. Arpeggios or phrases play according to the STYLE and VARIATION settings. * To check the effect of playing a chord, press the [CHORD] button to make it light up. Selecting the phrase type (style/variation) Turn the [STYLE] knob. -
Page 17: Functions And Menus
Functions and Menus Functions and Menus Using the functions Hold down the [SHIFT] button and press the keyboard button to which the function you want to execute is assigned. Use the [TEMPO/VALUE] knob to set the values, or use the [D (ENTER)] button (for CLEAR, WRITE and MENU) to confirm. - Page 18 Functions and Menus Using the menus Hold down the [SHIFT] button and press the [B (MENU)] button. Use the [TEMPO/VALUE] knob to select the item, and then press the [D (ENTER)] button. The value is displayed. Turn the [TEMPO/VALUE] knob to set the value. Press the [C (EXIT)] button to return to the list of menus (step 2).
- Page 19 Functions and Menus Item Value Explanation Sets which synchronization signal is used by this unit. AUTO, InT, AUTO (Auto): Inputted clocks are accepted. NIDI, USB InT (Int): The unit operates according to its internal clock. NIDI (MIDI): Only MIDI input is accepted. SYnC USB (USB): Only USB MIDI input is accepted.
-
Page 20: Connecting To A Computer Or Mobile Device
Connecting to a Computer or Mobile Device Connecting to a Computer or Mobile Device You can transmit and receive audio and MIDI data by connecting a USB cable from your computer or mobile device (smartphone or tablet) to this unit. You don’t need to install a device driver on your computer or other device to do this (the unit supports USB Audio Device Class 2.0 specs). -
Page 21: Factory Reset And Backup/Restore
To cancel the factory reset, turn off the power. Press the [CHORD] button. The factory reset is executed. When all buttons are blinking, turn the power of the J-6 off and then on again. Backing up and restoring your data Backup Connect your computer to the J-6 with a USB cable. -
Page 22: Main Specifications
Main Specifications Main Specifications User Patterns Sequencer Maximum measures: 64 Instruments Preset Patches: 64 Effects DELAY, REVERB Display 7 segments, 4 characters (LED) SYNC (IN, OUT) jacks: Miniature phone type Connectors MIX (IN, OUT) /PHONES jacks: Stereo miniature phone type MIDI (IN, OUT) jacks: Stereo miniature phone type USB port: USB Type-C®... -
Page 23: Signal Flow
Signal Flow Signal Flow... -
Page 24: Chord Set List
Chord Set List Chord Set List Key buttons Genre C´ D´ F´ G´ A´ Jazz Jazz Jazz Blues Trad Maj Trad Min Trad Min 2 Pop Min Pop Min Jazz Min Jazz Min Oct Stack 4th Stack 5th Stack... - Page 25 Chord Set List Key buttons Genre C´ D´ F´ G´ A´ Utility Utility Utility Utility Utility Utility Utility Utility Utility Utility Pop/Synth...
- Page 26 Chord Set List Key buttons Genre C´ D´ F´ G´ A´ Cinematic Cinematic/Synthwave Cinematic/House Cinematic Cinematic New Age/Cinematic Synthwave Synthwave Synthwave Synthwave Synthwave Synthwave Synthwave Synthwave Synthwave/House Trance...
- Page 27 Chord Set List Key buttons Genre C´ D´ F´ G´ A´ House House House House House House Jazz House Jazz House House/Techno Techno...
- Page 28 Chord Set List Key buttons Genre C´ D´ F´ G´ A´ Gospel/R&B Gospel/R&B Gospel/R&B Lofi R&B Lofi R&B Funk Funk Neo Soul Neo Soul Neo Soul Neo Soul Neo-Soul Neo-Soul Neo-Soul Neo-Soul Neo-Soul...
- Page 29 Chord Set List Key buttons Genre C´ D´ F´ G´ A´ Neo-Soul Jazz/Bossa Bossa Nova Bossa Nova Jazz Jazz Jazz Jazz Jazz Jazz Jazz Jazz Jazz Jazz Classical Classical...
- Page 30 Chord Set List Key buttons Genre C´ D´ F´ G´ A´ Classical Classical Modern Modern...
-
Page 31: Phrase List
Phrase List Phrase List STYLE CATEGORY ARPEGGIO BEAT PHRASE UP1 (8th) UP1 (16th) Double o___ oo__ (16th) Chord Chord Strummed Strummed Whole (16th) Phrases Phrases Chord Chord note (Simple) (Rhythmic) Phrases Phrases (Simple) (Rhythmic) UP&DOWN1 UP&DOWN1 Whole _o__ o_o_ (16th) (8th) (16th) note... -
Page 32: Midi Implementation Chart
MIDI Implementation Chart MIDI Implementation Chart AIRA Compact Model:J-6 Date: Feb. 10, 2022 Version 1.02 Function Transmitted Recognized Remarks Basic Default 1 (Synth), 16 (PC) 1 (Synth), 16 (PC) Memorized Channel Changed 1–16 1–16 Mode Default Mode 3 Mode 3... - Page 33 MIDI Implementation Chart Owner’s Manual ©2022 Roland Corporation...