Tascam DR-07 Owner's Manual
Portable digital recorder
Hide thumbs
Also See for DR-07:
- Supplementary manual (1 page) ,
- Quick start manual (32 pages) ,
- Quick start manual (3 pages)

Related Manuals for Tascam DR-07


Summary of Contents for Tascam DR-07
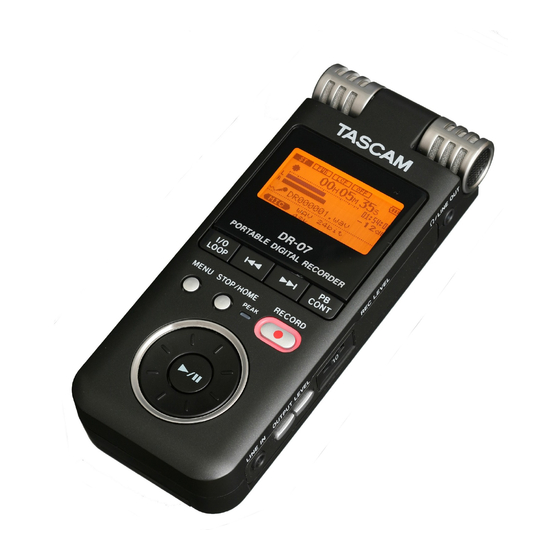
- Page 1 DR-07 Portable Digital Recorder OWNER’S MANUAL D01055620A This device has a serial number located on the bottom panel. Please record it and retain it for your records. Serial number: __________________...
-
Page 2: Important Safety Instructions
When a cart is used, use caution when moving the cart/ apparatus combination to avoid injury from tip-over. TASCAM DR-07 13 Unplug this apparatus during lightning storms or when unused for long periods of time. - Page 3 If the battery fluid leaks, wipe away any fluid on the battery compartment before inserting new batteries. Declaration of Conformity Model Number : DR-07 Trade Name : TASCAM Responsible party : TEAC AMERICA, INC. Address : 7733 Telegraph Road, Montebello, California, U.S. A.
- Page 4 CAUTION Changes or modifications to this equipment not expressly approved by TEAC CORPORATION for compliance could void the user's authority to operate this equipment. TASCAM DR-07 Information for Users on Collection and Disposal of Old Equipment and used Batteries These symbols on the products, packaging, and/or accompanying documents mean that used electrical and electronic products and batteries should not be mixed with general household waste.
- Page 5 IMPORTANT SAFETY INSTRUCTIONS Note for the battery symbol (bottom right two symbol examples) This symbol might be used in combination with a chemical symbol. In this case it complies with the requirement set by the Directive for the chemical involved. TASCAM DR-07...
-
Page 6: Table Of Contents
Using an AC adapter (purchased separately) Turning the power on and off Setting the date and time Windscreen 3–Part Names and Functions Top panel Right side panel TASCAM DR-07 Left side panel Rear Panel Bottom panel 4–Screen Overview Home Screen Record Screen... - Page 7 12–Loop, Repeat and Single Playback Loop playback Repeat and single track playback modes 13–System Settings and Formatting Making System Settings Restoring the factory settings Formatting the SD card Using QUICK FORMAT Using FULL FORMAT 14–Viewing File Information File information page TASCAM DR-07...
- Page 8 Table of Contents Card information page System information page 15–LCD Menu List 16–Messages 17–Specifications Dimensions TASCAM DR-07...
-
Page 9: 1-Introduction
“Connecting with a computer” on page 41 for how to make the connection). The Owner’s Manual file is in the Manual folder inside the DR-07 folder. In order to open the file, Adobe Reader (or other software that can open pdf files) must be installed on your computer. - Page 10 ID3 tags, we often refer to the same “tracks” as “files” because they can be manipulated in ways similar to files on a computer. We give hints and tips on using the DR-07 when you see this icon. A note provides additional explanations NOTE for special situations.
-
Page 11: Supplied Accessories
Unless you own the copyright, or have obtained the appropriate permission from the copyright holder or the rightful licensor, your unauthorized recording, reproduction or distribution thereof may result in severe criminal penalties under copyright laws and international copyright treaties. If you are uncertain TASCAM DR-07... -
Page 12: About Sd Cards
SD card into the unit before use. You can use 64 MB–2 GB SD cards and 4 GB–32 GB SDHC cards with this unit. Please see the TASCAM web site (www.tascam. com) for information about cards that have been tested with the DR-07. -
Page 13: Precautions For Use
Cleaning the unit To clean the unit, wipe gently with a soft dry cloth. Do not use any benzene, paint thinner, ethyl alcohol or other chemical agents to clean the unit as they could damage the surface. 1–Introduction TASCAM DR-07... -
Page 14: 2-Preparation
A list of SD cards that have been tested with • this unit can be found on the TASCAM web site (www.tascam.com). The SD card slot and the USB connector are under the cover on the left side of the unit. The SD card is to be inserted in here. -
Page 15: Removing The Sd Card
Other cases that require formatting • The above “ FORMAT ERROR appears if you install an SD card that was for- matted by a device other than the DR-07. Reformat the card to use it with this unit. ” screen also TASCAM DR-07... -
Page 16: Write-Protected Cards
SD card when used with a computer In either case, press ¥/π to reformat the card. Always make backup copies of important files as soon as you can. TASCAM DR-07 Write-protected cards SD cards have write-protect (lock) switches. Unprotected Files cannot be recorded or edited on a card if you slide its switch down. -
Page 17: Powering The Unit
Powering the unit The DR-07 can be operated using two AA batteries or an optional AC adapter (PS-P520). This unit can use alkaline or Ni-MH batteries. NOTE When using batteries to power the unit, use the BATTERY TYPE item on the SETUP screen to set the type of batteries you are using (see “Select... -
Page 18: Using An Ac Adapter (Purchased Separately)
NOTE When both batteries are installed and the AC adapter is connected, power will be supplied from the AC adapter. TASCAM DR-07 CAUTION Use only the PS-P520 AC adapter. Using an AC adapter other than the specified can cause a malfunction, fire, or electric shock. -
Page 19: Setting The Date And Time
When you create an audio file, date and time information is included in the file data. 1 Press the key to open the Menu MENU Screen. 2 Use the wheel to select DATE/TIME and press the ¥/π key to open the TASCAM DR-07... - Page 20 4 After making the setting, press the ¥/π key to restart the clock from the newly set value. The display returns to the Menu Screen. TASCAM DR-07 NOTE • The contents of date and time settings last only several minutes if the power is not supplied by batteries or an AC adapter.
-
Page 21: Windscreen
2–Preparation Windscreen By covering this unit’s built-in stereo mics with a windscreen, noise caused by wind and other sources can be reduced. TASCAM DR-07... -
Page 22: 3-Part Names And Functions
Use this key to set the IN (start) and OUT (end) points, and playback the interval (loop playback). Also, use this key to cancel the loop playback. (See “Loop playback” on page 73.) TASCAM DR-07 ” jack on the MIC IN... - Page 23 Press this key during playback or when playback is stopped to skip to beginning of the next track. Press and hold this key to search forward. ) Screen. When the PB CONTROL icon appears at the top of TASCAM DR-07...
- Page 24 When in recording standby, press this key to start recording. The key lights while recording. When recording, press this key to pause recording. TASCAM DR-07 0 PEAK indicator This lights when the selected input signal exceeds the maximum level. q Wheel When a setting screen is open, use the Wheel to change the setting of the selected item.
-
Page 25: Right Side Panel
Use this to connect with headphones or the line input jack of an amp or other equipment. During recording or recording standby, this outputs the input signals and in other cases, this outputs the playback signal. jack and the TASCAM DR-07... -
Page 26: Left Side Panel
3–Part Names and Functions Left side panel u DC IN 5V jack Connect a TASCAM PS-P520 AC adapter (purchased separately) to this jack. Do not connect other adapters. i SD card slot lid o POWER key Press and hold this key to turn the unit’s power ON and OFF. -
Page 27: Rear Panel
(this end) facing the sound source. • Connecting a mic to the MIC IN connector disables the built-in mics. 3–Part Names and Functions Bottom panel f Battery compartment cover TASCAM DR-07... - Page 28 3–Part Names and Functions [When the battery compartment cover removed] TASCAM DR-07 g Tripod screw socket (1/4 inch) This unit can be attached to a tripod or a mic stand. CAUTION • Always tighten all the screws on the tripod or the mic stand to avoid the risk of the unit falling and being damaged.
-
Page 29: 4-Screen Overview
Record Screen. 1 Status of playback control function settings These show whether the various playback control functions (speed control and key change) are currently active. When they are active, their icons appear as light letters on a TASCAM DR-07... - Page 30 ) with more bars indicating more power. When the battery power is almost gone, the icon blinks, warning that the power is about to turn OFF. TASCAM DR-07 ). (See “Special When using the AC adapter (sold separately) appears. 4 Unit status The following icons appear to show the current operation status.
- Page 31 Playback file number/total number of files The total number of files in the selected playback area and the number of the current file are shown. icon appears TASCAM DR-07...
-
Page 32: Record Screen
Playback position display bar This bar shows the current playback position. The bar darkens from the left as playback proceeds. TASCAM DR-07 Record Screen This screen opens when you press the key to start recording standby mode and stays open... - Page 33 8 Remaining recording time The remaining recording time appears in hours: minutes: seconds. 9 dB display Shows the value of the maximum level in dB during each time interval. 0 Record mode Shows the recording file type and sampling frequency. TASCAM DR-07...
-
Page 34: Setting Screens
Most of the setting screens are accessed by first pressing the button to open the Menu MENU Screen, but some screens can also be accessed directly using dedicated keys. The following table provides an overview of the setting screens. TASCAM DR-07... - Page 35 Set the date and time of the built-in clock PLAYBACK Set playback control function settings CONTROL 4–Screen Overview Access method Press the MENU the Menu Screen and select the desired setting screen Press and hold the key to open PB CONT TASCAM DR-07...
-
Page 36: Operation Basics
Press this key to open the Menu Screen (except when the Menu Screen is already open or the Record screen is open). TASCAM DR-07 When the Menu Screen is open, press this key to return to the Home Screen. When the Record Screen is open, press this key to open the menu of the Input Setting screen. -
Page 37: Operation Example
MENU 2 Turn the wheel to select SETUP in inverse), and press the ¥/π key to open the Setup Screen. 3 Turn the wheel to select the item, and press the ¥/π key to SPEED CUE/REV (highlighted CUE/REV TASCAM DR-07... - Page 38 ¥/π key again to confirm it. 5 Press to return to the Home STOP/HOME Screen. TASCAM DR-07 NOTE • When the ¶ icon appears in the lower right part of the screen, as shown in the preceding...
-
Page 39: 5-Making Connections
(stereo mini-jack) on the rear panel. Use the Input Setting Screen to adjust the level control, the low cut filter and other settings. (See “Selecting the input source” on page 49.) MIC IN TASCAM DR-07... -
Page 40: Connecting To The Line In Jack
The auto gain function and stereo/mono switch- ing cannot be applied to a signal input through the LINE IN. TASCAM DR-07 Connecting monitors Connect headphones, speakers with built-in amplifiers, an amp and speaker system or other monitoring system to the DR-07 / jack. LINE OUT... -
Page 41: Connecting With A Computer
To connect to a computer, opent the lid on the left side of the unit, use the included USB cable to connect the USB port of the DR-07 and the computer. 5–Making Connections... -
Page 42: Disconnecting From A Computer
Disconnecting from a computer To end the USB connection, first follow the procedures for your computer to disconnect the DR-07 and then remove the USB cable. The DR-07 automatically restarts. See the computer manual for how to close the connection on the computer. -
Page 43: 6-Copying Tracks From A Computer
CD or other source to your computer. When copying files to you computer, choose file types that the DR-07 can handle (the types of MP3s and WAV files listed above). You can also prepare your own tracks using... -
Page 44: Managing The Music Folder From A Computer
Managing the Music Folder from a computer You can manage the contents of the Music Folder on an SD Card in the DR-07 from a computer. You can create up two levels of sub-folders inside the Music Folder. The DR-07 does not recognize folders and audio files at or below the third sub- level. -
Page 45: 7-Playback
When the Home Screen is displayed, use the ¥/π, µ and ≤ keys to operate the DR-07 as you would with an ordinary CD player or other audio device. Use the wheel to change the playback position. NOTE • When the Home Screen is not displayed, these keys and the wheel have different functions. -
Page 46: Search Forward And Backward
CUE/REV SPEED Setup Screen to change the search speed. (See “Making system settings” on page 74.) TASCAM DR-07 Using the wheel to change the playback position You can use the wheel to adjust the playback position within a track. When you turn the wheel,... -
Page 47: Adjusting The Volume
7–Playback Adjusting the volume Use the keys to adjust the OUTPUT LEVEL (+, –) volume of the monitoring signal output from the jack. The volume level appears on LINE OUT the display while being adjusted. TASCAM DR-07... -
Page 48: 8-Recording
MENU Screen. 2 Select the REC SETTING Recording Settings Screen. TASCAM DR-07 3 Use the from the following options: WAV at 16-bit (factory setting) or 24-bit, or MP3 at 32 kbps, 64 kbps, 96 kbps, 128 kbps, 192 kbps, 256 kbps, or 320 kbps. -
Page 49: Selecting The Input Source
Follow these procedures to select the input source. 1 Press the key and select MENU item, then press the ¥/π key to SETTING open the Input Setting Screen. 2 Use the item to select one of the INPUT following input sources. INPUT TASCAM DR-07... -
Page 50: Setting The Mic Input Functions
If you use speakers to monitor, the sound output from the speakers may also be recorded, causing a poor recording and even feedback. TASCAM DR-07 NOTE The input source is the recording source when recording. jack, the input... - Page 51 Set it to limit the input gain so that input level of loud sounds are reduced to prevent distortion. The factory default setting is , the 8–Recording 40HZ 80Hz to have the DR-07 automatically to have the DR-07 automatically TASCAM DR-07...
-
Page 52: Display Of Input Functions On The Record Screen
Icons appear on the Record Screen to show the status of the TYPE POWER LOW CUT settings. LEVEL CTRL TASCAM DR-07 When TYPE appears as light letters on a dark background. to prevent input When POWER light letters on a dark background. - Page 53 REC LEVEL MIC Input Setting Screen to set the MIC IN item to GAIN TASCAM DR-07...
-
Page 54: Recording
• To record the sound of a source most effec- tively and accurately, point the front of the DR-07’s built-in mics toward the sound source with the LCD facing up. • An easy way to set the input level is to raise... -
Page 55: Special Functions During Recording
1 Press the ≤ key during recording to create a new file with the number at the end of the file name incremented (increased) and continue recording in this file from its beginning (00:00:00). RECORD You can increment even when paused. 8–Recording TASCAM DR-07... - Page 56 MENU screen. Select REC SETTING ≤ key to open the Rec Setting screen. TASCAM DR-07 2 Use the SIZE item to select the file size for automatic incrementing. Options: 64M, 128M, 256M, 512M, 1G, 2GB (default setting)
-
Page 57: Pre-Recording
1 Press the screen. Select the Á/π key to open the REC SETTING screen. 8–Recording key to be delayed 10 RECORD key being pushed. RECORD key to open the menu list MENU and press REC SETTING TASCAM DR-07... -
Page 58: File Divide Function
MENU screen. Select and press the Á/π DIVIDE key to open the DIVIDE screen TASCAM DR-07 2 Use the wheel to locate the point where you want to divide the file. NOTE • You can press the PLAY key and select the point where you want to divide the file during playback. - Page 59 You cannot divide a file if the resulting file names would be 200 or more char- acters long. • You cannot divide a file if a resulting file name would be the same as the name of an already existing file. TASCAM DR-07...
-
Page 60: 9-Playback Area And Playlist
On the Browse Screen, regardless of the playback area setting, you can select any file on the card that you want. TASCAM DR-07 Setting the playback area Use the following procedures to select the playback area on the Play Mode Screen. -
Page 61: Selecting A Folder For The Playback Area
Browse Screen, the playback area changes to the selected folder. 1. Press the Screen, and select the the ¥/π key to open the Browse Screen. No PLAYLIST key to open the Menu MENU item. Press BROWSE TASCAM DR-07 ”... -
Page 62: Selecting A File To Set The Playback Area
The display returns to the Home Screen, and the first file in the folder is selected. This folder becomes the playback area regardless of the previous playback area setting. TASCAM DR-07 Selecting a file to set the playback area When the playback area is set to... -
Page 63: Playlist
Adding tracks to the playlist 1 Press the Screen. Select the the ¥/π key to open the Browse Screen. for the item, you can set AREA key to open the Menu MENU item and press BROWSE TASCAM DR-07... -
Page 64: Editing The Playlist
The tracks are numbered in the order that they are added. NOTE For an explanation of how to use the Browse TASCAM DR-07 Screen and how to select tracks, see “Screen navigation” on page 67. Editing the playlist You can view and edit the playlist you have made on the Playlist Screen. - Page 65 Select this to change the order of tracks in the playlist. In addition to the file name, the track number also appears highlighted in inverse. In step 2, use the wheel to move the track to a different position in the playlist. TASCAM DR-07...
- Page 66 9–Playback Area and Playlist In the above example, the 4th track has been moved to the 3rd track position. 3 Press the ¥/π key to complete the move and return to the ordinary Playlist Screen. TASCAM DR-07...
-
Page 67: 10-Browse Screen
On the Browse Screen, you can view the contents of the Music Folder, which contains the audio files on the SD card that you can use with the DR-07. On this screen, you can also play and erase selected audio files, create folders, add tracks to the playlist and so on. -
Page 68: Icons On The Browse Screen
Open folder The contents of the folder marked with this icon currently appear on this screen. TASCAM DR-07 File operations Select the desired audio file on the Browse Screen and press the ¥/π key to open the pop-up window that is shown below. -
Page 69: Folder Operations
Use the wheel to select the item you want from the following list and press ¥/π to execute it. SELECT Returns to the Home Screen and selects the first file in the folder. This folder becomes the new playback area regardless of the previous playback key causes the TASCAM DR-07... - Page 70 All files in the selected folder are deleted but sub- folders are not deleted. Also, read-only files are not deleted. Furthermore, files which are not recog- nized by the DR-07 are left as they are. CANCEL No operation is conducted and the selected folder is left as is.
-
Page 71: 11-Special Playback Control Functions
11–Special Playback Control Functions Not only can you use the DR-07 to change the tempo of track playback, you can even do this without changing the pitch. You can also change the playback pitch of a track without changing the tempo. -
Page 72: Changing The Speed
ON and OFF is unique to this function. For all other playback control functions, changing the setting on the Playback TASCAM DR-07 Control Screen from anything other than the factory default results in the function being turned ON all the time. -
Page 73: Changing The Pitch Without Changing The Speed
(100 cents = 1 semitone). NOTE Even if you use the FINE TUNE the key, as long as the item setting is icon will not appear as light letters on a dark background on the Home Screen. icon item to adjust TASCAM DR-07... -
Page 74: 12-Loop, Repeat And Single Playback
By following the instructions STOP/HOME in this chapter, however, you can also make the DR-07 loop a section of a track that you choose, repeat the entire sequence of tracks in the current playback area, play a single track repeatedly or play a single track once and stop. -
Page 75: Repeat And Single Track Playback Modes
12–Loop, Repeat and Single Playback Repeat and single track playback modes You can set the DR-07 to repeatedly play the current track or all tracks in the playback area, as well as play just a single track once. 1 Press the... -
Page 76: 13-System Settings And Formatting
To open the Setup Screen, press the Select from the Menu Screen and press SETUP the ¥/π key. The following settings can be made for the items on the Setup Screen. TASCAM DR-07 Making System Settings Setting the search speed Use the CUE/REV SPEED key. MENU of forward and backward searching when pressing and holding the ≤... -
Page 77: Restoring The Factory Settings
“MUSIC” and “UTILITY” folders as well as the “dr-1.sys” file that is necessary to use the SD card with the DR-07. CAUTION When the unit is shipped new from the factory, its SD card also has a “MANUAL”... -
Page 78: Using Quick Format
Full formatting checks the memory for errors while formatting, so it takes more time than quick formatting and you might have to wait a while. TASCAM DR-07 NOTE Full formatting of a 2GB SD card takes about 20 minutes or more depending on the type of SD card. -
Page 79: 14-Viewing File Information
Use the Information Screen to view various types of information about your DR-07. To open the Information Screen, first press the key to open the Menu Screen. Select MENU “ ” and press the ¥/π key. INFORMATION Use the to switch between the following wheel three information pages. -
Page 80: Card Information Page
Shows the file name. If an MP3 file has ID3 tag title information, that information appears. DATE The date of the file appears.. SIZE The size of the file appears. TASCAM DR-07 Card information page page shows the status of the currently CARD inserted SD card. TOTAL MUSIC Shows the number of playable files contained by the Music Folder. -
Page 81: System Information Page
14–Viewing File Information System information page page shows information about the SYSTEM DR-07’s system settings and firmware version. CUE/REV SPD Shows the speed of forward and backward searching. AUTO OFF Shows the automatic power OFF setting. BACKLIGHT Shows the automatic backlight OFF setting. -
Page 82: 15-Lcd Menu List
Menu Item Page FILE (1/3) CARD (2/3) INFORMATION SYSTEM (3/3) BROWSE PLAYLIST PLAY MODE TASCAM DR-07 Setting/ Operation Item File information display SD card information display System information display File operation in SD card Edit the playlist Set the repeat area... - Page 83 (OFF/AUTO/Limiter) Set the format of music files FORMAT Set the sampling frequency SAMPLE Set the maximum file size SIZE Set the On/Off of the pre-recording PRE REC Set the On/Off of the recording delay DELAY Divide files Descriptions TASCAM DR-07...
- Page 84 15–LCD Menu List Menu Item Page SETUP DATE/TIME TASCAM DR-07 Setting/ Operation Item Set the fast forward/rewind speed (x2/x4/x8/x10) CUE/REV SPEED Set the auto shut down time when operated by AUTO OFF batteries (Off/3 min/5 min/10 min/30 min) Set the auto backlight turn off time (Off/5 sec/10...
-
Page 85: 16-Messages
The following is a list of the popup messages that might appear on the DR-07 under certain conditions. Message The length of the file name is longer than 200 characters when the Divide is File Name used. The same file name already exists when a new file is created when the Divide is... - Page 86 When “ press the ¥/π key to format the entire card in FAT format. CAUTION TASCAM DR-07 Meaning and response , but no files have been added to the Playlist. Add a file to the Execution of FAT formatting erases all data currently on the card.
- Page 87 FAT formatted the card using a computer connected by USB (or Format CARD by card reader). This message also appears when a new card is inserted in the unit. Always use the DR-07 to conduct FAT formatting of cards to be used with When “ Are you Sure? card.
- Page 88 Writing to the card timed out. Write Timeout Backup files on the card to your computer, and format the card using the DR-07. Erase unnecessary files or move them to your computer to make open space. Card Full A folder cannot be created below this level.
- Page 89 File Error Can't Save Data Player Error If any of these errors occur, turn the DR-07 power OFF and restart the unit. Device Error If the error message continues to appear, contact a TEAC Repair Center. Writing Failed Sys Rom Err...
- Page 90 System Error System Error System Error System Error If any of these errors occur, turn the DR-07 power OFF and restart the unit. System Error If the error message continues to appear, contact a TEAC Repair Center. System Error System Error...
-
Page 91: 17-Specifications
3.5-mm phone (stereo) Input impedance 23 kΩ Nominal input level -10 dBV Maximum input level +6 dBV Jack 3.5-mm phone (stereo) Nominal line output -14 dBV +2 dBV 15 mW + 15 mW (with 32 Ω impedance headphones) TASCAM DR-07... - Page 92 S/N ratio (LINE IN > /LINE OUT) Other specifications Audio file compatibility Physical Battery life (continuous operation) Operating temperature TASCAM DR-07 20 Hz–20 kHz, +1/-3 dB 0.015% or less (at 1 kHz, +6 dBV input) 87 dB or more MP3 files 32–320 kbps 44.1/48 kHz sampling frequency...
- Page 93 Power PC, iMac, G3, G4 266 MHz or faster 64 MB or more memory USB port (USB 2.0 recommended) Intel chipset Supported OS Windows 2000 SP4 or later, Windows XP and Windows Vista Mac OS X 10.2 or later AC adapter (PS-P520) TASCAM DR-07...
-
Page 94: Dimensions
Dimensions Specifications and external appearance may be changed without notification to improve the product. • Illustrations and other depictions in the owner’s manual may differ in part from the actual product as a result of • product improvements. TASCAM DR-07... - Page 96 Río Churubusco 364, Colonia Del Carmen, Delegación Coyoacán, CP 04100, México DF, México TEAC UK LIMITED Phone: +44-8451-302511 Suites 19 & 20, Building 6, Croxley Green Business Park, Hatters Lane, Watford, Hertfordshire. WD18 8TE, U.K. TEAC EUROPE GmbH Phone: +49-611-71580 Bahnstrasse 12, 65205 Wiesbaden-Erbenheim, Germany DR-07 www.tascam.jp www.tascam.com www.tascam.com www.teacmexico.net www.tascam.co.uk www.tascam.de...