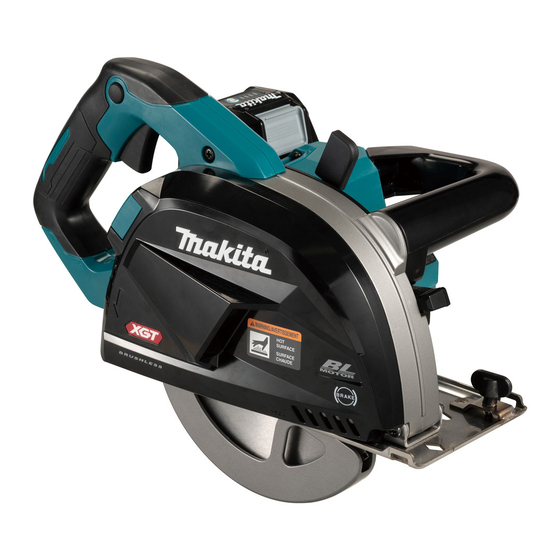
Makita CS002G Instruction Manual
Cordless metal cutter
Hide thumbs
Also See for CS002G:
- Instruction manual (103 pages) ,
- Instruction manual (72 pages) ,
- Instruction manual (81 pages)
Table of Contents
Advertisement
Quick Links
Advertisement
Table of Contents

Related Manuals for Makita CS002G


Summary of Contents for Makita CS002G
- Page 1 INSTRUCTION MANUAL Cordless Metal Cutter CS002G Read before use.
-
Page 2: Specifications
SPECIFICATIONS Model: CS002G Blade diameter 185 mm Max. Cutting depth 67 mm No load speed (RPM) 3,500 min Rated voltage D.C. 36 V - 40 V max Overall length 350 mm Net weight 4.2 - 5.4 kg • Due to our continuing program of research and development, the specifications herein are subject to change without notice. -
Page 3: Ec Declaration Of Conformity
Avoid body contact with earthed or grounded Vibration surfaces, such as pipes, radiators, ranges and refrigerators. There is an increased risk of elec- The vibration total value (tri-axial vector sum) deter- tric shock if your body is earthed or grounded. mined according to EN62841-2-5: Do not expose power tools to rain or wet con- Work mode: cutting metal ditions. - Page 4 Always wear protective goggles to protect When using the tool, do not wear cloth work your eyes from injury when using power tools. gloves which may be entangled. The entangle- The goggles must comply with ANSI Z87.1 in ment of cloth work gloves in the moving parts may the USA, EN 166 in Europe, or AS/NZS 1336 result in personal injury.
- Page 5 Hold the power tool by insulated gripping Blade depth and bevel adjusting locking levers surfaces, when performing an operation where must be tight and secure before making the the cutting tool may contact hidden wiring. cut. If blade adjustment shifts while cutting, it may Contact with a “live” wire will also make exposed cause binding and kickback.
- Page 6 CAUTION: Only use genuine Makita batteries. away. It may result in loss of your eyesight. Use of non-genuine Makita batteries, or batteries that Do not short the battery cartridge: have been altered, may result in the battery bursting Do not touch the terminals with any con- causing fires, personal injury and damage. It will also...
-
Page 7: Functional Description
Protections against other causes shown in the figure, it is not locked completely. Protection system is also designed for other causes that could damage the tool and allows the tool to stop automatically. Take all the following steps to clear the causes, when the tool has been brought to a temporary halt or stop in operation. Turn the tool off, and then turn it on again to restart. Charge the battery(ies) or replace it/them with recharged battery(ies). Let the tool and battery(ies) cool down. If no improvement can be found by restoring protection system, then contact your local Makita Service Center. Fig.1 ► 1 . Red indicator 2. Button 3. Battery cartridge 7 ENGLISH... - Page 8 WARNING: NEVER use the tool if it runs when you simply pull the switch trigger without press- ing the lock-off button. A switch in need of repair may result in unintentional operation and serious personal injury. Return tool to a Makita service center for proper repairs BEFORE further usage. To prevent the switch trigger from being accidentally pulled, a lock-off button is provided. To start the tool, Fig.2 depress the lock-off button and pull the switch trigger.
-
Page 9: Adjusting Depth Of Cut
Adjusting depth of cut Lighting the lamp CAUTION: CAUTION: After adjusting the depth of cut, Do not look in the light or see the always tighten the lever securely. source of light directly. Loosen the lever and move the base up or down. At the To turn on the lamp without running the tool, pull the desired depth of cut, secure the base by tightening the switch trigger without pressing the lock-off button. - Page 10 Push the latch button on the dust case to remove the After dumping the metal chips, set the dust case. dust case. Dump the metal chips while the inside of the Align the hole on the dust case with the hook on the dust case faces downward.
-
Page 11: Electronic Function
This tool is equipped with an electric blade brake. If the tool consistently fails to quickly stop the circular saw CAUTION: Use only the Makita wrench to blade after switch trigger released, have tool serviced at install or remove the circular saw blade. a Makita service center. - Page 12 For tool with the inner flange for After installing the circular saw blade, set the dust case again. other than 15.88 mm hole-diameter saw blade The inner flange has a certain diameter protrusion on one side of it and a different diameter protrusion on the other side. Choose a correct side on which protrusion fits into the saw blade hole perfectly. Mount the inner flange onto the mounting shaft so that the correct side of protrusion on the inner flange faces outward and then place saw blade and outer flange. Fig.16 ► 1 . Mounting shaft 2. Inner flange 3. Circular saw blade 4. Outer flange 5.
-
Page 13: Operation
If the lower guard is not functioning prop- improper mounting of the blade causing blade move- erly even after removing metal chips, have your tool ment and severe vibration resulting in possible loss of serviced at a Makita service center. control during operation and in serious personal injury. Blade guard cleaning When changing the circular saw blade, make sure to... -
Page 14: Maintenance
NOTICE: Never use gasoline, benzine, thinner, alcohol or the like. Discoloration, deformation or cracks may result. To maintain product SAFETY and RELIABILITY, repairs, any other maintenance or adjustment should be performed by Makita Authorized or Factory Service Centers, always using Makita replacement parts. 14 ENGLISH... -
Page 15: Optional Accessories
Circular saw blades for metal cutter cannot be re-sharpened. OPTIONAL ACCESSORIES CAUTION: These accessories or attachments are recommended for use with your Makita tool specified in this manual. The use of any other accessories or attachments might present a risk of injury to persons. Only use accessory or attachment for its stated purpose. If you need any assistance for more details regard- ing these accessories, ask your local Makita Service Center. - Page 16 Makita Europe N.V. Jan-Baptist Vinkstraat 2, 3070 Kortenberg, Belgium Makita Corporation 3-11-8, Sumiyoshi-cho, Anjo, Aichi 446-8502 Japan 885965-221 www.makita.com 20211202...