
Related Manuals for Honeywell CGW-MB


Summary of Contents for Honeywell CGW-MB
- Page 1 SOM Module CGW-MB Installation and Users’ Manual P/N:LS10248-000HW-E | REV. E | APRIL/30/2021 ECN: 0002934...
-
Page 2: Table Of Contents
1.8: Warnings and Cautions in This Manual................................14 1.9: Disclaimer ............................................14 Section 2: Overview ......................................15 2.1: Operation............................................15 2.2: Honeywell Connected Life Safety Services.................................15 2.3: CLSS Gateway mainboard Board Layout ................................15 2.3.1: Connecting Interfaces.....................................16 2.3.2: LED Indicators ........................................17 2.3.3: Switches on the CLSS Gateway mainboard Board ..........................19 2.4: CGW-MB Parts..........................................19... - Page 3 7.7.3: Legacy Modbus CLSS Gateway mainboard............................43 Replacing the Modbus CLSS Gateway mainboard (Modbus-GW)....................43 Using Both the CGW-MB and the Modbus CLSS Gateway mainboard ..................43 7.8: Agency Listings and Approvals....................................44 7.8.1: Agency Restrictions and Limitations ............................... 44 7.9: Standards............................................
- Page 4 7.23: Read Device Identification (0x2B/0x0E)................................ 67 7.24: Troubleshooting .......................................... 68 7.24.1: What are some basic guidelines when installing a CGW-MB?....................68 7.24.2: How fast can the Modbus client poll the CLSS Gateway mainboard?................... 68 7.24.3: How can I tell if the CLSS Gateway mainboard is running?......................68 7.24.4: How do I recover a lost password from the CLSS Gateway mainboard?................
- Page 5 8.10.1: To Configure the BACnet Settings ..............................117 8.11: Replacing the BACNET-GW ....................................120 8.12: Using Both the CGW-MB and the Legacy BACnet CLSS Gateway mainboard ................120 8.13: BACnet PIC Statement ......................................121 8.13.1: Protocol Implementation Conformance Statement (Normative)..................121 BACnet Protocol Revision: 14..................................
- Page 6 Table of Contents C.4.5: To Use an RS232 Connection for Events............................145 IQ8: Connecting through a Serial Interface Card ..........................145 IQ8 Panels ..........................................147 To Use an RS-485 Connection..................................147 C.5: Farenhyt Panels ........................................... 151 C.5.1: Connection Options...................................... 151 C.5.2: To Use an RS-485 Connection ................................
-
Page 7: Section 1: General Information
Usages In this manual, product name usages are as below: • The CGW-MB may also be referred as the CLSS Gateway mainboard • The Connected Life Safety Services mobile App may also be referred as the CLSS App •... - Page 8 Refer to ... Install and get started Getting Started with CLSS quickly QHW-62051 Install and operate the CLSS-Enabled LTE Commercial Fire Alarm Communicator communicator Installation and Operating Guide LS10265-000HW-E CGW-MB Installation and Users’ Manual | P/N:LS10248-000HW-E | REV.G | JUL/31/2022...
-
Page 9: Documentation Feedback
Updated for the IC certification support. Rev. B • Added the cellular modules support. June 22, 2020 • Added the Upgrading the CLSS Gateway mainboard Firmware section. • Updated the Troubleshooting section. CGW-MB Installation and Users’ Manual | P/N:LS10248-000HW-E | REV.G | JUL/31/2022... - Page 10 • Figure C.2: Eth1 and Eth0 identified • C.5 FireWarden Panels: Minimum required versions details updated • C.11 VESDA® Detectors: Minimum required versions details updated CGW-MB Installation and Users’ Manual | P/N:LS10248-000HW-E | REV.G | JUL/31/2022...
- Page 11 • Figure 7.3. Eth1 and Eth0 are changed to Ethernet • 7.8 Replacing the Modbus CLSS Gateway mainboard (Modbus- GW): Added this new section • 7.9 Using Both the CGW-MB and the Modbus CLSS Gateway mainboard: Added this new section • Table 7.3 CLSS-Compatible Equipment List: The CLSS Gateway mainboards column removed.
-
Page 12: Abbreviations Used
UART Universal Asynchronous Receiver/Transmitter A physical connection that converts and provides serial data for the panel and parallel data for the CLSS Gateway mainboard. Universal Serial Bus CGW-MB Installation and Users’ Manual | P/N:LS10248-000HW-E | REV.G | JUL/31/2022... -
Page 13: Approvals
: (1) l’appareil ne doit pas produire de brouillage, et (2) l’utilisateur de l’appareil doit accepter tout brouillage radioélectrique subi, même si le brouillage est susceptible d’en compromettre le fonctionnement. Caution Statements: CGW-MB Installation and Users’ Manual | P/N:LS10248-000HW-E | REV.G | JUL/31/2022... -
Page 14: User Information
Le produit final doit être étiqueté dans la zone visible avec ce qui suit: “Contient IC: 1609A CGWMBSOM ”. NFPA Compliance (USA) Install the CGW-MB in accordance with the National Fire Protection Association Installation Standard NFPA 72. CSFM CSFM ID: 7300-1637:0504... -
Page 15: Warnings And Cautions In This Manual
Images in the document are for reference purpose only and are subject to change. All trademarks, service marks, word marks, design marks, and logos are property of their respective owners. CGW-MB Installation and Users’ Manual | P/N:LS10248-000HW-E | REV.G | JUL/31/2022... -
Page 16: Section 2: Overview
Section 2: Overview CGW-MB is an embedded and intelligent CLSS Gateway mainboard for connected buildings. It enables system maintenance providers as well as end users to remotely manage connected fire detection systems. The CLSS Gateway mainboard also supports them to ensure compliance. -
Page 17: 1: Connecting Interfaces
• When power is not supplied to the NUP connector Receives the alarm data and device data from a USB port of a panel. Wireless Wireless antenna Aerial Cellular 40-pin connector for the compatible cellular module. CGW-MB Installation and Users’ Manual | P/N:LS10248-000HW-E | REV.G | JUL/31/2022... -
Page 18: 2: Led Indicators
CLSS App. FLASHING FAST (flashes once per 0.25 second) The CLSS Gateway mainboard is ready for the CLSS App connection. OFF The mobile connectivity is disabled. CGW-MB Installation and Users’ Manual | P/N:LS10248-000HW-E | REV.G | JUL/31/2022... - Page 19 FLASHING SLOW (flashes once per 1 second) The LTE radio is transmitting data. FLASHING FAST (flashes once per 0.2 second) The LTE radio may have a connectivity issue, which requires attention. OFF There is no cellular connection. CGW-MB Installation and Users’ Manual | P/N:LS10248-000HW-E | REV.G | JUL/31/2022...
-
Page 20: 3: Switches On The Clss Gateway Mainboard Board
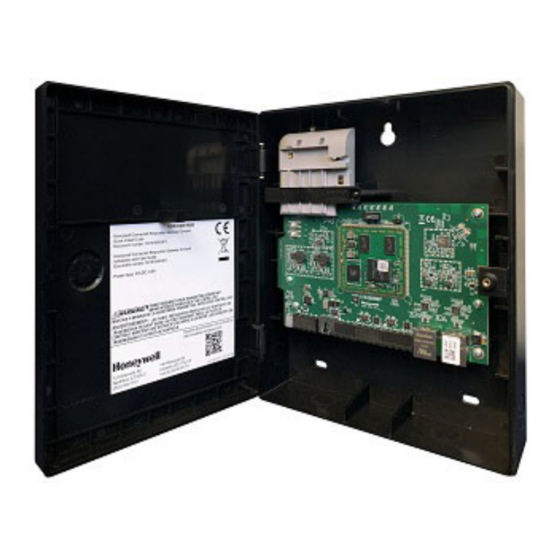
CGW-MB board CGW-BB CGW-MB enclosure 50160636-001 CGW-MB kit. It includes a 30” NUP cable and a NOTIFIER lock and key set. 32351718-001 10 ft NUP Serial (RS-232) cable kit CGW-MB Installation and Users’ Manual | P/N:LS10248-000HW-E | REV.G | JUL/31/2022... -
Page 21: Section 3: Security Recommendations
• Use discretion to allow or deny a location access request. • Disconnect the CLSS App from the CGW-MB, once the required activity is completed. • Turn OFF the location access in the CLSS App's Security Settings, when location access is not required. -
Page 22: 3: Software And Firmware Updates
The CLSS Pathway device sends alarms to CLSS Site Manager, using the below endpoints: Region All End-points West US • https://fireclssnocwus.honeywell.com/clssnocalarmrcvr/ • https://fireclssnocwus.honeywell.com/clssnocapisrv/ East US • https://fireclssnoceus.honeywell.com/clssnocalarmrcvr/ • https://fireclssnoceus.honeywell.com/clssnocapisrv/ CGW-MB Installation and Users’ Manual | P/N:LS10248-000HW-E | REV.G | JUL/31/2022... -
Page 23: Best Practices: Network Security
• Use only authorized removable media. For example, use CD, DVD, external hard drives, or USB memory sticks, which have been scanned using up-to-date anti-virus software. CGW-MB Installation and Users’ Manual | P/N:LS10248-000HW-E | REV.G | JUL/31/2022... -
Page 24: Section 4: Installation
Configuration Computer Future Use UART/TTL RED COLOR BLACK COLOR /NUP BROWN COLOR GREEN COLOR WHITE COLOR Fire Alarm Panel Figure 4.2: CLSS Gateway mainboard Connection Options - Bottom Side CGW-MB Installation and Users’ Manual | P/N:LS10248-000HW-E | REV.G | JUL/31/2022... -
Page 25: Section 5: Configurations
CLSS Site Manager. 5.1 Commissioning the CLSS Gateway mainboard You can commission the CGW-MB for an already added customer or for a new customer. 5.1.1 The Commissioning Steps Step 1: Connect to the IP network through the Ethernet 1 port of the CLSS Gateway mainboard for the CLSS Site Manager. - Page 26 9. On the dashboard, from the All Customers option, find the required customer > site. 10.Tap on the specific building. 11.To commission the CLSS Gateway mainboard, tap on CONNECT CLSS Gateway mainboard and follow the on-screen instructions (see Figure 5.2). CGW-MB Installation and Users’ Manual | P/N:LS10248-000HW-E | REV.G | JUL/31/2022...
- Page 27 At the end of 60 minutes, the user will have the option to extend the session. If not extended, the session will expire after 60 minutes and the user must enable a new session of control functionality within the Connected Life Safety Services App. CGW-MB Installation and Users’ Manual | P/N:LS10248-000HW-E | REV.G | JUL/31/2022...
-
Page 28: Verifying The Clss Gateway Mainboard Connections
The CLSS Gateway mainboard is in the configuration mode Flashing fast The CLSS Gateway mainboard is getting the inventory data Flashing slow The CLSS Gateway mainboard is communicating with the panel CGW-MB Installation and Users’ Manual | P/N:LS10248-000HW-E | REV.G | JUL/31/2022... -
Page 29: Panel Brand And Connection Settings
7. Tap APPLY. 8. Tap Panel Type on the CLSS Gateway mainboard Summary screen. 9. Change the values for the panel brand on the Communication Settings screen. 10.Tap SAVE. CGW-MB Installation and Users’ Manual | P/N:LS10248-000HW-E | REV.G | JUL/31/2022... -
Page 30: Honeywell Clss Alarm Transmission Services
The communication path between the CLSS Gateway mainboard and the Central Station is supervised. The default supervision timing is 5 minutes. • In case of an AC failure, the CGW-MB communicates to the central station after 120- minutes. 5.4.1 Central Station Communication The CGW-MB receives events from a listed Fire Alarm Control Unit and transmits events using cellular, wireless, or Ethernet to Honeywell's Network Operations Center (NOC). -
Page 31: Install A Fixed Clss Gateway Mainboard At The Site
5. Select Installed CLSS Gateway mainboards and then go to the INSTALLED CLSS Gateway mainboardS section. NOTE: To view only those CLSS Gateway mainboards not yet activated, select Show only CLSS Gateway mainboards without activations at the right side. CGW-MB Installation and Users’ Manual | P/N:LS10248-000HW-E | REV.G | JUL/31/2022... -
Page 32: Verifying The Central Station Communication Configurations
Honeywell CLSS Alarm Transmission Services Configurations 6. Find the CGW-MB requiring alarm transmission from the CLSS Gateway mainboard list shown. 7. Click on the specific CGW-MB of the building. 8. Click on the Connected CLSS Gateway mainboard activation card inside the selected CLSS Gateway mainboard. -
Page 33: Section 6: Post-Installation Activities
3. Click VIEW on the notification at the top. Click the SETTINGS icon at the bottom left. 4. Click CLSS Gateway mainboard Management in the Settings page. 5. Click Add CLSS Gateway mainboard on top. CGW-MB Installation and Users’ Manual | P/N:LS10248-000HW-E | REV.G | JUL/31/2022... -
Page 34: 2: To Upgrade After Commissioning The Clss Gateway Mainboard
4. Enter the OC of the CLSS Gateway mainboard in the Search OC field to find the CLSS Gateway mainboard to update. Scroll across to find the CLSS Gateway mainboards to update. 5. Click Update. CGW-MB Installation and Users’ Manual | P/N:LS10248-000HW-E | REV.G | JUL/31/2022... -
Page 35: 3: To Locally Upgrade With A Pc
If an LED is indicating differently, refer Table 2.2 to determine the operational status. If necessary, refer to the 6.2, "Troubleshooting" section to fix the problem or contact Honeywell Technical Support. CGW-MB Installation and Users’ Manual | P/N:LS10248-000HW-E | REV.G | JUL/31/2022... -
Page 36: Troubleshooting
6.2 Troubleshooting Issues that may occur during the CLSS Gateway mainboard’s operation can be resolved on your own using the tables below or by contacting Honeywell Technical Support. The issues can be either LED-indicated issues or other issues. 6.2.1 To Troubleshoot LED-Indicated Issues When an LED status indicates issues, refer to the below table to determine their possible fixes. -
Page 37: 2: To Troubleshoot Other Issues
Ensure that the user account is associated with the CLSS active. Gateway mainboard. The panel’s date and time are Ensure that the panel’s date and time incorrect. are correct. CGW-MB Installation and Users’ Manual | P/N:LS10248-000HW-E | REV.G | JUL/31/2022... - Page 38 Trouble IN SYSTEM Connect the ANN-PRI The ANN-PRI communication cable ANN-PRI COMM communication cable with the panel. is not connected to the panel. FAULT DDEV #: ALL DEVICES CGW-MB Installation and Users’ Manual | P/N:LS10248-000HW-E | REV.G | JUL/31/2022...
-
Page 39: Section 7: Modbus Communications
Section 7: Modbus Communications The CGW-MB can use a third-party client to monitor the nodes inside a Modbus LAN network, and send alarm and event data of these nodes for the CLSS users. NOTE: The Modbus interface provides supplementary data to the third party client. -
Page 40: Bandwidth Calculation
Bandwidth Calculation Modbus Communications 7.6 Bandwidth Calculation Use the following information to calculate the network bandwidth CGW-MB usage requires and how it will impact the network. Table 7.2: Total Required Bandwidth For TCP Request Description Bytes Ethernet Header IP Header... -
Page 41: Nfn Network
NFN Network Modbus Communications 7.7 NFN Network 7.7.1 System Architecture An Internet or Intranet IP network connection is needed for the architectures described here. Figure 7.1: Single Panel Architecture CGW-MB Installation and Users’ Manual | P/N:LS10248-000HW-E | REV.G | JUL/31/2022... -
Page 42: Cgw-Mb In Nfn Network
NFN Network Modbus Communications CGW-MB in NFN Network Figure 7.2: NFN Network Architecture CGW-MB Installation and Users’ Manual | P/N:LS10248-000HW-E | REV.G | JUL/31/2022... -
Page 43: 2: Redundancy
Modbus client. CAUTION: THE FIRST AND SECOND CLSS GATEWAY MAINBOARDS MUST HAVE DIFFERENT NODE NUMBERS AND DIFFERENT IP ADDRESSES. Redundancy: For NFN Network Figure 7.3: Redundant CGW-MBs CGW-MB Installation and Users’ Manual | P/N:LS10248-000HW-E | REV.G | JUL/31/2022... -
Page 44: 3: Legacy Modbus Clss Gateway Mainboard
7.7.3 Legacy Modbus CLSS Gateway mainboard A panel’s network might already be using a Modbus CLSS Gateway mainboard in its network. You can add the CGW-MB to the network or replace the legacy Modbus CLSS Gateway mainboard with the CGW-MB. -
Page 45: Agency Listings And Approvals
• FDNY: COA#000121, COA#000122 7.8.1 Agency Restrictions and Limitations • CGW-MB is UL 864 and ULC-S527 listed for supplementary use only. 7.9 Standards Compliance This product has been investigated to, and found to be in compliance with, the following... -
Page 46: Compatible Equipment
• BACNET-GW-3 • NCA-2 • NCD • NFN-GW-EM-3 • NFN-GW-PC-F • NFN-GW-PC-HNMF • NFN-GW-PC-HNSF • NFN-GW-PC-HNW • NFN-GW-PC-HNW-2 • NFN-GW-PC-W • NWS-3 • PC NFN CLSS Gateway mainboards • VESDA-HLI-GW CGW-MB Installation and Users’ Manual | P/N:LS10248-000HW-E | REV.G | JUL/31/2022... -
Page 47: Mapping For Channels
428950 L5M1 - L1M159 428951 430540 L6M1 - L1M159 430541 432130 L7M1 - L1M159 432131 433720 L8M1 - L1M159 433721 435310 L9M1 - L1M159 435311 436900 L10M1 - L1M159 CGW-MB Installation and Users’ Manual | P/N:LS10248-000HW-E | REV.G | JUL/31/2022... -
Page 48: Modbus Feature Activation
4. Click CLSS Gateway mainboard under the Features section. 5. Note down the purchased number under Available Features. 6. Click PURCHASE at the top right side. Figure 7.5: Purchasing the Modbus Support CGW-MB Installation and Users’ Manual | P/N:LS10248-000HW-E | REV.G | JUL/31/2022... -
Page 49: 2: To Activate The Modbus Support
4. Find and tap the OC of the CLSS Gateway mainboard. 5. Tap ADD ACTIVATION. 6. Tap Modbus Support under the One Time Activations. 7. Tap ACTIVATE. 8. Wait for the activation successful message. CGW-MB Installation and Users’ Manual | P/N:LS10248-000HW-E | REV.G | JUL/31/2022... -
Page 50: Installation And Configurations
Each CGW-MB is shipped with a default node number of 235. • The computer used to configure the CGW-MB must establish an IP connection to the CLSS Gateway mainboard. Consult with a network administrator if unsure how to make this connection. -
Page 51: To Configure The Modbus Settings
9. Assign the Eth1 port with a static IP address for the Modbus connection. 10.Connect the Ethernet cable between the Eth1 port of CGW-MB and its LAN device. 11.Find and click Modbus Settings in the CLSS Gateway mainboard Settings section. - Page 52 IP – no other Modbus clients may communicate with the CLSS Gateway mainboard. However, any computer running a browser in the local network will still be able to access the CGW-MB configuration Authorized Client IP web page as normal.
- Page 53 If an Unknown node comes on line and is found to be of the wrong type for the CGW-MB to monitor, its Monitored field is automatically set to No. Some nodes in the node list are not usable by the CGW-MB and therefore are not configurable and do not have a unit ID.
-
Page 54: To Configure The Modbus Client
The Modbus master addresses each fire panel in the panel’s network with a Unit ID. • The Unit ID used in the CGW-MB must be in the range 1 to 240. This is a Modbus range limitation. •... -
Page 55: 2: Enabling The Control
9. Wait until the CGW-MB shows the changes. 10.Check that the changes are correct. 7.19.3 Control Commands Using the CGW-MB you can send relevant command values to the holding registers of Points, Panels, and Zones. NOTE: Refer to the section for detailed register mapping information. -
Page 56: Zone Commands
XLS 2000 XLS 3000 7.19.4 Sending Commands Send commands through the CGW-MB by writing command values to the appropriate holding registers. For detailed register mapping information refer to the 7.21 "Register section. The following tables display the values representing all the command Mapping"... -
Page 57: For Notifier Ul
* Activate and Deactivate work only for output-controlled modules like control and relay. Different panels support different zone types. Refer to Table 7.7, “Zone Command Availability by Panel” for information about zone types supported. CGW-MB Installation and Users’ Manual | P/N:LS10248-000HW-E | REV.G | JUL/31/2022... -
Page 58: Notifier Ul: Analog Values And Trending
The client should wait 5 seconds after the initialization request to insure that the CGW-MB has had enough time to get the analog values and load the registers. Thereafter the CGW-MB continues to poll the points. The analog value in the CGW-MB are updated no faster than once every 5 seconds. -
Page 59: Register Mapping
10 minutes of polling on a 10 second interval, the client requests analog values from the points L1M20 to L1M22. Result: The CGW-MB sends back zeros in response to the first request for analog values from the points L1M1 through L1M10. The CGW-MB sends back actual values on the second request from the client 10 seconds later. -
Page 60: Point Status Holding Registers
Each holding register range is for detectors or modules. Table 7.15: Point Status Holding Register Channel Addresses Start Address End Address Address 400001 400300 L1D1–L1D300 CGW-MB Installation and Users’ Manual | P/N:LS10248-000HW-E | REV.G | JUL/31/2022... -
Page 61: 2: Point Device Type Input Registers
405701 406000 L10M1–L10M300 NOTE: On the AFP-2800, output activation status is not reported to the CGW-MB and therefore the bits and event type will always indicate a non-active state. 7.21.2 Point Device Type Input Registers NOTE: If the point is not present in the panel programming, all bits in the byte will contain a value of 1 or FFFFH. -
Page 62: 3: Zones/Panel Circuits Status Holding Registers
Enable (Bit 10): The zone/panel circuit is enabled. Disable (Bit 9): The zone/panel circuit is disabled. Ack Fire Alarm (Bit 8): The fire alarm on this zone/panel circuit is acknowledged. CGW-MB Installation and Users’ Manual | P/N:LS10248-000HW-E | REV.G | JUL/31/2022... -
Page 63: 4: Gamewell-Fci: Cam Text Event Holding Registers
Specifically, the lower byte contains the actual active event for this point. An active state is defined in this CLSS Gateway mainboard as any Fire, Security, Critical Process, Medical, Mass Notification, or Supervisory alarm state. CGW-MB Installation and Users’ Manual | P/N:LS10248-000HW-E | REV.G | JUL/31/2022... -
Page 64: 5: Bell Circuits Status Holding Registers
If the bell circuit is not present in the panel programming, all bits in the lower byte will contain a ‘1’ or the value ‘FFH’, but the upper byte will contain a ‘0’. CGW-MB Installation and Users’ Manual | P/N:LS10248-000HW-E | REV.G | JUL/31/2022... -
Page 65: 6: Bell Circuits Device Type Input Registers
Device Types (see Table 7.27: Bell Circuit Device Type -Input Register Addresses Start Address End Address Device Address 306001 306001 BellCircuit1 306002 306002 BellCircuit2 306003 306003 BellCircuit3 306004 306004 BellCircuit4 CGW-MB Installation and Users’ Manual | P/N:LS10248-000HW-E | REV.G | JUL/31/2022... -
Page 66: 7: Panel Status Holding Register
310300 L1M1–L1M300 310301 310600 L2M1–L2M300 310601 310900 L3M1–L3M300 310901 311200 L4M1–L4M300 311201 311500 L5M1–L5M300 311501 311800 L6M1–L6M300 311801 312100 L7M1–L7M300 312101 312400 L8M1–L8M300 312401 312700 L9M1–L9M300 312701 313000 L10M1–L10M300 CGW-MB Installation and Users’ Manual | P/N:LS10248-000HW-E | REV.G | JUL/31/2022... -
Page 67: 1: Panel And System Troubles Holding Registers
414107 414113 414118 Loop Prealarms Lx 414103 414108 414114 414119 Loop Disables Lx 414104 414109 414115 414120 Loop tests Lx 414105 414110 414116 414121 Active NONAS Lx 414111 414122 CGW-MB Installation and Users’ Manual | P/N:LS10248-000HW-E | REV.G | JUL/31/2022... -
Page 68: 3: Clss Gateway Mainboard Information Input Registers
Modbus Communications 7.22.3 CLSS Gateway mainboard Information Input Registers NOTE: Information/debug values are used by the CGW-MB Unit ID only. All other nodes reject reads in this address range. The CGW-MB records some status and configuration information for debugging and technical support purposes. -
Page 69: Troubleshooting
Be sure only one client is polling the CLSS Gateway mainboard. • Check the CGW-MB configuration tool and be sure that the Authorized Client IP address is set to 0.0.0.0. If using the Authorized Client IP security feature, confirm that the address in the CLSS Gateway mainboard matches the address in the Modbus client. -
Page 70: 6: How Many Analog Values Can I Read At A Time
CGW-MB (acting as a Modbus slave) interfaces with a Modbus master through Modbus TCP protocol. For a Modbus RTU master to interface with the CGW-MB, use Moxa MGate MB3180 and convert the Modbus TCP protocol to the Modbus RTU (Serial) protocol. -
Page 71: 2: Software Configuration
The MGate MB3180 accepts the Modbus Unit ID as a virtual slave ID and monitors devices with these virtual slave IDs. By default, the CGW-MB assigns a Modbus Unit ID to each node on the NFN network. The ID is equal to node number of the node. They can be changed, Slave ID Map but should be within 1 to 99. -
Page 72: 3: Connecting The Moxa Mgate Mb3180 Interface
2. Connect the MB3180 to the CGW-MB. Figures show possible configurations for connecting the CGW-MB to the Moxa interface. 3. Power up the system. Figure 7.8: Connection Through Crossover Ethernet Cable CGW-MB Installation and Users’ Manual | P/N:LS10248-000HW-E | REV.G | JUL/31/2022... -
Page 73: System Trouble
0x03 Illegal data value registers a client can read at one time is 10. Invalid Data written to the register when sending commands. CGW-MB Installation and Users’ Manual | P/N:LS10248-000HW-E | REV.G | JUL/31/2022... -
Page 74: Cgw-Mb Active Event Code
CO Alarm & Fire Alarm CO Supervisory CO Supervisory & Photo Supervisory CO Supervisory & Fire Alarm CO Alarm & Photo Supervisory Device Not Present For Gamewell-FCI General Alarm Gas Alarm CO Supervisory CGW-MB Installation and Users’ Manual | P/N:LS10248-000HW-E | REV.G | JUL/31/2022... - Page 75 “No Active Status” does not indicate the point/device is in a normal state. The holding register for the point or device contains more detail. For more information, refer to 7.21 "Register Mapping" CGW-MB Installation and Users’ Manual | P/N:LS10248-000HW-E | REV.G | JUL/31/2022...
-
Page 76: Device Types
0047H 0010H Signals Silence Switch 0048H Monitor Wireless Signals Silence Wireless Monitor 0011H 0049H Switch Pull Station 0012H Reset Switch 004AH Wireless Pull Station 0013H Wireless Reset Switch 004BH CGW-MB Installation and Users’ Manual | P/N:LS10248-000HW-E | REV.G | JUL/31/2022... - Page 77 Process Monitor 0080H ECS/MNS General 1050H Process Auto 0081H ECS/MNS Control 1051H 4-20mA sensor 0090H ECS/MNS Strobe 1052H Wireless 4-20mA sensor 0091H ECS/MNS Speaker 1053H Feedback 00A0H ECS/MNS Relay 1054H CGW-MB Installation and Users’ Manual | P/N:LS10248-000HW-E | REV.G | JUL/31/2022...
-
Page 78: System Troubles Register Map
ANNUN.10 NO ANSWER ANNUN.14 NO ANSWER ANNUN.11 TROUBLE ANNUN.15 TROUBLE 360003 ANNUN.11 NO ANSWER ANNUN.15 NO ANSWER ANNUN.12 TROUBLE ANNUN.16 TROUBLE ANNUN.12 NO ANSWER ANNUN.16 NO ANSWER ANNUN.13 TROUBLE ANNUN.17 TROUBLE CGW-MB Installation and Users’ Manual | P/N:LS10248-000HW-E | REV.G | JUL/31/2022... - Page 79 OPTION MODULE Reserved STYLE 6 ON LOOP 3 Reserved AVPS. TROUBLE Reserved NAM CCBE PROG. LOST 360007 Reserved MAN. EVAC INITIATED Reserved MAN. EVAC RECEIVED Reserved Reserved Reserved Reserved CGW-MB Installation and Users’ Manual | P/N:LS10248-000HW-E | REV.G | JUL/31/2022...
- Page 80 ANNUN.62 TROUBLE ANNUN.58 NO ANSWER ANNUN.62 NO ANSWER 360011 ANNUN.59 TROUBLE ANNUN.63 TROUBLE ANNUN.59 NO ANSWER ANNUN.63 NO ANSWER ANNUN.60 TROUBLE ANNUN.64 TROUBLE ANNUN.60 NO ANSWER ANNUN.64 NO ANSWER CGW-MB Installation and Users’ Manual | P/N:LS10248-000HW-E | REV.G | JUL/31/2022...
- Page 81 STYLE 4 SHORT B LOOP 9 STYLE 6 SHORT LOOP 5 STYLE 4 SHORT A LOOP 10 STYLE 6 SHORT LOOP 6 STYLE 4 SHORT B LOOP 10 STYLE 6 SHORT LOOP 7 CGW-MB Installation and Users’ Manual | P/N:LS10248-000HW-E | REV.G | JUL/31/2022...
- Page 82 360019 ANNUN. 83 TROUBLE ANNUN. 87 TROUBLE ANNUN. 83 NO ANSWER ANNUN. 87 NO ANSWER ANNUN. 84 TROUBLE ANNUN. 88 TROUBLE ANNUN. 84 NO ANSWER ANNUN. 88 NO ANSWER CGW-MB Installation and Users’ Manual | P/N:LS10248-000HW-E | REV.G | JUL/31/2022...
- Page 83 360023 ANNUN. 115 TROUBLE ANNUN. 119 TROUBLE ANNUN. 115 NO ANSWER ANNUN. 119 NO ANSWER ANNUN. 116 TROUBLE ANNUN. 120 TROUBLE ANNUN. 116 NO ANSWER ANNUN. 120 NO ANSWER CGW-MB Installation and Users’ Manual | P/N:LS10248-000HW-E | REV.G | JUL/31/2022...
- Page 84 REMOTE DISPLAY 23 TROUBLE REMOTE DISPLAY 19 NO REMOTE DISPLAY 23 NO ANSWER ANSWER REMOTE DISPLAY 20 TROUBLE REMOTE DISPLAY 24 TROUBLE REMOTE DISPLAY 20 NO REMOTE DISPLAY 24 NO ANSWER ANSWER CGW-MB Installation and Users’ Manual | P/N:LS10248-000HW-E | REV.G | JUL/31/2022...
- Page 85 Reserved Reserved Reserved 360030 Reserved Reserved Reserved Reserved Reserved Reserved Reserved Reserved Reserved Reserved Reserved Reserved Reserved Reserved Reserved Reserved 360031 Reserved Reserved Reserved Reserved Reserved Reserved Reserved Reserved CGW-MB Installation and Users’ Manual | P/N:LS10248-000HW-E | REV.G | JUL/31/2022...
- Page 86 IR ENABLED ON LOOP 10 TRANSMIT/RECIEVE ERROR IR ENABLED ON LOOP 3 ABOVE LIMIT ON LOOP 1 TRANSMIT/RECIEVE ERROR IR ENABLED ON LOOP 4 ABOVE LIMIT ON LOOP 2 CGW-MB Installation and Users’ Manual | P/N:LS10248-000HW-E | REV.G | JUL/31/2022...
- Page 87 ANALOG OUTPUT D TROUBLE 360037 DAP Port B Failure Reserved DAL No Answer / DAL DEVICE NO Reserved ANSWER LOCAL MIC TROUBLE AMPLIFIER LIMIT LOCAL PHONE TROUBLE AMPLIFIER SUPERVISION CGW-MB Installation and Users’ Manual | P/N:LS10248-000HW-E | REV.G | JUL/31/2022...
- Page 88 BACKUP AMP 2 OVERCURRENT BACKUP AMP 2 TRIP BACKUP AMP 3 OVERCURRENT BACKUP AMP 3 TRIP BACKUP AMP 4 OVERCURRENT BACKUP AMP 4 TRIP PRIMARY AMP 1 TRIP DSBUS 1 AC FAIL CGW-MB Installation and Users’ Manual | P/N:LS10248-000HW-E | REV.G | JUL/31/2022...
- Page 89 ANNUN 21 TYPE MISMATCH ANNUN 29 TYPE MISMATCH ANNUN 22 TYPE MISMATCH ANNUN 30 TYPE MISMATCH ANNUN 23 TYPE MISMATCH ANNUN 31 TYPE MISMATCH ANNUN 24 TYPE MISMATCH ANNUN 32 TYPE MISMATCH CGW-MB Installation and Users’ Manual | P/N:LS10248-000HW-E | REV.G | JUL/31/2022...
- Page 90 0 for router, 1-15 for peripheral) AIO Address 3 Comm Loss (LSB is (Reserved) 0 for router, 1-15 for peripheral) AIO Address 4 Comm Loss (LSB is (Reserved) 0 for router, 1-15 for peripheral) CGW-MB Installation and Users’ Manual | P/N:LS10248-000HW-E | REV.G | JUL/31/2022...
- Page 91 Auxiliary Trouble 30 Auxiliary Trouble 38 360052 Auxiliary Trouble 31 Auxiliary Trouble 39 Auxiliary Trouble 32 Auxiliary Trouble 40 Auxiliary Trouble 33 Auxiliary Trouble 41 Auxiliary Trouble 34 Auxiliary Trouble 42 CGW-MB Installation and Users’ Manual | P/N:LS10248-000HW-E | REV.G | JUL/31/2022...
- Page 92 Amplifier Failure 1 Battery LOW Amplifier Failure 2 STYLE 6 ON LOOP 1 Amplifier Failure 3 STYLE 6 ON LOOP 2 Amplifier Failure 4 STYLE 6 ON LOOP 4 CGW-MB Installation and Users’ Manual | P/N:LS10248-000HW-E | REV.G | JUL/31/2022...
- Page 93 360060 CPU/DISPLAY HARDWARE EXTERNAL PSU FAULT FAULT EXTERNAL PSU LOW SYSTEM SOUNDER CIRCUIT FAULT VOLTAGE OUTPUT DIRVER FAULT NETWORK ZONE DUPLICATION NETWORK DOMAIN RING OR GENERAL FAULT SUBNET LOST CGW-MB Installation and Users’ Manual | P/N:LS10248-000HW-E | REV.G | JUL/31/2022...
- Page 94 NO DEV. INST ON L1 460001 STYLE 6 POS. LOOP 2 PANEL DOOR OPEN CORRUPT LOGIC EQUAT AUXILIARY TROUBLE LCD80 SUPERVISORY TERM. SUPERVISORY EPROM ERROR / FLASH IMAGE ANNUN. 1 TROUBLE ERROR CGW-MB Installation and Users’ Manual | P/N:LS10248-000HW-E | REV.G | JUL/31/2022...
- Page 95 ANNUN.30 NO ANSWER ANNUN.27 TROUBLE ANNUN.31 TROUBLE 460005 ANNUN.27 NO ANSWER ANNUN.31 NO ANSWER ANNUN.28 TROUBLE ANNUN.32 TROUBLE ANNUN.28 NO ANSWER ANNUN.32 NO ANSWER ANNUN.29 TROUBLE NETWORK FAIL PORT A CGW-MB Installation and Users’ Manual | P/N:LS10248-000HW-E | REV.G | JUL/31/2022...
- Page 96 ANNUN.38 TROUBLE ANNUN.34 NO ANSWER ANNUN.38 NO ANSWER 460008 ANNUN.35 TROUBLE ANNUN.39 TROUBLE ANNUN.35 NO ANSWER ANNUN.39 NO ANSWER ANNUN.36 TROUBLE ANNUN.40 TROUBLE ANNUN.36 NO ANSWER ANNUN.40 NO ANSWER CGW-MB Installation and Users’ Manual | P/N:LS10248-000HW-E | REV.G | JUL/31/2022...
- Page 97 STYLE 6 NEG. LOOP 7 GROUND FAULT LOOP 8 STYLE 6 NEG. LOOP 8 GROUND FAULT LOOP 9 STYLE 6 NEG. LOOP 9 GROUND FAULT LOOP 10 STYLE 6 NEG. LOOP 10 CGW-MB Installation and Users’ Manual | P/N:LS10248-000HW-E | REV.G | JUL/31/2022...
- Page 98 460017 ANNUN. 67 TROUBLE ANNUN. 71 TROUBLE ANNUN. 67 NO ANSWER ANNUN. 71 NO ANSWER ANNUN. 68 TROUBLE ANNUN. 72 TROUBLE ANNUN. 68 NO ANSWER ANNUN. 72 NO ANSWER CGW-MB Installation and Users’ Manual | P/N:LS10248-000HW-E | REV.G | JUL/31/2022...
- Page 99 460022 ANNUN. 107 TROUBLE ANNUN. 111 TROUBLE ANNUN. 107 NO ANSWER ANNUN. 111 NO ANSWER ANNUN. 108 TROUBLE ANNUN. 112 TROUBLE ANNUN. 108 NO ANSWER ANNUN. 112 NO ANSWER CGW-MB Installation and Users’ Manual | P/N:LS10248-000HW-E | REV.G | JUL/31/2022...
- Page 100 REMOTE DISPLAY 23 TROUBLE REMOTE DISPLAY 19 NO ANSWER REMOTE DISPLAY 23 NO ANSWER REMOTE DISPLAY 20 TROUBLE REMOTE DISPLAY 24 TROUBLE REMOTE DISPLAY 20 NO ANSWER REMOTE DISPLAY 24 NO ANSWER CGW-MB Installation and Users’ Manual | P/N:LS10248-000HW-E | REV.G | JUL/31/2022...
- Page 101 Reserved Reserved Reserved 460030 Reserved Reserved Reserved Reserved Reserved Reserved Reserved Reserved Reserved Reserved Reserved Reserved Reserved Reserved Reserved Reserved 460031 Reserved Reserved Reserved Reserved Reserved Reserved Reserved Reserved CGW-MB Installation and Users’ Manual | P/N:LS10248-000HW-E | REV.G | JUL/31/2022...
- Page 102 IR ENABLED ON LOOP 10 TRANSMIT/RECIEVE ERROR ABOVE IR ENABLED ON LOOP 3 LIMIT ON LOOP 1 TRANSMIT/RECIEVE ERROR ABOVE IR ENABLED ON LOOP 4 LIMIT ON LOOP 2 CGW-MB Installation and Users’ Manual | P/N:LS10248-000HW-E | REV.G | JUL/31/2022...
- Page 103 ANALOG OUTPUT D TROUBLE 460037 DAP Port B Failure Reserved DAL No Answer / DAL DEVICE NO Reserved ANSWER LOCAL MIC TROUBLE AMPLIFIER LIMIT LOCAL PHONE TROUBLE AMPLIFIER SUPERVISION CGW-MB Installation and Users’ Manual | P/N:LS10248-000HW-E | REV.G | JUL/31/2022...
- Page 104 DSBUS 2 SELF TEST FAIL DSBUS 3 HIGH BATT DSBUS 3 SELF TEST FAIL DSBUS 4 HIGH BATT DSBUS 4 SELF TEST FAIL DSBUS 1 LOW BATT PRIMARY AMP 1 FAIL CGW-MB Installation and Users’ Manual | P/N:LS10248-000HW-E | REV.G | JUL/31/2022...
- Page 105 Earth Fault (LSB is PMB address 1-5) Earth Fault Switch Mismatch (LSB is PMB 2 COMM LOSS PMB address 1-5) PMB 3 COMM LOSS Battery Low (LSB is PMB address 1-5) CGW-MB Installation and Users’ Manual | P/N:LS10248-000HW-E | REV.G | JUL/31/2022...
- Page 106 LOSS OF PART LOOP4 LOSS OF PART LOOP5 LOSS OF PART LOOP6 LOSS OF PART LOOP7 LOSS OF PART LOOP8 LOSS OF PART LOOP9 LOSS OF PART LOOP10 LOSS OF ENTIRE LOOP1 CGW-MB Installation and Users’ Manual | P/N:LS10248-000HW-E | REV.G | JUL/31/2022...
- Page 107 CONFIGURATION NEEDS EXPANSION CONFIGURATION NEEDS RS485 CARD EXTERNAL PSU FAULT EXTERNAL PSU LOW SYSTEM VOLTAGE NETWORK ZONE DUPLICATION NETWORK DOMAIN RING OR SUBNET LOST INCOMPATIBLE LOOP1 DEVICE AND LIB CGW-MB Installation and Users’ Manual | P/N:LS10248-000HW-E | REV.G | JUL/31/2022...
- Page 108 SENSOR AT ADDRESS OUT OF RANGE LOOP8 460062 SENSOR AT ADDRESS OUT OF RANGE LOOP9 SENSOR AT ADDRESS OUT OF RANGE LOOP10 NEW AUXILIARY SUPPLY FAT/FBF MISSING FAULT ID2NET DUPLICATE NODE CGW-MB Installation and Users’ Manual | P/N:LS10248-000HW-E | REV.G | JUL/31/2022...
-
Page 109: Section 8: The Bacnet Feature
BACnet client, which is using the BACnet communication protocol. The CGW-MB acts like any other node on a panel network. It can communicate with a single panel or network of panels directly or through a network control module. -
Page 110: Canada
• COMPACT-24-N • COMPACT-PLUS • VIGPLUS-24 • VIGI-24 • VIGI-72 Network Cards • NCM-W, NCM-F • HS-NCM-W, HS-NCM-SF, HS-NCM-MF, HS- NCM-WSF, HS-NCM-WMF, HS-NCM-MFSF • NFN-GW-PC-NHW-2, HS-NCM-WMF-2, HS- NCM-WSF-2, HS-NCM-W-2 CGW-MB Installation and Users’ Manual | P/N:LS10248-000HW-E | REV.G | JUL/31/2022... -
Page 111: Cgw-Mb Parts
10 ft NUP Serial (RS-232) cable kit 32351718-001 8.5 System Requirements The CGW-MB can monitor up to 16 panels. All of these panels should have a combined maximum of 15,000 objects only. This includes all detectors, monitor modules, control modules, bell circuits, and so on. -
Page 112: Ip Requirements
“Single Panel Connecting to BACnet via CGW-MB” on page 111 connection topology details. Figure 8.1: Single Panel Connecting to BACnet via CGW-MB Refer to “Compatible Equipment” on page 109 for supported panels and annunciators. CGW-MB Installation and Users’ Manual | P/N:LS10248-000HW-E | REV.G | JUL/31/2022... -
Page 113: 2: Multi-Panel Network Architecture
IP Requirements The BACnet Feature 8.7.2 Multi-panel Network Architecture The CGW-MB can connect to a NUP, RS232, USB, or TTL port available on a panel and interact with that panel's network. RS232 (NUP) TTL Connection Panel Network Figure 8.2: CLSS Gateway mainboard Connected with Multiple Panels... -
Page 114: Bacnet Feature Activation
4. Click CLSS Gateway mainboard under the Features section. 5. Note down the purchased number under Available Features. 6. Click PURCHASE at the top right side. Figure 8.4: Purchasing the BACnet Support CGW-MB Installation and Users’ Manual | P/N:LS10248-000HW-E | REV.G | JUL/31/2022... -
Page 115: 2: To Activate The Bacnet Support
4. Find and tap the OC of the CLSS Gateway mainboard. 5. Tap ADD ACTIVATION. 6. Tap BACnet Support under the One Time Activations. 7. Tap ACTIVATE. 8. Wait for the activation successful message. CGW-MB Installation and Users’ Manual | P/N:LS10248-000HW-E | REV.G | JUL/31/2022... -
Page 116: Configuring The Bacnet Network Settings
Each CGW-MB is shipped with a default node number of 235. • The computer used to configure the CGW-MB must establish an IP connection to the CLSS Gateway mainboard. Consult with a network administrator if unsure how to make this connection. -
Page 117: To Connect With The Bacnet Client
The BACnet Feature 8.10 To Connect with the BACnet Client 1. At the CGW-MB side, connect an Ethernet cable to the Ethernet Port 1. 2. Connect the other end of the Ethernet cable to the IP network. 3. Connect the system running the BACnet client to the same IP network. -
Page 118: 1: To Configure The Bacnet Settings
8. Go to the Network Settings in the CLSS Gateway mainboard Settings section. 9. Assign the Eth1 port with a static IP address for the BACnet connection. 10.Connect the Ethernet cable between the Eth1 port of CGW-MB and its LAN device. CGW-MB Installation and Users’ Manual | P/N:LS10248-000HW-E | REV.G | JUL/31/2022... - Page 119 Specify the time in seconds. As per this value, the device will periodically re-register with the BBMD to maintain full participation in the BACnet/IP network. Note: Maximum value is 30 seconds. CGW-MB Installation and Users’ Manual | P/N:LS10248-000HW-E | REV.G | JUL/31/2022...
- Page 120 LifeSafety PreAlarm Click to set Priorities of Events Property Return to Click to set Priorities of Events Safety Alarm Supervisory Return To Click to set Priorities of Events Normal CGW-MB Installation and Users’ Manual | P/N:LS10248-000HW-E | REV.G | JUL/31/2022...
-
Page 121: Replacing The Bacnet-Gw
The CGW-MB and the BACNET-GW-3 have different addressing schemes. Refer to the Compatible Equipment section for the supported objects details. Ensure that the replacing CGW-MB has correct object addresses and the old object mappings of BACNET-GW-3 are removed. Refer to the BACnet PIC Statement section for the CGW-MB object addressing details. -
Page 122: Bacnet Pic Statement
For the CGW-MB object addressing details, refer to the BACnet PIC Statement. section. CAUTION: THE NODE NUMBER OF THE CGW-MB SHOULD BE DIFFERENT FROM OTHER CLSS GATEWAY MAINBOARDS IN THE NETWORK. CAUTION: THE IP ADDRESS OF THE CGW-MB SHOULD BE DIFFERENT FROM OTHER CLSS GATEWAY MAINBOARDS AND DEVICES IN THE NETWORK. - Page 123 All statuses other than normal and fault. BACnet BACnet Enumeration Fire Panel State Reliability Reliability reNoFaultDete All statuses other than trouble. cted re_UnreliableOt Security Trouble, Fire Trouble, Non- Fire Trouble CGW-MB Installation and Users’ Manual | P/N:LS10248-000HW-E | REV.G | JUL/31/2022...
- Page 124 Expected BACnet Event Fire Panel State Transition Bit Event Enable toOffNormal toFault toNormal Direct REAL % Alarm Reading Proprietary REAL Drift Compensation Percent (ONYX Property 1001 Series Panels Only) CGW-MB Installation and Users’ Manual | P/N:LS10248-000HW-E | REV.G | JUL/31/2022...
- Page 125 All statuses other than those included in 3 and 4 below. None Security Trouble, Fire Trouble, Non- Present Value Fire Trouble None Fire Device or Zone Disabled, Non- Fire Device Disabled CGW-MB Installation and Users’ Manual | P/N:LS10248-000HW-E | REV.G | JUL/31/2022...
- Page 126 Device or Zone Disabled, Non-Fire Device Disabled) Boolean Fire Panel State FALSE All statuses other than disable Out of Service TRUE Fire Device or Zone Disabled, Non- Fire Device Disabled CGW-MB Installation and Users’ Manual | P/N:LS10248-000HW-E | REV.G | JUL/31/2022...
- Page 127 If device is in trouble state (Non-Fire OutOfService Trouble)and also device goes to disable state(Non-Fire Device Disabled) Boolean Fire Panel State FALSE All statuses other than disable Out of Service TRUE Non-Fire Device Disabled CGW-MB Installation and Users’ Manual | P/N:LS10248-000HW-E | REV.G | JUL/31/2022...
- Page 128 If device is in trouble state OutOfService (Trouble)and also device goes to disable state(Device Disabled) Out of Service Boolean Fire Panel State FALSE All statuses other than disable TRUE Device Disabled CGW-MB Installation and Users’ Manual | P/N:LS10248-000HW-E | REV.G | JUL/31/2022...
- Page 129 Indicating support for multiple character sets does not imply that they can all be supported simultaneously. ANSI X3.4 IBM/Microsoft DBCS ISO 8859-1 ISO 10646 (UCS-2) ISO 10646 (ICS-4) JIS C 6226 CGW-MB Installation and Users’ Manual | P/N:LS10248-000HW-E | REV.G | JUL/31/2022...
-
Page 130: Equations For Object Ids (Instance Numbers)
Modules = ((Loop - 1) x 1000) + (Module Address + 299) + Panel# Example: L01D200 = ((Loop - 1) x 1000) + (Detector Address - 1) = 0 + 199 = GO199 CGW-MB Installation and Users’ Manual | P/N:LS10248-000HW-E | REV.G | JUL/31/2022... - Page 131 (XR Relay# + 3620) System Troubles or Generic Panel Points (System Trouble# + 14200) 800 addresses are dedicated to system troubles or generic panel points. Bucketized the troubles as mentioned below. CGW-MB Installation and Users’ Manual | P/N:LS10248-000HW-E | REV.G | JUL/31/2022...
- Page 132 MSI/LSP CLSS CLOUD MSI/LSP ZONE LICENSE MSI/LSP NETWORK DISPLAY MSI/LSP LICENSE LICENSE MSI/LSP AUDIO LIBRARY MSI/LSP DATABASE MSI/LSP VOICE MSI/LSP LIMIT EXCEED MSI/LSP MSI/LSP PHONE MSI/LSP AMPLIFLIER MSI/LSP MSI/LSP CGW-MB Installation and Users’ Manual | P/N:LS10248-000HW-E | REV.G | JUL/31/2022...
- Page 133 These objects will always be the same object ID on each device. You do not need to add the Node Number offset. INPUTNOTIFY = 1 OUTPUTNOTIFY = 2 ZONENOTIFY = 3 CGW-MB Installation and Users’ Manual | P/N:LS10248-000HW-E | REV.G | JUL/31/2022...
-
Page 134: Appendix A: Clss Gateway Mainboard Operating Conditions
THIS SYSTEM AND ITS PERIPHERALS BE INSTALLED IN AN ENVIRONMENT WITH A NORMAL ROOM TEMPERATURE OF 15 - 27° C (60 - 80° F). A.1 Wirings and Power POWER LIMITED NON-POWER LIMITED POTS 1 POTS 2 CGW-MB Installation and Users’ Manual | P/N:LS10248-000HW-E | REV.G | JUL/31/2022... -
Page 135: Appendix B: Modulations And Power Used
Target Power that Meets Spectrum Mask and EVM Compliance Table B.1: Wireless Power Specifications 2.4 GHz Tx Power Specifications Power Tol. Rate Channel (dBM) (dB) GFSK 1Mbps 2MHz 0 - 39 +/-2.0 CGW-MB Installation and Users’ Manual | P/N:LS10248-000HW-E | REV.G | JUL/31/2022... -
Page 136: Appendix C: Connecting To The Panels
Ethernet Connection Eth 1 Modbus Eth 0 Client Future Use Configuration Computer Future Use UART/TTL RED COLOR BLACK COLOR /NUP BROWN COLOR GREEN COLOR WHITE COLOR Fire Alarm Panel CGW-MB Installation and Users’ Manual | P/N:LS10248-000HW-E | REV.G | JUL/31/2022... - Page 137 CLSS Gateway mainboard Board Connections Connecting to the Panels Figure C.2: CLSS Gateway mainboard Connection Options - Bottom Side CGW-MB Installation and Users’ Manual | P/N:LS10248-000HW-E | REV.G | JUL/31/2022...
-
Page 138: C.1.1: Connecting To A Fire Alarm Panel
Connecting to the Panels C.1.1 Connecting to a Fire Alarm Panel The panel sends data from all its devices to the connected CGW-MB. The data transmission is based on the connection type and the panel compatibility. WARNING: WHILE THE CLSS GATEWAY MAINBOARD IS WORKING DO NOT REMOVE CONNECTIONS TO THE CLSS GATEWAY MAINBOARD, CLSS SITE MANAGER, AND THE PANEL. -
Page 139: C.2: Supported Panels
For the Panel/CPU1: v1.0.703 | For SIB version Panel: v0.68 For the CGW-MB: 3.0.4.56 C.3.2 To Use an RS-232 Connection Using an RS-232 cable the CGW-MB and the panel are connected. The RS-232 port in the CLSS Gateway mainboard board is labeled as 6 in the Figure C.2. - Page 140 On the Panel Side • Connect the Red wire to the +ve pin of the AM82-MB board. • Connect the Black wire to the -ve pin of the AM82-MB board. CGW-MB Installation and Users’ Manual | P/N:LS10248-000HW-E | REV.G | JUL/31/2022...
-
Page 141: C.4: Esser Panels
Interface) (784850) Use the RS-232 module (772386) along with SEI Card (Serial Essernet® Interface) (784856) Minimum Required Versions ESCOM panel: 02.06.011 FlexES panel: 4.07R001 IQ8 panel: 03.13R000 CGW-MB: 3.1.4.78 CGW-MB Installation and Users’ Manual | P/N:LS10248-000HW-E | REV.G | JUL/31/2022... -
Page 142: C.4.2: To Use An Rs 232 Connection
Connecting to the Panels C.4.2 To Use an RS 232 Connection ESCOM Panels Using an RS-232 cable the CGW-MB and the panel are connected. The RS-232 port in the CLSS Gateway mainboard board is labeled as 6 in the Figure C.2. -
Page 143: C.4.3: To Use An Rs-485 Connection
6. Enter the CLSS Gateway mainboard name in the Label field. 7. Click OK. C.4.3 To Use an RS-485 Connection Using an RS-485 cable the CGW-MB and the panel are connected. The RS-485 ports in the CLSS Gateway mainboard board are labeled as 3 and 4 in the Figure C.2. -
Page 144: C.4.4: To Use An Rs-232 Connection For Inventory Synchronization
From the CLSS Gateway mainboard: • Connect the Rx wire to the Tx pin of the TTY-RS-232 converter. • Connect the Tx wire to the Rx pin of the TTY-RS-232 converter. CGW-MB Installation and Users’ Manual | P/N:LS10248-000HW-E | REV.G | JUL/31/2022... - Page 145 485A_IN +* 485A_IN -* RS 485B - * The connection can also be to 485B_IN + and 485B_IN -. Figure C.6: Complete Setup with Both RS-485 and RS-232 Connections CGW-MB Installation and Users’ Manual | P/N:LS10248-000HW-E | REV.G | JUL/31/2022...
-
Page 146: C.4.5: To Use An Rs232 Connection For Events
On the CLSS Gateway mainboard Side • Connect the +ve wire to the +ve pin of the power supply port. • Connect the -ve wire to the -ve pin of the power supply port. CGW-MB Installation and Users’ Manual | P/N:LS10248-000HW-E | REV.G | JUL/31/2022... - Page 147 3. Select WINMANG from the Device in use list. 4. Go to the Serial Interface 3 section. 5. Select Remote Access from the Device in use list. 6. Click OK. CGW-MB Installation and Users’ Manual | P/N:LS10248-000HW-E | REV.G | JUL/31/2022...
-
Page 148: Iq8 Panels
On the Panel Side • Connect the +ve wire to the +UBext pin of the SEI-2 card. • Connect the -ve wire to the GND pin of the SEI-2 card. CGW-MB Installation and Users’ Manual | P/N:LS10248-000HW-E | REV.G | JUL/31/2022... - Page 149 EARTH VCC - Tx + VCC + 24 V RxD + 485A_IN+* SEI2 485A_IN -* RxD - * The connection can also be to 485B_IN + and 485B_IN -. CGW-MB Installation and Users’ Manual | P/N:LS10248-000HW-E | REV.G | JUL/31/2022...
- Page 150 • Ensure that the RS-232 cable is connected in the RS-232 port of the CLSS Gateway mainboard. • Switch the S7 Switch next to the RS-232 port towards NUP_IN. Figure C.10: The S7 Switch CGW-MB Installation and Users’ Manual | P/N:LS10248-000HW-E | REV.G | JUL/31/2022...
- Page 151 • Connect the +ve wire to the +Ub pin of the SEI card. • Connect the -ve wire to the Gnd pin of the SEI card. Figure C.11: IQ8 Panel RS-232 Power Connectors CGW-MB Installation and Users’ Manual | P/N:LS10248-000HW-E | REV.G | JUL/31/2022...
-
Page 152: C.5: Farenhyt Panels
Using an RS-485 cable the CGW-MB connects with the annunciator primary terminal of the panel. CAUTION: CONNECT EITHER THE CGW-MB OR THE ANN S/P G MODULE WITH THE PANEL. BOTH OF THEM SHOULD NOT BE CONNECTED TOGETHER WITH THE PANEL. - Page 153 • Connect the Red wire to the +ve pin. • Connect the Black wire to the -ve pin. Future For panel connection, use only the RS-485 port Figure C.12: Farenhyt Panel: RS-485 Connections CGW-MB Installation and Users’ Manual | P/N:LS10248-000HW-E | REV.G | JUL/31/2022...
-
Page 154: C.5.3: Programming For Annunciator (Ann-Pri)
Farenhyt Panels Connecting to the Panels C.5.3 Programming for Annunciator (ANN-PRI) Programming enables the panel to recognize the CGW-MB and the annunciator. CAUTION: BEFORE PROGRAMMING, ENSURE THAT THE ANN-PRI COMMUNICATION CABLE IS CONNECTED WITH THE PANEL. C.5.4 To Program for Annunciator Using the keypad on the panel, you select options on the screens. -
Page 155: C.6: Firewarden Panels
Using an RS-485 cable the CGW-MB connects with the annunciator primary terminal of the panel. CAUTION: CONNECT EITHER THE CGW-MB OR THE ANN S/P G MODULE WITH THE PANEL. BOTH OF THEM SHOULD NOT BE CONNECTED TOGETHER WITH THE PANEL. - Page 156 FireWarden Panels Connecting to the Panels Figure C.13: FireWarden Panel: RS-485 Connections CGW-MB Installation and Users’ Manual | P/N:LS10248-000HW-E | REV.G | JUL/31/2022...
-
Page 157: C.6.3: Programming For Annunciator (Ann-Pri)
FireWarden Panels Connecting to the Panels C.6.3 Programming for Annunciator (ANN-PRI) Programming enables the panel to recognize the CGW-MB and the annunciator. CAUTION: BEFORE PROGRAMMING, ENSURE THAT THE ANN-PRI COMMUNICATION CABLE IS CONNECTED WITH THE PANEL. C.6.4 To Program for Annunciator Using the keypad on the panel, you select options on the screens. -
Page 158: C.6.5: To Use Panel's Printer Port Connection
Connect the serial cable in the DB9 serial port of the ANN-S/PG module on the panel. CAUTION: ENSURE THAT ONLY THE ANN-S/PG IS CONNECTED AND NOT THE CGW-MB. ONLY ONE OF THESE TWO CAN BE CONNECTED. BOTH OF THEM MUST NOT BE CONNECTED TOGETHER. - Page 159 FireWarden Panels Connecting to the Panels Figure C.15: FireWarden Panels: Printer Port Connections CGW-MB Installation and Users’ Manual | P/N:LS10248-000HW-E | REV.G | JUL/31/2022...
-
Page 160: C.7: Gamewell-Fci Panels
ILI95-S-E3 S3 Series Panels SLP-E3 INI-7100 CAUTION: DO NOT INSTALL DACT-E3 AND THE CGW-MB TOGETHER ON AN ILI-MB-E3 CIRCUIT BOARD OR AN ILI95-MB-E3 CIRCUIT BOARD. YOU CAN USE DACT-E3 ON A DIFFERENT NODE WITHIN THE NETWORK. Minimum Required Versions Gamewell-E3: 7.00.106 Gamewell-S3: 7.00.106... - Page 161 • Connect the Red wire to the +ve pin in the TB3 port. • Connect the Black wire to the -ve pin in the TB3 port. Figure C.16: E3 Panel: CLSS Gateway mainboard Connections CGW-MB Installation and Users’ Manual | P/N:LS10248-000HW-E | REV.G | JUL/31/2022...
- Page 162 On the Panel Side • Connect the Red wire to the +ve pin in the TB2 port. • Connect the Black wire to the -ve pin in the TB2 port. CGW-MB Installation and Users’ Manual | P/N:LS10248-000HW-E | REV.G | JUL/31/2022...
- Page 163 Gamewell-FCI Panels Connecting to the Panels Figure C.17: S3 Series: CLSS Gateway mainboard Connections TB5 and RS-232 Connections The pin connections are as below: CGW-MB Installation and Users’ Manual | P/N:LS10248-000HW-E | REV.G | JUL/31/2022...
-
Page 164: C.8: Gent Panels
NOTE: If Tx1 and Rx1 are connected, select the Port 1 settings in the panel for communication. If Tx2 and Rx2 are connected, select the Port 2 settings in the panel for communication. CGW-MB Installation and Users’ Manual | P/N:LS10248-000HW-E | REV.G | JUL/31/2022... - Page 165 2. Ensure that the S7 switch next to the RS-232 port is switched towards NUP_IN. Figure C.19: The S7 Switch On the Panel Side At the PB15 terminal of the panel, • Connect the Red wire (+ve) to the +24V pin. CGW-MB Installation and Users’ Manual | P/N:LS10248-000HW-E | REV.G | JUL/31/2022...
-
Page 166: To Use A Usb Connection
Connect the CLSS Gateway mainboard to a 24V DC internal power source of the panel. NOTE: The external power supply must be dedicated and not shared with any other devices. CGW-MB Installation and Users’ Manual | P/N:LS10248-000HW-E | REV.G | JUL/31/2022... - Page 167 Gent Panels Connecting to the Panels NOTE: The panel’s power supply to the CLSS Gateway mainboard must be within +24V DC power. CGW-MB Installation and Users’ Manual | P/N:LS10248-000HW-E | REV.G | JUL/31/2022...
-
Page 168: C.8.3: Vigilon Series Panels
Using an add-on I/O card (VIG-IOC-DOM), certain Vigilon panel variants can communicate with the CGW-MB. • The I/O card has a rotary switch, which should point to 5. • The baud rate of the I/O card should be 19200. CGW-MB Installation and Users’ Manual | P/N:LS10248-000HW-E | REV.G | JUL/31/2022... - Page 169 1. In the panel, find the RS-485/RS-232 (P4) connectors on the main control board. 2. Connect the RS-232 cable to the Tx (Brown), Rx (White), and 0V (Green) terminals of the RS-485/RS-232 (P4) connectors. CGW-MB Installation and Users’ Manual | P/N:LS10248-000HW-E | REV.G | JUL/31/2022...
-
Page 170: To Use A Usb Connection
NOTE: The external power supply must be dedicated and not shared with any other devices. NOTE: The panel’s power supply to the CLSS Gateway mainboard must be within +24V DC power. CGW-MB Installation and Users’ Manual | P/N:LS10248-000HW-E | REV.G | JUL/31/2022... -
Page 171: C.9: Morley-Ias Panels
NOTE: The external power supply must be dedicated and not shared with any other devices. NOTE: The panel’s power supply to the CLSS Gateway mainboard must be within +24V DC power. CGW-MB Installation and Users’ Manual | P/N:LS10248-000HW-E | REV.G | JUL/31/2022... - Page 172 2. Ensure that the S7 switch next to the RS-232 port is switched towards NUP_OUT. Figure C.24: The S7 Switch On the Panel Side In the SK4 or SK5 terminal, Connect the RS-232 cable for the non-resettable internal power. CGW-MB Installation and Users’ Manual | P/N:LS10248-000HW-E | REV.G | JUL/31/2022...
-
Page 173: C.10: Notifier® Ul
N16E N16X C.10.2 To Use a NUP Connection Some NOTIFIER panel variants use a NUP connection with the CGW-MB. 1. On the CLSS Gateway mainboard Side Connect the NUP cable to the NUP port of the CLSS Gateway mainboard board. - Page 174 • High-speed Network of Panels: Connect the NUP cable into an open NUP port of the HS-NCM card on the panel. If no NUP port is available, an additional HS-NCM card must be added and connected. CGW-MB Installation and Users’ Manual | P/N:LS10248-000HW-E | REV.G | JUL/31/2022...
- Page 175 • Ensure that the NUP cable is connected with the NUP port of the CLSS Gateway mainboard. • Find the S7 switch next to the NUP port, and switch it towards NUP_IN. Figure C.28: The S7 Switch CGW-MB Installation and Users’ Manual | P/N:LS10248-000HW-E | REV.G | JUL/31/2022...
- Page 176 • Stand-alone Panel: Ensure that the NUP cable is connected with the NUP port (J1) of the panel. • Network of Panels: Connect to a +24V external power source or to the panel’s power supply port. CGW-MB Installation and Users’ Manual | P/N:LS10248-000HW-E | REV.G | JUL/31/2022...
-
Page 177: C.11: Notifier® European Panels (En)
CLSS Fusion Tool Suite. C.11.3 To Use a NUP Connection Some NOTIFIER panel variants use a NUP connection with the CGW-MB. 1. On the CLSS Gateway mainboard Side Connect the NUP cable with a pre-formed connector to the NUP port of the CLSS Gateway mainboard board. - Page 178 7. It is the P2 pin on the CLSS Gateway mainboard board. • On the External Power Supply Side Connect to the 24V DC external power supply. CGW-MB Installation and Users’ Manual | P/N:LS10248-000HW-E | REV.G | JUL/31/2022...
-
Page 179: C.12: Silent Knight Panels
Using an RS-485 cable the CGW-MB connects with the annunciator primary terminal of the panel. CAUTION: CONNECT EITHER THE CGW-MB OR THE ANN S/P G MODULE WITH THE PANEL. BOTH OF THEM SHOULD NOT BE CONNECTED TOGETHER WITH THE PANEL. - Page 180 Silent Knight Panels Connecting to the Panels Future For panel connection, use only the RS-485 port Figure C.30: Silent Knight Panel: RS-485 Connections CGW-MB Installation and Users’ Manual | P/N:LS10248-000HW-E | REV.G | JUL/31/2022...
-
Page 181: C.12.3: Programming For Annunciator (Ann-Pri)
Silent Knight Panels Connecting to the Panels C.12.3 Programming for Annunciator (ANN-PRI) Programming enables the panel to recognize the CGW-MB and the annunciator. CAUTION: BEFORE PROGRAMMING, ENSURE THAT THE ANN-PRI COMMUNICATION CABLE IS CONNECTED WITH THE PANEL. C.12.4 To Program for Annunciator Using the keypad on the panel, you select options on the screens. -
Page 182: C.13: Triga Panels
Using an RS-485 cable the CGW-MB connects with the annunciator primary terminal of the panel. CAUTION: CONNECT EITHER THE CGW-MB OR THE ANN S/P G MODULE WITH THE PANEL. BOTH OF THEM SHOULD NOT BE CONNECTED TOGETHER WITH THE PANEL. - Page 183 Triga Panels Connecting to the Panels Future For panel connection, use only the RS-485 port Figure C.31: Triga Panel: RS-485 Connections CGW-MB Installation and Users’ Manual | P/N:LS10248-000HW-E | REV.G | JUL/31/2022...
-
Page 184: C.13.3: Programming For Annunciator (Ann-Pri)
Triga Panels Connecting to the Panels C.13.3 Programming for Annunciator (ANN-PRI) Programming enables the panel to recognize the CGW-MB and the annunciator. CAUTION: BEFORE PROGRAMMING, ENSURE THAT THE ANN-PRI COMMUNICATION CABLE IS CONNECTED WITH THE PANEL. C.13.4 To Program for Annunciator Using the keypad on the panel, you select options on the screens. -
Page 185: C.14: Vesda® Detectors
For the CGW-MB: 3.0.4.70 C.14.2 To Use an Ethernet Connection Using an Ethernet cable the CGW-MB and the VESDA detectors are connected. NOTE: The CGW-MB can connect with a VESDA detector or a VESDA Detector Connector. Before Connecting 1. In the Configuration Computer 1. - Page 186 7. It is the P2 pin on the CLSS Gateway mainboard board. • On the External Power Supply Side Connect to the 24V DC external power supply. • CGW-MB Installation and Users’ Manual | P/N:LS10248-000HW-E | REV.G | JUL/31/2022...
- Page 187 12 Clintonville Rd 140 Waterside Rd Northford, CT 06472 Leicester LE5 1TN, UK (203) 484-7161 +44 (0) 203 4091779...