
Related Manuals for Mx Onda MX-HE2657


Summary of Contents for Mx Onda MX-HE2657
- Page 1 MANUAL DE USUARIO E INSTALACIÓN HORNO DE ENCASTRE DE 60 CM MX-HE2657 y MX-HE2660 MODELOS: ANTES DE SU USO LEA ATENTAMENTE ESTE MANUAL...
- Page 2 INTRODUCCIÓN MX ONDA le agradece la deferencia que ha tenido al adquirir este producto. Este horno de encastre ha sido fabricado con materiales de alta calidad, su diseño hace que se adapte a cualquier tipo de cocina. Entre otros tiene las siguientes características:...
-
Page 3: Medidas De Seguridad
ANTES DE CONECTAR EL HORNO • Lea atentamente estas instrucciones y guárdelas para un posterior uso. • Después de quitar el embalaje, verifique que el aparato no esté dañado. En caso de duda no lo utilice; póngase en contacto con el personal de asistencia técnica. •... - Page 4 • Este aparato está diseñado solamente para uso doméstico, no profesional. MX ONDA no aceptará ninguna responsabilidad y la garantía carecerá de validez en caso de uso inadecuado o incumplimiento de las instrucciones.
- Page 5 • No utilice el horno si está bajo medicación que pueda mermar sus capacidades. • No coloque la bandeja del horno, recipientes o papel de aluminio en la base del horno. El calor acumulado puede dañar la base del mismo. •...
- Page 6 • En caso de avería, anomalías, sí la puerta de cristal está dañada (arañazos, fisuras, etc.), la clavija o el cable u otras partes presentan deterioro, desenchufe el aparato y no intente repararlo por su cuenta. Póngase en contacto con el Servicio Técnico Oficial MX ONDA más cercano.
-
Page 7: Panel De Control
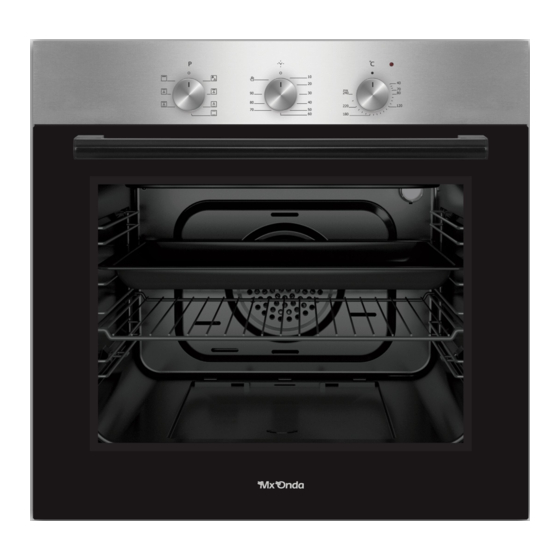
CONTROLES Y ELEMENTOS 1. Panel frontal 2. Bandeja honda (opcional) 3. Soporte rustepollos (opcional) 4. Parrilla 5. Bandeja esmaltada 6. Puerta del horno PANEL DE CONTROL 1. Encendido/apagado y selector de funciones 2. Temporizador 3. Selector de temperatura... -
Page 8: Instalación
INSTALACIÓN Advertencia: Antes de instalar el horno compruebe que no haya daños en el mismo. NO instale el horno si después de retirar el embalaje observa daños en el mismo, golpes, cristal roto o con fisuras, cable o enchufe deteriorados, etc. Muy importante: El ventilador de refrigeración extrae el calor para evitar el sobrecalentamiento de las superficies externas durante el funciona-... - Page 9 Precauciones Deberá escoger la ubicación del horno realizando las mediciones oportunas y teniendo en cuenta que ha de disponer de una toma de corriente de red con potencia suficiente antes de iniciar la instalación. No instale el horno en zonas donde haya fuertes corrientes de aire. Para el traslado del horno serán necesarias, al menos, dos personas.
- Page 10 Instalación en un mueble elevado El mueble ha de tener las dimensiones indicadas en la Figura 4. Para obtener una refrigeración óptima y eficiente, deberá dejar un espacio en la parte posterior, superior e inferior del mueble tal y como se indica en la Figura 4.
- Page 11 Requisitos de la instalación • Las dimensiones del horno se indican en la Figura 3. • El material del mueble donde vaya a ser instalado el horno deben ser resistentes al calor para evitar una deformación causada por la radiación del calor, debe soportar una temperatura mínima de 100 ºC.
- Page 12 Colocar y fijar el horno • Para colocar el horno en el mueble se recomienda que al menos sean dos personas. • Compruebe que el cerco del horno y el borde frontal del mueble coinciden de manera uniforme. • El cable de alimentación no debe estar debajo del horno, atrapado entre las paredes del horno y el mueble o que permanezca doblado.
- Page 13 • Si el cable está dañado, para ser sustituido o reemplazado, la operación debe ser realizada por un Servicio Técnico Oficial Mx Onda. • El instalador autorizado debe asegurarse de que se haya realizado la conexión eléctrica correcta y que cumpla con las normas de seguridad.
- Page 14 4. Gire el botón de encendido/apagado y selector de funciones hacia la posición de calor en la parte inferior y superior 5. Mediante el temporizador elija un tiempo de funcionamiento de 30 minutos. 6. Durante el funcionamiento puede que se produzca un poco de humo y olor, esto es normal y es debido a la eliminación de los restos de aceite para la protección de los elementos internos procedentes de la fabricación.
- Page 15 Iluminación interior + Convección Utilice esta función cuando haya finalizado el proceso de cocción y desee mantener los alimentos calientes utilizando el calor residual mediante el sistema de convección. Función Grill + Convección Este modo de funcionamiento es apto para cocinar alimentos cárnicos. En función del alimento a cocinar le recomendamos colocar una bandeja en la parte inferior con un poco de agua, para evitar que el alimento quede demasiado seco.
-
Page 16: Mantenimiento Y Limpieza
Temporizador Al girar el control en el sentido de las agujas del reloj, el horno se pondrá en funcionamiento y el temporizador se activará e iniciará la cuenta atrás desde el tiempo seleccionado. Finalizado el tiempo sonará una indicación acústica y desconectará el horno. - Page 17 Limpieza de los accesorios • Limpie los accesorios después de cada uso con un producto anti grasa. • También podrá lavar los accesorios en el lavavajillas. Limpieza del interior • No utilice estropajos de metal que puedan rayar las superficies, utilice productos de limpieza específicos para hornos.
- Page 18 2. Fije el bloqueo de la bisagra al mayor ángulo tal y como se indica en la Figura 8.2. Ajuste a la misma posición las dos bisagras que sujetan la puerta al horno. 3. Después cierre la puerta para que quede en una posición en contacto con el bloqueo de la bisagra, tal y como se muestra en la Figura 9.1.
- Page 19 2. Retire los tornillos situados a ambos lados (derecho e izquierdo) del perfil tal y como se muestra en la Figura 13, después extraiga el perfil tirando del mismo hacia afuera como se muestra en la Figura 14. El cristal quedará...
- Page 20 Guías soporte Advertencia: Es muy importante colocar correctamente las guías soporte. No coloque las guías tocando la parte posterior del horno. La posición de las guías soporte para se muestran en la siguiente figura. Extracción e inserción de las guías soporte Presione los clips en la dirección que indican las flechas y separe la parte inferior de las guías soporte de la pared del horno, después deslice hacia arriba las guías soporte y extráigalas.
- Page 21 Compatibilidad Electromagnética y la 2014/35/EC (LVD) en materia de seguridad de baja tensión. “MX, MX ONDA” y sus logotipos son marcas registradas de MX ONDA, S.A. Teléfono de información y Servicio Técnico: 902 551 501 MX ONDA, S. A.
- Page 22 USER AND INSTALLATION MANUAL 60 CM BUILT-IN OVEN MX-HE2657 and MX-HE2660 MODELS: BEFORE USE PLEASE READ THIS MANUAL CAREFULLY...
- Page 23 INTRODUCTION MX ONDA thanks you for the deference you have shown by purchasing this product. This built-in oven has been manufactured with high quality materials, its design makes it adapt to any type of kitchen. Among others it has the following characteristics: •...
-
Page 24: Before Connecting The Oven
BEFORE CONNECTING THE OVEN • Please read these instructions carefully and save them for later use. • After removing the packaging, check that the appliance is not damaged. If in doubt do not use it; contact technical support personnel. • All operations related to the electrical installation and / or repair must be carried out by a specialized and authorized installer. - Page 25 • This appliance is designed for household, non-professional use only. MX ONDA will not accept any responsibility and the guarantee will be invalid in case of improper use or non- compliance with the instructions.
- Page 26 • Do not use the oven handle to hang tea towels, etc. • Do not use the oven if you are under medication that may impair its capabilities. • Do not place the oven tray, containers or aluminum foil on the base of the oven.
- Page 27 • In case of breakdown, anomalies, if the glass door is damaged (scratches, cracks, etc.), the plug or the cable or other parts show deterioration, unplug the appliance and do not try to repair it yourself. Contact the closest MX ONDA Official Technical Service.
-
Page 28: Controls And Elements
CONTROLS AND ELEMENTS 1. Front panel 2. Deep tray (optional) 3. Chicken roast stand (optional) 4. Grill 5. Enameled tray 6. Oven door CONTROL PANEL 1. On / off and function selector 2. Timer 3. Temperature selector... -
Page 29: Installation
INSTALLATION Warning: Before installing the oven, check that there is no damage to the oven. DO NOT install the oven if after removing the packaging you notice damage to it, bumps, broken or cracked glass, damaged cord or plug, etc. Very important: The cooling fan extracts heat to prevent overheating of external surfaces during oven operation. - Page 30 Cautions You must choose the location of the oven by making the appropriate measurements and taking into account that you must have a mains power outlet with sufficient power before starting the installation. Do not install the oven in areas with strong drafts. At least two people will be required to move the oven.
- Page 31 Fig. 2 Installation in a raised kitchen cabinet The furniture must have the dimensions indicated in Figure 4. For optimal and efficient cooling, you should leave a space at the back, top and bottom of the cabinet as indicated in Figure 4.
- Page 32 Fig. 4 Installation requirements • The dimensions of the oven are indicated in Figure 3. • The material of the cabinet where the oven is to be installed must be heat resistant to avoid deformation caused by heat radiation, it must withstand a minimum temperature of 100 ºC.
-
Page 33: Electrical Connection Of The Oven
Place and fix the oven • To place the oven in the cabinet, it is recommended that there be at least two people. • Check that the oven frame and the front edge of the cabinet coincide evenly. • The power cord must not be under the oven, caught between the oven walls and the cabinet, or remain bent. - Page 34 • If the cable is damaged, to be substituted or replaced, the operation must be carried out by an Official Mx Onda Technical Service. • The authorized installer must ensure that the correct electrical connection has been made and that it complies with safety regulations.
- Page 35 6. During operation, there may be a little smoke and odor, this is normal and is due to the removal of traces of oil to protect the internal elements from the manufacture. 7. Once the oven is completely cool, wipe it with a cloth slightly dampened with soapy water, then wipe it dry with a clean, dry cloth.
- Page 36 Interior lighting + Convection Use this function when the cooking process is finished and you want to keep the food warm using the residual heat through the convection system. Grill + Convection function This operating mode is suitable for cooking meat foods. Depending on the food to be cooked, we recommend placing a tray at the bottom with a little water, to prevent the food from being too dry.
-
Page 37: Tips For The Use Of The Oven
Timer Turning the control clockwise will start the oven and the timer will activate and count down from the selected time. At the end of the time, an acoustic indication will sound and the oven will switch off. To deactivate the timer, set this control to the position Note: At any time you can increase or decrease the timer time, simply turn it to the left or right to decrease or increase the time respectively. - Page 38 Cleaning the inside of the oven • Do not use metal scourers that can scratch the surfaces, use specific cleaning products for ovens. • For stubborn stains, clean after preheating at 90 ° C for 30 seconds. • Do not use steam cleaners. •...
- Page 39 Fig. 7 Fig. 9 Fig. 8.1 Fig. 8.2 Fig. 9.1 Fig. 9.2 Cleaning the oven door glass To remove the glass from the oven door and depending on the model you have, you must proceed as indicated in point 1 or point 2. 1.
- Page 40 2. Remove the screws located on both sides (right and left) of the profile as shown in Figure 13, then remove the profile by pulling it out as shown in Figure 14. The glass will be free after removing the profile as shown in Figure 15.
- Page 41 Support guides Warning: It is very important to correctly position the support guides. Do not place the guides touching the back of the oven. The position of the support guides for is shown in the following figure. Rack 4 Rack 3 Rack 2 Rack 1 Removing and inserting the support guides...
-
Page 42: Technical Specifications
This product complies with the European Directives 2014/30 / EC (EMC) on Electromagnetic Compatibility and 2014/35 / EC (LVD) on low voltage safety. "MX, MX ONDA" and their logos are registered trademarks of MX ONDA, S.A. Information and Technical Service telephone number: 902 551 501 MX ONDA, S.