Table of Contents
Advertisement
Quick Links
Advertisement
Table of Contents

Related Manuals for Garmin GHC 50


Summary of Contents for Garmin GHC 50
- Page 1 ™ Owner’s Manual...
- Page 2 © 2022 Garmin Ltd. or its subsidiaries All rights reserved. Under the copyright laws, this manual may not be copied, in whole or in part, without the written consent of Garmin. Garmin reserves the right to change or improve its products and to make changes in the content of this manual without obligation to notify any person or organization of such changes or improvements. Go to www.garmin.com...
-
Page 3: Table Of Contents
Cancelling a Steering Pattern..... 5 Communications Settings....12 NMEA 2000 Settings......12 Sailboat Autopilot Operation..... 5 Wi‑Fi® Network......... 12 Wind Hold..........6 Garmin Marine Network....12 Engaging Wind Hold......6 Setting Alarms........13 Engaging Wind Hold from Heading System Alarms........13 Hold............6 NMEA 2000 Alarms...... -
Page 5: Introduction
Introduction WARNING See the Important Safety and Product Information guide in the product box for product warnings and other important information. You are responsible for the safe and prudent operation of your vessel. The autopilot is a tool that enhances your capability to operate your boat. -
Page 6: Basic Autopilot Operation
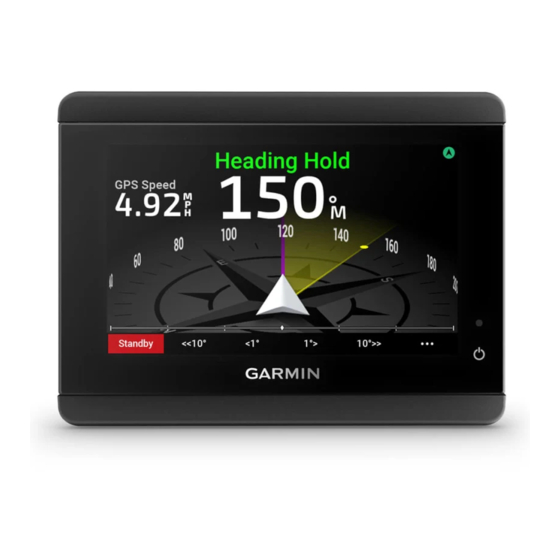
Basic Autopilot Operation Heading Screen The heading screen displays the status of the autopilot. Autopilot status information and icon. Standby and appear in gray when the autopilot is in standby mode. Heading Hold and appear in green when the autopilot is engaged. Numeric heading information. -
Page 7: Engaging The Autopilot
Engaging the Autopilot When you engage the autopilot, the autopilot takes control of the helm and steers the boat to maintain your heading. From the heading screen in standby mode, select Engage. Heading Hold and at the top of the heading screen appear in green when the autopilot is engaged. Your actual and intended heading information shows in the center of the heading screen. -
Page 8: Powerboat Autopilot Operation
You can use the orbit pattern to steer the boat in a continuous circle around the active waypoint. The size of the circle is defined by your distance from the active waypoint when you begin the orbit pattern. See the owner's manual for your Garmin chartplotter for more information about setting and using waypoints. 1 From the autopilot screen, select >... -
Page 9: Setting Up And Following The Cloverleaf Pattern
The default setting turns the boat at a range of 1000 ft. (300 m) from the active waypoint. See the owner's manual for your Garmin chartplotter for more information about setting and using waypoints. 1 From the autopilot screen, select >... -
Page 10: Wind Hold
Wind Hold You can set the autopilot to maintain a specific bearing relative to the apparent or true wind angle. You must connect a compatible wind sensor the same NMEA 2000 network as the autopilot system to perform a wind hold or wind-based steering maneuvers. -
Page 11: Adjusting The Wind Hold Angle
Adjusting the Wind Hold Angle You can adjust the wind hold angle on the autopilot when wind hold is engaged. • To adjust the wind hold angle in increments of 1°, select <1° or 1°>. NOTE: Holding <1° or 1°> for a few seconds automatically transitions the autopilot from Wind Hold to Heading Hold and initiates rudder steering (Heading Hold, page •... -
Page 12: Adjusting The Autopilot Response
The autopilot system must be configured to work properly with your boat. You can configure the autopilot using a chartplotter on the same NMEA 2000 network as the autopilot. For configuration instructions, go to support.garmin.com, and download the configuration guide for your specific autopilot model. Adjusting the Step Steering Increment 1 From the autopilot screen, select >... -
Page 13: Reactor™ Autopilot Remote Control
2 Select an action key to change. 3 Select a pattern or action to assign to the action key. Enabling the Autopilot Controls on a Garmin Watch You can control the Garmin autopilot with a compatible Garmin watch. Go to garmin.com for a list of compatible Garmin watches. -
Page 14: Customizing The Autopilot Button Actions
Customizing the Autopilot Button Actions Before you can set the autopilot button actions, you must install and configure a compatible Garmin autopilot. You can select up to three autopilot actions for your Garmin watch to perform. NOTE: Available autopilot actions depend on the autopilot installed. -
Page 15: Gps Settings
GPS Settings NOTE: GPS settings and info are available only when the helm control device is connected to a GPS antenna or a device with GPS capability. Select > Global Settings > System > GPS. Skyview: Shows the relative position of GPS satellites in the sky. GLONASS: Turns on or off GLONASS data (Russia satellite system). -
Page 16: Communications Settings
The Garmin Marine Network allows you to share data from Garmin peripheral devices with chartplotters quickly and easily. You can connect a device to the Garmin Marine Network to receive data from and share data with other devices and chartplotters that are compatible with the Garmin Marine Network. -
Page 17: Setting Alarms
You may need to update the device software when you install the device or add an accessory to the device. The software update requires either a Garmin memory card reader accessory or another Garmin chartplotter connected over the Garmin Marine Network. - Page 18 May 2022 GUID-BD39FCBD-2F6F-4A48-8A61-1FE1F349792B v1...